


1、导入jar文件
- 导入antlr-2.7.6.jar
- 导入commons-collections-3.1.jar
- 导入dom4j-1.6.1.jar
- 导入hibernate-jpa-2.0-api-1.0.1.Final.jar
- 导入hibernate3.jar
- 导入javassist-3.12.0.GA.jar
- 导入jta-1.1.jar
- 导入mysql-connector-java-3.1.13-bin.jar
- 导入slf4j-api-1.6.1.jar
这一部分没有过多的解释,只需要大家了解每个jar文件包的作用即可。
2、编辑实体
- package com.entity;
- import java.util.Date;
- public class User {
- private String id;
- private String name;
- private String password;
- private Date createTime;
- private Date expireTime;
- public String getId() {
- return id;
- }
- public void setId(String id) {
- this.id = id;
- }
- public String getName() {
- return name;
- }
- public void setName(String name) {
- this.name = name;
- }
- public String getPassword() {
- return password;
- }
- public void setPassword(String password) {
- this.password = password;
- }
- public Date getCreateTime() {
- return createTime;
- }
- public void setCreateTime(Date createTime) {
- this.createTime = createTime;
- }
- public Date getExpireTime() {
- return expireTime;
- }
- public void setExpireTime(Date expireTime) {
- this.expireTime = expireTime;
- }
- }
package com.entity; import java.util.Date; public class User { private String id; private String name; private String password; private Date createTime; private Date expireTime; public String getId() { return id; } public void setId(String id) { this.id = id; } public String getName() { return name; } public void setName(String name) { this.name = name; } public String getPassword() { return password; } public void setPassword(String password) { this.password = password; } public Date getCreateTime() { return createTime; } public void setCreateTime(Date createTime) { this.createTime = createTime; } public Date getExpireTime() { return expireTime; } public void setExpireTime(Date expireTime) { this.expireTime = expireTime; } }这一步与普通的JDBC没有太大的区别,在JDBC中我们也可以通过实体封装需要的信息,如果你对面向对象编程有一定的了解相信不难理解。
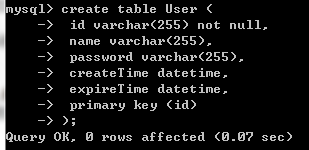
3、创建数据库、表
创建数据库
创建表
显示表结构
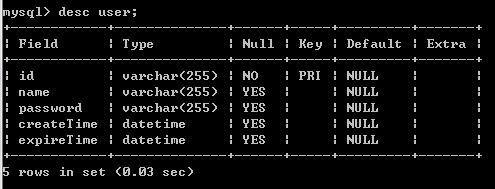
这一步就是一个创建数据库的过程,与我们平常做项目使用的数据库结构和过程也没有区别。
4、创建实体映射文件User.hbm.xml
- <?xml version="1.0"?>
- <!DOCTYPE hibernate-mapping PUBLIC
- "-//Hibernate/Hibernate Mapping DTD 3.0//EN"
- "http://hibernate.sourceforge.net/hibernate-mapping-3.0.dtd">
- <hibernate-mapping>
- <class name="com.entity.User">
- <id name="id">
- <generator class="uuid"/>
- </id>
- <property name="name"/>
- <property name="password"/>
- <property name="createTime"/>
- <property name="expireTime"/>
- </class>
- </hibernate-mapping>
<?xml version="1.0"?>
<!DOCTYPE hibernate-mapping PUBLIC
    "-//Hibernate/Hibernate Mapping DTD 3.0//EN"
    "http://hibernate.sourceforge.net/hibernate-mapping-3.0.dtd">
<hibernate-mapping>
    <class name="com.entity.User">
        <id name="id">
            <generator class="uuid"/>
        </id>
        <property name="name"/>
        <property name="password"/>
        <property name="createTime"/>
        <property name="expireTime"/>
    </class>
</hibernate-mapping>
从这一步开始,JDBC开始与Hibernate有一定的区别,这里我们重点讲一下User.hbm.xml的作用。User.hbm.xml的作用简而言之就是对实体和数据库中的表进行相呼应,保证我们对实体对象进行的操作都会在数据库中产生与之对应响应的结果。但仅这样的配置还有一个问题那就是我们如何将能够将数据库中的表与对象进行关联。这就需要接下来的配置了。
5、创建数据库连接和映射配置文件 hibernate.cfg.xml
- <!DOCTYPE hibernate-configuration PUBLIC
- "-//Hibernate/Hibernate Configuration DTD 3.0//EN"
- "http://hibernate.sourceforge.net/hibernate-configuration-3.0.dtd">
- <hibernate-configuration>
- <session-factory>
- <property name="hibernate.connection.driver_class">com.mysql.jdbc.Driver</property>
- <property name="hibernate.connection.url">jdbc:mysql://localhost:3306/hibernate_first</property>
- <property name="hibernate.connection.username">root</property>
- <property name="hibernate.connection.password">root</property>
- <property name="hibernate.dialect">org.hibernate.dialect.MySQLDialect</property>
- <property name="hibernate.show_sql">true</property>
- <mapping resource="com/entity/User.hbm.xml"/>
- </session-factory>
- </hibernate-configuration>
<!DOCTYPE hibernate-configuration PUBLIC
    "-//Hibernate/Hibernate Configuration DTD 3.0//EN"
    "http://hibernate.sourceforge.net/hibernate-configuration-3.0.dtd">

<hibernate-configuration>
    <session-factory>
        <property name="hibernate.connection.driver_class">com.mysql.jdbc.Driver</property>
        <property name="hibernate.connection.url">jdbc:mysql://localhost:3306/hibernate_first</property>
        <property name="hibernate.connection.username">root</property>
        <property name="hibernate.connection.password">root</property>
        <property name="hibernate.dialect">org.hibernate.dialect.MySQLDialect</property>
        <property name="hibernate.show_sql">true</property>

        <mapping resource="com/entity/User.hbm.xml"/>
    </session-factory>
</hibernate-configuration>
这里的重点区别在于,通过映射说明<mapping resource="com/entity/User.hbm.xml"/>我们可以将数据库连接和映射进行联系,也就是说通过 hibernate.cfg.xml的配置,我们就可以找到具体的实体和数据库表对应关系。到此为止我们所有的配置就进行完毕了,接下来做一个测试。
6、创建测试文件 Client.java
- package test;
- import java.util.Date;
- import org.hibernate.Session;
- import org.hibernate.SessionFactory;
- import org.hibernate.cfg.Configuration;
- import com.entity.User;
- public class Client {
- public static void main(String[] args) {
- //读取hibernate.cfg.xml文件
- Configuration cfg = new Configuration().configure();
- //建立SessionFactory
- SessionFactory factory = cfg.buildSessionFactory();
- //取得session
- Session session = null;
- try {
- session = factory.openSession();
- //开启事务
- session.beginTransaction();
- User user = new User();
- user.setName("NAME1");
- user.setPassword("PWD1");
- user.setCreateTime(new Date());
- user.setExpireTime(new Date());
- //保存User对象
- session.save(user);
- //提交事务
- session.getTransaction().commit();
- }catch(Exception e) {
- e.printStackTrace();
- //回滚事务
- session.getTransaction().rollback();
- }finally {
- if (session != null) {
- if (session.isOpen()) {
- //关闭session
- session.close();
- }
- }
- }
- }
- }
package test;

import java.util.Date;

import org.hibernate.Session;
import org.hibernate.SessionFactory;
import org.hibernate.cfg.Configuration;

import com.entity.User;

public class Client {

    public static void main(String[] args) {

        //读取hibernate.cfg.xml文件
        Configuration cfg = new Configuration().configure();

        //建立SessionFactory
        SessionFactory factory = cfg.buildSessionFactory();

        //取得session
        Session session = null;
        try {
            session = factory.openSession();
            //开启事务
            session.beginTransaction();
            User user = new User();
            user.setName("NAME1");
            user.setPassword("PWD1");
            user.setCreateTime(new Date());
            user.setExpireTime(new Date());

            //保存User对象
            session.save(user);

            //提交事务
            session.getTransaction().commit();
        }catch(Exception e) {
            e.printStackTrace();
            //回滚事务
            session.getTransaction().rollback();
        }finally {
            if (session != null) {
                if (session.isOpen()) {
                    //关闭session
                    session.close();
                }
            }
        }
    }
}
程序执行结果如下:

通过上述实例的演示,对比上一篇Hibernate从入门到精通(一)JDBC简介文章中我们提到的JDBC操作的缺陷可以看出,我们向数据库中添加一个对象只需要通过HibernateAPI中最核心的Session接口,调用save()方法即可,不需要我们在代码中编写SQL语句,也不需要程序员对SQL语言过多的了解,这就体现了Hibernate完全面向对象编程。
到此为止,我们已经基本了解了Hibernate的基本使用步骤,接下来我们会分别讲解一些Hibernate中的一些重点概念和使用。


 198
198


 被折叠的 条评论
为什么被折叠?
被折叠的 条评论
为什么被折叠?
 到【灌水乐园】发言


