


简介:有自己写的,也有网上看到的,即使是别人写的也会对其改动,或添加注释,并保持统一的编码风格,便于阅读。目标是不用第三方库即可完成(浏览器原生),简单做,能够阐述逻辑和原理清楚即可,因此可能考虑不是最周详的,包括跨浏览器的问题,如果你打算使用在项目中使用最好测试清楚,还可能要进一步修改之。
注意:打算提供在线例子的,但短时间内没有静态空间,所以例子的事情要稍等一阵子。已提供在线例子。
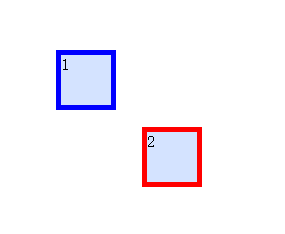
1、简易拖放效果
使用了 DOM 1 的方式登记事件,其实无必要 DOM Level 2 的 addEventListener,因为根据鼠标事件,同一时刻通常 document 只有一个 mousemove/mouseup 事件。点击查看例子。
<meta charset="utf-8" />
<title>拖放 DD</title>
<script>
    SimpleDrag = function(el) {
        this.el = el;
        this._x = this._y = 0;
        el.onmousedown = delegate(this, this.start);
        this.move = delegate(this, this.move);

        function delegate(object, fn){ // 绑定当前 this,并且修正浏览器兼容问题 e ||  window.event
            return function(e) {
                return fn.call(object, (e || window.event));
            }
        }
    };
    SimpleDrag.prototype = {
        start : function(e) {
            this._x = e.clientX - this.el.offsetLeft;
            this._y = e.clientY - this.el.offsetTop;
            document.onmousemove = this.move;
            document.onmouseup = this.stop;
        },
        // 拖动
        move : function(e) {
            this.el.style.left = e.clientX - this._x + "px";
            this.el.style.top  = e.clientY - this._y + "px";
        },
        // 停止拖动
        stop : function() {
            document.onmousemove = document.onmouseup = null;
        }
    };
</script>
<style>
    .dragable{
        background-color:#C4E3FD;
        width:50px; height:50px;
        position:absolute;
        left: 20px;
        cursor:move;
    }
    .dragEl_1{
        top : 10px;
        border:5px solid blue;
    }
    .dragEl_2{
        top : 80px;
        border:5px solid red;
    }
</style>
<div class="dragable dragEl_1">1</div>
<div class="dragable dragEl_2">2</div>
<script>
    new SimpleDrag(document.querySelector(".dragEl_1"));
    new SimpleDrag(document.querySelector(".dragEl_2"));
</script>
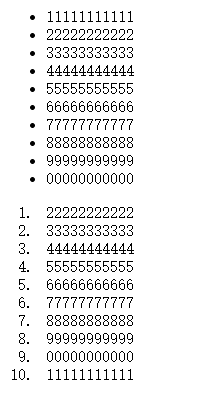
2、上下滚动内容
原理是取出最尾元素放到前头。点击查看例子。
<html>
<head>
	<meta http-equiv="Content-Type" content="text/html; charset=utf-8" />
	<title>上下滚动内容</title>
</head>
<body>
	<ul id="scroll">
		<li>11111111111</li>
		<li>22222222222</li>
		<li>33333333333</li>
		<li>44444444444</li>
		<li>55555555555</li>
		<li>66666666666</li>
		<li>77777777777</li>
		<li>88888888888</li>
		<li>99999999999</li>
		<li>00000000000</li>
	</ul>


	<ol id="scrollA">
		<li>11111111111</li>
		<li>22222222222</li>
		<li>33333333333</li>
		<li>44444444444</li>
		<li>55555555555</li>
		<li>66666666666</li>
		<li>77777777777</li>
		<li>88888888888</li>
		<li>99999999999</li>
		<li>00000000000</li>
	</ol>

	<script>
		/**
		 * @param {Element} el 列表元素
		 * @param {Number} interval 动画时间间隔
		 * @param {Boolean} canstop 是否可以鼠标移入时候暂停动画
		 */
		function ScrollContent(el, interval, canstop) {
			interval = interval || 3000;
			canstop  = canstop  || false;

			function scroll() {
				var lastEl = el.firstChild;
				while (lastEl.nodeType != 1)  // 找到最后一个元素
					lastEl = lastEl.nextSibling;

				el.appendChild(el.removeChild(lastEl)); // 把最后一个元素放到前头
			}

			var t = window.setInterval(scroll, interval);

			if (canstop) {
				el.onmouseover = function() {
					if (t) window.clearInterval(t);
				}
				el.onmouseout = function() {
					t = window.setInterval(scroll, interval);
				}
			}
		}

		new ScrollContent(document.getElementById('scroll'), 1000);
		new ScrollContent(document.getElementById('scrollA'), 500, true);
	</script>
</body>
</html>
3、左右滚动内容
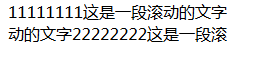
原理跟前者一样,只不过是把元素换为字符串,应该是更简单的了。点击查看在线例子。
<meta charset="utf-8" />
<title>水平字幕滚动</title>

<div class="content1">这是一段滚动的文字11111111</div>
<div class="content2">这是一段滚动的文字22222222</div>
<script>
	/**
	 * @param {Element} el 列表元素
	 * @param {Number} interval 动画时间间隔
	 * @param {Boolean} canstop 是否可以鼠标移入时候暂停动画
	 */
	function ScrollContent_Hoz(el, interval, canstop) {
		interval = interval || 500;
		canstop  = canstop  || false;
		var arr = el.innerHTML.split("");
		function scroll() {
			arr.push(arr.shift());
			el.innerHTML = arr.join("");
		}

		var t = window.setInterval(scroll, interval);

		if (canstop) {
			el.onmouseover = function() {
				if (t) window.clearInterval(t);
			}
			el.onmouseout = function() {
				t = window.setInterval(scroll, interval);
			}
		}
	}

	new ScrollContent_Hoz(document.querySelector('.content1'));
	new ScrollContent_Hoz(document.querySelector('.content2'), null, true);
</script>
4、多级联动下拉菜单
联动本身并无多大难点,只是 onchange 事件的运用即可。值得一提的是这个演示了日历控件所涉及的日历生成算法——当然这是后话了。点击查看在线例子。

<meta charset="UTF-8">
<title>联动 Select 下拉</title>
<select id="year">
	<option value="0">--请选择--</option>
</select>年
<select id="month">
	<option value="0">--请选择--</option>
</select>月
<select id="day">
	<option value="0">--请选择--</option>
</select>日

<script>
	function initSelect(selectEl, i, end) {
		selectEl.length = 1;
		for (; i <= end; i++) {
			try {
				selectEl.add(new Option(i, i), null);
			} catch (e) {
				selectEl.add(new Option(i, i));
			}
		}
	}
	var year = document.getElementById("year");
	var month = document.getElementById("month");
	var day = document.getElementById("day");

	initSelect(year, 1970, 2012);

	year.onchange = function() {
		if (this.value != 0) {
			initSelect(month, 1, 12);
		} else {
			month.length = 1;
			day.length = 1;
		}
	}
	month.onchange = function() {
		if (this.value != 0) {
			var m30 = {
				2 : 1,
				4 : 1,
				6 : 1,
				9 : 1,
				11 : 1
			};
			if (this.value == 2) { // 二月份特别处理
				if (isLeapYear(year.value))
					 initSelect(day, 1, 29);
				else initSelect(day, 1, 28);
			} else if (this.value in m30) // 三十天的月份
			/*
			因为2、4、6、9、11月份都是30天,如果把它们放在一个数组中,那么还要遍历来判断是否相等,则比较麻烦了,于是在这里把这些都当成对象来处理,使用 in 判断即可
			*/
					 initSelect(day, 1, 30);
			else 	 initSelect(day, 1, 31);
		} else day.length = 1;
	}
	// 判断闰年的条件:能被4整除且不能被100整除 或 能被100整除且能被400整除
	function isLeapYear(y) {
		return (y % 4 == 0 && y % 100 != 0)
			|| (y % 100 == 0 && y % 400 == 0);
	}
</script>
5、Tab 多选项卡
主要控制 tab display:block/none 来显示与隐藏,原理比较简单。使用方法:new SimpleTab(document.querySelector('.tab2')).jump(0);。点击查看在线例子。
代码比较长,所以只贴 JS 部分。完整代码参见 HTML。
/--------------------公共方法 -------------START
var emptyStr = '';
// 允许用户输入 .abc/abc 的 CSS Selector,推荐 abc 即可
function removeFirstDot(str){
	if(str && str.charAt(0) === '.'){
		var arr = str.split(emptyStr);
		arr.shift();
		return arr.join(emptyStr);
	}

	return str;
}

/**
 * 增加元素样式。
 * @param {String} cls
 */
Element.prototype.addCls = function (cls) {
	cls = removeFirstDot(cls);

	var _cls = this.className;
	if (_cls.indexOf(cls) === -1) {
		// not found, so add it
		if (_cls === '')this.className = cls;
		else this.className += ' ' + cls;
	}
}

/**
 * 移除元素样式。
 * @param {String} cls
 */
Element.prototype.removeCls = function (cls) {
	cls = removeFirstDot(cls);
	var _cls = this.className;
	var reg = new RegExp('\\s?\\b' + cls + '\\b', 'ig');
	if (reg.test(_cls))
		this.className = _cls.replace(reg, '');// remove it
}

/--------------------公共方法 -------------END

SimpleTab = function(container) {
	this.el = container;
	var ul = container.querySelector('ul');
	this.buttons = ul.children, // tab候选栏strip
	this.tabs = container.querySelector('.content').children;
	ul.onclick = onTabChooserPressHandler.bind(this);
}

/**
 * 跳到指定的 tab,仿佛好象点击那样
 * @param {int} index
 */
SimpleTab.prototype.jump = function(index){
	var btn = this.buttons[index];
	onTabChooserPressHandler.call(this, {
		target : btn,
		currentTarget : this.el.querySelector('ul')
	});
}

var onPressed_ClassName = 'selected';
// 登记的单击事件是整个 tan panel
function onTabChooserPressHandler(e) {
	// 搜索 el 下的 li 元素,到容器为止
	var el = e.target;
	if (el.tagName != 'LI') return;

	var buttons = e.currentTarget.children, // tab候选栏strip
		tabs = e.currentTarget.parentNode.querySelector('.content').children;
	!buttons.length && console.log('该控件未发现任何 strip。');

	for (var nextIndex = 0, j = buttons.length; nextIndex < j; nextIndex++)
		if (buttons[nextIndex] == el)
			break; // 获取 nextIndex

	// 查找与 index 相等的 item 设置其高亮,否则移除样式。
	var btn, showTab;
	for (var i = 0, j = buttons.length; i < j; i++) {
		btn = buttons[i], showTab = tabs[i];
		// debugger;
		if (nextIndex == i && btn.className.indexOf(onPressed_ClassName) == -1) { // 找到目标项
			btn.addCls(onPressed_ClassName);
			showTab.addCls(onPressed_ClassName);
			this.currentIndex = i; // 保存当前游标


		} else if (btn == el && btn.className.indexOf(onPressed_ClassName) != -1) {
			// 已在当前项
		} else if (btn.className.indexOf(onPressed_ClassName) != -1) {
			btn.removeCls(onPressed_ClassName);
			showTab.removeCls(onPressed_ClassName);
		}
	}
}

new SimpleTab(document.querySelector('.tab2')).jump(0);
6、全屏幕遮罩及 ESC 键盘事件响应
一般这是全局性的组件,设置为“单例”即可。全屏幕基本是 CSS 还有一个 JS 的小尾巴,因为似乎用 CSS 不容易设置高度,用 JS 做还是比较可行的。点击查看在线例子。
<meta charset="UTF-8">
<title>全屏幕遮罩及 ESC 键盘事件响应</title>

<div class="mask"></div>

<style>
	.mask {
		position: fixed;
		top: 0;
		left: 0;
		width: 100%;
		z-index: 9999999;
		background-color: rgba(0, 0, 0, 0.5);
	}
</style>

<script>
     // 获取页面内容高度赋予 mask
    document.querySelector('.mask').style.height = document.body.scrollHeight + 'px';

    // 键盘事件
    function onEnterAndEsc(e){
        e = e || event;
        var keycode = e.which || e.keyCode;
        switch(keycode){
            case 13: //enter
            	// 如果 form 里有 action,按下回车自动提交
     			// ...
            break;
            case 339: //exit
            case 340: //back
            case 27:
            	var mask = document.querySelector('.mask');
            	mask.parentNode.removeChild(mask);
        }
    }

    document.onkeydown = onEnterAndEsc;
</script>
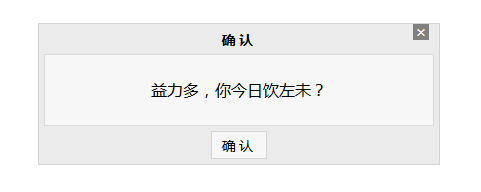
7、消息对话框
和这里其他的组件一样,对话框也是一个非常雏形的组件,仅仅完成了 fixed 定位、居中、关闭这几样功能,——可能样式方面的代码还着墨的比较多。至于背景遮罩,前面一个例子就有,有兴趣的童鞋可以看看怎么把两者组装起来。另外对话框拖放也是一个功能点,咱们在第一个例子的时候已经有介绍了。动手能力强的童鞋也可以试着自己把它们封装在一起,形成完整的对话框组件——这里就不再赘述了。点击查看在线例子。
<meta charset="UTF-8">
<title>MsgBox</title>

<div class="msgbox">
	<h1>确认</h1>
	<div class="topCloseBtn closeAction">×</div>
	<div class="inner">
		益力多,你今日饮左未?
	</div>
	<div class="btn">
 		<div class="closeAction">确认</div>
	</div>
</div>


<style>
	.msgbox {
		position: fixed;
		background-color: #ebebeb;
		border: 1px solid #d3d3d3;
		width: 50%;
		min-width: 300px;
		max-width: 400px;
		z-index: 99999999;
		margin: auto;
		min-height: 100px;
	}

	.msgbox h1 {
		font-size: .9rem;
		text-align: center;
		padding: 5px 0;
		letter-spacing: 3px;
	}

	.msgbox .topCloseBtn {
		position: absolute;
		text-align: center;
		top: 0;
		right: 10px;
		width: 16px;
		line-height: 16px;
		height: 16px;
		background-color: gray;
		color: white;
		cursor: pointer;
	}
	.msgbox .inner {
		margin: 5px;
		margin-top: 0;
		padding: 10px;
		overflow: hidden;
		background-color: #f7f7f7;
		text-align: center;
		border: 1px solid #dadada;
		min-height:50px;
		line-height:50px;
	}
	.msgbox .btn {
		margin: 5px auto;
		width: 70%;
		overflow: hidden;
		text-align: center;
	}

	.msgbox .btn > div {
		display: inline-block;
		max-width: 80px;
		cursor: pointer;
		text-align: center;
		border: 1px solid #d3d3d3;
		padding: 3px 10px;
		letter-spacing: 3px;
		box-sizing: border-box;
		background-color: #f7f7f7;
		font-size: .9rem;
	}
</style>

<script>
function MsgBox(msgbox) {
	// 计算居中
	msgbox.style.left = (window.innerWidth / 2 - msgbox.clientWidth / 2) + 'px';
	msgbox.style.top = (window.innerHeight / 2 - msgbox.clientHeight / 2) + 'px';

	// 平均分按钮宽度
	var btn = msgbox.querySelector('.btn'), btns = msgbox.querySelectorAll('.btn>div');
	var j = btns.length, width = btn.clientWidth / j - 12; // 要减去间隙

	// 登记关闭事件
	[].forEach.call(msgbox.querySelectorAll('.closeAction'), function(closeBtn){
		closeBtn.onclick = function(){
			msgbox.parentNode.removeChild(msgbox);
		}
	});
}

new MsgBox(document.querySelector('.msgbox'));
</script>
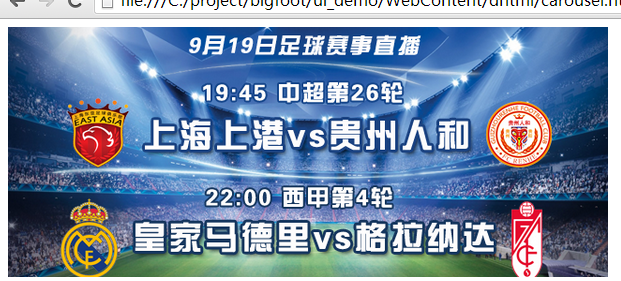
8、跑马灯 Carousel 轮播
跑马灯是个经典的效果,几乎每个网站、APP 都会用到,我们应该要好好掌握跑马灯实现的算法。一种最普遍的思路:把图片们用 ul 之类(div 亦可)的包起来,并设置 float,然后设置这个 ul 本身为 absolute 定位,其父标签用 relative 定位。通过设置 ul 的 left 或 top 值,从而实现图片队列的滚动效果。 点击查看在线例子。
<meta charset="UTF-8">
<title>carousel</title>

<div class="carousel">
	<div>
		<div>
			<a href="topic/?id=283">
				<img src="http://imgu.3gtv.net:9090/_file/section/20150919114717260.jpg">
			</a>
		</div>
		<div>
			<a href="live/?id=3">
				<img src="http://imgu.3gtv.net:9090/_file/section/20150918214948448.png">
			</a>
		</div>
		<div>
			<a href="topic/?id=346">
				<img src="http://imgu.3gtv.net:9090/_file/section/20150910171423733.png">
			</a>
		</div>
		<div>
			<a href="topic/?id=345">
				<img src="http://imgu.3gtv.net:9090/_file/section/20150909172539065.jpg">
			</a>
		</div>

	</div>
</div>

<style>
	.carousel{
		height:250px;
		width:600px;
		overflow:hidden;
		position: relative;
	}

	.carousel > div{
		left:0;
		position:absolute;
		white-space: nowrap;
		transition: 200ms left linear;
		-moz-transition: 200ms left linear;
		-o-transition: 200ms left linear;
		-ie-transition: 200ms left linear;
		-webkit-transition: 200ms left linear;
	}

	.carousel > div > div{
		float: left;
	}
	.carousel > div > div img {
		width: 100%;
	}
</style>

<script>
function Carousel(el) {
	var containerWidth = el.clientWidth,
		mover = el.querySelector('div'),
		items = mover.children, len = items.length;

    // 设置 mover 和 item 宽度。初始化时候运行。
    for (var i = 0; i < len; i++) {
        items[i].style.width = containerWidth + 'px'; // 设置item 宽度
    }
    mover.style.width = containerWidth * len  + 'px'; // 总宽度,也是容器中最宽的宽度。赋予给 mover。
    var count = 0;
    setInterval(function(){
    	if(++count == len)count = 0;
    	mover.style.left = -count * containerWidth + 'px';
    }, 2000);
}

new Carousel(document.querySelector('.carousel'));
</script>


 750
750

 被折叠的 条评论
为什么被折叠?
被折叠的 条评论
为什么被折叠?
 到【灌水乐园】发言


