


第一次安装,过程中遇到了不少问题,这里做了记录。
1、下载安装包
2 、移动到指定目录并解压
tar -zvxf mysql-5.5.62-linux-glibc2.12-x86_64.tar.gz
解压后 修改解压目录为 mysql
mv mysql-5.5.62-linux-glibc2.12-x86_64 mysql
3、 添加系统mysql组和mysql用户:
执行命令:groupadd mysql和useradd -r -g mysql mysql
4、创建mysql数据目录,新目录不存在则创建.
数据库数据默认目录datadir=/var/lib/mysql,可通过vim /etc/my.cnf 查看
在 mysql主目录下 mkdir ./data
5、 修改数据权限 chown -R mysql:mysql ./
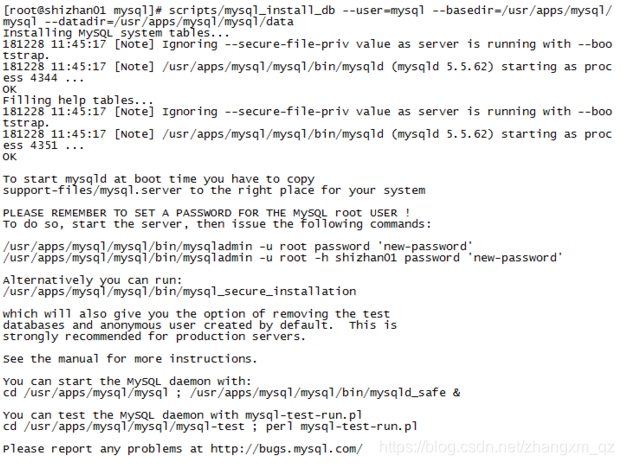
6、初始化数据库
scripts/mysql_install_db --user=mysql --basedir=/usr/apps/mysql/mysql --datadir=/usr/apps/mysql/mysql/data
7、添加到启动服务 cp support-files/mysql.server /etc/init.d/mysql
8、服务启动 service mysql start 提示错误如下:
Starting MySQL.. ERROR! The server quit without updating PID file (/usr/local/mysql/shizhan01.pid).
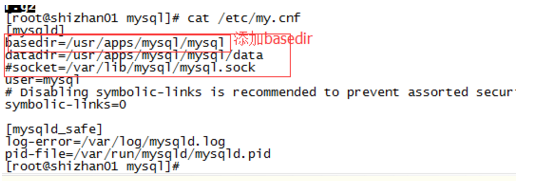
遇到这种问题 注释掉 my.cnf 中的无用目录
添加basedir 修改 datadir 注释 socket ,如下图:
按照安装完成的提示 执行bin/mysql_secure_sinstallation 完成密码配置
   [root@shizhan01 mysql]# bin/mysql_secure_installation
NOTE: RUNNING ALL PARTS OF THIS SCRIPT IS RECOMMENDED FOR ALL MySQL
      SERVERS IN PRODUCTION USE! PLEASE READ EACH STEP CAREFULLY!
In order to log into MySQL to secure it, we'll need the current
password for the root user. If you've just installed MySQL, and
you haven't set the root password yet, the password will be blank,
so you should just press enter here.
Enter current password for root (enter for none):
ERROR 1045 (28000): Access denied for user 'root'@'localhost' (using password: YES)
Enter current password for root (enter for none):
OK, successfully used password, moving on...
Setting the root password ensures that nobody can log into the MySQL
root user without the proper authorisation.
You already have a root password set, so you can safely answer 'n'.
Change the root password? [Y/n] n
 ... skipping.
By default, a MySQL installation has an anonymous user, allowing anyone
to log into MySQL without having to have a user account created for
them. This is intended only for testing, and to make the installation
go a bit smoother. You should remove them before moving into a
production environment.
Remove anonymous users? [Y/n] n
 ... skipping.
Normally, root should only be allowed to connect from 'localhost'. This
ensures that someone cannot guess at the root password from the network.
Disallow root login remotely? [Y/n] n
 ... skipping.
By default, MySQL comes with a database named 'test' that anyone can
access. This is also intended only for testing, and should be removed
before moving into a production environment.
Remove test database and access to it? [Y/n] n
 ... skipping.
Reloading the privilege tables will ensure that all changes made so far
will take effect immediately.
Reload privilege tables now? [Y/n] y
 ... Success!
Cleaning up...
All done! If you've completed all of the above steps, your MySQL
installation should now be secure.
Thanks for using MySQL!
问题:
本地 mysql -uroot -p 连接mysql 成功后 ,show databases 只有两个 performance_schema || test
同时在其他客户端连接 提示 :
错误代码是1130,ERROR 1130: Host xxx.xxx.xxx.xxx is not allowed to connect to this MySQL server
百度得知 需要切换到mysql 数据库中 去执行相应操作才能解决。
执行 use mysql时报错
提示:ERROR 1044 (42000): Access denied for user ‘’@‘localhost’ to database ‘mysql’。
百度解决原因及办法如下
在网上找了半天,终于发现是因为mysql数据库的user表里,存在用户名为空的账户即匿名账户,导致登录的时候是虽然用的是root,但实际是匿名登录的,通过错误提示里的’’@'localhost’可以看出来,解决办法如下:
方法一:
1.关闭mysql
# service mysqld stop
2.屏蔽权限
# mysqld_safe --skip-grant-table
屏幕出现: Starting demo from …
3.新开起一个终端输入
# mysql -u root mysql
mysql> UPDATE user SET Password=PASSWORD(‘newpassword’) where USER=‘root’;
mysql> FLUSH PRIVILEGES;//记得要这句话,否则如果关闭先前的终端,又会出现原来的错误
mysql> \q
方法二:
1.关闭mysql
# service mysqld stop
2.屏蔽权限
# mysqld_safe --skip-grant-table
屏幕出现: Starting demo from …
3.新开起一个终端输入
# mysql -u root mysql
mysql> delete from user where USER=’’;
mysql> FLUSH PRIVILEGES;//记得要这句话,否则如果关闭先前的终端,又会出现原来的错误
mysql> \q
但是在 执行 # mysqld_safe --skip-grant-table 时 报错 提示 不知道 --skip-grant-table 这个配置项
百度找到了另外一种方式 再 /etc/my.cnf 中增加 skip-grant-table (完成设置后注释掉)然后重启mysql服务

按照上述两种方法执行 完成后注释掉 my.cnf 中的 配置 重启服务执行如下sql
新建一个用户 mysql 拥有所有权限
grant all privileges on . to mysql identified by ‘mysql’;
然后用 mysql 用户 再客户端登录 成功!


 486
486


 被折叠的 条评论
为什么被折叠?
被折叠的 条评论
为什么被折叠?
 到【灌水乐园】发言


