Maven3 + Spring4 + SpringMVC4 + Mybatis3

Maven、Spring、SpringMVC、Mybatis 整合基本流程

完整源代码见Github:Maven-Spring-SpringMVC-Mybatis.

1 整合思路

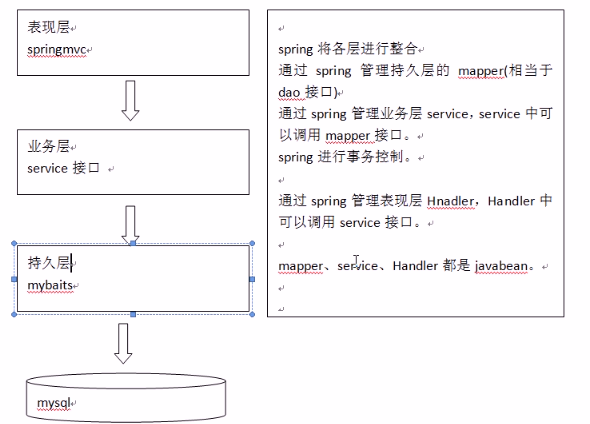
1.1 Spring、SpringMVC、Mybatis 整合的系统架构:

整合的系统架构

1.2 整合基本流程

  整合采用自下而上的方式整合:

  • 第一步:整合 dao 层,mybatis和spring整合,通过spring管理mapper接口。使用 mapper的扫描器自动扫描mapper接口在spring中进行注册。
  • 第二步:整合 service 层,通过spring管理 service接口。使用配置方式将service接口配置在spring配置文件中。实现事务控制。
  • 第三步:整合 springmvc,由于 springmvc 是 spring 的模块,不需要整合,加入相应的 jar 包即可。

2 整合流程

2.1 pom.xml 中添加依赖

    <properties>
        <project.build.sourceEncoding>UTF-8</project.build.sourceEncoding>
        <!-- spring version -->
        <spring.version>4.2.5.RELEASE</spring.version>
        <mybatis.version>3.2.8</mybatis.version>
    </properties>

    <dependencies>
        <!-- spring-core -->
        <dependency>
            <groupId>org.springframework</groupId>
            <artifactId>spring-core</artifactId>
            <version>${spring.version}</version>
        </dependency>

        <!-- spring-context -->
        <dependency>
            <groupId>org.springframework</groupId>
            <artifactId>spring-context</artifactId>
            <version>${spring.version}</version>
        </dependency>

        <!-- Spring AOP -->
        <dependency>
            <groupId>org.springframework</groupId>
            <artifactId>spring-aop</artifactId>
            <version>${spring.version}</version>
        </dependency>

        <!-- AspectJ Runtime -->
        <dependency>
            <groupId>org.aspectj</groupId>
            <artifactId>aspectjrt</artifactId>
            <version>1.8.6</version>
        </dependency>

        <!-- AspectJ Weaver -->
        <dependency>
            <groupId>org.aspectj</groupId>
            <artifactId>aspectjweaver</artifactId>
            <version>1.8.6</version>
        </dependency>

        <!-- Spring Jdbc 的支持 -->
        <dependency>
            <groupId>org.springframework</groupId>
            <artifactId>spring-jdbc</artifactId>
            <version>4.2.5.RELEASE</version>
        </dependency>

        <!-- SpringMVC -->
        <dependency>
            <groupId>org.springframework</groupId>
            <artifactId>spring-webmvc</artifactId>
            <version>${spring.version}</version>
        </dependency>

        <!-- c3p0 datasource -->
        <dependency>
            <groupId>c3p0</groupId>
            <artifactId>c3p0</artifactId>
            <version>0.9.1</version>
        </dependency>

        <!-- mysql-connector -->
        <dependency>
            <groupId>mysql</groupId>
            <artifactId>mysql-connector-java</artifactId>
            <version>5.1.38</version>
        </dependency>

        <!-- mybatis -->
        <dependency>
            <groupId>org.mybatis</groupId>
            <artifactId>mybatis</artifactId>
            <version>${mybatis.version}</version>
        </dependency>

        <!-- cglib javassist -->
        <dependency>
            <groupId>cglib</groupId>
            <artifactId>cglib</artifactId>
            <version>3.1</version>
        </dependency>
        <dependency>
            <groupId>org.javassist</groupId>
            <artifactId>javassist</artifactId>
            <version>3.17.1-GA</version>
        </dependency>

        <!-- logger -->
        <dependency>
            <groupId>commons-logging</groupId>
            <artifactId>commons-logging</artifactId>
            <version>1.1.1</version>
        </dependency>
        <dependency>
            <groupId>log4j</groupId>
            <artifactId>log4j</artifactId>
            <version>1.2.17</version>
        </dependency>
        <dependency>
            <groupId>org.slf4j</groupId>
            <artifactId>slf4j-api</artifactId>
            <version>1.7.5</version>
        </dependency>
        <dependency>
            <groupId>org.apache.logging.log4j</groupId>
            <artifactId>log4j-core</artifactId>
            <version>2.0.2</version>
        </dependency>
        <dependency>
            <groupId>org.slf4j</groupId>
            <artifactId>slf4j-log4j12</artifactId>
            <version>1.7.5</version>
        </dependency>

        <!-- mybatis-spring 整合 -->
        <dependency>
            <groupId>org.mybatis</groupId>
            <artifactId>mybatis-spring</artifactId>
            <version>1.2.2</version>
        </dependency>

        <!-- jstl 标签库 -->
        <dependency>
            <groupId>jstl</groupId>
            <artifactId>jstl</artifactId>
            <version>1.2</version>
        </dependency>

        <!-- junit -->
        <dependency>
            <groupId>junit</groupId>
            <artifactId>junit</artifactId>
            <version>4.10</version>
            <scope>test</scope>
        </dependency>
    </dependencies>
 
 
  • 1
  • 2
  • 3
  • 4
  • 5
  • 6
  • 7
  • 8
  • 9
  • 10
  • 11
  • 12
  • 13
  • 14
  • 15
  • 16
  • 17
  • 18
  • 19
  • 20
  • 21
  • 22
  • 23
  • 24
  • 25
  • 26
  • 27
  • 28
  • 29
  • 30
  • 31
  • 32
  • 33
  • 34
  • 35
  • 36
  • 37
  • 38
  • 39
  • 40
  • 41
  • 42
  • 43
  • 44
  • 45
  • 46
  • 47
  • 48
  • 49
  • 50
  • 51
  • 52
  • 53
  • 54
  • 55
  • 56
  • 57
  • 58
  • 59
  • 60
  • 61
  • 62
  • 63
  • 64
  • 65
  • 66
  • 67
  • 68
  • 69
  • 70
  • 71
  • 72
  • 73
  • 74
  • 75
  • 76
  • 77
  • 78
  • 79
  • 80
  • 81
  • 82
  • 83
  • 84
  • 85
  • 86
  • 87
  • 88
  • 89
  • 90
  • 91
  • 92
  • 93
  • 94
  • 95
  • 96
  • 97
  • 98
  • 99
  • 100
  • 101
  • 102
  • 103
  • 104
  • 105
  • 106
  • 107
  • 108
  • 109
  • 110
  • 111
  • 112
  • 113
  • 114
  • 115
  • 116
  • 117
  • 118
  • 119
  • 120
  • 121
  • 122
  • 123
  • 124
  • 125
  • 126
  • 127
  • 128
  • 129
  • 130
  • 131
  • 132
  • 133
  • 134
  • 135
  • 136
  • 137
  • 138
  • 139

2.2 整合 Mybatis 和 Spring:整合 dao 层

2.2.1 配置 db.properties
jdbc.driver=com.mysql.jdbc.Driver
jdbc.url=jdbc:mysql://localhost:3306/springmvc_mybatis?useUnicode=true&amp;characterEncoding=UTF-8
jdbc.username=username
jdbc.password=password
jdbc.initialPoolSize=5
jdbc.maxPoolSize=10
 
 
  • 1
  • 2
  • 3
  • 4
  • 5
  • 6
  • 1
  • 2
  • 3
  • 4
  • 5
  • 6
2.2.2 配置 Mybatis 的 SqlMapConfig.xml

  在 resources/config/mybatis 目录下创建 SqlMapConfig.xml :

<?xml version="1.0" encoding="UTF-8" ?>
<!DOCTYPE configuration
        PUBLIC "-//config.mybatis.org//DTD Config 3.0//EN"
        "http://mybatis.org/dtd/mybatis-3-config.dtd">
<configuration>

    <!-- 全局 setting 的配置,根据需要进行配置,如Lazy Loading、二级缓存等 -->

    <!-- 别名的配置 -->
    <typeAliases>
        <!-- 批量扫描别名 -->
        <package name="com.markliu.ssm.po" />
    </typeAliases>

    <!-- 配置 mapper
     由于使用的是在 spring 和 config.mybatis 的整合包中配置的批量扫描 mapper,
     所以此处不需要配置了。但需要遵循一定的规则:mapper.java 和 mapper.xml 同名且在同一个目录下。
     <mappers>
     </mappers>
    -->
    <mappers>
        <!-- maven 的目录结构下的resources为classpath -->
        <mapper resource="config/mybatis/mapper/ItemsCustomMapper.xml" />
        <mapper resource="config/mybatis/mapper/ItemsMapper.xml" />
        <mapper resource="config/mybatis/mapper/OrderDetailMapper.xml" />
        <mapper resource="config/mybatis/mapper/OrdersMapper.xml" />
        <mapper resource="config/mybatis/mapper/UserMapper.xml" />
    </mappers>
</configuration>


  • 1
  • 2
  • 3
  • 4
  • 5
  • 6
  • 7
  • 8
  • 9
  • 10
  • 11
  • 12
  • 13
  • 14
  • 15
  • 16
  • 17
  • 18
  • 19
  • 20
  • 21
  • 22
  • 23
  • 24
  • 25
  • 26
  • 27
  • 28
  • 29
  • 30
  • 1
  • 2
  • 3
  • 4
  • 5
  • 6
  • 7
  • 8
  • 9
  • 10
  • 11
  • 12
  • 13
  • 14
  • 15
  • 16
  • 17
  • 18
  • 19
  • 20
  • 21
  • 22
  • 23
  • 24
  • 25
  • 26
  • 27
  • 28
  • 29
  • 30
2.2.3 配置 Spring 的 applicationContext-dao.xml

  在 resources/config/spring 目录下创建 applicationContext-dao.xml :

<?xml version="1.0" encoding="UTF-8"?>
<beans xmlns="http://www.springframework.org/schema/beans"
       xmlns:xsi="http://www.w3.org/2001/XMLSchema-instance"
       xmlns:context="http://www.springframework.org/schema/context"
       xmlns:tx="http://www.springframework.org/schema/tx"
       xmlns:aop="http://www.springframework.org/schema/aop"
       xsi:schemaLocation="http://www.springframework.org/schema/beans http://www.springframework.org/schema/beans/spring-beans-4.2.xsd
        http://www.springframework.org/schema/context http://www.springframework.org/schema/context/spring-context-4.2.xsd
        http://www.springframework.org/schema/aop http://www.springframework.org/schema/aop/spring-aop-4.2.xsd
        http://www.springframework.org/schema/tx http://www.springframework.org/schema/tx/spring-tx-4.2.xsd">

    <!-- 引入数据库配置文件 -->
    <context:property-placeholder location="classpath:config/db.properties"/>

    <!-- 配置C3P0 数据源 -->
    <bean id="dataSource" class="com.mchange.v2.c3p0.ComboPooledDataSource">
        <property name="user" value="${jdbc.username}"/>
        <property name="password" value="${jdbc.password}"/>
        <property name="driverClass" value="${jdbc.driver}"/>
        <property name="jdbcUrl" value="${jdbc.url}"/>
        <property name="initialPoolSize" value="${jdbc.initialPoolSize}"/>
        <property name="maxPoolSize" value="${jdbc.maxPoolSize}"/>
    </bean>

    <!-- 配置 SqlSessionFactory -->
    <bean id="sqlSessionFactory" class="org.mybatis.spring.SqlSessionFactoryBean">
        <!-- 加载mybatis的配置文件 -->
        <property name="configLocation" value="classpath:config/mybatis/SqlMapConfig.xml"/>
        <!-- 加载数据源 -->
        <property name="dataSource" ref="dataSource"/>
    </bean>

    <!-- 通过MapperScannerConfigurer进行mapper扫描(建议使用)
     mapper 批量扫描,从 mapper 包中扫描出 mapper 接口,自动创建代理对象,并在 spring 容器中注册名陈为类名首字母小写。
     遵循的规范:将 mapper.java 和 mapper.xml 映射文件名陈一致,且在同一个目录
     -->
    <bean class="org.mybatis.spring.mapper.MapperScannerConfigurer">
        <!-- 指定扫描的包,如果存在多个包使用(逗号,)分割 -->
        <property name="basePackage" value="com.markliu.ssm.mapper" />
        <!-- 注意此处是sqlSessionFactoryBeanName,如果写成 sqlSessionFactory,ref="sqlSessionFactory"
             会造成 <context:property-placeholder location="classpath:config/db.properties"/> 失效 而连接不上数据库
         -->
        <property name="sqlSessionFactoryBeanName" value="sqlSessionFactory" />
    </bean>
</beans>
 
 
  • 1
  • 2
  • 3
  • 4
  • 5
  • 6
  • 7
  • 8
  • 9
  • 10
  • 11
  • 12
  • 13
  • 14
  • 15
  • 16
  • 17
  • 18
  • 19
  • 20
  • 21
  • 22
  • 23
  • 24
  • 25
  • 26
  • 27
  • 28
  • 29
  • 30
  • 31
  • 32
  • 33
  • 34
  • 35
  • 36
  • 37
  • 38
  • 39
  • 40
  • 41
  • 42
  • 43
  • 44
  • 45
2.2.4 逆向工程生成 po 类、 mapper.java 和 mapper.xml (单表的CRUD)

  Mybatis 逆向工程的基本流程参考 mybatis-generator.md

2.2.5 对于关联查询,需要手动创建 mapper.java 和 mapper.xml

  ItemsCustomMapper.xml:

<?xml version="1.0" encoding="UTF-8" ?>
<!DOCTYPE mapper PUBLIC "-//mybatis.org//DTD Mapper 3.0//EN" "http://mybatis.org/dtd/mybatis-3-mapper.dtd" >
<mapper namespace="com.markliu.ssm.mapper.ItemsCustomMapper">

    <!-- 定义条件查询的 sql 片段 -->
    <sql id="ItemsCustom_Query_Where">
      <!-- 使用动态 sql,构造条件查询 -->
        <if test="itemsCustom!=null">
            <if test="itemsCustom.name!=null and itemsCustom.name!='">
                items.name like '%${itemsCustom.name}%'
            </if>
        </if>
    </sql>
    <!-- 商品列表查询 -->
    <!--
     parameterType:使用封装复杂查询的 Vo 类,便于后续系统的扩展
     resultType:使用扩展的 Custom 类,便于后续系统的扩展
     -->
    <select id="getAllItemsLikeName"
            parameterType="com.markliu.ssm.po.ItemsCustomQueryVo"
            resultType="com.markliu.ssm.po.ItemsCustom">
        select * from items
        <where>
          <include refid="ItemsCustom_Query_Where" />
        </where>
    </select>
</mapper>
 
 
  • 1
  • 2
  • 3
  • 4
  • 5
  • 6
  • 7
  • 8
  • 9
  • 10
  • 11
  • 12
  • 13
  • 14
  • 15
  • 16
  • 17
  • 18
  • 19
  • 20
  • 21
  • 22
  • 23
  • 24
  • 25
  • 26
  • 27
  • 1
  • 2
  • 3
  • 4
  • 5
  • 6
  • 7
  • 8
  • 9
  • 10
  • 11
  • 12
  • 13
  • 14
  • 15
  • 16
  • 17
  • 18
  • 19
  • 20
  • 21
  • 22
  • 23
  • 24
  • 25
  • 26
  • 27

  ItemsCustomMapper.Java:

public interface ItemsCustomMapper {
    List<ItemsCustom> getAllItemsLikeName(ItemsCustomQueryVo itemsCustomQueryVo) throws Exception;
}


  • 1
  • 2
  • 3
  • 4
  • 1
  • 2
  • 3
  • 4

2.3 整合 Mybatis 和 SpringMVC:整合 service 层

2.3.1 定义 service 接口
package com.markliu.ssm.service;

import com.markliu.ssm.po.ItemsCustom;
import com.markliu.ssm.po.ItemsCustomQueryVo;
import java.util.List;

public interface ItemsService {
    /**
     * 获取 Items 列表
     * @param itemsCustomQueryVo 封装针对 ItemsCustom 的复杂查询的 Vo 类
     * @return Items 列表
     * @throws Exception database exception
     */
    List<ItemsCustom> getAllItemsLikeName(ItemsCustomQueryVo itemsCustomQueryVo) throws Exception;
}


  • 1
  • 2
  • 3
  • 4
  • 5
  • 6
  • 7
  • 8
  • 9
  • 10
  • 11
  • 12
  • 13
  • 14
  • 15
  • 16
  • 1
  • 2
  • 3
  • 4
  • 5
  • 6
  • 7
  • 8
  • 9
  • 10
  • 11
  • 12
  • 13
  • 14
  • 15
  • 16
2.3.2 定义 service 接口的实现类
package com.markliu.ssm.service.impl;

import com.markliu.ssm.mapper.ItemsCustomMapper;
import com.markliu.ssm.po.ItemsCustom;
import com.markliu.ssm.po.ItemsCustomQueryVo;
import com.markliu.ssm.service.ItemsService;
import org.springframework.beans.factory.annotation.Autowired;
import org.springframework.stereotype.Service;
import java.util.List;

@Service("itemsService")
public class ItemsServiceImpl implements ItemsService {

    // 注意 itemsCustomMapper 已通过包自动扫描的方式注入到 IoC 容器中,
    // 所以此处可以通过 Autowired 自动注入
    private ItemsCustomMapper itemsCustomMapper;

    @Autowired
    public void setItemsCustomMapper(ItemsCustomMapper itemsCustomMapper) {
        this.itemsCustomMapper = itemsCustomMapper;
    }

    public List<ItemsCustom> getAllItemsLikeName(ItemsCustomQueryVo itemsCustomQueryVo)
            throws Exception {
        // 调用 dao 层的ItemsCustomMapper
        return itemsCustomMapper.getAllItemsLikeName(itemsCustomQueryVo);
    }
}


  • 1
  • 2
  • 3
  • 4
  • 5
  • 6
  • 7
  • 8
  • 9
  • 10
  • 11
  • 12
  • 13
  • 14
  • 15
  • 16
  • 17
  • 18
  • 19
  • 20
  • 21
  • 22
  • 23
  • 24
  • 25
  • 26
  • 27
  • 28
  • 29
  • 1
  • 2
  • 3
  • 4
  • 5
  • 6
  • 7
  • 8
  • 9
  • 10
  • 11
  • 12
  • 13
  • 14
  • 15
  • 16
  • 17
  • 18
  • 19
  • 20
  • 21
  • 22
  • 23
  • 24
  • 25
  • 26
  • 27
  • 28
  • 29
2.3.3 service 层定义事物管理 applicationContext-transaction.xml
<?xml version="1.0" encoding="UTF-8"?>
<beans xmlns="http://www.springframework.org/schema/beans"
       xmlns:xsi="http://www.w3.org/2001/XMLSchema-instance"
       xmlns:context="http://www.springframework.org/schema/context"
       xmlns:tx="http://www.springframework.org/schema/tx"
       xmlns:aop="http://www.springframework.org/schema/aop"
       xsi:schemaLocation="http://www.springframework.org/schema/beans http://www.springframework.org/schema/beans/spring-beans-4.2.xsd
        http://www.springframework.org/schema/context http://www.springframework.org/schema/context/spring-context-4.2.xsd
        http://www.springframework.org/schema/aop http://www.springframework.org/schema/aop/spring-aop-4.2.xsd
        http://www.springframework.org/schema/tx http://www.springframework.org/schema/tx/spring-tx-4.2.xsd">

    <!-- Spring 配置事务配置
    主要由三个部分组成:DataSource、TransactionManager和 AOP 代理机制。
    对于 mybatis 的事物控制,spring 采用基于jdbc的事物控制
     -->

    <!-- 配置 DataSource 由于在 applicationContext-dao.xml 中已经配置过了,
    所以 dataSource 已经存在与 IoC 容器中-->

    <!-- 配置事物管理器 TransactionManager -->
    <bean id="transactionManager" class="org.springframework.jdbc.datasource.DataSourceTransactionManager">
        <property name="dataSource" ref="dataSource"/>
    </bean>

    <!-- 配置通知 -->
    <tx:advice id="interceptorAdvice" transaction-manager="transactionManager">
        <tx:attributes>
            <tx:method name="save*" propagation="REQUIRED"/>
            <tx:method name="delete*" propagation="REQUIRED" />
            <tx:method name="update*" propagation="REQUIRED" />
            <tx:method name="insert*" propagation="REQUIRED" />

            <tx:method name="find*" propagation="SUPPORTS" read-only="true" />
            <tx:method name="get*" propagation="SUPPORTS" read-only="true" />
            <tx:method name="select*" propagation="SUPPORTS" read-only="true" />
        </tx:attributes>
    </tx:advice>

    <!-- 配置切面 aop -->
    <aop:config>
        <aop:advisor advice-ref="interceptorAdvice" pointcut="execution(* com.markliu.ssm.service.impl.*.*(..))"/>
    </aop:config>

</beans>
 
 
  • 1
  • 2
  • 3
  • 4
  • 5
  • 6
  • 7
  • 8
  • 9
  • 10
  • 11
  • 12
  • 13
  • 14
  • 15
  • 16
  • 17
  • 18
  • 19
  • 20
  • 21
  • 22
  • 23
  • 24
  • 25
  • 26
  • 27
  • 28
  • 29
  • 30
  • 31
  • 32
  • 33
  • 34
  • 35
  • 36
  • 37
  • 38
  • 39
  • 40
  • 41
  • 42
  • 43
  • 44
  • 1
  • 2
  • 3
  • 4
  • 5
  • 6
  • 7
  • 8
  • 9
  • 10
  • 11
  • 12
  • 13
  • 14
  • 15
  • 16
  • 17
  • 18
  • 19
  • 20
  • 21
  • 22
  • 23
  • 24
  • 25
  • 26
  • 27
  • 28
  • 29
  • 30
  • 31
  • 32
  • 33
  • 34
  • 35
  • 36
  • 37
  • 38
  • 39
  • 40
  • 41
  • 42
  • 43
  • 44

2.3 整合 Mybatis 和 SpringMVC:整合 controller 层

2.3.1 springmvc-dispatcherservlet.xml

  创建springmvc.xml文件,配置处理器映射器、适配器、视图解析器。

<?xml version="1.0" encoding="UTF-8"?>
<beans xmlns="http://www.springframework.org/schema/beans"
       xmlns:xsi="http://www.w3.org/2001/XMLSchema-instance"
       xmlns:context="http://www.springframework.org/schema/context"
       xmlns:mvc="http://www.springframework.org/schema/mvc"
       xsi:schemaLocation="http://www.springframework.org/schema/beans
       http://www.springframework.org/schema/beans/spring-beans.xsd
       http://www.springframework.org/schema/context
       http://www.springframework.org/schema/context/spring-context.xsd
       http://www.springframework.org/schema/mvc
       http://www.springframework.org/schema/mvc/spring-mvc.xsd">

    <!-- 配置扫描 springmvc 的 controller 和 service 的包 -->
    <context:component-scan base-package="com.markliu.ssm.controller" />
    <context:component-scan base-package="com.markliu.ssm.service" />
    <mvc:annotation-driven />

    <bean id="viewResolver" class="org.springframework.web.servlet.view.InternalResourceViewResolver">
        <property name="prefix" value="/WEB-INF/jsp/"/>
        <property name="suffix" value=".jsp" />
    </bean>

</beans>
 
 
  • 1
  • 2
  • 3
  • 4
  • 5
  • 6
  • 7
  • 8
  • 9
  • 10
  • 11
  • 12
  • 13
  • 14
  • 15
  • 16
  • 17
  • 18
  • 19
  • 20
  • 21
  • 22
  • 23
  • 1
  • 2
  • 3
  • 4
  • 5
  • 6
  • 7
  • 8
  • 9
  • 10
  • 11
  • 12
  • 13
  • 14
  • 15
  • 16
  • 17
  • 18
  • 19
  • 20
  • 21
  • 22
  • 23
2.3.2 在 web.xml 中配置前端控制器
    <servlet>
        <servlet-name>springmvc-dispatcherservlet</servlet-name>
        <servlet-class>org.springframework.web.servlet.DispatcherServlet</servlet-class>
        <init-param>
            <param-name>contextConfigLocation</param-name>
            <param-value>classpath:config/spring/springmvc-dispatcherservlet.xml</param-value>
        </init-param>
        <load-on-startup>1</load-on-startup>
    </servlet>

    <servlet-mapping>
        <servlet-name>springmvc-dispatcherservlet</servlet-name>
        <!-- url-pattern 的三种配置方式:
        第一种:*.action : 访问.action结尾的资源时,由 DispatcherServlet 解析
        第二种:/        : 访问所有资源都由 DispatcherServlet 解析,对于html、css、js、image等静态资源,需要配置不让 DispatcherServlet 解析
        第三种:/*       : 注意这种方式错误,因为使用这种配置方式,最终咬转发到一个jsp页面时,仍然会由 DispatcherServlet 解析 jsp 地址,
                          不能根据jsp页面找到处理的handler,会报错。
         -->
        <url-pattern>/</url-pattern>
    </servlet-mapping>
 
 
  • 1
  • 2
  • 3
  • 4
  • 5
  • 6
  • 7
  • 8
  • 9
  • 10
  • 11
  • 12
  • 13
  • 14
  • 15
  • 16
  • 17
  • 18
  • 19
  • 20
  • 1
  • 2
  • 3
  • 4
  • 5
  • 6
  • 7
  • 8
  • 9
  • 10
  • 11
  • 12
  • 13
  • 14
  • 15
  • 16
  • 17
  • 18
  • 19
  • 20
2.3.3 编写控制器 Handler(Controller)
@Controller
@RequestMapping(value = "/items")
public class ItemsController {

    private ItemsService itemsService;

    @Autowired
    public void setItemsService(ItemsService itemsService) {
        this.itemsService = itemsService;
    }

    private ItemsMapper itemsMapper;

    @SuppressWarnings("SpringJavaAutowiringInspection")
    @Autowired
    public void setItemsMapper(ItemsMapper itemsMapper) {
        this.itemsMapper = itemsMapper;
    }

    @RequestMapping(value = "/query_items", method = {RequestMethod.POST, RequestMethod.GET})
    public ModelAndView queryItems() throws Exception {

        Items items = itemsMapper.selectByPrimaryKey(1);
        System.out.println(items.toString());

        List<ItemsCustom> itemsCustomList = itemsService.getAllItemsLikeName(null);

        for (ItemsCustom itemsCustom : itemsCustomList) {
            System.out.println(itemsCustom.toString());
        }

        ModelAndView modelAndView = new ModelAndView();
        modelAndView.addObject("itemsCustomList", itemsCustomList);
        modelAndView.setViewName("items/itemsList");
        return modelAndView;
    }
}
 
 
  • 1
  • 2
  • 3
  • 4
  • 5
  • 6
  • 7
  • 8
  • 9
  • 10
  • 11
  • 12
  • 13
  • 14
  • 15
  • 16
  • 17
  • 18
  • 19
  • 20
  • 21
  • 22
  • 23
  • 24
  • 25
  • 26
  • 27
  • 28
  • 29
  • 30
  • 31
  • 32
  • 33
  • 34
  • 35
  • 36
  • 37
  • 1
  • 2
  • 3
  • 4
  • 5
  • 6
  • 7
  • 8
  • 9
  • 10
  • 11
  • 12
  • 13
  • 14
  • 15
  • 16
  • 17
  • 18
  • 19
  • 20
  • 21
  • 22
  • 23
  • 24
  • 25
  • 26
  • 27
  • 28
  • 29
  • 30
  • 31
  • 32
  • 33
  • 34
  • 35
  • 36
  • 37
2.3.4 加载spring容器

  将mapper、service、controller加载到spring容器中。建议使用通配符加载 spring 容器的配置文件

  • applicationContext-dao.xml
  • applicationContext-transaction.xml
  • springmvc-dispatcherservlet.xml 
      在web.xml中,添加spring容器监听器,加载spring容器。
    <!-- 加载 spring 容器 -->
    <context-param>
        <param-name>contextConfigLocation</param-name>
        <param-value>/WEB-INF/classes/config/spring/applicationContext-*.xml</param-value>
    </context-param>
    <listener>
        <listener-class>org.springframework.web.context.ContextLoaderListener</listener-class>
    </listener>
 
 
  • 1
  • 2
  • 3
  • 4
  • 5
  • 6
  • 7
  • 8
  • 1
  • 2
  • 3
  • 4
  • 5
  • 6
  • 7
  • 8

Done.

  • 0
    点赞
  • 0
    收藏
    觉得还不错? 一键收藏
  • 0
    评论
评论
添加红包

请填写红包祝福语或标题

红包个数最小为10个

红包金额最低5元

当前余额3.43前往充值 >
需支付:10.00
成就一亿技术人!
领取后你会自动成为博主和红包主的粉丝 规则
hope_wisdom
发出的红包
实付
使用余额支付
点击重新获取
扫码支付
钱包余额 0

抵扣说明:

1.余额是钱包充值的虚拟货币,按照1:1的比例进行支付金额的抵扣。
2.余额无法直接购买下载,可以购买VIP、付费专栏及课程。

余额充值