


Spring MVC 框架入门-Hello World 实例
下面的例子是如何使用Spring MVC框架,编写一个简单的web Hello World应用程序。开发工具是用的 Eclipse IDE,按照以下步骤使用Spring Web框架开发动态Web应用程序。
目录
1.Create a Dynamic Web Project with a name HelloWeb and create a packagecom.yiibai under the src folder in the created project.
2.Drag and drop below mentioned Spring and other libraries into the folder WebContent/WEB-INF/lib
3.Create a Java class HelloController under the com.yiibai package
4.Create Spring configuration files Web.xml and HelloWeb-servlet.xml under theWebContent/WEB-INF folder.
5.Create a sub-folder with a name jsp under theWebContent/WEB-INF folder. Create a view filehello.jsp under this sub-folder.
6.The final step is to create the content of all the source and configuration files and export the application as explained below.
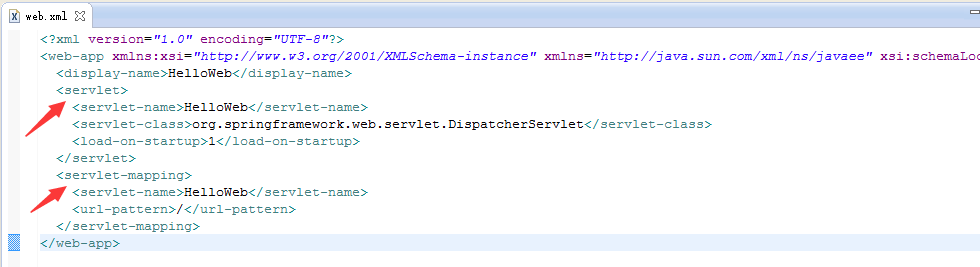
1.配置web.xml
说明:web.xml 文件将被保存在您的Web应用程序的 WebContent/ WEB-INF 目录。 在 DispatcherServlet 的 HelloWeb 初始化,该框架将尝试从一个名为 [servlet-name]-servlet.xml位于应用程序 WebContent/WEB-INF 目录文件加载应用程序上下文。在这种情况下我们的文件将是HelloWeb-servlet.xml。接下来,标记指示URL会被DispatcherServlet处理。这里全部用。jsp结束HTTP请求将由DispatcherServlet的HelloWeb处理。
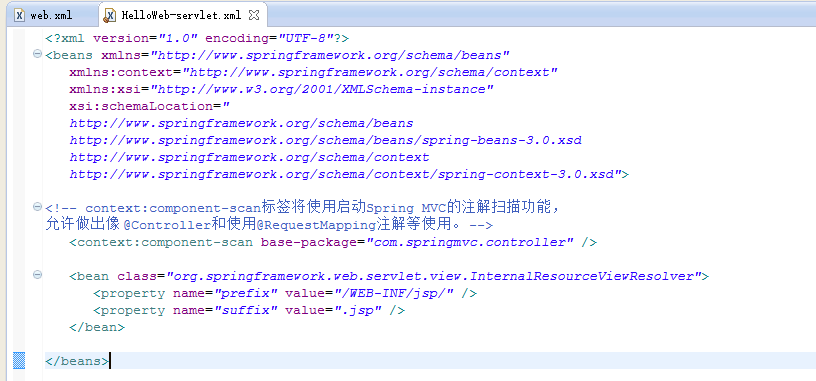
2.配置HelloWeb-Servlet.xml
说明:[servlet-name]-servlet.xml 文件将被用于创建定义的Bean,会覆盖在全局范围里名字相同的bean,<context:component-scan...>标签将使用启动Spring MVC的注解扫描功能,允许做出像 @Controller和使用@RequestMapping注解等使用。使用InternalResourceViewResolver将有定义来解析视图名的规则。按照上述定义的规则,命名为你好的逻辑视图被委托给一个视图实现位于/WEB-INF/jsp/hello.jsp配置HelloWeb-Servlet.xml
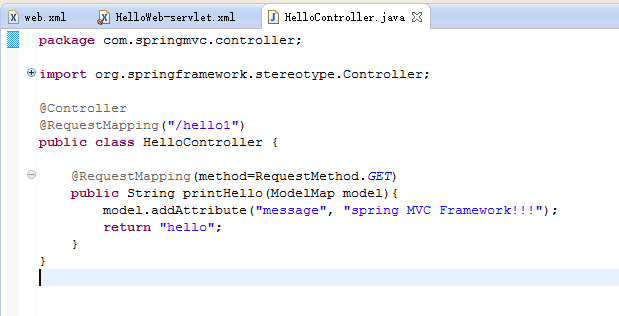
3.编写控制器
说明:DispatcherServlet 委托请求发送到控制器,以执行特定于它的功能。注解@Controller表示一个特定的类提供一个控制器的角色。注解@RequestMapping 用于将URL映射到任何一个类或者一个特定的处理方法。注解@Controller类定义为一个Spring MVC控制器。在这里,使用@RequestMapping第一次使用表明,该控制器上的所有处理方法是相对于/hello 路径。下一步标注使用@RequestMapping(方法= RequestMethod.GET)用于声明printHello() 方法作为控制器的默认服务方法来处理HTTP GET请求。可以定义另一种方法来处理同一URL的POST请求。
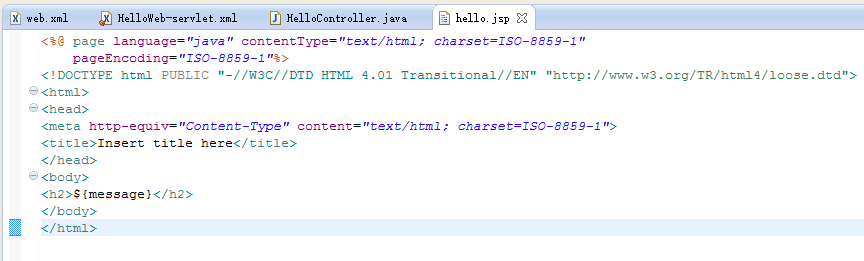
4.创建jsp视图
说明: ${message}是我们已经建立了控制器内部的属性。你可以在视图中显示多个属性。视图建在/WEB-INF/jsp/hello.jsp
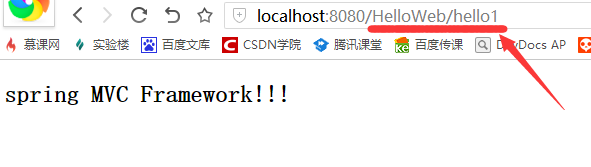
5.在浏览器中输入
附录各段代码
1.web.xml代码如下:
<?xml version="1.0" encoding="UTF-8"?>
<web-app xmlns:xsi="http://www.w3.org/2001/XMLSchema-instance" xmlns="http://java.sun.com/xml/ns/javaee" xsi:schemaLocation="http://java.sun.com/xml/ns/javaee http://java.sun.com/xml/ns/javaee/web-app_3_0.xsd" id="WebApp_ID" version="3.0">
  <display-name>HelloWeb</display-name>
  <servlet>
    <servlet-name>HelloWeb</servlet-name>
    <servlet-class>org.springframework.web.servlet.DispatcherServlet</servlet-class>
    <load-on-startup>1</load-on-startup>
  </servlet>
  <servlet-mapping>
    <servlet-name>HelloWeb</servlet-name>
    <url-pattern>/</url-pattern>
  </servlet-mapping>
</web-app>
2.helloWeb-servlet.xml代码如下:
<?xml version="1.0" encoding="UTF-8"?>
<beans xmlns="http://www.springframework.org/schema/beans"
   xmlns:context="http://www.springframework.org/schema/context"
   xmlns:xsi="http://www.w3.org/2001/XMLSchema-instance"
   xsi:schemaLocation="
   http://www.springframework.org/schema/beans
   http://www.springframework.org/schema/beans/spring-beans-3.0.xsd
   http://www.springframework.org/schema/context
   http://www.springframework.org/schema/context/spring-context-3.0.xsd">
<!-- context:component-scan标签将使用启动Spring MVC的注解扫描功能,
允许做出像 @Controller和使用@RequestMapping注解等使用。 -->
   <context:component-scan base-package="com.springmvc.controller" />
   <bean class="org.springframework.web.servlet.view.InternalResourceViewResolver">
      <property name="prefix" value="/WEB-INF/jsp/" />
      <property name="suffix" value=".jsp" />
   </bean>
</beans>
3.HelloController.java代码如下:
package com.springmvc.controller;

import org.springframework.stereotype.Controller;
import org.springframework.ui.ModelMap;
import org.springframework.web.bind.annotation.RequestMapping;
import org.springframework.web.bind.annotation.RequestMethod;

@Controller
@RequestMapping("/hello1")
public class HelloController {

    @RequestMapping(method=RequestMethod.GET)
    public String printHello(ModelMap model){
        model.addAttribute("message", "spring MVC Framework!!!");
        return "hello";
    }
}
4.hello.jsp代码如下:
<%@ page language="java" contentType="text/html; charset=ISO-8859-1"
    pageEncoding="ISO-8859-1"%>
<!DOCTYPE html PUBLIC "-//W3C//DTD HTML 4.01 Transitional//EN" "http://www.w3.org/TR/html4/loose.dtd">
<html>
<head>
<meta http-equiv="Content-Type" content="text/html; charset=ISO-8859-1">
<title>Insert title here</title>
</head>
<body>
<h2>${message}</h2>
</body>
</html>


 996
996


 被折叠的 条评论
为什么被折叠?
被折叠的 条评论
为什么被折叠?
 到【灌水乐园】发言


