


一.webservice介绍
WebService是帮助多个应用程序与平台和编程语言之间以独立的方式互相通信的标准化技术。它是利用标准 XML messaging(主要 SOAP) 技术,可以访问网络上的其他计算机的记述多种操作的软件接口。此接口主要由 WSDL (WebService Description Language)记述,可以处理多种多样的系统运作。
webservice优点
1)HTTP只能传输字符串类型,需要我们自己解析,而WebService支持复杂的数据类型。
2)传统客户端调用服务器的方法的过程是,发送,接收,解析消息,触发方法,而WebService类似于RPC,不需要我们关心如何发送接收和解析数据,能够像调用本地方法那样调用远程方法。
webservice的缺点
1)不适合相互调用,仅能让客户端调用服务端API,类似于单工通信。
2)相当于HTTP + XML解析,所以会比HTTP还慢,不适合需要高效通信的场景。
3)WebService会降低程序的性能,一台机器或一个局域网里面运行的同构应用程序就不应该用WebService进行通信。
webservice的适用/不适用场景
1)跨防火墙通信
2)应用程序集成:将不同语言写成的在不同平台上运行的各种程序集成起来。
3)软件重用
4)对内的接口不要使用webservice
二. IDEA开发SpringBoot开发webservice接口
本例使用若依通知公告示例
1.引入依赖
在ruoyi-system的pom.xml 引入依赖

        <!--webservice start-->
        <dependency>
            <groupId>org.springframework.boot</groupId>
            <artifactId>spring-boot-starter-web-services</artifactId>
        </dependency>
        <dependency>
            <groupId>org.apache.cxf</groupId>
            <artifactId>cxf-spring-boot-starter-jaxws</artifactId>
            <version>3.4.3</version>
        </dependency>
        <dependency>
            <groupId>org.apache.cxf</groupId>
            <artifactId>cxf-rt-transports-http-jetty</artifactId>
            <version>3.4.3</version>
        </dependency>
        <!--webservice end-->
2. 创建服务端接口
创建服务端接口及接口发布文件
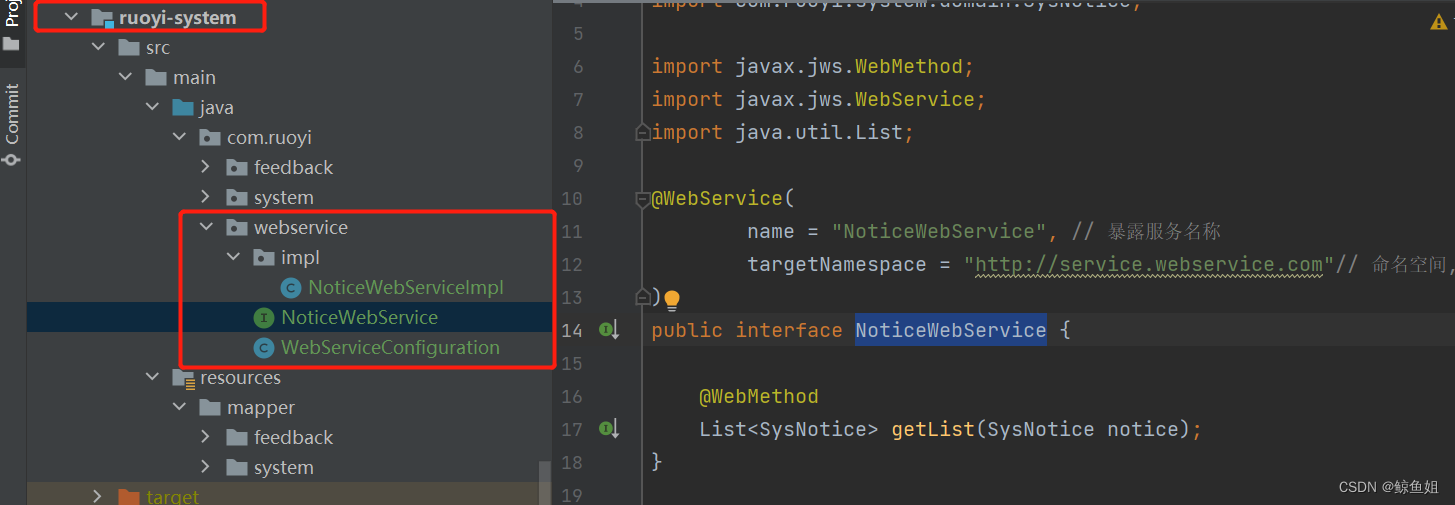
(1)NoticeWebService.java 接口
package com.ruoyi.webservice;
import com.ruoyi.system.domain.SysNotice;
import javax.jws.WebMethod;
import javax.jws.WebService;
import java.util.List;

@WebService(
        name = "NoticeWebService", // 暴露服务名称
        targetNamespace = "http://service.webservice.com"// 命名空间,一般是接口的包名倒序
)
public interface NoticeWebService {

    @WebMethod
    List<SysNotice> getList(SysNotice notice);
}
(2)NoticeWebServiceImpl.java 接口
package com.ruoyi.webservice.impl;

import com.ruoyi.system.domain.SysNotice;
import com.ruoyi.system.service.ISysNoticeService;
import com.ruoyi.webservice.NoticeWebService;
import org.springframework.beans.factory.annotation.Autowired;
import org.springframework.stereotype.Service;

import javax.jws.WebService;
import java.util.List;

@Service
@WebService(serviceName = "NoticeWebService", // 与接口中指定的name一致, 都可以不写
        targetNamespace = "http://service.webservice.com", // 与接口中的命名空间一致,一般是接口的包名倒,都可以不用写
        endpointInterface = "com.ruoyi.webservice.NoticeWebService" // 接口类全路径
)
public class NoticeWebServiceImpl implements NoticeWebService {

    @Autowired
    private ISysNoticeService noticeService;

    @Override
    public List<SysNotice> getList(SysNotice notice) {
        System.out.println("服务被调用 参数:" + notice.getNoticeId());
        SysNotice notice1=new SysNotice();
        notice1.setNoticeId(Long.valueOf(1));
        return noticeService.selectNoticeList(notice1);
    }

}
(3)WebServiceConfiguration.java 发布接口
package com.ruoyi.webservice;

import org.apache.cxf.bus.spring.SpringBus;
import org.apache.cxf.jaxws.EndpointImpl;
import org.springframework.beans.factory.annotation.Autowired;
import org.springframework.context.annotation.Bean;
import org.springframework.context.annotation.Configuration;

import javax.xml.ws.Endpoint;

@Configuration
public class WebServiceConfiguration {


    @Autowired
    private NoticeWebService noticeWebService;

    @Autowired
    private SpringBus spirngBus;


    /**
     * 发布服务
     * @return
     */
    @Bean
    public Endpoint noticeWebServiceEndpoint(){

        System.out.println("服务发布");
        //这里指定的端口不能跟应用的端口冲突, 单独指定
        String path = "http://127.0.0.1:9090/ws/notice";

        EndpointImpl endpoint  = new EndpointImpl(spirngBus, noticeWebService);
        endpoint.publish(path);

        System.out.println("服务成功,path: " + path);
        System.out.println(String.format("在线的wsdl:%s?wsdl", path));

        return endpoint ;
    }
}
(4) 运行后

在浏览器访问接口链接: http://127.0.0.1:9090/ws/notice?wsdl
如上所示,被调用的接口开发完成。
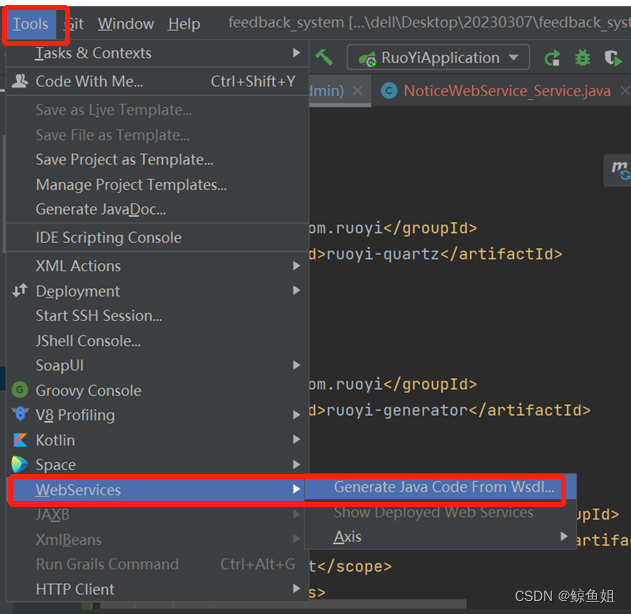
3. 创建客户端
本文使用的客户端是IDEA2021
(1)在ruoyi-admin下创建webservice目录—>noticeWebService目录,然后打开noticeWebSevice目录,点击菜单栏tools—》WebSevices——》Generate Java Code from Wsdl

输入WSDL地址,输出目录地址,选择Glassfish/jax-ws 2.2RI/Metro 1.x/JWSDP2.2
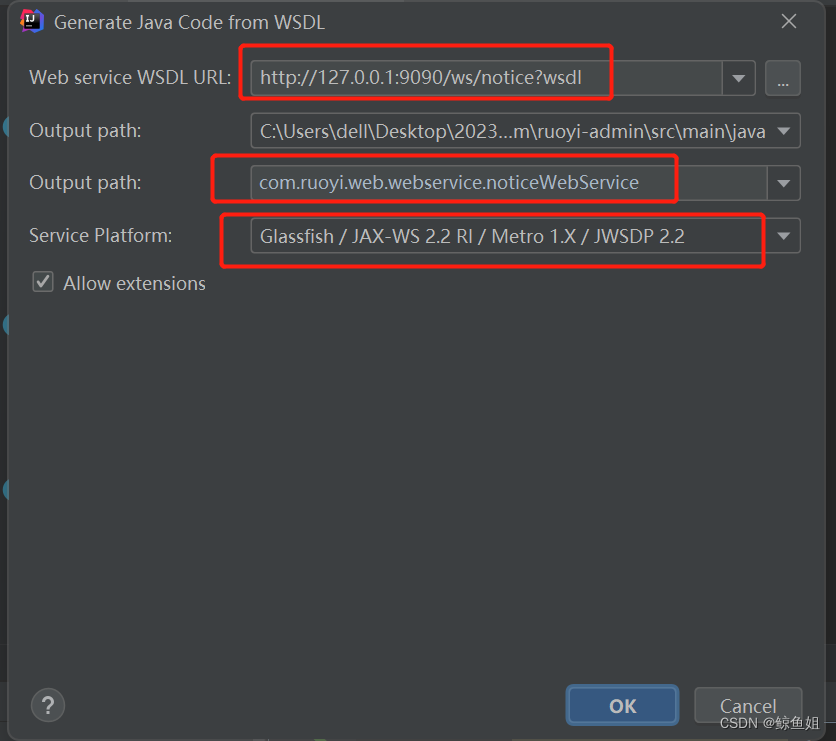
单击ok后,在目录下自动生成以下文件,主要使用的是NoticeWebService文件和NoticeWebService_Service文件

4. 调用验证
(1)引入单元测试依赖
        <!-- 单元测试-->
        <dependency>
            <groupId>org.springframework.boot</groupId>
            <artifactId>spring-boot-starter-test</artifactId>
            <scope>test</scope>
            <exclusions>
                <exclusion>
                    <groupId>org.junit.jupiter</groupId>
                    <artifactId>junit-jupiter-engine</artifactId>
                </exclusion>
            </exclusions>
        </dependency>
        <dependency>
            <groupId>junit</groupId>
            <artifactId>junit</artifactId>
        </dependency>


        <dependency>
            <groupId>org.springframework.boot</groupId>
            <artifactId>spring-boot-test</artifactId>
        </dependency>
        <dependency>
            <groupId>org.springframework</groupId>
            <artifactId>spring-test</artifactId>
        </dependency>
        <!-- 单元测试结束-->
(2) 创建MyTest文件
创建MyTest类,给接口传入SysNotice参数,通过NoticeWebService调用接口
package com.ruoyi.web;


import com.ruoyi.web.webservice.noticeWebService.NoticeWebService;
import com.ruoyi.web.webservice.noticeWebService.NoticeWebService_Service;
import com.ruoyi.RuoYiApplication;
import com.ruoyi.web.webservice.noticeWebService.SysNotice;
import org.junit.Test;
import org.junit.runner.RunWith;
import org.springframework.boot.autoconfigure.EnableAutoConfiguration;
import org.springframework.boot.autoconfigure.jdbc.DataSourceAutoConfiguration;
import org.springframework.boot.test.context.SpringBootTest;
import org.springframework.test.context.junit4.SpringRunner;


import java.util.List;

@RunWith(SpringRunner.class)
@SpringBootTest(classes = RuoYiApplication.class)
@EnableAutoConfiguration(exclude = {DataSourceAutoConfiguration.class})
public class MyTest {


    @Test
    public void test()
    {
        System.out.println("--------调用webservice接口begin-------");

        NoticeWebService_Service noticeWebService = new NoticeWebService_Service();
        SysNotice notice1=new SysNotice();
        notice1.setNoticeId(Long.valueOf(1));
        NoticeWebService webService = noticeWebService.getNoticeWebServiceImplPort();
        List<SysNotice> list = webService.getList(notice1);
        for(int i=0;i<list.size();i++)
        System.out.println(list.get(i).getNoticeId()+"===="+list.get(i).getNoticeTitle());
        System.out.println("--------调用webservice接口end-------");

    }
}
(3)选择MyTest,右键run 运行结果如下,说明调用成功。


 3万+
3万+


 被折叠的 条评论
为什么被折叠?
被折叠的 条评论
为什么被折叠?
 到【灌水乐园】发言


