


转载请标明出处:http://blog.csdn.net/zhaoyanjun6/article/details/119997762
本文出自【赵彦军的博客】
Java IO流学习总结一:输入输出流
Java IO流学习总结二:File
Java IO流学习总结三:缓冲流-BufferedInputStream、BufferedOutputStream
Java IO流学习总结四:缓冲流-BufferedReader、BufferedWriter
Java IO流学习总结五:转换流-InputStreamReader、OutputStreamWriter
Java IO流学习总结六:ByteArrayInputStream、ByteArrayOutputStream
Java IO流学习总结七:Commons IO 2.5-FileUtils
文章目录
okio简介
Okio是一个库,它补充了java.io和java.nio,使访问、存储和处理数据变得更加容易。
OkHttp的的 io 功能就是 OKio 提供的,OkHttp是Android中包含的一个功能强大的HTTP客户端。
github地址:https://github.com/square/okio
api主页:https://square.github.io/okio/
maven地址:https://mvnrepository.com/artifact/com.squareup.okio/okio
依赖引入
implementation group: 'com.squareup.okio', name: 'okio', version: '2.10.0'
Okio定义了自己的一套继承链,Source对应InputStream, Sink对应OutputStream,这样对比就不难理解了,看一下接口的定义。
public interface Source extends Closeable {

  long read(Buffer sink, long byteCount) throws IOException;

  Timeout timeout();

  @Override void close() throws IOException;
}


public interface Sink extends Closeable, Flushable {

  void write(Buffer source, long byteCount) throws IOException;

  @Override void flush() throws IOException;

  Timeout timeout();

  @Override void close() throws IOException;
}
使用读取数据
练习1:读取文本
    /**
     * 读取文件中的文本
     * @param file
     * @throws IOException
     */
    public void readFile(File file) throws IOException {
        try (Source fileSource = Okio.source(file)) {
            Buffer buffer = new Buffer();
            fileSource.read(buffer, 1024);
            while (true) {
                String line = buffer.readUtf8Line();
                if (line == null) break;
                System.out.println(line);
            }
        }
    }
可以看到Source 就相当于 InputStream , 我们看看 Okio.source(file) 的源码
/** Returns a source that reads from `file`. */
@Throws(FileNotFoundException::class)
fun File.source(): Source = inputStream().source()
再看看 inputStream() 方法
@kotlin.internal.InlineOnly
public inline fun File.inputStream(): FileInputStream {
    return FileInputStream(this)
}
是不是很熟悉,还是 Java IO 那一套。只不过是封装了一层。
我们看看如何创建一个 Source ,它提供了几个方法
Okio.source(InputStream input)
Okio.source(File file)
Okio.source(Socket socket)
还有一点,okio 最新版本都用kotlin重新实现了,我们看看,上面的代码如果用 kotlin 写是什么样子的。
 /**
     * 读取文件中的文本
     * @param file
     * @throws IOException
     */
    @Throws(IOException::class)
    fun readFile(file: File) {
        file.source().use { fileSource ->
            val buffer = Buffer()
            fileSource.read(buffer, 1024)
            while (true) {
                val line = buffer.readUtf8Line() ?: break
                println(line)
            }
        }
    }
是不是简介了不少。
我们用了一个 Buffer() 类做缓冲类,我们看看它的继承关系:
class Buffer : BufferedSource, BufferedSink, Cloneable, ByteChannel {
注意事项:
我们定义了 fileSource.read(buffer, 1024) , 这句话的含义是从文件读数据存入 Buffer 中,最大存入 1024 个字节,返回的是字节个数,如果文件读完了,返回 -1 。
所以完整读取文本文件的代码为:
    public void readFile(File file) throws IOException {
        try (Source fileSource = Okio.source(file)) {
            Buffer buffer = new Buffer();
            while (fileSource.read(buffer, 1024) != -1) {
                while (true) {
                    //一次读一行
                    String line = buffer.readUtf8Line();
                    if (line == null) break;
                    System.out.println(line);
                }
            }
        }
    }
readUtf8Line()一次读一行,有没有方法一次把 buffer 里面内容读完,也有的 buffer.readUtf8() , 所以代码可以改成如下
  /**
     * 读取文件中的文本
     *
     * @param file
     * @throws IOException
     */
    public void readFile(File file) throws IOException {
        try (Source fileSource = Okio.source(file)) {
            Buffer buffer = new Buffer();
            fileSource.read(buffer, 1024);
            while (fileSource.read(buffer, 1024) != -1) {
                //一次读完
                String line = buffer.readUtf8();
                System.out.println(line);
            }
        }
    }
BufferedSource
BufferedSource 是一个带有缓冲功能的 Source , 说白了BufferedSource 其实就是内置了一个 Buffer
上面的代码就可以改成:
    /**
     * 读取文件中的文本
     * @param file
     * @throws IOException
     */
    public void readFile(File file) throws IOException {
        try (Source fileSource = Okio.source(file)) {
            BufferedSource bufferedSource = Okio.buffer(fileSource);
            while (true) {
                String line = bufferedSource.readUtf8Line();
                if (line == null) break;
                System.out.println(line);
            }
        }
    }
readUtf8Line() API读取所有数据,直到下一行分隔符\n、\r\n或文件结尾。它以字符串形式返回该数据,省略结尾的分隔符。当遇到空行时,该方法将返回一个空字符串。如果没有更多的数据可读取,它将返回null。
所以我们可以进一步优化代码如下:
   /**
     * 读取文件中的文本
     *
     * @param file
     * @throws IOException
     */
    public void readFile(File file) throws IOException {
        try (Source fileSource = Okio.source(file)) {
            BufferedSource bufferedSource = Okio.buffer(fileSource);
            String line;
            while ((line = bufferedSource.readUtf8Line()) != null) {
                System.out.println(line);
            }
        }
    }
所以我们也可以优化成
 /**
     * 读取文件中的文本
     *
     * @param file
     * @throws IOException
     */
    public void readFile(File file) throws IOException {
        try (Source fileSource = Okio.source(file); BufferedSource bufferedSource = Okio.buffer(fileSource)) {
            String line = bufferedSource.readUtf8();
            System.out.println(line);
        }
    }
最后我们可以封装一个方法来读取文本文件
   /**
     * 读取文件中的文本
     *
     * @param file
     * @throws IOException
     */
    public String readFile(File file) throws IOException {
        try (Source fileSource = Okio.source(file); BufferedSource bufferedSource = Okio.buffer(fileSource)) {
            return bufferedSource.readUtf8();
        }
    }
甚至可以更近一步,再简介一下:
 /**
     * 读取文件中的文本
     *
     * @param file
     * @throws IOException
     */
    public String readFile(File file) throws IOException {
        try (BufferedSource bufferedSource = Okio.buffer(Okio.source(file))) {
            return bufferedSource.readUtf8();
        }
    }
kotlin 版本如下:
    @Throws(IOException::class)
    fun readFile(file: File): String? {
        file.source().buffer().use { bufferedSource ->
            return bufferedSource.readUtf8()
        }
    }
是不是很简洁。
写文件 Sink
如果文件不存在,会自动创建文件
   /**
     * 把文本写入文件
     * @param file
     * @throws IOException
     */
    public void writeFile(String content, File file) throws IOException {
        try (Sink sink = Okio.sink(file); BufferedSink bufferedSink = Okio.buffer(sink)) {
            bufferedSink.write(content.getBytes()); //写字节
        }
    }
如何创建一个 Sink ?
Okio.sink(File file)
Okio.sink(OutputStream outputStream)
Okio.sink(Socket sink)
除此之外,还有其他写数据方法:
bufferedSink.write(byte[] bytes)
bufferedSink.writeUtf8(String string)
bufferedSink.writeAll(Source source)
bufferedSink.write(ByteString byteString)
综合演练1:文本读写
我们来实现一个读文本,然后再写文本的代码
public class Test {

    public static void main(String[] args) {
        Test test = new Test();
        try {
            //从文件读取文本
            String string = test.readFile(new File("/Users/xmly/workspace/web1/src/main/aa.txt"));
            //写文本到文件
            test.writeFile(string, new File("/Users/xmly/workspace/web1/src/main/aa1.txt"));
        } catch (IOException e) {
            e.printStackTrace();
        }
    }

    /**
     * 读取文件中的文本
     *
     * @param file
     * @throws IOException
     */
    public String readFile(File file) throws IOException {
        try (BufferedSource bufferedSource = Okio.buffer(Okio.source(file))) {
            return bufferedSource.readUtf8();
        }
    }

    /**
     * 把文本写入文件
     *
     * @param file
     * @throws IOException
     */
    public void writeFile(String content, File file) throws IOException {
        try (Sink sink = Okio.sink(file); BufferedSink bufferedSink = Okio.buffer(sink)) {
            bufferedSink.write(content.getBytes());
        }
    }
}
综合演练2:文件复制
public class Test {

    public static void main(String[] args) {
        Test test = new Test();
        try {
            //从文件读取文本
            File file1 = new File("/Users/xmly/Desktop/1234.jpeg");
            File file2 = new File("/Users/xmly/workspace/web1/src/main/aa1.jpeg");
            test.copyFile(file1, file2);
        } catch (IOException e) {
            e.printStackTrace();
        }
    }

    /**
     * 复制文件
     *
     * @param file1
     * @param file2
     * @throws IOException
     */
    public void copyFile(File file1, File file2) throws IOException {
        try (BufferedSource bufferedSource = Okio.buffer(Okio.source(file1)); BufferedSink bufferedSink = Okio.buffer(Okio.sink(file2))) {
            bufferedSink.writeAll(bufferedSource);
        }
    }
}
相比java IO , Okio 简直是神器,太简洁,太牛B了
对象序列化/反序列化
序列化:把对象转成二进制数据,可以存储到本地,也可以网络传输
反序列化:把二进制数据转换成对象
通常我们把对象转换成 json 格式的数据,然后再把 json 转换成对象,这种情况也属于对象的序列化/对象的反序列化
对象序列化/反序列化
定义 User 对象
public class User implements Serializable {
    int id;
    String name;
}
定义序列化方法和反序列化方法
 /**
     * 对象序列化 (把对象转成ByteString对象)
     *
     * @param ob
     * @return
     * @throws IOException
     */
    public ByteString serialize(Object ob) throws IOException {
        Buffer buffer = new Buffer();
        try (ObjectOutputStream outputStream = new ObjectOutputStream(buffer.outputStream())) {
            outputStream.writeObject(ob);
        }
        return buffer.readByteString();
    }

    /**
     * 对象反序列化 (把ByteString转成对象)
     *
     * @param byteString
     * @return
     */
    public Object deserialize(ByteString byteString) throws IOException, ClassNotFoundException {
        Buffer buffer = new Buffer();
        buffer.write(byteString);
        try (ObjectInputStream objectInputStream = new ObjectInputStream(buffer.inputStream())) {
            return objectInputStream.readObject();
        }
    }
我们跑一下,验证一下结果:
 try {
     User user = new User();
     user.id = 100;
     user.name = "zhaoyanjun";

     //序列号
     ByteString byteString = serialize(user);

     //反序列化
     User user1 = (User) deserialize(byteString);
     System.out.println("user = id:" + user1.id + " name:" + user1.name);

} catch (IOException | ClassNotFoundException e) {
    e.printStackTrace();
}
输出结果:
user = id:100 name:zhaoyanjun
结果证明,我们已经成功实现了对象的序列化和反序列化。
序列化数据传输
在上面,我们已经把对象序列化了,下面我们把序列化的数据保存到本地文件,然后再把本地文件中二进制数据取出来。其实底层都是操作二进制数据
 /**
     * 把ByteString写入文件
     *
     * @param byteString
     * @param file
     * @throws IOException
     */
    public void writeByteStringToFile(ByteString byteString, File file) throws IOException {
        try (BufferedSink bufferedSink = Okio.buffer(Okio.sink(file))) {
            bufferedSink.write(byteString);
        }
    }

    /**
     * 从文件读数据
     * @param file
     * @return
     * @throws IOException
     */
    public ByteString readByteStringFromFile(File file) throws IOException {
        try (BufferedSource source = Okio.buffer(Okio.source(file))) {
            return source.readByteString();
        }
    }
这就完成了序列化数据传输。
最后,我们看一下 ByteString 写入文件后,是什么样子的?

序列化数据转成base64字符串
我们知道序列化后,变成 ByteString ,是个二进制数据,写入文件或者发给服务器还好,如果要想直接发给同事,就很难了。
其实也有解决的办法,把二进制数据转换为 base64 编码的字符串就可以了。如下:
//把ByteString转为base64编码的字符串
String base = byteString.base64();

//把base64编码的字符串转成ByteString
ByteString newByteString = ByteString.decodeBase64(base);
数据Hash
我们这里说的数据 hash 并不是特指 java 中的 hashCode 方法。而是一种数据处理形式,可以理解为 特征处理 , 就是 把任意长度的输入通过散列算法变换成固定长度的输出
Hash 的特性:
- 输入域无穷,输出域有限。
- 输入参数确定,经过hash函数映射出的返回值一样。
- 输入域上的值经过函数值映射后会几乎均等的分布在输出域上
- 不可逆
常见的 Hash 算法:
- MD5
- SHA-1
- SHA-256
- SHA-512
ByteString 的 Hash 值的计算
ByteString byteString = readByteString(new File("README.md"));
System.out.println("   md5: " + byteString.md5().hex());
System.out.println("  sha1: " + byteString.sha1().hex());
System.out.println("sha256: " + byteString.sha256().hex());
System.out.println("sha512: " + byteString.sha512().hex());
buffers 的 Hash 值的计算
Buffer buffer = readBuffer(new File("README.md"));
System.out.println("   md5: " + buffer.md5().hex());
System.out.println("  sha1: " + buffer.sha1().hex());
System.out.println("sha256: " + buffer.sha256().hex());
System.out.println("sha512: " + buffer.sha512().hex());
实战:文本做md5计算
思路:
- 第一步:把文本转换成 ByteString
- 第二步:计算 ByteString md5值
 /**
     * 计算字符串md5值
     *
     * @param data
     * @return
     */
    public String md5(String data) {
        ByteString byteString = ByteString.encodeString(data, Charset.forName("UTF-8"));
        return byteString.md5().hex();
    }
我们来验证一下:
System.out.println("md5:" + md5("周五下班了"));
输出结果:
md5:e0a0fd4fe31a1ff28b0085e168ca4aef
md5 其他实现方式:http://blog.csdn.net/zhaoyanjun6/article/details/120874209
实战:文件做md5计算
 /**
     * 从文件读数据
     *
     * @param file
     * @return
     * @throws IOException
     */
    public ByteString readByteStringFromFile(File file) throws IOException {
        try (BufferedSource source = Okio.buffer(Okio.source(file))) {
            return source.readByteString();
        }
    }

    /**
     * 计算文件md5值
     *
     * @param file
     * @return
     */
    public String md5(File file) {
        try {
            return readByteStringFromFile(file).md5().hex();
        } catch (IOException e) {
            e.printStackTrace();
        }
        return "";
    }
我做了测试,非常好用,这里就不贴结果了
md5 其他实现方式:http://blog.csdn.net/zhaoyanjun6/article/details/120874209
数据加密 AES
AES 简介
如果你对AES加密算法不是很了解,请移步到我的另外一篇博客:
AES加密 — 详解
OKio 支持的AES加密
我们封装一个方法,来实现 aes 加解密。
 /**
     * AES加密
     *
     * @param bytes
     * @param file
     * @param key 秘钥
     * @param iv 偏移量
     * @throws GeneralSecurityException
     * @throws IOException
     */
    void encryptAes(ByteString bytes, File file, byte[] key, byte[] iv)
            throws GeneralSecurityException, IOException {
        Cipher cipher = Cipher.getInstance("AES/CBC/PKCS5Padding");
        cipher.init(Cipher.ENCRYPT_MODE, new SecretKeySpec(key, "AES"), new IvParameterSpec(iv));
        try (BufferedSink sink = Okio.buffer(Okio.cipherSink(Okio.sink(file), cipher))) {
            sink.write(bytes);
        }
    }

    /**
     * AES解密
     *
     * @param file
     * @param key 秘钥
     * @param iv 偏移量
     * @return
     * @throws GeneralSecurityException
     * @throws IOException
     */
    ByteString decryptAesToByteString(File file, byte[] key, byte[] iv)
            throws GeneralSecurityException, IOException {
        Cipher cipher = Cipher.getInstance("AES/CBC/PKCS5Padding");
        cipher.init(Cipher.DECRYPT_MODE, new SecretKeySpec(key, "AES"), new IvParameterSpec(iv));
        try (BufferedSource source = Okio.buffer(Okio.cipherSource(Okio.source(file), cipher))) {
            return source.readByteString();
        }
    }
我们再来贴一下 Kotlin 的实现
//加密
fun encryptAes(bytes: ByteString, file: File, key: ByteArray, iv: ByteArray) {
  val cipher = Cipher.getInstance("AES/CBC/PKCS5Padding")
  cipher.init(Cipher.ENCRYPT_MODE, SecretKeySpec(key, "AES"), IvParameterSpec(iv))
  val cipherSink = file.sink().cipherSink(cipher)
  cipherSink.buffer().use {
    it.write(bytes)
  }
}

//解密
fun decryptAesToByteString(file: File, key: ByteArray, iv: ByteArray): ByteString {
  val cipher = Cipher.getInstance("AES/CBC/PKCS5Padding")
  cipher.init(Cipher.DECRYPT_MODE, SecretKeySpec(key, "AES"), IvParameterSpec(iv))
  val cipherSource = file.source().cipherSource(cipher)
  return cipherSource.buffer().use {
    it.readByteString()
  }
}
我们写一个测试demo跑一下代码
public class Test {

    public static void main(String[] args) {
        Test test = new Test();
        try {
            //加密密码(16位)
            String key = "zhaoyanjunzhaoy1";
            //偏移量(16位)
            String iv = "1234567890123456";

            //带加密内容
            ByteString message = ByteString.encodeString("今天是周一,很开心", Charset.forName("UTF-8"));

            //加密字符串,并且把加密后的内容写入文件
            File file = new File("/Users/xmly/workspace/web1/src/main/aa2.txt");
            test.encryptAes(message, file, key.getBytes("utf-8"), iv.getBytes());

            //解密,把文件内容解密出来
            ByteString sb = test.decryptAesToByteString(file, key.getBytes("utf-8"), iv.getBytes());
            System.out.println("解密后内容:" + sb.string(Charset.forName("UTF-8")));

        } catch (IOException | GeneralSecurityException e) {
            e.printStackTrace();
        }
    }
}
运行结果如下:
解密后内容:今天是周一,很开心
看到,我们已经把文件成功解密了
我们再看看,字符串 ”今天是周一,很开心“ 加密后的文件内容是什么样的.
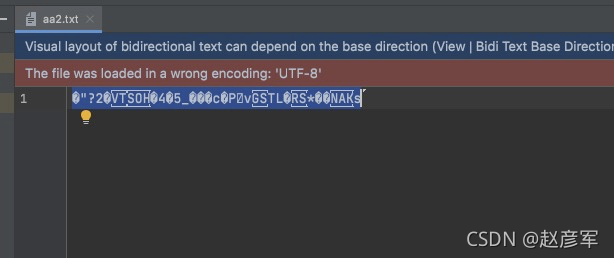
可以看到是乱码,无法识别,说明加密成功。


 被折叠的 条评论
为什么被折叠?
被折叠的 条评论
为什么被折叠?
 到【灌水乐园】发言


