


官网https://docs.spring.io/spring-framework/docs/current/reference/html/web.html
1 DispatcherServlet
DispatcherServlet是前端控制器。它是一个共享的Servlet,接收所有请求。而实际请求的处理是其他component进行的。
1.1 SpringMVC应用的上下文结构
这里先明确一点:这里提到的上下文结构都是指的spring上下文,也就是spring容器。要和Servlet上下文区别开。
在springmvc中,默认使用两级上下文结构,一个根上下文,一个子上下文。根上下文中包括了基础的bean比如数据模型和service,子上下文中可以覆盖根上下文中的bean。为什么这么设计?这么设计会更有灵活性。下面详细进行分析。
基于springMVC的应用,其本质是一个java web项目,这个java web项目经过打包(或者拷贝编译后的文件)部署到Tomcat中运行,既然部署到tomcat中运行,那么就需要遵循tomcat规范和Servlet规范,其中最重要的且我们能够介入地方是web.xml文件,该文件可以说是我们了解整个项目的起点,因为Tomcat在启动的时候,需要加载哪些Servlet、需要执行哪些监听器都是在这里面配置的。典型且最简单的web.xml配置如下
<!DOCTYPE web-app PUBLIC
        "-//Sun Microsystems, Inc.//DTD Web Application 2.3//EN"
        "http://java.sun.com/dtd/web-app_2_3.dtd" >

<web-app>
  <display-name>Archetype Created Web Application</display-name>
  <context-param>
    <param-name>contextConfigLocation</param-name>
    <param-value>WEB-INF/applicationContext.xml</param-value>
  </context-param>
  <listener>
    <listener-class>org.springframework.web.context.ContextLoaderListener</listener-class>
  </listener>
  <servlet>
    <servlet-name>dispatcher</servlet-name>
    <servlet-class>org.springframework.web.servlet.DispatcherServlet</servlet-class>
    <init-param>
      <!--配置dispatcher.xml作为mvc的配置文件-->
      <param-name>contextConfigLocation</param-name>
      <param-value>/WEB-INF/dispatcher-servlet.xml</param-value>
    </init-param>
    <load-on-startup>1</load-on-startup>
  </servlet>
  <servlet-mapping>
    <servlet-name>dispatcher</servlet-name>
    <url-pattern>/</url-pattern>
  </servlet-mapping>
</web-app>
其中WEB-INF/applicationContext.xml文件,对于简单的应用来说里面内容可以是空的,我们不用关心。我们需要关心的是其中配置的ContextLoaderListener和DispatcherServlet,这两个配置是SpringMVC产生上下文结构的关键,下面介绍SpringMVC的上下文结构
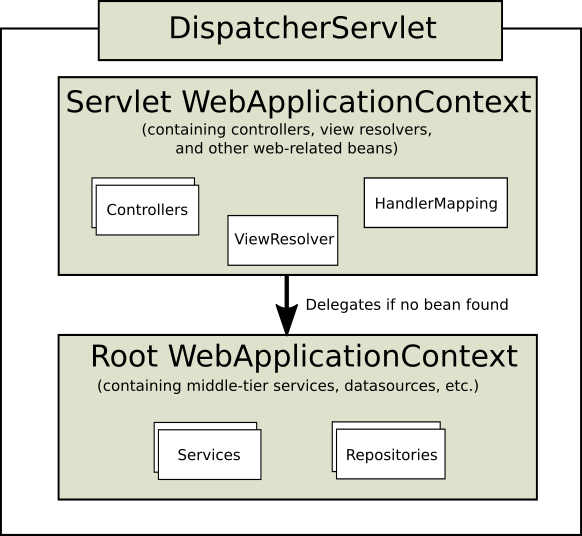
上图是取自官网的一个图片,图中展示的是一个请求来了之后,到了前端控制器,前端控制器会首先把请求转给子上下文处理。如果子上下文中没有对应的Servlet则会转给根上下文寻找对应的servlet进行处理。
这里先给结论:tomcat初始化时,对应一个Tomcat上下文,因为Tomcat是Servlet容器,我们叫这个上下文为Servlet上下文。Servlet上下文初始化过程中会根据web.xml做如下两步:第1步、ContextLoaderListener中会初始化spring IOC容器,这个IOC容器就是root 上下文;第2步,实例化DispatcherServlet,实例化时会创建web上下文。Servlet容器中会有root上下文和web上下文的引用。
下面说一下其过程:
1.1.1 根上下文的初始化
web.xml中的监听器ContextLoaderListener代码如下,其实现了ServletContextListener接口,并实现其接口方法contextInitialized,当Servlet容器初始化完成后,将调用这个方法,进行root web application的初始化。
public class ContextLoaderListener extends ContextLoader implements ServletContextListener {
    public ContextLoaderListener() {
    }
    public ContextLoaderListener(WebApplicationContext context) {
        super(context);
    }
    /**
     * Initialize the root web application context.
     */
    @Override
    public void contextInitialized(ServletContextEvent event) {
        initWebApplicationContext(event.getServletContext());
    }
    /**
     * Close the root web application context.
     */
    @Override
    public void contextDestroyed(ServletContextEvent event) {
        closeWebApplicationContext(event.getServletContext());
        ContextCleanupListener.cleanupAttributes(event.getServletContext());
    }
}
我们继续看initWebApplicationContext(event.getServletContext());
在这个方法中创建WebApplicationContext,其中this.context的类型是spring中的WebApplicationContext。然后调用configureAndRefreshWebApplicationContext方法。
然后Servlet容器中设置属性org.springframework.web.context.WebApplicationContext.ROOT=root上下文实例
    public WebApplicationContext initWebApplicationContext(ServletContext servletContext) {
        this.context = createWebApplicationContext(servletContext);
        ConfigurableWebApplicationContext cwac = (ConfigurableWebApplicationContext) this.context;
        configureAndRefreshWebApplicationContext(cwac, servletContext);
        servletContext.setAttribute(WebApplicationContext.ROOT_WEB_APPLICATION_CONTEXT_ATTRIBUTE, this.context);
    }
最终会执行到AbstractApplicationContext的refresh()方法,看到这个方法,大家有没有感觉比较熟悉?这个方法正是spring容器启动过程中调用的方法。
    public void refresh() throws BeansException, IllegalStateException {
        synchronized (this.startupShutdownMonitor) {
            // Prepare this context for refreshing.
            prepareRefresh();
            // Tell the subclass to refresh the internal bean factory.
            ConfigurableListableBeanFactory beanFactory = obtainFreshBeanFactory();
            // Prepare the bean factory for use in this context.
            prepareBeanFactory(beanFactory);
            try {
                // Allows post-processing of the bean factory in context subclasses.
                postProcessBeanFactory(beanFactory);
                // Invoke factory processors registered as beans in the context.
            invokeBeanFactoryPostProcessors(beanFactory);
                // Register bean processors that intercept bean creation.
                registerBeanPostProcessors(beanFactory);
                // Initialize message source for this context.
                initMessageSource();
                // Initialize event multicaster for this context.
                initApplicationEventMulticaster();
                // Initialize other special beans in specific context subclasses.
                onRefresh();
                // Check for listener beans and register them.
                registerListeners();
                // Instantiate all remaining (non-lazy-init) singletons.
                finishBeanFactoryInitialization(beanFactory);
                // Last step: publish corresponding event.
                finishRefresh();
            }

            catch (BeansException ex) {
            }

            finally {
            }
        }
    }
由此可见,我们创建的root WebApplicationContext正是这个spring IOC容器,这个上下文正是spring上下文。通过在web.xml中配置ContextLiaderListener,来启动spring IOC容器。
2 web上下文的初始化
在web.xml中我们配置了一个Servlet:DispatcherServlet,并且设定在Servlet容器启动时实例化。所以,下一步将是DispatcherServlet的实例化过程。
首先,会调用init方法
    public final void init() throws ServletException {
        initServletBean();
    }
然后调用initServletBean方法
    protected final void initServletBean() throws ServletException {
        try {
            this.webApplicationContext = initWebApplicationContext();
            initFrameworkServlet();
        }
    }
在这里调用了initWebApplicationContext方法
protected WebApplicationContext initWebApplicationContext() {
        WebApplicationContext rootContext = WebApplicationContextUtils.getWebApplicationContext(getServletContext());
        WebApplicationContext wac = createWebApplicationContext(rootContext);
    if (this.publishContext) {
       // Publish the context as a servlet context attribute.
       String attrName = getServletContextAttributeName();
       getServletContext().setAttribute(attrName, wac);
    }
return wac; }
这里首先获取root上下文实例,然后创建web上下文实例。然后,向Servlet容器中设置属性org.springframework.web.servlet.FrameworkServlet.CONTEXT.dispatcher=wac,也就是说Servlet容器持有web上下文的引用。
    protected WebApplicationContext createWebApplicationContext(ApplicationContext parent) {
        ConfigurableWebApplicationContext wac = (ConfigurableWebApplicationContext) BeanUtils.instantiateClass(contextClass);

        wac.setEnvironment(getEnvironment());
        wac.setParent(parent);
        wac.setConfigLocation(getContextConfigLocation());

        configureAndRefreshWebApplicationContext(wac);

        return wac;
    }
这里设置parent为root上下文实例。最终,同样调用了spring AbstractApplicationContext的refresh方法。
总结:通过分析root上下文和web上下文的实例化过程,我们知道,这两个上下文都是spring中的IOC容器。且都在Servlet容器中有一个对象的引用,分别是org.springframework.web.context.WebApplicationContext.ROOT和org.springframework.web.servlet.FrameworkServlet.CONTEXT.dispatcher。这也是为什么,我们在启动springboot时refresh会调用两次的原因
1.2 Servlet3.0 SPI
Servlet3.0对应的JSR规范为JSR315。从Sevlet3.0开始,提供了SPI(Service Provider Interface)机制,是Servlet提供的一个服务发现机制,可发现并自动加载在CLASSPATH下的jar包中META-INF/services/javax.servlet.ServletContainerInitializer文件中配置的类。该文件中配置的类必须是javax.servlet.ServletContainerInitializer的实现类。
Servlet容器加载servlet和filters的传统做法是在web.xml中配置。有了SPI机制之后,Servlet就可以通过代码的方式注册Servlet和filters。
Servlet3.0之后,web容器在进行初始化时,根据SPI规范会调用ServletContainerInitializer实现类的onStartup方法,在onStartup方法中,我们可以定义servlet和filters并注册到web容器,这样就省去了web.xml文件,这也是springboot中的做法。
举例
public class MyServlet implements Servlet {
    @Override
    public void init(ServletConfig config) throws ServletException {
        System.out.println("MyServlet init");
    }

    ...省略
}
MyServletContainerInitializer.java
public class MyServletContainerInitializer implements ServletContainerInitializer {
    @Override
    public void onStartup(Set<Class<?>> c, ServletContext servletContext) throws ServletException {
        //注册Servlet
        ServletRegistration.Dynamic servlet = servletContext.addServlet("myServlet", new MyServlet());
        //配置servlet-mapping
        servlet.addMapping("/user1", "/user2");
        //是否容器启动就初始化
        servlet.setLoadOnStartup(1);

        //注册Filter
//        FilterRegistration.Dynamic filter = servletContext.addFilter("myFilter", new MyFilter());
//        filter.addMappingForUrlPatterns(null, true, "/user1");
        //注册Listener,直接注册就行了
//        servletContext.addListener(new MyListener());
    }
}
在resources/META-INF/services下创建文件javax.servlet.ServletContainerInitializer

内容如下:
com.szj.service.MyServletContainerInitializer
然后我们启动tomcat,调试,会发现MyServletContainerInitializer确实被执行。
SPI在spring-web中的应用
在spring-web这个jar中,有如下配置
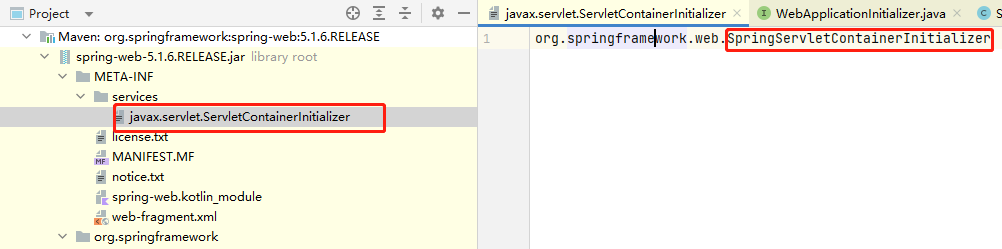
SpringServletContainerInitializer.java
这个类实现了ServletContainerInitializer接口。也就是说支持SPI机制。
@HandlesTypes(WebApplicationInitializer.class)
public class SpringServletContainerInitializer implements ServletContainerInitializer {
    @Override
    public void onStartup(@Nullable Set<Class<?>> webAppInitializerClasses, ServletContext servletContext)
            throws ServletException {

        List<WebApplicationInitializer> initializers = new LinkedList<>();

        if (webAppInitializerClasses != null) {
            for (Class<?> waiClass : webAppInitializerClasses) {
                // Be defensive: Some servlet containers provide us with invalid classes,
                // no matter what @HandlesTypes says...
                if (!waiClass.isInterface() && !Modifier.isAbstract(waiClass.getModifiers()) &&
                        WebApplicationInitializer.class.isAssignableFrom(waiClass)) {
                    try {
                        initializers.add((WebApplicationInitializer)
                                ReflectionUtils.accessibleConstructor(waiClass).newInstance());
                    }
                    catch (Throwable ex) {
                        throw new ServletException("Failed to instantiate WebApplicationInitializer class", ex);
                    }
                }
            }
        }

        if (initializers.isEmpty()) {
            servletContext.log("No Spring WebApplicationInitializer types detected on classpath");
            return;
        }

        servletContext.log(initializers.size() + " Spring WebApplicationInitializers detected on classpath");
        AnnotationAwareOrderComparator.sort(initializers);
        for (WebApplicationInitializer initializer : initializers) {
            initializer.onStartup(servletContext);
        }
    }

}
这个方法中接收一个Set集合,从该集合中过滤实现WebApplicationInitializer接口的类,然后放入list中,然后依次对这个list中的类调用onStartup方法。
总结:在spring中,只要实现了WebApplicationInitializer接口的类都会执行它的onStartup方法,进而在该方法中定义servlet、filter、listener等,并且添加到Tomcat中,实现去web.xml化
官网中的例子
import org.springframework.web.WebApplicationInitializer;

public class MyWebApplicationInitializer implements WebApplicationInitializer {

    @Override
    public void onStartup(ServletContext container) {
        XmlWebApplicationContext appContext = new XmlWebApplicationContext();
        appContext.setConfigLocation("/WEB-INF/spring/dispatcher-config.xml");

        ServletRegistration.Dynamic registration = container.addServlet("dispatcher", new DispatcherServlet(appContext));
        registration.setLoadOnStartup(1);
        registration.addMapping("/");
    }
}
WebApplicationInitializer接口是由springmvc提供的,其实现类能够由springMVC自动监测和初始化配置到Servlet3.0容器。
SpringMVC提供了一个便捷的类专门用来注册DispatcherServlet:AbstractDispatcherServletInitializer
其继承关系如下:AbstractDispatcherServletInitializer <--- AbstractContextLoaderInitializer <--- WebApplicationInitializer
public abstract class AbstractDispatcherServletInitializer extends AbstractContextLoaderInitializer {
    public static final String DEFAULT_SERVLET_NAME = "dispatcher";
    @Override
    public void onStartup(ServletContext servletContext) throws ServletException {
        super.onStartup(servletContext);
        registerDispatcherServlet(servletContext);
    }
...省略
1.3 特殊的bean
下面列出了一些特殊的bean,DispatcherServlet代理请求到这些特殊的bean,对请求进行处理和render适当的响应。
| Bean type | Explanation |
|---|---|
|
| 把一个请求映射到一个Handler,并且这个Handler会有一个interceptor列表进行请求前和请求后的处理。 |
|
| 处理器映射器负责找到合适的Handler实例,处理器适配器负责代理调用Handler实例。 例如,调用带注解的Controller需要解析注解,HandlerAdapter的主要目的是对DispatcherServlet屏蔽此类细节 |
|
| Strategy to resolve exceptions, possibly mapping them to handlers, to HTML error views, or other targets. See Exceptions. |
|
| 当Handler返回一个字符串形式的逻辑视图名时,ViewResolver负责解析逻辑视图名到实际视图的对应关系,并且渲染视图到response |
|
| Resolve the |
|
| Resolve themes your web application can use — for example, to offer personalized layouts. See Themes. |
|
| Abstraction for parsing a multi-part request (for example, browser form file upload) with the help of some multipart parsing library. See Multipart Resolver. |
|
| Store and retrieve the “input” and the “output” |
1.4 MVC Config
MVC Config顾名思义,就是MVC 配置,对MVC进行配置有两种方式,一种是xml文件,另一种是java配置。更通俗的讲,MVC Config对应的是在applicationContext.xml中引入 xmlns:mvc="http://www.springframework.org/schema/mvc" 命名空间后通过 <mvc: 做的一些配置。
下面对java配置MVC Config进行介绍,并给出对应的xml配置。
1.4.1 开启MVC Config
现在,我们有两种方式来开启MVC Config,分别是xml方式和java方式。
@Configuration
@EnableWebMvc
public class WebConfig {
}
对应的xml配置为
<?xml version="1.0" encoding="UTF-8"?>
<beans xmlns="http://www.springframework.org/schema/beans"
    xmlns:mvc="http://www.springframework.org/schema/mvc"
    xmlns:xsi="http://www.w3.org/2001/XMLSchema-instance"
    xsi:schemaLocation="
        http://www.springframework.org/schema/beans
        https://www.springframework.org/schema/beans/spring-beans.xsd
        http://www.springframework.org/schema/mvc
        https://www.springframework.org/schema/mvc/spring-mvc.xsd">

    <mvc:annotation-driven/>

</beans>
1.4.2 MVC Config API
java MVC Config对应的API为:实现WebConfigurer接口的类,也就是说,如果一个类实现了WebConfigurer接口,则我们可以在这个配置类中进行MVC的相关配置。
@Configuration
@EnableWebMvc
public class WebConfig implements WebMvcConfigurer {

    // Implement configuration methods...
}
对应的xml配置为<mvc:annotation-driven />标签不同的属性及其子标签。
其中WebConfigurer接口定义如下
public interface WebMvcConfigurer {
    default void configurePathMatch(PathMatchConfigurer configurer) {}
    default void configureContentNegotiation(ContentNegotiationConfigurer configurer) {}
    default void configureAsyncSupport(AsyncSupportConfigurer configurer) {}
    default void configureDefaultServletHandling(DefaultServletHandlerConfigurer configurer) {}
    default void addFormatters(FormatterRegistry registry) {}
    default void addInterceptors(InterceptorRegistry registry) {}
    default void addResourceHandlers(ResourceHandlerRegistry registry) {}
    default void addCorsMappings(CorsRegistry registry) {}
    default void addViewControllers(ViewControllerRegistry registry) {}
    default void configureViewResolvers(ViewResolverRegistry registry) {}
    default void addArgumentResolvers(List<HandlerMethodArgumentResolver> resolvers) {}
    default void addReturnValueHandlers(List<HandlerMethodReturnValueHandler> handlers) {}
    default void configureMessageConverters(List<HttpMessageConverter<?>> converters) {}
    default void extendMessageConverters(List<HttpMessageConverter<?>> converters) {}
    default void configureHandlerExceptionResolvers(List<HandlerExceptionResolver> resolvers) {}
    default void extendHandlerExceptionResolvers(List<HandlerExceptionResolver> resolvers) {}
    @Nullable default Validator getValidator() {return null;}
    @Nullable default MessageCodesResolver getMessageCodesResolver() {return null;}
}
接口中这些配置默认是空实现,如果我们希望实现特定的配置,只需要重写接口中的相关方法就可以,比如:
@Configuration
@EnableWebMvc
public class WebConfig implements WebMvcConfigurer {
    @Override
    public void addFormatters(FormatterRegistry registry) {
        // ...
    }
}
等效的xml配置为
<?xml version="1.0" encoding="UTF-8"?>
<beans xmlns="http://www.springframework.org/schema/beans"
    xmlns:mvc="http://www.springframework.org/schema/mvc"
    xmlns:xsi="http://www.w3.org/2001/XMLSchema-instance"
    xsi:schemaLocation="
        http://www.springframework.org/schema/beans
        https://www.springframework.org/schema/beans/spring-beans.xsd
        http://www.springframework.org/schema/mvc
        https://www.springframework.org/schema/mvc/spring-mvc.xsd">

    <mvc:annotation-driven conversion-service="conversionService"/>

    <bean id="conversionService"
            class="org.springframework.format.support.FormattingConversionServiceFactoryBean">
        <property name="converters">
            <set>
                <bean class="org.example.MyConverter"/>
            </set>
        </property>
        <property name="formatters">
            <set>
                <bean class="org.example.MyFormatter"/>
                <bean class="org.example.MyAnnotationFormatterFactory"/>
            </set>
        </property>
        <property name="formatterRegistrars">
            <set>
                <bean class="org.example.MyFormatterRegistrar"/>
            </set>
        </property>
    </bean>

</beans>
再比如我们配置跨域请求的代码:
@Configuration
@EnableWebMvc
public class CorsConfig implements WebMvcConfigurer  {
    @Override
    public void addCorsMappings(CorsRegistry registry) {
        if (true) {
            //设置允许跨域的路径
            registry.addMapping("/**")
                    //设置允许跨域请求的域名
                    .allowedOrigins("*")
                    //是否允许证书 不再默认开启
                    .allowCredentials(true)
                    //设置允许的方法
                    .allowedMethods("*")
                    //跨域允许时间
                    .maxAge(3600*24);
        }
    }
}
此外,通过WebMvcConfigurer还可以配置类型转换、Validation、添加Interceptors等,见https://docs.spring.io/spring-framework/docs/current/reference/html/web.html#mvc-config
1.4.3 Servlet Config
从Servlet 3.0开始,我们可以选择使用java配置来代替web.xml,只需要实现WebApplicationInitializer接口,该接口只有一个onStartup方法。
下面例子注册了一个DispatcherServlet:
public class MyWebApplicationInitializer implements WebApplicationInitializer {

    @Override
    public void onStartup(ServletContext container) {
        XmlWebApplicationContext appContext = new XmlWebApplicationContext();
        appContext.setConfigLocation("/WEB-INF/spring/dispatcher-config.xml");

        ServletRegistration.Dynamic registration = container.addServlet("dispatcher", new DispatcherServlet(appContext));
        registration.setLoadOnStartup(1);
        registration.addMapping("/");
    }
}
对于注册DispatcherServlet,springMVC为我们提供了更便捷的类AbstractDispatcherServletInitializer,这里不再赘述。
1.5 拦截器
所有实现HandlerMapping接口的处理器映射器都支持拦截器。
所有的拦截器都必须实现org.springframework.web.servlet.HandlerInterceptor接口,其定义如下
public interface HandlerInterceptor {
    default boolean preHandle(HttpServletRequest request, HttpServletResponse response, Object handler) throws Exception { return true;}
    default void postHandle(HttpServletRequest request, HttpServletResponse response, Object handler, @Nullable ModelAndView modelAndView) throws Exception {}
    default void afterCompletion(HttpServletRequest request, HttpServletResponse response, Object handler, @Nullable Exception ex) throws Exception {}
}
preHandle方法返回一个boolean值,根据这个值来决定继续执行链还是停止。当返回false时,往往表示在这个Interceptor中已经处理了请求,不需要继续执行链了。
postHandle表示handler执行后需要执行的逻辑。这个方法对使用了注解@ResponseBody and ResponseEntity的请求不起作用。因为使用了这些注解后,请求将会在处理器适配器HandlerAdapter内部进行处理,并且生成响应,执行到postHandle时,将不能对response做任何干预了(比如添加额外的Header等)。这种情形,应该使用ResponseBodyAdvice接口。
1.6 异常处理
如果request mapping或者一个request handler中发生异常,DispatcherServlet将委托给由HandlerExceptionResolver实现类组成的异常处理链进行异常的处理。
public interface HandlerExceptionResolver {
    @Nullable
    ModelAndView resolveException(HttpServletRequest request, HttpServletResponse response, @Nullable Object handler, Exception ex);
}
异常处理链:我们可以在spring中配置多个HandlerExceptionResolver。springMVC将把这些配置组成一个异常处理链。当处理链中的某一个实例进行异常处理时,将执行resolveException方法,其返回有3种类型
1 一个ModelAndView对象,指向一个error view,此时异常处理链其他处理器将不会被调用
2 一个空的ModelAndView对象,表示异常在该异常处理器内部做了处理,不会继续执行处理链中的其他处理器
3 null,表示该异常没有得到处理,将会又处理链中的后续处理器进行处理。如果异常处理链中的所有处理器都不能处理该异常,则将会抛给Servlet容器进行处理。
如果异常处理链中的所有HandlerExceptionResolver都无法处理该异常,或者在某个HandlerExceptionResolver中response被设置为4xx或5xx等error status,Servlet容器将渲染一个html格式的的默认error页面。如果我们想customize这个默认的error页面,我们可以在web.xml中做如下定义
<error-page>
    <location>/my_error</location>
</error-page>
Servlet容器将在容器内部进行ERROR dispatch,转发到我们配置的URL:/my_error。然后这个请求将会再次被DispatcherServlet接收,然后可能mapping到一个专门的Controller进行处理,比如下面的controller
@RestController
public class ErrorController {
    @RequestMapping(path = "/error")
    public Map<String, Object> handle(HttpServletRequest request) {
        Map<String, Object> map = new HashMap<String, Object>();
        map.put("status", request.getAttribute("javax.servlet.error.status_code"));
        map.put("reason", request.getAttribute("javax.servlet.error.message"));
        return map;
    }
}
1.7 视图解析
有两个接口在Spring处理视图相关事宜时至关重要,分别是视图解析器接口ViewResolver和视图接口本身View。视图解析器ViewResolver负责处理视图名与实际视图之间的映射关系(比如视图名hello对应的实际视图/WEB-INF/hello.jsp)。视图接口View负责准备请求,并将请求的渲染交给某种具体的视图技术实现。
例如,假设使用的视图技术是JSP,JSP视图技术也是Servlet容器默认支持的一种视图技术,如果我们使用的视图解析器是UrlBasedViewResolver,这个视图解析器将会把url解析成一个视图名,并将请求转发给RequestDispatcher(Servlet内部的类)来进行视图渲染。
<bean id="viewResolver" class="org.springframework.web.servlet.view.UrlBasedViewResolver">
    <property name="viewClass" value="org.springframework.web.servlet.view.JstlView"/>
    <property name="prefix" value="/WEB-INF/jsp/"/>
    <property name="suffix" value=".jsp"/>
</bean>
如果返回一个test逻辑视图名,那么该视图解析器会将请求转发到Servlet容器的RequestDispatcher,后者会将请求交给/WEB-INF/jsp/test.jsp视图去渲染。
有关视图解析器的详细介绍可参考:https://www.cnblogs.com/zhenjingcool/p/16616535.html
springmvc中的视图解析器
| ViewResolver | Description |
|---|---|
|
| Subclasses of |
|
| Simple implementation of the |
|
| Convenient subclass of |
|
| Convenient subclass of |
|
| Implementation of the |
|
| Implementation of the |
所有的视图解析器都是ViewResolver接口的子类
public interface ViewResolver {
    View resolveViewName(String viewName, Locale locale) throws Exception;
}
当进行视图解析的时候,就是调用的resolveViewName()方法进行视图名和视图之间的匹配的。
我们可以配置多个视图解析器,springmvc会把它们组成一个视图解析器链。当进行视图解析时,会遍历这个视图解析链,如果某一个视图解析器返回null,将会继续执行链中的其他视图解析器,直到返回一个对应的View对象。一般我们会把InternalResourceViewResolver配置在视图解析链的最后,因为InternalResourceViewResolver默认会把视图名解析为一个对应的jsp资源(比如/WEB-INF/xxx.jsp),当所有其他视图解析器都返回null时,InternalResourceViewResolver一定会返回一个jsp资源,虽然这个jsp不一定存在,但是至少不会返回null。
当逻辑视图名以 redirect: 开头时,视图解析器将它视为一个重定向的指令,比如: redirect:/myapp/some/resource
当逻辑视图名以 forward: 开头时,视图解析器将会创建一个 InternalResourceView 视图,它会执行Servlet容器自带的 RequestDispatcher.forward() 。但是需要注意的是如果视图解析器是 InternalResourceViewResolver 或者视图是 InternalResourceView ,以 forward: 开头的视图名将不起作用。这个特性主要用于其他视图技术,但是有时希望forward to一个能够被Servlet容器处理的资源(比如jsp或者一个servlet)。
ContentNegotiatingViewResolver
这个视图解析器其实是一个视图解析器选择器,这个视图解析器会根据请求来进一步选择一个合适的视图解析器来进行视图解析。
ContentNegotiatingViewResolver中可以囊括多个视图解析器,例如:
<bean class="org.springframework.web.servlet.view.ContentNegotiatingViewResolver"
   p:order="1">
   <property name="viewResolvers">
       <list>
           <bean class="com.lyx.app.viewResolver.PdfViewResolver"
                 p:packageName="com.lyx.app.view"/>
           <bean class="com.lyx.app.viewResolver.XslViewResolver"
                 p:packageName="com.lyx.app.view"/>
           <ref bean="jspResolver"/>
       </list>
   </property>
</bean>
那么ContentNegotiatingViewResolver是如何智能的选择视图解析器的呢?有3种方式:
1 根据请求后缀名,比如以.xls为后缀,那么他会判断为contentType:application/vnd.ms-excel ,进而选择合适的视图解析器。
2 根据请求参数,比如请求参数xxxx/?format=json它就会判断contentType是application/json
3 根据Accept请求头,例如请求头包含text/html,他就会判断请求的contextType是text/html
1.8 @Controller
SpringMVC提供了@Controller和@RestController注解,带这个注解的类不需要扩展基类或实现特定的接口即可实现请求的映射和响应.
例子:
@Controller
public class HelloController {
    @GetMapping("/hello")
    public String handle(Model model) {
        model.addAttribute("message", "Hello World!");
        return "index";
    }
}
上面这个例子,方法接收一个Model,返回一个string类型的视图名。
我们在使用带注解的handler之前,需要spring的注解扫描功能。spring中开启注解扫描的方式是:
@Configuration
@ComponentScan("org.example.web")
public class WebConfig {
    // ...
}
或者在xml配置中配置:
<context:component-scan base-package="org.example.web"/>
@RestController是一个复合注解
其定义如下
@Controller
@ResponseBody
public @interface RestController {
    @AliasFor(annotation = Controller.class)
    String value() default "";
}
它包含了@ResponseBody注解,也就是说使用@RestController会自动为每个方法上添加@ResponseBody,这样内容将会直接写入response,而不是返回一个逻辑视图名然后在视图解析器中匹配视图和渲染到指定的模板。这也是为什么使用@ResponseBody将不会用到视图解析器的原因。
1.8.1 @RequestMapping
该注解用于进行请求映射到控制器的具体方法上,可以匹配不同的属性,比如URL,请求方法,请求头,请求参数以及media type等。
@RequestMapping可以在类级别上也可以在方法级别上。此外还有几个特定于请求类型的注解,@GetMapping,@PostMapping,@PutMapping,@DeleteMapping,@PatchMapping
@RestController
@RequestMapping("/persons")
class PersonController {

    @GetMapping("/{id}")
    public Person getPerson(@PathVariable Long id) {
        // ...
    }

    @PostMapping
    @ResponseStatus(HttpStatus.CREATED)
    public void add(@RequestBody Person person) {
        // ...
    }
}
注:https://blog.csdn.net/guanhang89/article/details/85042560这篇文章是对官网内容的翻译,此处参考了这个文章。
@RequestMapping作用是进行请求的匹配,下面介绍几种匹配规则
URL匹配:
示例
@Controller
@RequestMapping("/owners/{ownerId}")
public class OwnerController {

    @GetMapping("/pets/{petId}")
    public Pet findPet(@PathVariable Long ownerId, @PathVariable Long petId) {
        // ...
    }
}
Content-Type匹配:
表示特定类型的请求
@PostMapping(path = "/pets", consumes = "application/json")
public void addPet(@RequestBody Pet pet) {
    // ...
}
Accept匹配:
这个参数表示客户端期望响应的媒体类型
@GetMapping(path = "/pets/{petId}", produces = "application/json")
@ResponseBody
public Pet getPet(@PathVariable String petId) {
    // ...
}
参数和请求头匹配:
@GetMapping(path = "/pets/{petId}", params = "myParam=myValue")
public void findPet(@PathVariable String petId) {
    // ...
}
@GetMapping(path = "/pets", headers = "myHeader=myValue")
public void findPet(@PathVariable String petId) {
    // ...
}
1.8.2 控制器方法可使用的参数和注解
官网中给出了一个表格,列出了我们可以使用的注解和参数。
也就是说,我们可以根据请求类型,合理的使用这些参数接收和处理请求参数。
| Controller method argument | Description |
|---|---|
|
| For access to the raw request body as exposed by the Servlet API. |
|
| Choose any specific request or response type — for example, |
| @RequestParam | |
| @RequestBody | For access to the HTTP request body. Body content is converted to the declared method argument type by using |
当然,可使用的注解和参数远不止这些,这里只是抛砖引玉,记录在这里,后面需要还是要查看官方文档。
1.8.3 控制器方法可使用的返回值类型和注解
| Controller method return value | Description |
|---|---|
|
| The return value is converted through |
|
| The return value that specifies the full response (including HTTP headers and body) is to be converted through |
|
| For returning a response with headers and no body. |
|
| A view name to be resolved with |
|
| A |
|
| Attributes to be added to the implicit model, with the view name implicitly determined through a |
|
| An attribute to be added to the model, with the view name implicitly determined through a Note that |
|
| The view and model attributes to use and, optionally, a response status. |
更多注解类型请参考官网。
1.8.4 常用的请求和响应注解和参数
@RequestParam:
@RequestParam用来绑定Servlet请求参数,也就是查询参数或者表单数据
当@RequestParam作用在Map<String, String>或者Dto上时,请求参数将会自动填充这些Map和Dto对象
如果一个参数没有被其他参数解析器解析,并且是一些简单类型,则默认是@RequestParam注解的,比如
    public Object queryDetail(String subprojectId)
  {
        ...
    }
上例方法参数subprojectId没有添加任何注解,则默认是@RequestParam注解的
@RequestBody:
使用@RequestBody注解可以通过HttpMessageConverter让请求体反序列化为对象
public Object deliveryParams(@RequestBody Map params) {
}
@RequestHeader:
用来绑定请求头,当@RequestHeader作用在Map<String, String>上时,请求参数将会自动填充Map
@GetMapping("/demo")
public void handle(
        @RequestHeader("Accept-Encoding") String encoding,
        @RequestHeader("Keep-Alive") long keepAlive) {
    //...
}
@CookieValue:
用来绑定cookie
@GetMapping("/demo")
public void handle(@CookieValue("JSESSIONID") String cookie) {
    //...
}
HttpEntity:
HttpEntity某种程度上是和@RequestBody一样,但是是基于包含请求头和请求体的容器对象
@PostMapping("/accounts")
public void handle(HttpEntity<Account> entity) {
    // ...
}
@ResponseBody:
可以在方法上使用@ResponseBody注解,能够让返回值通过HttpMessageConverter序列化为返回体
@GetMapping("/accounts/{id}")
@ResponseBody
public Account handle() {
    // ...
}
当使用@RestController注解时,它同时包含了@Controller和@ResponseBody,此时方法上可以不写@ResponseBody


 9578
9578


 被折叠的 条评论
为什么被折叠?
被折叠的 条评论
为什么被折叠?
 到【灌水乐园】发言


