


<div class="markdown_views"><p>为了方便别人使用我们开发的<a href="http://lib.csdn.net/base/android" class="replace_word" title="Android知识库" target="_blank" style="color:#df3434; font-weight:bold;">Android</a> Library,一般我们都会把Android Library打成aar包,并将aar包发布到Maven仓库当中。如果是开源项目就可以把包发布到Maven Central仓库或者JCenter仓库中;如果是公司内部使用,一般公司内部会自己搭建私有Maven仓库,就把包发布到私有Maven仓库当中,以方便别人直接使用。</p>
本文将介绍如何使用Android Studio将项目发布到Maven私有仓库(使用Nexus搭建)以及JCenter中央仓库。
准备工作
首先得有一个Android项目。我以自己GitHub上的一个项目customprogressbar作说明。
项目结构图:
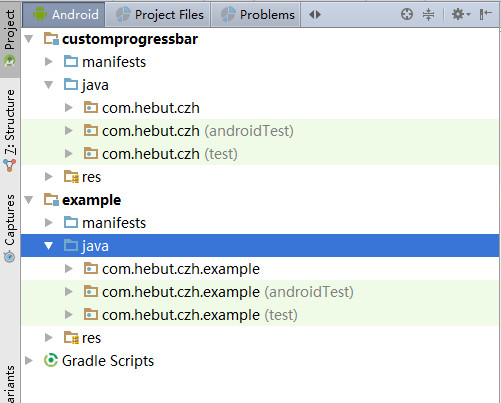
这个项目有两个module:customprogressbar和example。
customprogressbar
这个module是Android Library类型的,提供自定义进度条的功能example
这个module使用了customprogressbar提供的功能
此时,由于两个module在同一project下面,example要使用customprogressbar,只需要在example的build.gradle添加如下依赖即可。
example/build.gradle
compile project(':customprogressbar')
- 1

- 1
下面,我们看如何把customprogressbar发布到Maven仓库当中。首先是使用Nexus搭建的Maven私有仓库。
发布到私有Maven仓库
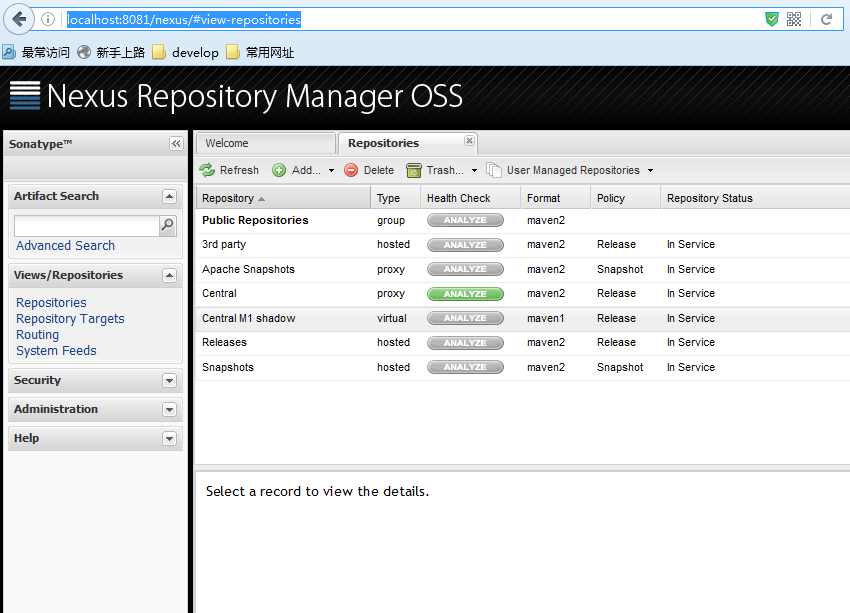
我们使用Nexus在本地搭建了一个Maven仓库。Nexus使用方法不介绍了,大家自己Google。
启动Nexus,在浏览器输入:http://localhost:8081/nexus/ 即可看到Maven仓库管理界面。
下面贴上customprogressbar的build.gradle的脚本代码
customprogressbar/build.gradle
apply plugin: 'com.android.library'

android {
    compileSdkVersion 23
    buildToolsVersion "23.0.2"

    defaultConfig {
        minSdkVersion 15
        targetSdkVersion 23
        versionCode 1
        versionName "1.0"
    }
    buildTypes {
        release {
            minifyEnabled false
            proguardFiles getDefaultProguardFile('proguard-android.txt'), 'proguard-rules.pro'
        }
    }
}

dependencies {
    compile fileTree(dir: 'libs', include: ['*.jar'])
    testCompile 'junit:junit:4.12'
    compile 'com.android.support:appcompat-v7:23.3.0'
}

apply from: './nexus-push.gradle'
- 1
- 2
- 3
- 4
- 5
- 6
- 7
- 8
- 9
- 10
- 11
- 12
- 13
- 14
- 15
- 16
- 17
- 18
- 19
- 20
- 21
- 22
- 23
- 24
- 25
- 26
- 27
- 1
- 2
- 3
- 4
- 5
- 6
- 7
- 8
- 9
- 10
- 11
- 12
- 13
- 14
- 15
- 16
- 17
- 18
- 19
- 20
- 21
- 22
- 23
- 24
- 25
- 26
- 27
好,可以看到,基本上都是Android Studio自动生成的代码,只有最后一句不是。最后一句引用了另一个gradle脚本文件,我们的项目发布代码都写在这个脚本文件中。
customprogressbar/nexus-push.gradle
apply plugin: 'maven'

task androidJavadocs(type: Javadoc) {
    source = android.sourceSets.main.java.srcDirs
    classpath += project.files(android.getBootClasspath().join(File.pathSeparator))
}

task androidJavadocsJar(type: Jar, dependsOn: androidJavadocs) {
    classifier = 'javadoc'
    from androidJavadocs.destinationDir
}

task androidSourcesJar(type: Jar) {
    classifier = 'sources'
    from android.sourceSets.main.java.srcDirs
}

artifacts {
    archives androidSourcesJar
    archives androidJavadocsJar
}

uploadArchives {
    repositories {
        mavenDeployer {
            repository(url: "http://localhost:8081/nexus/content/repositories/releases/") {
                authentication(userName: "deployment", password: "deployment123")
            }

            pom.groupId = 'com.hebut.czh'
            pom.artifactId = 'customprogressbar'
            pom.version = '0.0.1'

            pom.project {
                licenses {
                    license {
                        name 'The Apache Software License, Version 2.0'
                        url 'http://www.apache.org/licenses/LICENSE-2.0.txt'
                    }
                }
            }
        }
    }
}
- 1
- 2
- 3
- 4
- 5
- 6
- 7
- 8
- 9
- 10
- 11
- 12
- 13
- 14
- 15
- 16
- 17
- 18
- 19
- 20
- 21
- 22
- 23
- 24
- 25
- 26
- 27
- 28
- 29
- 30
- 31
- 32
- 33
- 34
- 35
- 36
- 37
- 38
- 39
- 40
- 41
- 42
- 43
- 44
- 1
- 2
- 3
- 4
- 5
- 6
- 7
- 8
- 9
- 10
- 11
- 12
- 13
- 14
- 15
- 16
- 17
- 18
- 19
- 20
- 21
- 22
- 23
- 24
- 25
- 26
- 27
- 28
- 29
- 30
- 31
- 32
- 33
- 34
- 35
- 36
- 37
- 38
- 39
- 40
- 41
- 42
- 43
- 44
首先需要引用maven插件;然后定义了2个任务:androidSourcesJar和androidJavadocsJar,这两个任务分别用于对Java sources打包和Java doc进行打包;接着我们对uploadArchives.repositories闭包进行一些配置,包括仓库的url地址,上传所需的用户名和密码,以及pom属性。
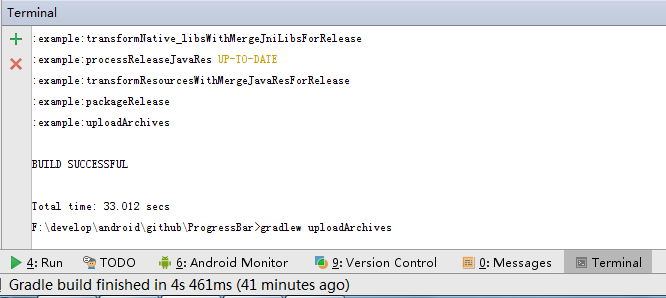
OK, 脚本编写完之后,在Android Studio的Terminal面板执行如下命令
gradlew uploadArchives
- 1

- 1
如图所示:
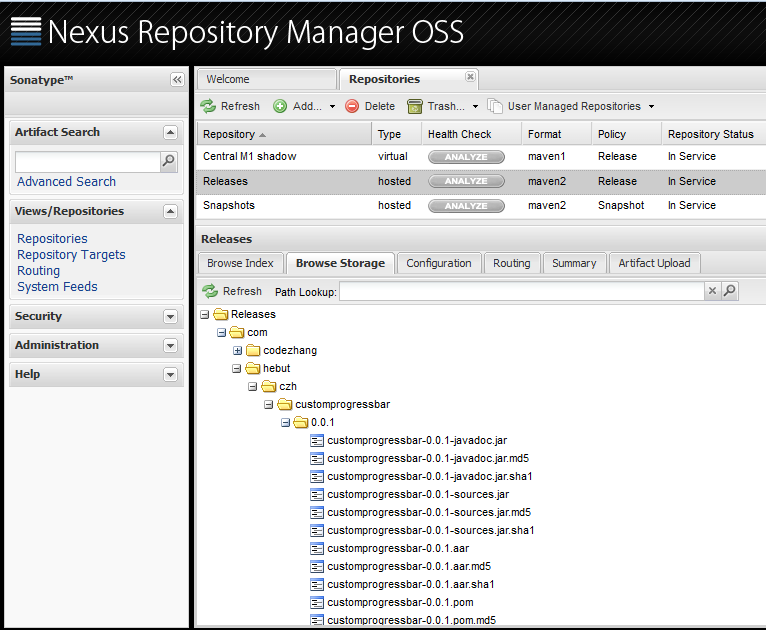
发布成功后就可以在nexus查看已发布的项目:
好的,接下来看Example如何使用这个Maven仓库中的aar包。
首先在项目根目录下的build.gradle文件添加仓库url地址。
build.gradle
allprojects {
    repositories {
        jcenter()

        maven {
            url "http://localhost:8081/nexus/content/repositories/releases/"
        }
    }
}
- 1
- 2
- 3
- 4
- 5
- 6
- 7
- 8
- 9
- 1
- 2
- 3
- 4
- 5
- 6
- 7
- 8
- 9
接下来在example的build.gradle中添加依赖即可使用。
/example/build.gradle
compile 'com.hebut.czh:customprogressbar:0.0.1'
- 1
- 1
发布到JCenter仓库
JCenter仓库是由bintray提供并维护,这个仓库是类似Maven中央仓库。只要你能连上Internet,你就可以通过Gradle或者Maven去下载仓库中的依赖包到你自己的项目中。
当然,我们也可以通过Android Studio把aar包发布到JCenter当中,这样就可以让更多的开发者使用我们提供的aar包。
把项目发布到JCenter中需要3步:
1. 注册bintray账户
2. 编写Gradle脚本,把项目发布到你bintray账户下的Maven仓库
3. 同步到JCenter仓库
第1步和第3步都很简单,下面先讲第2步。
同样在customprogressbar的build.gradle文件中编写代码,跟前边相比就一处不一样,这里就贴上不一样的代码。
customprogressbar/build.gradle
apply from: './jcenter-push.gradle'
- 1
- 1
还是一样,上传的主要脚本代码写在另一个文件当中。由于,bintray在Maven仓库外面又加了一个package层,使用package来对仓库进行管理,所以,上传的方式有点不同。
customprogressbar/jcenter-push.gradle
apply plugin: 'com.jfrog.bintray'
apply plugin: 'com.github.dcendents.android-maven'

def siteUrl = 'https://github.com/codezhanghao/CustomProgressbar'
def gitUrl = 'https://github.com/codezhanghao/CustomProgressbar.git'

group = 'com.hebut.czh'
version = '0.0.1'

install {
    repositories.mavenInstaller {
        pom {
            project {
                packaging 'aar'
                name 'custom progressbar for android'
                url siteUrl

                licenses {
                    license {
                        name 'The Apache Software License, Version 2.0'
                        url 'http://www.apache.org/licenses/LICENSE-2.0.txt'
                    }
                }

                developers {
                    developer {
                        id 'czh'
                        name 'ZHANG.Hao'
                        email '809026704@qq.com'
                    }
                }

                scm {
                    connection gitUrl
                    developerConnection gitUrl
                    url siteUrl
                }
            }

        }
    }
}

task androidJavadocs(type: Javadoc) {
    source = android.sourceSets.main.java.srcDirs
    classpath += project.files(android.getBootClasspath().join(File.pathSeparator))
}

task androidJavadocsJar(type: Jar, dependsOn: androidJavadocs) {
    classifier = 'javadoc'
    from androidJavadocs.destinationDir
}

task androidSourcesJar(type: Jar) {
    classifier = 'sources'
    from android.sourceSets.main.java.srcDirs
}

artifacts {
    archives androidSourcesJar
    archives androidJavadocsJar
}

Properties properties = new Properties()
properties.load(project.rootProject.file('local.properties').newDataInputStream())

bintray {
    user = properties.getProperty("bintray.user")
    key = properties.getProperty("bintray.apikey")
    configurations = ['archives']
    pkg {
        version {
            name = '0.0.1'
            desc = 'custom progress bar 0.0.1'
        }
        repo = 'maven'
        name = 'custom-progressbar'
        licenses = ['Apache-2.0']
        vcsUrl = gitUrl
        publish = true
    }
}
- 1
- 2
- 3
- 4
- 5
- 6
- 7
- 8
- 9
- 10
- 11
- 12
- 13
- 14
- 15
- 16
- 17
- 18
- 19
- 20
- 21
- 22
- 23
- 24
- 25
- 26
- 27
- 28
- 29
- 30
- 31
- 32
- 33
- 34
- 35
- 36
- 37
- 38
- 39
- 40
- 41
- 42
- 43
- 44
- 45
- 46
- 47
- 48
- 49
- 50
- 51
- 52
- 53
- 54
- 55
- 56
- 57
- 58
- 59
- 60
- 61
- 62
- 63
- 64
- 65
- 66
- 67
- 68
- 69
- 70
- 71
- 72
- 73
- 74
- 75
- 76
- 77
- 78
- 79
- 80
- 81
- 82
这里首先应用了两个插件:com.jfrog.bintray和com.github.dcendents.android-maven。
第一个插件是bintray官网提供的,用来配置bintray的Maven仓库的特有信息,bintray的用户名,apikey,以及提供了一个名为bintrayUpload任务用来上传项目的bintray的Maven仓库,对应代码:
bintray {
    ...
    ...
}
- 1
- 2
- 3
- 4
- 1
- 2
- 3
- 4
需要注意的使用,bintray的用户名和密码我放在了local.properties文件里面
local.properties:
sdk.dir=D\:\\develop\\Android\\sdk

bintray.user=czh        //bintray的用户名
bintray.apikey=*********    //修改成你自己的apikey,可以在bintray官网上查到
- 1
- 2
- 3
- 4
- 1
- 2
- 3
- 4
第二个插件是我Google出来的,用来配置项目的POM信息的,对应代码:
install {
    repositories.mavenInstaller {
        ...
        ...
    }
}
- 1
- 2
- 3
- 4
- 5
- 6
- 1
- 2
- 3
- 4
- 5
- 6
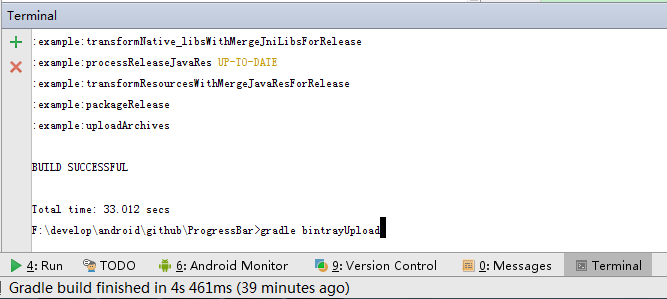
接下来在Android Studio的Terminal面板执行命令:
gradle bintrayUpload
- 1
- 1
如图所示:
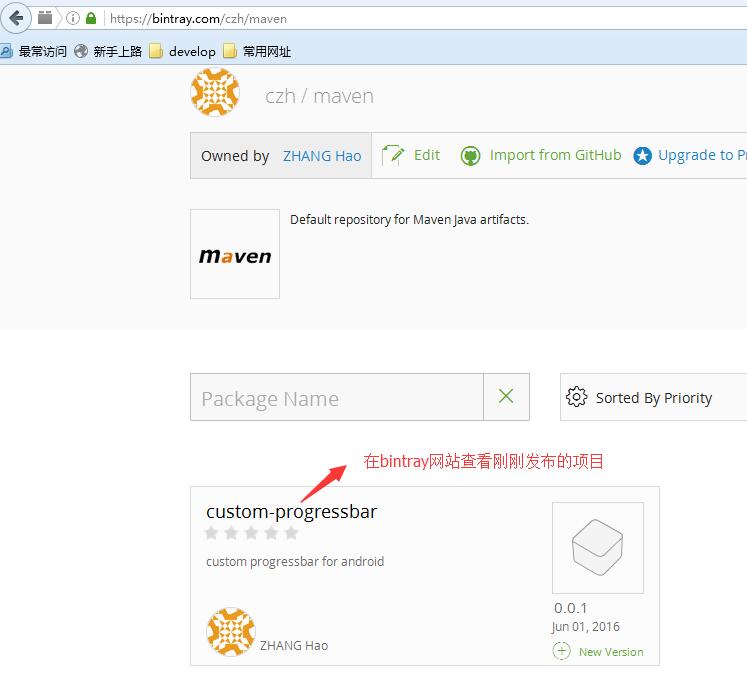
成功后,可以在bintray网站上的自己的Maven仓库中查看自己的发布的项目:
至此,第2步就结束了。
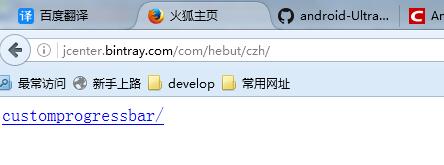
至于第3步,将你的bintray下的Maven仓库中的项目include到JCenter仓库中,就点击一个按钮即可。具体就是,点击进入你刚刚上传项目package的详细页当中,在右下角有一个Add to JCenter按钮,点击它,然后写上一些message,最后点击send按钮,就完事了。下面就是等待bintray工作人员进行审核。几个小时后,审核通过,bintray会给你发展站内消息,通知你项目已经include到JCenter当中。
如图所示:
OK,发布项目到JCenter即成功了。
之后,任何人任何时候,只需要添加一句依赖脚本代码就能直接使用你编写的customprogressbar中的功能。
compile 'com.hebut.czh:customprogressbar:0.0.1@aar'
- 1
- 1
然后Gradle会自动从JCenter仓库中下载对应的依赖包到本地项目中。
OK,本篇文章到这结束了,主要介绍了使用Android Studio发布项目到私有Maven仓库和JCenter中央仓库。希望可以帮助到你。谢谢观看~~~
(function () {('pre.prettyprint code').each(function () {
var lines = (this).text().split(′\n′).length;var numbering = $('
(this).addClass(′has−numbering′).parent().append( numbering);
for (i = 1; i <= lines; i++) {
numbering.append( ('
- ').text(i));
};
$numbering.fadeIn(1700);
});
});


 3万+
3万+


 被折叠的 条评论
为什么被折叠?
被折叠的 条评论
为什么被折叠?
 到【灌水乐园】发言


