Before the configuring Netegrity SiteMinder, please make sure you finish the following tasks:
1. Install WebSphere Application server 6.0.2.17 and WebSphere Portal server 6.0.1
2. Install HTTP server 6.0
3. Install Web Server plug-in for WebSphere Application Server
In the following instructions, WebSphere Application Server and HTTP server 6.0 are installed on the same machine: for example, install WebSphere Application Server 6.0.2.9 and WebSphere Portal server 6.0 under c:/IBM/WebSphere, install HTTP server 6.0 under c:/IBM HTTP Server, install Web Server plug-in under c:/IBM/WebSphere/Plugins.
Policy Server: Windows 2000 Server + Netegrity Policy Server v5.5
Portal Server: Windows 2003 Server + IBM HTTP Server v6.0 + WebSphere AppServer Server 6.0.2.17 + WebSphere Portal Server 6.0.1 + SiteMinder 5.x Web Agent + SiteMinder Agent v5.6 for IBM WebSphere
LDAP Server: Window 2000 + Domino V701_01122006 + Hotfix
Mail Server: Suse9.1 + Domino V701_01122006 + Hotfix
1. Install Netegrity Policy Server and configure on Policy Server Console
1.1 Install Netegrity Policy Server v5.5
Install Policy Server on a server with IIS for Web service and Sun JRE 1.3 (or above version). Enter your JRE's path or else this wizard will install JRE 1.3: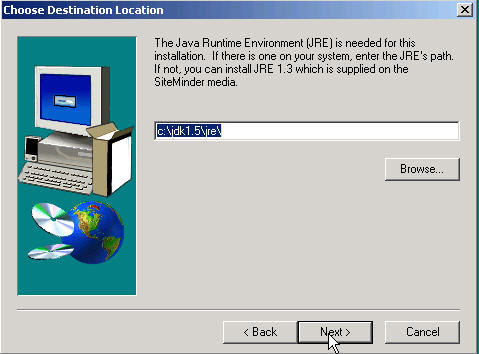
Select a Web server for policy server: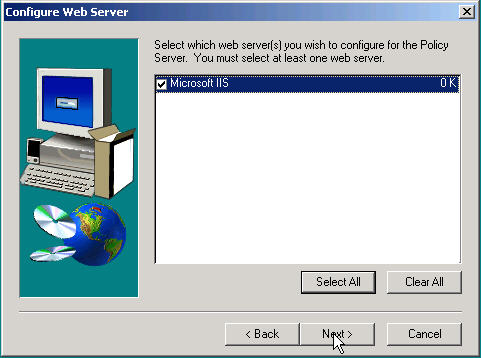
Enter the password for SiteMinder admin user, using this user name and password, you can administer policy server by browser: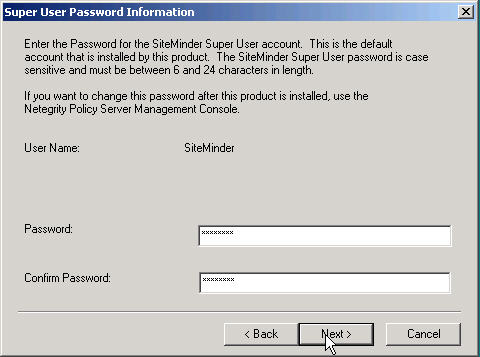
Install complete need restart machine.
Start->Programs menu:
1.2 Configure on policy server console
1.2.1 Access policy server
Using a browser to access policy server: http://<policy server's IP>/siteminder/smadmin2.html
Clicking Administer Policy Server, the browser will download administration applet. If there is a security warning about Netegrity, please trust it and click Yes. Then SiteMinder Administration window pops up, enter user name and password, click Login, then you will see Policy Administration Console window pop up.
1.2.2 Creating an agent
1). In the SiteMinder Administration console, on the System tab, right-click on Agents and then choose Create Agent.
2). In the "Name" field, type a unique name that is not assigned to an existing agent.
Note the name that you assign to the agent. You will need to refer to it when you create the associated agent configuration and realm objects.
3). (Optional) In the "Description" field, type a description.
4). Under "Agent Type," ensure that SiteMinder is selected and that the drop-down displays Web Agent.
5). Click OK to save and close the settings.
1.2.3. Creating an agent configuration
1). In the SiteMinder Administration console, on the System tab, click Agent Conf Objects, then in the right pane, right-click on the "ApacheDefaultSettings" agent configuration and choose Duplicate Configuration Object. Specify the agent configuration properties as described below.
2). In the "Name" field, type a unique name.
3). (Optional) In the "Description" field, type a description.
4). Set the following parameters as indicated:
For "DefaultAgentName," type the name of the associated agent that you created in the previous procedure. (If need, delete "#" before "DefaultAgentName")
For "CookieDomain," type the name of the domain where the Portal Server resides.
Set "AllowLocalConfig" to Yes.
Set "CssChecking" to NO.
For "BadUrlChars" type: ./,/*,*.,~,/
Leave the remaining parameters set to their default values.
5). Click OK to save and close the settings.
1.2.4. Creating a host configuration
1). In the SiteMinder Administration console, on the System tab, click Host Conf Objects, then in the right pane, right-click on an existing host configuration and choose Duplicate Configuration Object. Specify the settings as described below.
2). In the "Name" field, type a unique name.
3). (Optional) In the "Description" field, type a description.
4). Click OK to save and close the settings.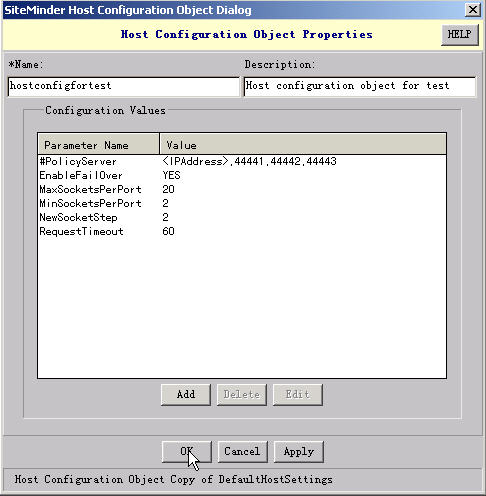
1.2.5. Create User Directories
1). In the SiteMinder Administration console, on the System tab, right-click on User Directory and then choose Create User Directory. Specify the domain properties as described below.
2). In the "Name" field, type a unique name.
3). (Optional) In the "Description" field, type a description.
4). In the "Server" field, type the LDAP server's IP or hostname.
5). Under LDAP Search, in the "Root" field, type BaseDN, and from "Scope" the drop-down list select "Subtree".
6). Under LDAP User DN Lookup,
in "Start" field, type "(&(objectclass=person)(uid=",
in "End" field, type "))"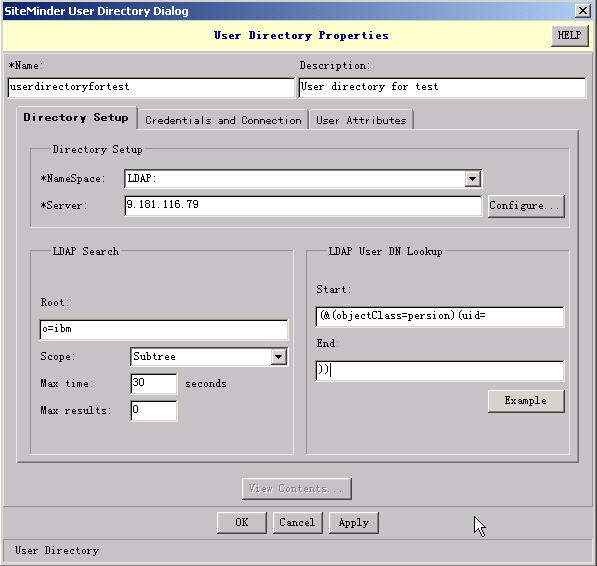
7). Select tab "Credentials and Connections", check Require Credentials, enter username and password. Then click OK to save and close the settings.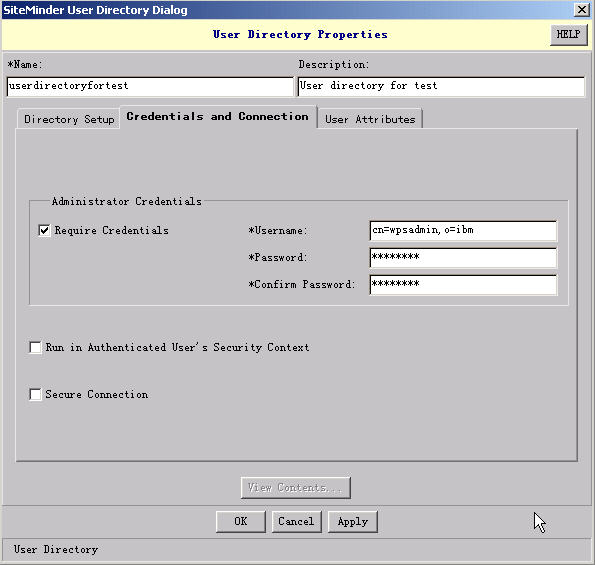
1.2.6. Creating a domain
1). In the SiteMinder Administration console, on the System tab, right-click on Domains and then choose Create Domain. Specify the domain properties as described below.
2). In the "Name" field, type a unique name.
3). (Optional) In the "Description" field, type a description.
4). From the drop-down list at the bottom of the dialog box, select the LDAP server you want to configure and then click Add.
5). After the server is added to the User Directories tab, click OK to save and close the settings.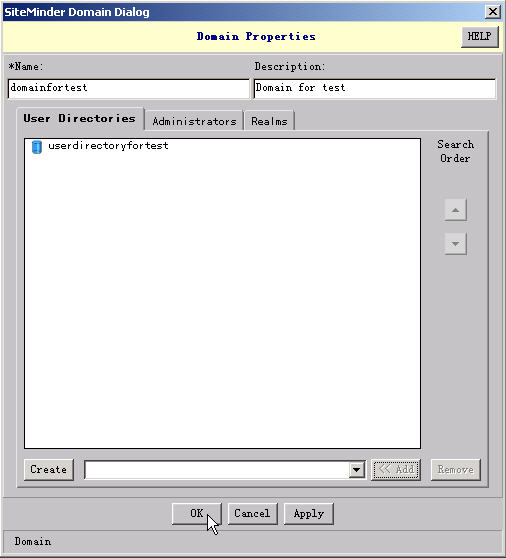
1.2.7. Creating a realm (for basic authentication)
1). In the SiteMinder Administration console, click the Domains tab, right-click on the domain you created, and choose Create Realm. Specify the realm properties as described below.
2). In the "Name" field, type a unique name.
3). (Optional) In the "Description" field, type a description.
4). On the Resource tab, in the "Agent" field, type the name of the associated agent that you created.
in "Resource Filte" field, type "/wps/myportal"
Leave the remaining options on the Resource, Session, and Advanced tabs set to their default values.
5). Click OK to save and close the settings.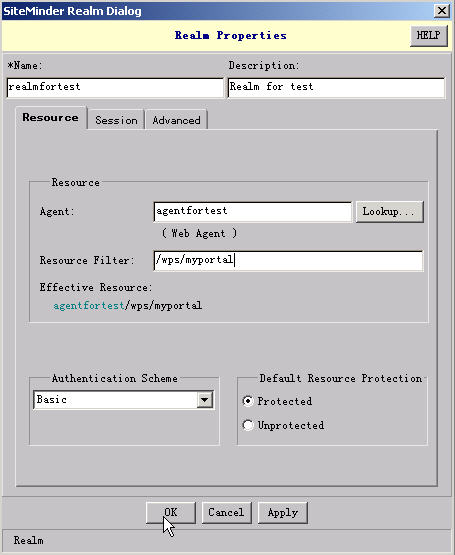
1.2.8. Create a SiteMinder TAI Validation Realm
1). In the SiteMinder Administration console, click the Domains tab, right-click on the domain you created, and choose Create Realm. Specify the realm properties as described below.
2). In the "Name" field, type a unique name.
3). (Optional) In the "Description" field, type a description.
4). On the Resource tab, in the "Agent" field, type the name of the associated agent that you created.
in "Resource Filte" field, type "/sitemindertai"
Leave the remaining options on the Resource, Session, and Advanced tabs set to their default values.
5). Click OK to save and close the settings.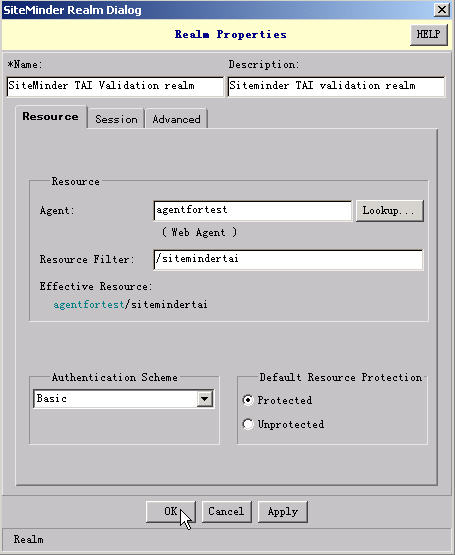
1.2.9. Creating rules for the realm
1). In the SiteMinder Administration console, click the Domains tab. Expand the domain you created, right-click on the realm you created, and then choose Create Rule under Realm. Specify the rule properties as described below.
2). In the "Name" field, type a unique name.
3). (Optional) In the "Description" field, type a description.
4). From the Realm list, select the realm you created; in the "Resource" field, type * (an asterisk).
5). Under "Action," select "Web Agent actions" and select all items (Get, Post, Put) in the list box.
6). Under "When this Rule fires," select "Allow Access," then under "Enable or Disable this Rule" select "Enabled."
7). Click OK to save and close the settings.
8). Repeat steps 1 through 3 to create a second rule.
9). From the Realm list, select the realm you created.
10). Under "Action," select "Authentication events" and then select "OnAuthAccept" from the drop-down list.
11). Under "Enable or Disable this Rule," select "Enabled."
12). Click OK to save and close the settings.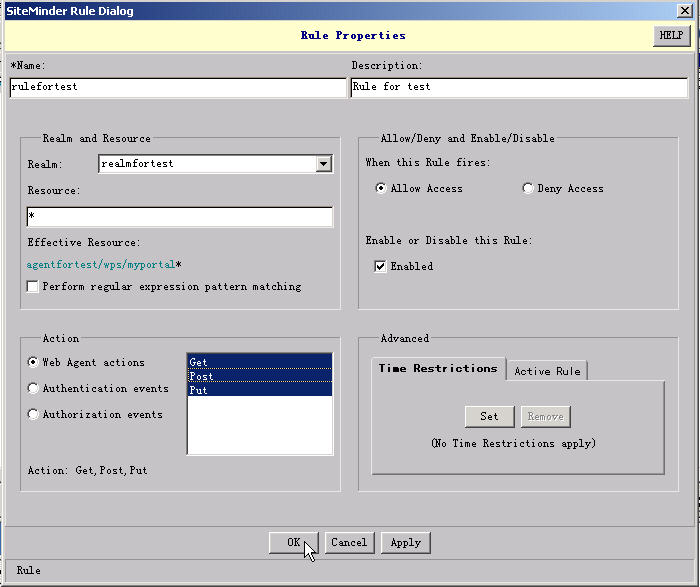
1.2.10. Creating a policy for the realm
1). In the SiteMinder Administration console, click the Domains tab. Expand the domain you created, right-click on Policies, and then choose Create Policy. Specify the policy properties as described below.
2). In the "Name" field, type a unique name.
3). (Optional) In the "Description" field, type a description.
4). On the Users tab, click Add/Remove.
5). In the next dialog box, select each LDAP sub-tree you want SiteMinder to authenticate users against and add it to the Current Members list. Then click OK.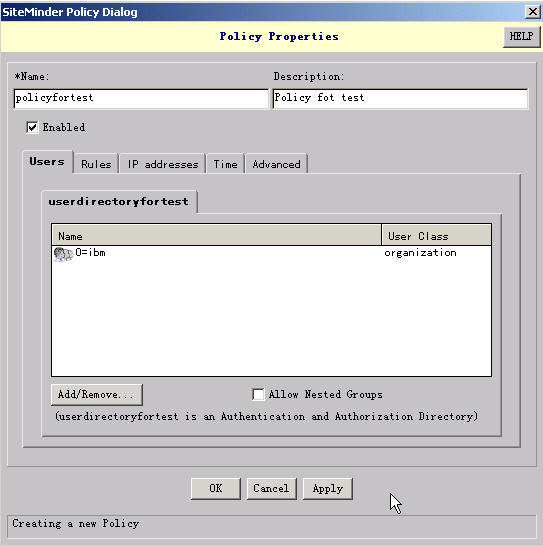
6). Click the Rules tab, then click Add/Remove Rules.
7). In the next dialog box, select the two rules you created, add them to the Current Members list, and then click OK.
8). Leave the options on the other tabs set to their default values.
9). Click OK to save and close the settings. 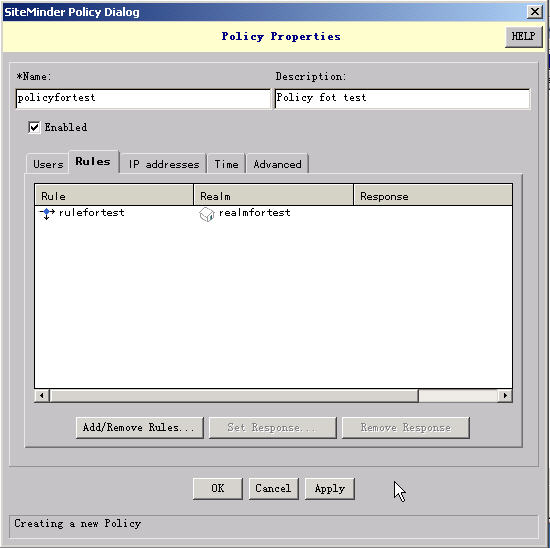
2. Install and configure SiteMinder Web Agent on Portal Server
The information in this appendix explains how to configure Portal Server with a SiteMinder 5.5 Policy Server. Therefore, you should install the latest version of the V5x SiteMinder Web Agent and any SiteMinder Hotfix that may be available. You can obtain these files from support.netegrity.com. For detailed installation instructions, refer to the readme files provided with the Web Agent and Hotfix.
Note: It is recommended that you install both the Web Agent and the Hotfix prior to configuring the Web Agent. When you install the Web Agent, the last dialog box provides an option to launch the Web Agent Configuration Wizard. Click Cancel, and then install the Hotfix.
After you install the Web Agent and Hotfix, follow the steps below to configure the Web Agent.
Procedure
1). Ensure that you have completed the Policy Server setup tasks.
2). Click Start in the Windows task bar and then choose Programs - SiteMinder to launch the Web Agent Configuration Wizard.
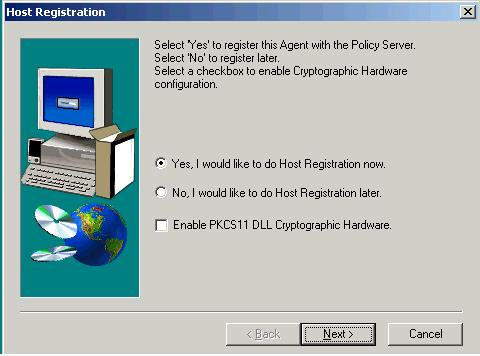
3). In the first dialog box, do the following:
Ensure that "Enable PKCS11" is not selected.
You can select "Yes, I would like to do Host Registration now." will generate smHost.conf.
You can also select "No, I would like to do Host Registration later.", let smagent TAI generate smHost.conf.
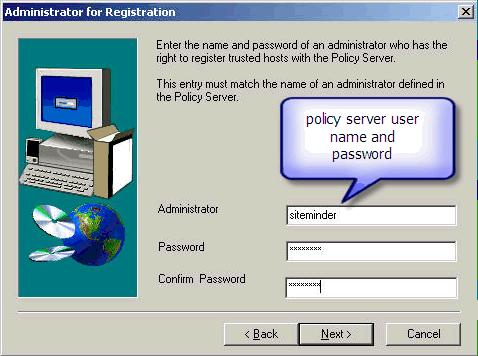
Enter the administrator user name and password, then reconfirm the password:
In the "Trusted Host Name" field, type the name of the system you want to register. This is typically the physical server name. This will create a Trusted Host entry on the Policy Server. You cannot create duplicate Trusted Host entries. If this system was previously registered, you need to either delete the existing Trusted Host entry on the Policy Server or register the system under a new name. Click Next.
4). In the next dialog box, in the "Policy Server IP Address" field, type the IP address of the Policy Server and then click Next.
5). In the next dialog box, in the "Host Configuration Object" field, type the name of the host configuration you created previously and then click Next.
6). In the next dialog box, accept the default location of the host conf file and then click Next.
7). In the next dialog box, select the appropriate Web server and then click Next.
8). In the next dialog box, review the details displayed. If you see a message that the agent configuration object has not been configured, click Configure and then do the following:
In the "Agent Conf Object" field, type the name of the agent configuration object you created previously. Click Next to return to the previous dialog box.
9). Click Finish.
This step will generate WebAgent.conf under IBM HTTP Server/conf.
3. Install and configure Netegrity TAI on Portal Server
3.1 Install Netegrity TAI (Netegrity SiteMinder Agent v5.6 for IBM WebSphere)
Installing TAI needs JRE. If there is no JRE on portal server, you need install JRE first.
if install ca-asa-6.0-was-win32.exe, WebAgent.conf will be not generated, but AsaAgent-auth.conf.
if install nete-asa-5.6-was-win32.exe. WebAgent.conf will be generated.
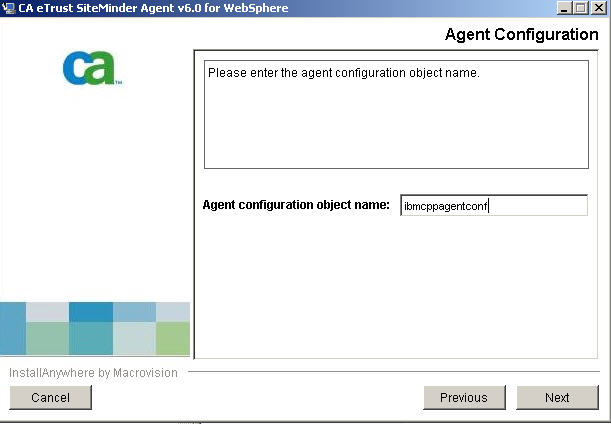
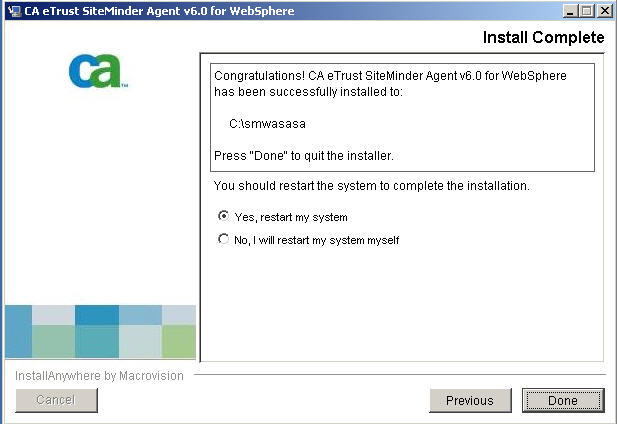
Those screen snapshot in following steps comes from installing ca-asa-6.0-was-win32.exe.
1). Accept terms of License agreement - Next
2). Where would you like to install? - Accept Default (C:/smwastai)
· In the Choose WebSphere Folder,specify the installation location
e.g., C:/IBM/WebSphere/AppServer
3). Choose the folder where WebSphere 6 is installed.
4). Would you like to create a Trusted Host?
If you don't create a Trusted Host in the above step, you must answer yes.
If you have created a Trusted Host, answer no then browse to smHost.conf:
Netegrity/SiteMinder Web Agent/Config/smHost.conf
3.2 configure Netegrity TAI on Portal Server
1). Start the WebSphere AppSever Server and access WebSphere Administrative Console (if they are not running already).
2). Select Security > Global Security > Authentication Mechanisms > LTPA. (You can skip this if it was already done)
Enter and re-enter the password to create a key store.
Set Timeout to the same value as the max timeout value for the Web (600) Agent realm protecting the proxy to WebSphere.
Click Apply and save the changes to the master configuration by clicking Save on the next two screens.
3). Select Security > Global Security (You can skip this, for default is so.)
In the Active Authentication Mechanism drop-down list, select LTPA (Lightweight Third Party Authentication).
Click Apply and save the changes to the master configuration by clicking Save on the next two screens.
4). Select Security > Global Security > Authentication Mechanisms > LTPA.
Scroll down to the Additional Properties field and click Trust Association.
In the General Properties field, check Enable Trust Association, and click Apply.
Under Additional Properties, click Interceptors.
Important Note: If the following TAM and WebSEAL Interceptors are present in the
configuration, you will need to delete them in order for the SiteMinder TAI to work correctly:
com.ibm.us.security.web.TAMTrustAssociationInterceptorPlus
com.ibm.us.security.web.WebSealTrustAssociationInterceptor
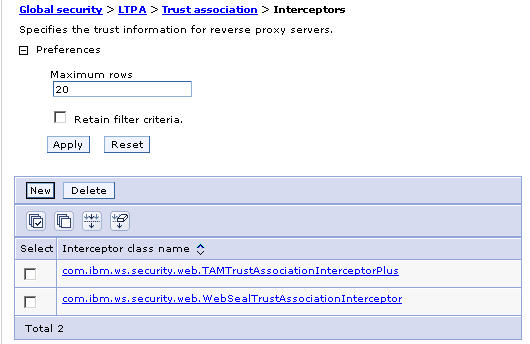
On the Interceptors page, click New.
Under General Properties on the New page, enter the following SitMinder TAI class name next to Interceptor Classname and click Apply:
com.netegrity.siteminder.websphere.tai.SiteMinderTrustAssociationInterceptor
On the configuration page for the SiteMinder Trust Association Interceptor, click the Custom Properties link under Additional Properties.
On the Custom Properties page, click New, enter the following:
. Name: siteminder_tai_conf
. Value: enter the absolute path to your SiteMinder TAI's WebAgent.conf file (for example, C:/smwastai/conf/WebAgent.conf).
. Enter an optional description for the SiteMinder TAI.
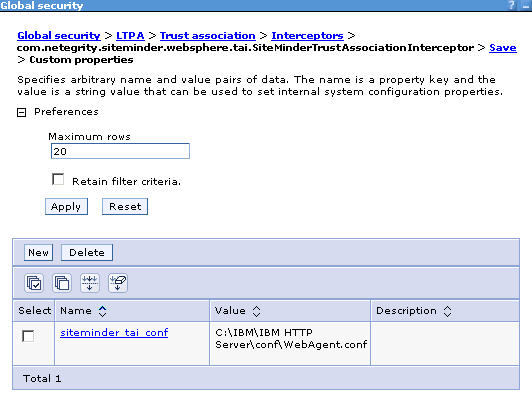
Click Apply and save the changes to the master configuration by clicking Save on the next two screens.
5). Log out of the Administration Console.
6). Important Note: In the WebAgent Configuration file - WebAgent.conf - or in the Agent Configuration object for both the WebAgent and the TAI, ensure that the following parameters are set as follows:
CssChecking=NO
BadUrlChars=./,/*,*.,~,/ i.e.,: remove //, /. and %00-%1f,%7f-%ff,%25 from the list of Bad URL Characters
7). Enable the TAI webagent.conf and the Web server webagent.conf:
Open webagent.conf
Set the value of EnableWebAgent to “yes”
Save the file
8). Copy smagent.properties under <TAI_PATH>/conf to profiles/wp_profile/properties/.
9). From a command line or shell in the WebSphere/AppServer/bin directory, stop and restart the WebSphere Server
4. Verify SiteMinder and Portal Server work well
4.1 Change the Login and Logout pages
1). Make backup copies of the following two files:
was_profile_root/installedApps/node_name/wps.ear/wps.war/themes/html/theme_name/banner_toolbar.jspf
was_profile_root/installedApps/node_name/wps.ear/wps.war/themes/html/theme_name/mainMenu.jsp
2). In each of the themes directory and subdirectories, there is a banner_toolbar.jspf file. Edit the appropriate banner_toolbar.jspf file and find the login button section. By default, WebSphere Portal ships the banner_toolbar.jspf with the Login screen section commented out, and the second section (Login Portlet) is uncommented. Replace each uncommented anchor href (each href is highlighted in bold ), depending on whether you use the Login Screen or the Login Portlet, with the following anchor tag:
<a class=wpsToolBarLink href='<%= wpsBaseURL %>/myportal'><wps:text key="link.login" bundle="nls.engine"/></a>
The following example shows what the banner_toolbar.jspf will look like after adding the above anchor tag:
<%-- comment this to enable screen login --%>
<portal-logic:if loggedIn="no">
<portal-navigation:urlGeneration contentNode="wps.Login">
<!--commented out the next href for Changing the Login Page
<a tabIndex="7" class="toolbarLink" href='<% wpsURL.write(escapeXmlWriter); %>'>
<portal-fmt:text key="link.login" bundle="nls.engine"/>
</a>
-->
<a tabIndex="7" class="toolbarLink" href='<%= wpsBaseURL %>/myportal'>
<portal-fmt:text key="link.login" bundle="nls.engine"/>
</a>
</portal-navigation:urlGeneration>
</portal-logic:if>
<%-- Uncomment this to enable screen login
<portal-logic:if loggedIn="no" notScreen="Login">
<a class="toolbarLink" href='<%= wpsBaseURL %>/myportal'><portal-fmt:text
key="link.login" bundle="nls.engine" /></a>
</portal-logic:if>
--%>
Note: The previous example uses the 'wps:' prefix to designate JSP tags from the portal tag library in portal.tld. Your custom JSPs might use a different tag prefix. See Tags used by the portal JSPs for more information.
The following example shows what the mainMenu.jsp will look like after adding the above anchor tag:
<%-- Login button --%>
<%-- Comment out to enable screen login --%>
<portal-logic:if loggedIn="no">
<portal-navigation:urlGeneration contentNode="wps.Login" themeTemplate="">
<c:set var="menuTitle"><portal-fmt:text key="link.login" bundle="nls.engine" /></c:set>
<% if ( menuItemCount > 0 ) { %>,<% } %>"asynchDoFormSubmit('<%= wpsBaseURL %>/myportal');",
'<c-rt:out value="<{menuTitle}" escapeXml="true" />',"<{defaultPageIconUrl}"
<% menuItemCount++; %>
</portal-navigation:urlGeneration>
</portal-logic:if>
<%-- Uncomment to allow screen login
<portal-logic:if loggedIn="no">
<c:set var="menuTitle"><portal-fmt:text key="link.login" bundle="nls.engine" /></c:set>
<% if ( menuItemCount > 0 ) { %>,<% } %>"asynchDoFormSubmit('<%= wpsBaseURL %>/myportal');",
'<c-rt:out value="<{menuTitle}" escapeXml="true" />',"<{defaultPageIconUrl}"
<% menuItemCount++; %>
</portal-logic:if>
--%>
Important for every operating system: Touch the Default.jsp file after editing any JSP files and before any restart. This updates the timestamp on the file to the current time and will signal a recompile of Default.jsp to incorporate the edit changes from other JSP files. Type:
touch Default.jsp. An alternative is to edit (open and save) Default.jsp, which has the same effect as the touch command. After updating banner_toolbar.jspf and mainMenu.jsp, you must restart WebSphere Portal unless reloading is enabled.
3). Open and save the versions of Default.jsp that include each of the files that you edited in a previous step. See the comments in each banner_toolbar.jspf file for more information.
4). Make a backup copy of the was_profile_root/installedApps/node_name/wps.ear/wps.war/WEB-INF/web.xml file. Edit the file as shown in bold here:
<login-config id="LoginConfig_1">
<auth-method>FORM</auth-method>
<realm-name>WPS</realm-name>
<form-login-config id="FormLoginConfig_1">
<form-login-page>/myportal</form-login-page>
<form-error-page/error.html/form-error-page>
</form-login-config>
</login-config>
5). Restart WebSphere Portal.
4.2 Access portal using a Web browser
To test your configuration, open the following URL in a Web browser:http://hostname/wps/myportal
SiteMinder authentication prompts to WebSphere Portal, Enter a valid username and password. The WebSphere Portal homepage displays, by-passing the WPS login page.




 203
203

 被折叠的 条评论
为什么被折叠?


