


1. LVS-DR 工作原理
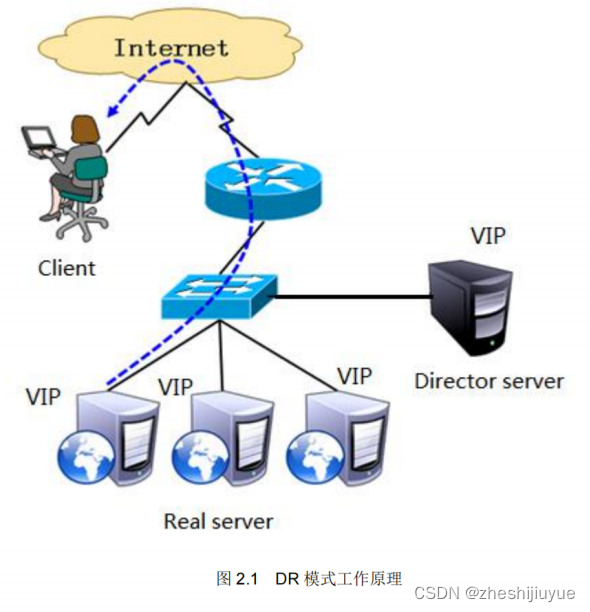
LVS-DR 模式,Director Server 作为群集的访问入口,不作为网关使用,节点 DirectorServer 与 Real Server 需要在同一个网络中,返回给客户端的数据不需要经过 DirectorServer。为了响应对整个群集的访问,Director Server 与 Real Server 都需要配置 VIP 地址工作原理如图 2.1 所示。
2. 数据包流向分析
(1)客户端发送请求到 Director Server,请求的数据报文 (源IP 是 CIP,目标IP 是 VIP)到达内核空间
(2) Director Server 和 Real Server 在同一个网络中,数据通过二层数据链路层来传输。
(3)内核空间判断数据包的目标 IP 是本机 VIP,此时 PVS 比对数据包请求的服务是否是集群服务,是集群服务就重新封装数据包。修改源 MAC 地址为 Director Server 的 MAC地址,修改目标 MAC 地址为 Real Server 的 MAC 地址,源P 地址与目标 P 地址没有改变,然后将数据包发送给 Real Server。
(4)到达 Real Server 的请求报文的 MAC 地址是自身的 MAC 地址,就接收此报文。数据包重新封装报文(源IP 地址为 VIP,目标 P CIP),将响应报文通过 接口传送给物理网卡然后向外发
5.Real Server 直接将响应报文传送到客户端。
3. LVS-DR 特点
- Director Server 和 Real Server 必须在同一个物理网络中。
- Real Server 可以使用私有地址,也可以使用公网地址。如果使用公网地址,可以通过互联网对 RIP 进行直接访问。
- 所有的请求报文经由 Director Server,但回复响应报文不能经过 Director Server。
- Real Server 的网关不允许指向 Director Server IP,即不允许数据包经过 Director Server。
- Real Server 上的 lo 接口配置 VIP 的IP 地址.
4. 案例分析
<配置负载调度器LVS>
(1)配置虚拟IP地址VIP
[root@localhost ~]# cd /etc/sysconfig/network-scripts/
[root@localhost network-scripts]# cp ifcfg-ens33 ifcfg-ens33:0
[root@localhost network-scripts]# vi ifcfg-ens33:0
TYPE=Ethernet
BOOTPROTO=static
NAME=ens33:0
DEVICE=ens33:0
ONBOOT=yes
IPADDR=192.168.10.172
NETMASK=255.255.255.0
[root@localhost network-scripts]# systemctl restart network
(2)调整内核参数,禁止转发重定向报文
由于 LVS 负载调度器和各节点需要共用 VIP 地址,应该关闭Linux 内核的重定向
[root@localhost ~]# vi /etc/sysctl.conf
在末尾添加:
net.ipv4.conf.all.send_redirects = 0
net.ipv4.conf.default.send_redirects = 0
net.ipv4.conf.ens33.send_redirects = 0
[root@localhost ~]# sysctl -p
(3)配置负载分配策略
[root@localhost ~]#yum -y install ipvsadm
[root@localhost ~]#ipvsadm -v \\查看版本
[root@localhost ~]# setenforce 0
[root@localhost ~]# systemctl stop firewalld
[root@localhost ~]#ipvsadm -C
[root@localhost ~]# ipvsadm -A -t 192.168.10.172:80 -s rr
[root@localhost ~]# ipvsadm -a -t 192.168.10.172:80 -r 192.168.10.102 -g -w 1
[root@localhost ~]# ipvsadm -a -t 192.168.10.172:80 -r 192.168.10.103 -g -w 1
[root@localhost ~]# ipvsadm-save
-A -t localhost.localdomain:http -s rr
-a -t localhost.localdomain:http -r 192.168.10.102:http -g -w 1
-a -t localhost.localdomain:http -r 192.168.10.103:http -g -w 1
[root@localhost ~]# systemctl enable ipvsadm
<配置web节点服务器>
(1)配置虚拟ip地址VIP
[root@localhost ~]# setenforce 0
[root@localhost ~]# systemctl stop firewalld
[root@localhost ~]#cd /etc/sysconfig/network-scripts/
[root@localhost network-scripts]# cp ifcfg-lo ifcfg-lo:0 (回环)
[root@localhost network-scripts]# vi ifcfg-lo:0
修改
DEVICE=lo:0
NETMASK=255.255.255.255 \\子网掩码必须为255.255.255.255
IPADDR=192.168.10.172
ONBOOT=yes
[root@localhost network-scripts]# systemctl restart network
[root@localhost network-scripts]# ifconfig
[root@localhost network-scripts]# cd
[root@localhost ~]# vi /etc/rc.local
添加
/sbin/route add -host 192.168.10.172 dev lo:0
[root@localhost ~]# route add -host 192.168.10.172 dev lo:0 (添加VIP本地访问路由)
Route add vip lo:0
(2)调整内核参数
[root@localhost ~]# vi /etc/sysctl.conf
添加:
net.ipv4.conf.all.arp_ignore = 1
net.ipv4.conf.all.arp_announce = 2
net.ipv4.conf.default.arp_ignore = 1
net.ipv4.conf.default.arp_announce = 2
net.ipv4.conf.lo.arp_ignore = 1
net.ipv4.conf.lo.arp_announce = 2
注释:
arp_ignore =1
当收到arp请求时,只有ARP请求数据包所请求的IP地址属于当前网卡的IP地址,才会回应ARP响应数据包。
arp_announce = 2
当发送arp请求时,忽略IP数据包的源IP地址,总是选择网卡所配置的首选IP地址作为ARP请求数据包的发送方IP地址
目的:因为lo:0的ip地址和调度器的ens33:0的ip地址是一样的,为了不造成ip冲突,要禁止更新VIP的mac地址。
[root@localhost ~]# sysctl -p
(3)安装httpd创建测试网页
[root@localhost ~]# yum -y install httpd
yum install nfs-utils
[root@localhost ~]# mount 192.168.10.105:/opt/wwwroot /var/www/html
[root@localhost ~]#vi /var/www/html/index.html
<h1>LVS负载均衡群集--测试页面01</h1>
(4)启用httpd服务
[root@localhost ~]# systemctl start httpd
<配置第二台web节点>
配置方法与第一台完全相同
注意:在实验环境中,为了验证负载过程,第二台web服务器的网站可以可第一个不一样,所以这两个web服务器就没有必要使用NFS,直接在web服务器本地创建测试网页文件即可
在client上测试网站http://192.168.10.172 或 Curl 192.168.10.172
[root@localhost ~]# curl 192.168.10.172
web 02
[root@localhost ~]# curl 192.168.10.172
web 01
[root@localhost ~]# curl 192.168.10.172
web 02
[root@localhost ~]# curl 192.168.10.172
web 02
<在nfs上创建共享目录>
[root@localhost ~]# yum -y install nfs-utils
[root@localhost ~]# mkdir /opt/wwwroot
[root@localhost ~]# cd /opt/wwwroot/
[root@localhost wwwroot]# vim index.html (该网页是web1和web2共享网页)
00000
[root@localhost ~]# vim /etc/exports
/opt/wwwroot 192.168.10.0/24(rw,sync,no_root_squash)
[root@localhost ~]# systemctl start nfs
[root@localhost ~]# systemctl start rpcbind
[root@localhost ~]# systemctl stop firewalld
在client上测试网站http://192.168.10.172 或
[root@localhost ~]# curl 192.168.10.172
oooo
输出的是共享文件的网页内容
也可以用脚本测试:
[root@localhost ~]# for i in $(seq 10); do curl http://192.168.10.172 ;done
<在LVS调度器上查看LVS策略>
[root@localhost ~]# ipvsadm -ln
IP Virtual Server version 1.2.1 (size=4096)
Prot LocalAddress:Port Scheduler Flags
-> RemoteAddress:Port Forward Weight ActiveConn InActConn
TCP 192.168.10.172:80 rr
-> 192.168.10.102:80 Route 1 0 0
-> 192.168.10.103:80 Route 1 0 0


 339
339

 被折叠的 条评论
为什么被折叠?
被折叠的 条评论
为什么被折叠?
 到【灌水乐园】发言


