原文:http://blog.csdn.net/sinat_30071459/article/details/51332084
说明:本博文假设你已经做好了自己的数据集,该数据集格式和VOC2007相同。下面是训练前的一些修改。
(做数据集的过程可以看http://blog.csdn.net/sinat_30071459/article/details/50723212)
Faster-RCNN源码下载地址:
Matlab版本:https://github.com/ShaoqingRen/faster_rcnn
Python版本:https://github.com/rbgirshick/py-faster-rcnn
本文用到的是Python版本,在Linux下运行。
Matlab版本的训练过程:http://blog.csdn.net/sinat_30071459/article/details/50546891
准备工作:
1.配置caffe
这个不多说,网上教程很多。
2.其他的注意事项
这里说的挺详细了,认真看看吧。地址:https://github.com/rbgirshick/py-faster-rcnn(主要内容如下)
下面大概翻译一下上面网址的内容吧。
(1)安装cython, python-OpenCV,easydict
- pip install cython
- pip install easydict
- apt-get install python-opencv
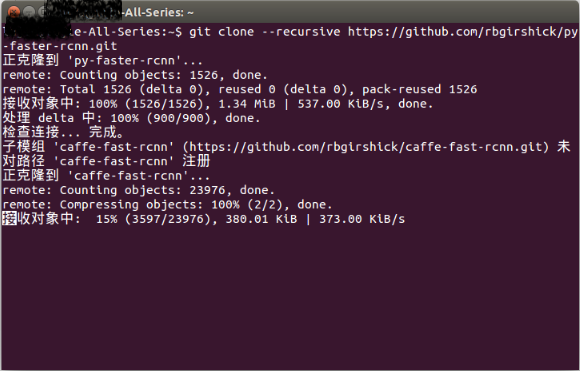
(2)下载py-faster-rcnn
- # Make sure to clone with --recursive
- git clone --recursive https://github.com/rbgirshick/py-faster-rcnn.git
如图:
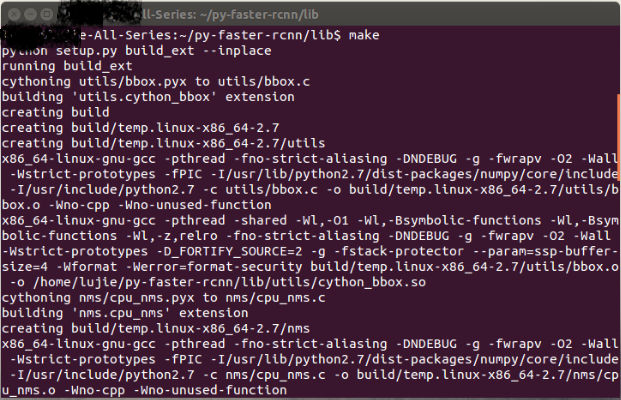
(3)进入py-faster-rcnn/lib
执行make
如图:
(4)进入py-faster-rcnn\caffe-fast-rcnn
执行 cp Makefile.config.example Makefile.config
然后,配置Makefile.config文件,可参考我的配置:Makefile.config文件
配置好Makefile.config文件后,执行:
如图:

(5)下载VOC2007数据集
提供一个百度云地址:http://pan.baidu.com/s/1mhMKKw4
解压,然后,将该数据集放在py-faster-rcnn\data下,用你的数据集替换VOC2007数据集。(替换Annotations,ImageSets和JPEGImages)
(用你的Annotations,ImagesSets和JPEGImages替换py-faster-rcnn\data\VOCdevkit2007\VOC2007中对应文件夹)
(6)下载ImageNet数据集下预训练得到的模型参数(用来初始化)
提供一个百度云地址:http://pan.baidu.com/s/1hsxx8OW
解压,然后将该文件放在py-faster-rcnn\data下
下面是训练前的一些修改。
1.py-faster-rcnn/models/pascal_voc/ZF/faster_rcnn_alt_opt/stage1_fast_rcnn_train.pt修改
- layer {
- name: 'data'
- type: 'Python'
- top: 'data'
- top: 'rois'
- top: 'labels'
- top: 'bbox_targets'
- top: 'bbox_inside_weights'
- top: 'bbox_outside_weights'
- python_param {
- module: 'roi_data_layer.layer'
- layer: 'RoIDataLayer'
- param_str: "'num_classes': 16" #按训练集类别改,该值为类别数+1
- }
- }
- layer {
- name: "cls_score"
- type: "InnerProduct"
- bottom: "fc7"
- top: "cls_score"
- param { lr_mult: 1.0 }
- param { lr_mult: 2.0 }
- inner_product_param {
- num_output: 16 #按训练集类别改,该值为类别数+1
- weight_filler {
- type: "gaussian"
- std: 0.01
- }
- bias_filler {
- type: "constant"
- value: 0
- }
- }
- }
- layer {
- name: "bbox_pred"
- type: "InnerProduct"
- bottom: "fc7"
- top: "bbox_pred"
- param { lr_mult: 1.0 }
- param { lr_mult: 2.0 }
- inner_product_param {
- num_output: 64 #按训练集类别改,该值为(类别数+1)*4
- weight_filler {
- type: "gaussian"
- std: 0.001
- }
- bias_filler {
- type: "constant"
- value: 0
- }
- }
- }
2.py-faster-rcnn/models/pascal_voc/ZF/faster_rcnn_alt_opt/stage1_rpn_train.pt修改
- layer {
- name: 'input-data'
- type: 'Python'
- top: 'data'
- top: 'im_info'
- top: 'gt_boxes'
- python_param {
- module: 'roi_data_layer.layer'
- layer: 'RoIDataLayer'
- param_str: "'num_classes': 16" #按训练集类别改,该值为类别数+1
- }
- }
3.py-faster-rcnn/models/pascal_voc/ZF/faster_rcnn_alt_opt/stage2_fast_rcnn_train.pt修改
- layer {
- name: 'data'
- type: 'Python'
- top: 'data'
- top: 'rois'
- top: 'labels'
- top: 'bbox_targets'
- top: 'bbox_inside_weights'
- top: 'bbox_outside_weights'
- python_param {
- module: 'roi_data_layer.layer'
- layer: 'RoIDataLayer'
- param_str: "'num_classes': 16" #按训练集类别改,该值为类别数+1
- }
- }
- layer {
- name: "cls_score"
- type: "InnerProduct"
- bottom: "fc7"
- top: "cls_score"
- param { lr_mult: 1.0 }
- param { lr_mult: 2.0 }
- inner_product_param {
- num_output: 16 #按训练集类别改,该值为类别数+1
- weight_filler {
- type: "gaussian"
- std: 0.01
- }
- bias_filler {
- type: "constant"
- value: 0
- }
- }
- }
- layer {
- name: "bbox_pred"
- type: "InnerProduct"
- bottom: "fc7"
- top: "bbox_pred"
- param { lr_mult: 1.0 }
- param { lr_mult: 2.0 }
- inner_product_param {
- num_output: 64 #按训练集类别改,该值为(类别数+1)*4
- weight_filler {
- type: "gaussian"
- std: 0.001
- }
- bias_filler {
- type: "constant"
- value: 0
- }
- }
- }
4.py-faster-rcnn/models/pascal_voc/ZF/faster_rcnn_alt_opt/stage2_rpn_train.pt修改
- layer {
- name: 'input-data'
- type: 'Python'
- top: 'data'
- top: 'im_info'
- top: 'gt_boxes'
- python_param {
- module: 'roi_data_layer.layer'
- layer: 'RoIDataLayer'
- param_str: "'num_classes': 16" #按训练集类别改,该值为类别数+1
- }
- }
5.py-faster-rcnn/models/pascal_voc/ZF/faster_rcnn_alt_opt/faster_rcnn_test.pt修改
- layer {
- name: "cls_score"
- type: "InnerProduct"
- bottom: "fc7"
- top: "cls_score"
- inner_product_param {
- num_output: 16 #按训练集类别改,该值为类别数+1
- }
- }
- layer {
- name: "bbox_pred"
- type: "InnerProduct"
- bottom: "fc7"
- top: "bbox_pred"
- inner_product_param {
- num_output: 64 #按训练集类别改,该值为(类别数+1)*4
- }
- }
6.py-faster-rcnn/lib/datasets/pascal_voc.py修改
(1)
- class pascal_voc(imdb):
- def __init__(self, image_set, year, devkit_path=None):
- imdb.__init__(self, 'voc_' + year + '_' + image_set)
- self._year = year
- self._image_set = image_set
- self._devkit_path = self._get_default_path() if devkit_path is None \
- else devkit_path
- self._data_path = os.path.join(self._devkit_path, 'VOC' + self._year)
- self._classes = ('__background__', # always index 0
- '你的标签1','你的标签2',你的标签3','你的标签4'
- )
上面要改的地方是
修改训练集文件夹:
- self._data_path = os.path.join(self._devkit_path, 'VOC'+self._year)
用你的数据集直接替换原来VOC2007内的Annotations,ImageSets和JPEGImages即可,以免出现各种错误。
修改标签:
- self._classes = ('__background__', # always index 0
- '你的标签1','你的标签2','你的标签3','你的标签4'
- )
修改成你的数据集的标签就行。
(2)
- cls = self._class_to_ind[obj.find('name').text.lower().strip()]
这里把标签转成小写,如果你的标签含有大写字母,可能会出现KeyError的错误,所以建议标签用小写字母。
(去掉lower应该也行)
建议训练的标签还是用小写的字母,如果最终需要用大写字母或中文显示标签,可参考:
http://blog.csdn.net/sinat_30071459/article/details/51694037
7.py-faster-rcnn/lib/datasets/imdb.py修改
该文件的append_flipped_images(self)函数修改为:
- def append_flipped_images(self):
- num_images = self.num_images
- widths = [PIL.Image.open(self.image_path_at(i)).size[0]
- for i in xrange(num_images)]
- for i in xrange(num_images):
- boxes = self.roidb[i]['boxes'].copy()
- oldx1 = boxes[:, 0].copy()
- oldx2 = boxes[:, 2].copy()
- boxes[:, 0] = widths[i] - oldx2 - 1
- print boxes[:, 0]
- boxes[:, 2] = widths[i] - oldx1 - 1
- print boxes[:, 0]
- assert (boxes[:, 2] >= boxes[:, 0]).all()
- entry = {'boxes' : boxes,
- 'gt_overlaps' : self.roidb[i]['gt_overlaps'],
- 'gt_classes' : self.roidb[i]['gt_classes'],
- 'flipped' : True}
- self.roidb.append(entry)
- self._image_index = self._image_index * 2
!!!为防止与之前的模型搞混,训练前把output文件夹删除(或改个其他名),还要把py-faster-rcnn/data/cache中的文件和
py-faster-rcnn/data/VOCdevkit2007/annotations_cache中的文件删除(如果有的话)。
至于学习率等之类的设置,可在py-faster-rcnn/models/pascal_voc/ZF/faster_rcnn_alt_opt中的solve文件设置,迭代次数可在py-faster-rcnn\tools的train_faster_rcnn_alt_opt.py中修改:
- max_iters = [80000, 40000, 80000, 40000]
分别为4个阶段(rpn第1阶段,fast rcnn第1阶段,rpn第2阶段,fast rcnn第2阶段)的迭代次数。可改成你希望的迭代次数。
如果改了这些数值,最好把py-faster-rcnn/models/pascal_voc/ZF/faster_rcnn_alt_opt里对应的solver文件(有4个)也修改,stepsize小于上面修改的数值。
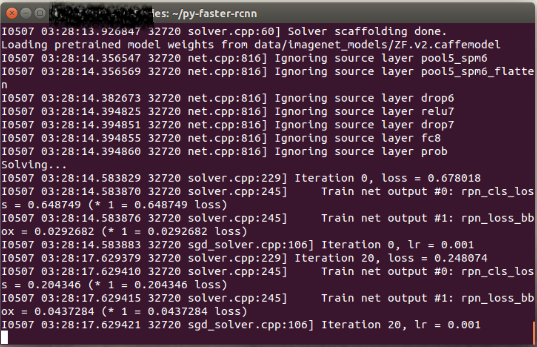
8.开始训练
进入py-faster-rcnn,执行:
- ./experiments/scripts/faster_rcnn_alt_opt.sh 0 ZF pascal_voc
这样,就开始训练了。
9.测试
将训练得到的py-faster-rcnn\output\faster_rcnn_alt_opt\***_trainval中ZF的caffemodel拷贝至py-faster-rcnn\data\faster_rcnn_models(如果没有这个文件夹,就新建一个),然后,修改:
py-faster-rcnn\tools\demo.py,主要修改:
- CLASSES = ('__background__',
- '你的标签1', '你的标签2', '你的标签3', '你的标签4')
改成你的数据集标签;
- NETS = {'vgg16': ('VGG16',
- 'VGG16_faster_rcnn_final.caffemodel'),
- 'zf': ('ZF',
- 'ZF_faster_rcnn_final.caffemodel')}
上面ZF的caffemodel改成你的caffemodel。
- im_names = ['1559.jpg','1564.jpg']
改成你的测试图片。(测试图片放在py-faster-rcnn\data\demo中)
10.结果
在py-faster-rcnn下,
执行:
或者将默认的模型改为zf:
- parser.add_argument('--net', dest='demo_net', help='Network to use [vgg16]',
- choices=NETS.keys(), default='vgg16')
修改:
执行:


 1万+
1万+


 被折叠的 条评论
为什么被折叠?
被折叠的 条评论
为什么被折叠?
 到【灌水乐园】发言


