


转载请标明出处:
http://blog.csdn.net/lmj623565791/article/details/45556391;
本文出自:【张鸿洋的博客】
1、概述
2015年初google发布了Android性能优化典范,发了16个小视频供大家欣赏,当时我也将其下载,通过微信公众号给大家推送了百度云的下载地址(地址在文末,ps:欢迎大家订阅公众号),那么近期google又在udacity上开了系列类的相关课程。有了上述的参考,那么本性能优化实战教程就有了坚实的基础,本系列将结合实例为大家展示如何去识别、诊断、解决Android应用开发中存在的性能问题。那么首先带来的就是大家最关注的渲染的性能优化(~~渲染就是把东西绘制到屏幕上)。
ps:本博客所有案例可能并不会完全按照Google给出的例子,因为范例代码比较多且不好在博客中展示,所以基本代码都会经过调整,但表达的意思不会变。
2、 Android渲染机制
大家自己编写App的时候,有时会感觉界面卡顿,尤其是自定义View的时候,大多数是因为布局的层次过多,存在不必要的绘制,或者onDraw等方法中过于耗时。那么究竟需要多快,才能给用户一个流畅的体验呢?那么就需要简单了解下Android的渲染机制,一图胜千言:
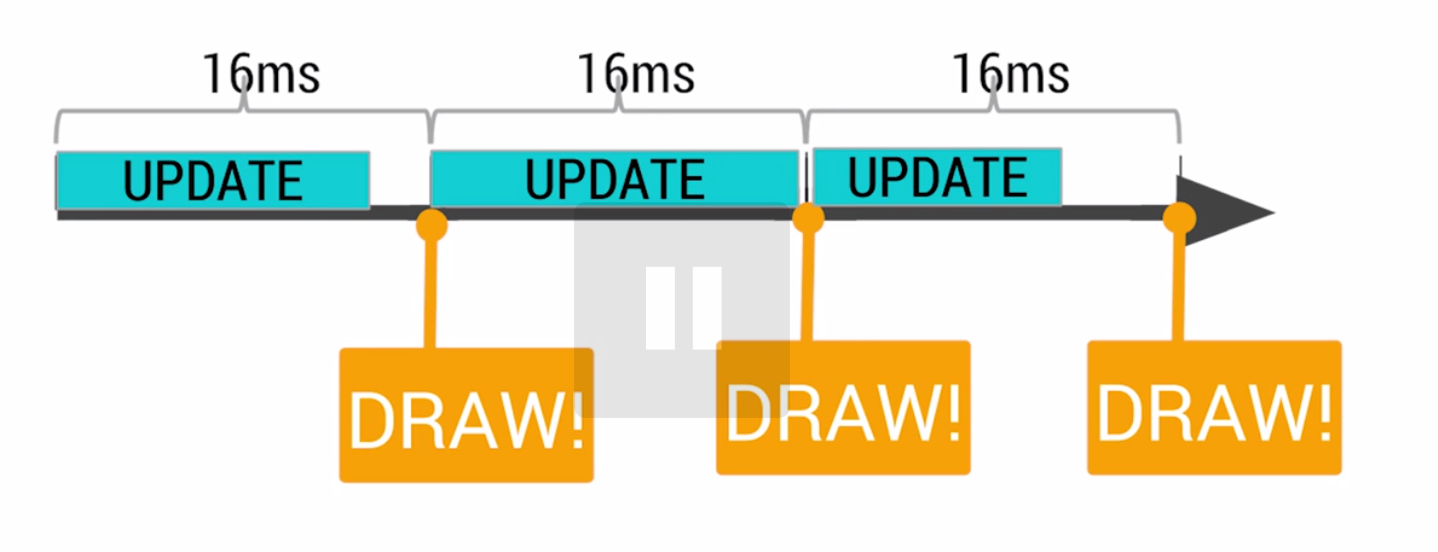
Android系统每隔16ms发出VSYNC信号,触发对UI进行渲染,那么整个过程如果保证在16ms以内就能达到一个流畅的画面。那么如果操作超过了16ms就会发生下面的情况:
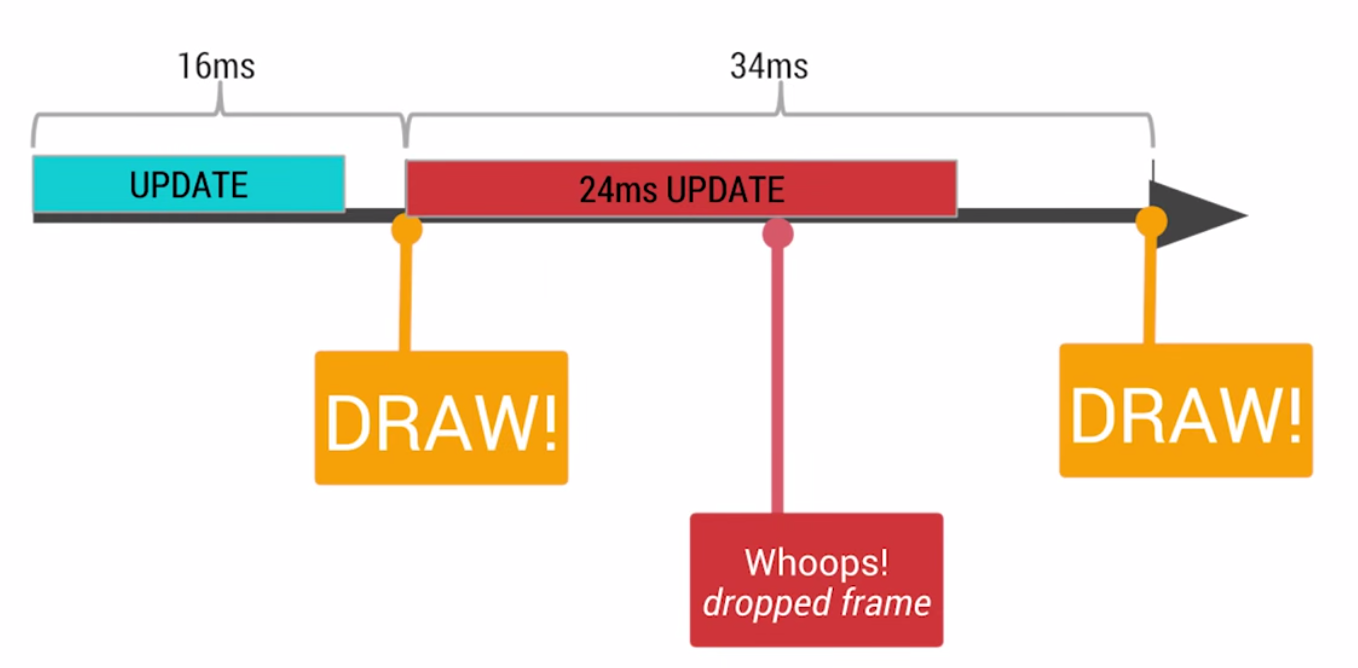
如果系统发生的VSYNC信号,而此时无法进行渲染,还在做别的操作,那么就会导致丢帧的现象,(大家在察觉到APP卡顿的时候,可以看看logcat控制太,会有drop frames类似的警告)。这样的话,绘制就会在下一个16ms的时候才进行绘制,即使只丢一帧,用户也会发现卡顿的~~(ps:上面标识不应该是32ms么,咋是34ms,难道我错过了什么)。
好了,很多朋友会不会奇怪为什么是16ms,16ms意味着着1000/60hz,相当于60fps,那么只要解释为什么是60fps,好在这个问题,网上有解答:
这是因为人眼与大脑之间的协作无法感知超过60fps的画面更新。12fps大概类似手动快速翻动书籍的帧率,这明显是可以感知到不够顺滑的。24fps使得人眼感知的是连续线性的运动,这其实是归功于运动模糊的
效果。24fps是电影胶圈通常使用的帧率,因为这个帧率已经足够支撑大部分电影画面需要表达的内容,同时能够最大的减少费用支出。但是低于30fps是
无法顺畅表现绚丽的画面内容的,此时就需要用到60fps来达到想要的效果,当然超过60fps是没有必要的(据说Dart能够带来120fps的体验)。本引用来源:Google 发布 Android 性能优化典范 - 开源中国社区
好了,有了对Android渲染机制基本的认识以后,那么我们的卡顿的原因就在于没有办法在16ms内完成该完成的操作,而主要因素是在于没有必要的layouts、invalidations、Overdraw。渲染的过程是由CPU与GPU协作完成,下面一张图很好的展示出了CPU和GPU的工作,以及潜在的问题,检测的工具和解决方案。
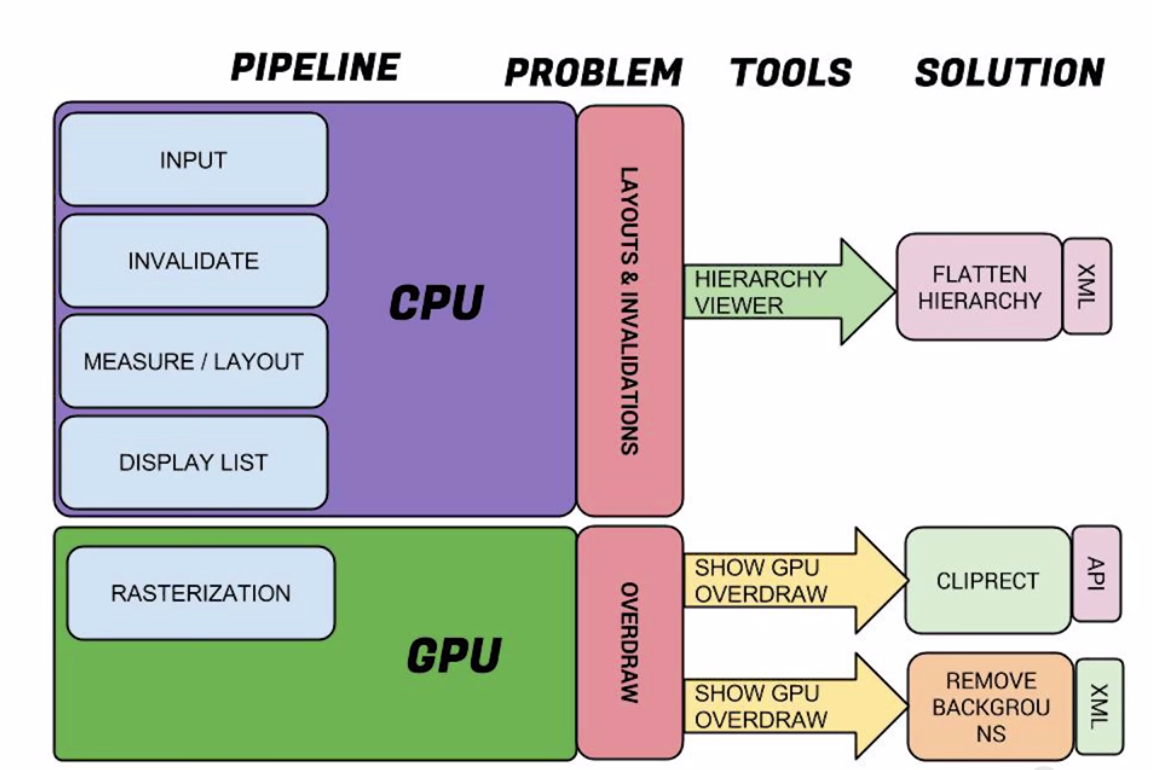
如果你对上图感到不理解,没关系,你只要知道问题:
- 通过Hierarchy Viewer去检测渲染效率,去除不必要的嵌套
- 通过Show GPU Overdraw去检测Overdraw,最终可以通过移除不必要的背景以及使用canvas.clipRect解决大多数问题。
如果你还觉得不能理解,没关系,文本毕竟是枯燥的,那么结合实例来展示优化的过程。
3、Overdraw的检测
对于性能优化,那么首先肯定是去发现问题,那么对么overdraw这个问题,还是比较容易发现的。
按照以下步骤打开Show GPU Overrdraw的选项:
设置 -> 开发者选项 -> 调试GPU过度绘制 -> 显示GPU过度绘制
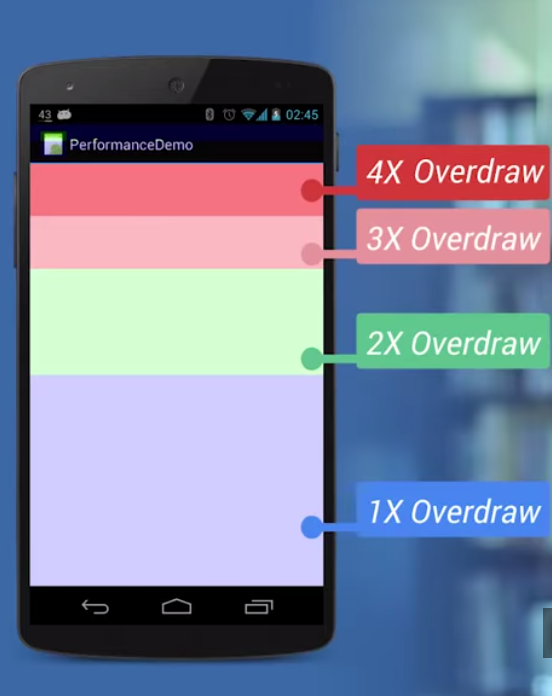
好了,打开以后呢,你会发现屏幕上有各种颜色,此时你可以切换到需要检测的程序,对于各个色块,对比一张Overdraw的参考图:
那么如果你发现你的app上深红色的色块比较多,那么可能就要注意了,接下来就开始说如果遇到overdraw的情况比较严重我们该则么处理。
4、Overdraw 的处理方案一:移除不必要的background
下面看一个简单的展示ListView的例子:
- activity_main
<?xml version="1.0" encoding="utf-8"?>
<LinearLayout xmlns:android="http://schemas.android.com/apk/res/android"
              android:layout_width="match_parent"
              android:layout_height="match_parent"
              android:paddingLeft="@dimen/activity_horizontal_margin"
              android:paddingRight="@dimen/activity_horizontal_margin"
              android:background="@android:color/white"
              android:paddingTop="@dimen/activity_vertical_margin"
              android:paddingBottom="@dimen/activity_vertical_margin"
              android:orientation="vertical"
    >

    <TextView
        android:layout_width="match_parent"
        android:layout_height="wrap_content"
        android:padding="@dimen/narrow_space"
        android:textSize="@dimen/large_text_size"
        android:layout_marginBottom="@dimen/wide_space"
        android:text="@string/header_text"/>

    <ListView
        android:id="@+id/id_listview_chats"
        android:layout_width="match_parent"
        android:background="@android:color/white"
        android:layout_height="wrap_content"
        android:divider="@android:color/transparent"
        android:dividerHeight="@dimen/divider_height"/>
</LinearLayout>
- 1
- 2
- 3
- 4
- 5
- 6
- 7
- 8
- 9
- 10
- 11
- 12
- 13
- 14
- 15
- 16
- 17
- 18
- 19
- 20
- 21
- 22
- 23
- 24
- 25
- 26
- 27
- 28
- 29
- 1
- 2
- 3
- 4
- 5
- 6
- 7
- 8
- 9
- 10
- 11
- 12
- 13
- 14
- 15
- 16
- 17
- 18
- 19
- 20
- 21
- 22
- 23
- 24
- 25
- 26
- 27
- 28
- 29
- item的布局文件
<?xml version="1.0" encoding="utf-8"?>

<LinearLayout xmlns:android="http://schemas.android.com/apk/res/android"
    android:layout_width="match_parent"
    android:layout_height="match_parent"
    android:orientation="horizontal"
    android:paddingBottom="@dimen/chat_padding_bottom">

    <ImageView
        android:id="@+id/id_chat_icon"
        android:layout_width="@dimen/avatar_dimen"
        android:layout_height="@dimen/avatar_dimen"
        android:src="@drawable/joanna"
        android:layout_margin="@dimen/avatar_layout_margin" />

    <LinearLayout
        android:layout_width="match_parent"
        android:layout_height="wrap_content"
        android:background="@android:color/darker_gray"
        android:orientation="vertical">

        <RelativeLayout
            android:layout_width="wrap_content"
            android:layout_height="wrap_content"
            android:background="@android:color/white"
            android:textColor="#78A"
            android:orientation="horizontal">

            <TextView xmlns:android="http://schemas.android.com/apk/res/android"
                android:layout_width="wrap_content"
                android:layout_height="wrap_content"
                android:layout_alignParentLeft="true"
                android:padding="@dimen/narrow_space"
                android:text="@string/hello_world"
                android:gravity="bottom"
                android:id="@+id/id_chat_name" />

            <TextView xmlns:android="http://schemas.android.com/apk/res/android"
                android:layout_width="wrap_content"
                android:layout_height="wrap_content"
                android:layout_alignParentRight="true"
                android:textStyle="italic"
                android:text="@string/hello_world"
                android:padding="@dimen/narrow_space"
                android:id="@+id/id_chat_date" />
        </RelativeLayout>

        <TextView xmlns:android="http://schemas.android.com/apk/res/android"
            android:layout_width="match_parent"
            android:layout_height="match_parent"
            android:padding="@dimen/narrow_space"
            android:background="@android:color/white"
            android:text="@string/hello_world"
            android:id="@+id/id_chat_msg" />
    </LinearLayout>
</LinearLayout>
- 1
- 2
- 3
- 4
- 5
- 6
- 7
- 8
- 9
- 10
- 11
- 12
- 13
- 14
- 15
- 16
- 17
- 18
- 19
- 20
- 21
- 22
- 23
- 24
- 25
- 26
- 27
- 28
- 29
- 30
- 31
- 32
- 33
- 34
- 35
- 36
- 37
- 38
- 39
- 40
- 41
- 42
- 43
- 44
- 45
- 46
- 47
- 48
- 49
- 50
- 51
- 52
- 53
- 54
- 55
- 56
- 57
- 1
- 2
- 3
- 4
- 5
- 6
- 7
- 8
- 9
- 10
- 11
- 12
- 13
- 14
- 15
- 16
- 17
- 18
- 19
- 20
- 21
- 22
- 23
- 24
- 25
- 26
- 27
- 28
- 29
- 30
- 31
- 32
- 33
- 34
- 35
- 36
- 37
- 38
- 39
- 40
- 41
- 42
- 43
- 44
- 45
- 46
- 47
- 48
- 49
- 50
- 51
- 52
- 53
- 54
- 55
- 56
- 57
- Activity的代码
package com.zhy.performance_01_render;

import android.os.Bundle;
import android.os.PersistableBundle;
import android.support.annotation.Nullable;
import android.support.v7.app.AppCompatActivity;
import android.view.LayoutInflater;
import android.view.View;
import android.view.ViewGroup;
import android.widget.ArrayAdapter;
import android.widget.ImageView;
import android.widget.ListView;
import android.widget.TextView;

/**
 * Created by zhy on 15/4/29.
 */
public class OverDrawActivity01 extends AppCompatActivity
{
    private ListView mListView;
    private LayoutInflater mInflater ;

    @Override
    protected void onCreate(@Nullable Bundle savedInstanceState)
    {
        super.onCreate(savedInstanceState);

        setContentView(R.layout.activity_overdraw_01);

        mInflater = LayoutInflater.from(this);
        mListView = (ListView) findViewById(R.id.id_listview_chats);

        mListView.setAdapter(new ArrayAdapter<Droid>(this, -1, Droid.generateDatas())
        {
            @Override
            public View getView(int position, View convertView, ViewGroup parent)
            {

                ViewHolder holder = null ;
                if(convertView == null)
                {
                    convertView = mInflater.inflate(R.layout.chat_item,parent,false);
                    holder = new ViewHolder();
                    holder.icon = (ImageView) convertView.findViewById(R.id.id_chat_icon);
                    holder.name = (TextView) convertView.findViewById(R.id.id_chat_name);
                    holder.date = (TextView) convertView.findViewById(R.id.id_chat_date);
                    holder.msg = (TextView) convertView.findViewById(R.id.id_chat_msg);
                    convertView.setTag(holder);
                }else
                {
                    holder = (ViewHolder) convertView.getTag();
                }

                Droid droid = getItem(position);
                holder.icon.setBackgroundColor(0x44ff0000);
                holder.icon.setImageResource(droid.imageId);
                holder.date.setText(droid.date);
                holder.msg.setText(droid.msg);
                holder.name.setText(droid.name);

                return convertView;
            }

            class ViewHolder
            {
                ImageView icon;
                TextView name;
                TextView date;
                TextView msg;
            }

        });
    }


}
- 1
- 2
- 3
- 4
- 5
- 6
- 7
- 8
- 9
- 10
- 11
- 12
- 13
- 14
- 15
- 16
- 17
- 18
- 19
- 20
- 21
- 22
- 23
- 24
- 25
- 26
- 27
- 28
- 29
- 30
- 31
- 32
- 33
- 34
- 35
- 36
- 37
- 38
- 39
- 40
- 41
- 42
- 43
- 44
- 45
- 46
- 47
- 48
- 49
- 50
- 51
- 52
- 53
- 54
- 55
- 56
- 57
- 58
- 59
- 60
- 61
- 62
- 63
- 64
- 65
- 66
- 67
- 68
- 69
- 70
- 71
- 72
- 73
- 74
- 75
- 76
- 77
- 实体的代码
package com.zhy.performance_01_render;

import java.util.ArrayList;
import java.util.List;

public class Droid
{
    public String name;
    public int imageId;
    public String date;
    public String msg;


    public Droid(String msg, String date, int imageId, String name)
    {
        this.msg = msg;
        this.date = date;
        this.imageId = imageId;
        this.name = name;
    }

    public static List<Droid> generateDatas()
    {
        List<Droid> datas = new ArrayList<Droid>();

        datas.add(new Droid("Lorem ipsum dolor sit amet, orci nullam cra", "3分钟前", -1, "alex"));
        datas.add(new Droid("Omnis aptent magnis suspendisse ipsum, semper egestas", "12分钟前", R.drawable.joanna, "john"));
        datas.add(new Droid("eu nibh, rhoncus wisi posuere lacus, ad erat egestas", "17分钟前", -1, "7heaven"));
        datas.add(new Droid("eu nibh, rhoncus wisi posuere lacus, ad erat egestas", "33分钟前", R.drawable.shailen, "Lseven"));

        return datas;
    }


}
- 1
- 2
- 3
- 4
- 5
- 6
- 7
- 8
- 9
- 10
- 11
- 12
- 13
- 14
- 15
- 16
- 17
- 18
- 19
- 20
- 21
- 22
- 23
- 24
- 25
- 26
- 27
- 28
- 29
- 30
- 31
- 32
- 33
- 34
- 35
- 36

- 1
- 2
- 3
- 4
- 5
- 6
- 7
- 8
- 9
- 10
- 11
- 12
- 13
- 14
- 15
- 16
- 17
- 18
- 19
- 20
- 21
- 22
- 23
- 24
- 25
- 26
- 27
- 28
- 29
- 30
- 31
- 32
- 33
- 34
- 35
- 36
现在的效果是:
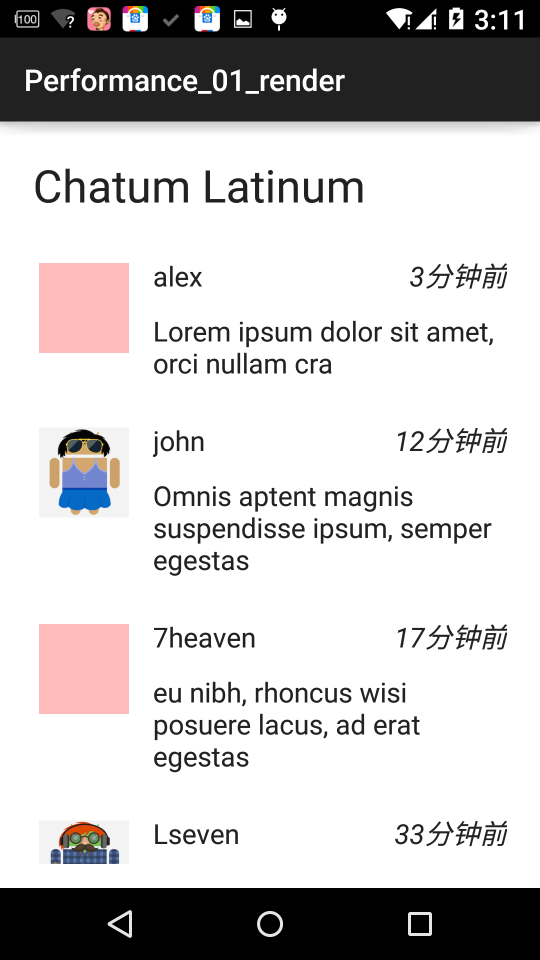
注意,我们的需求是整体是Activity是个白色的背景。
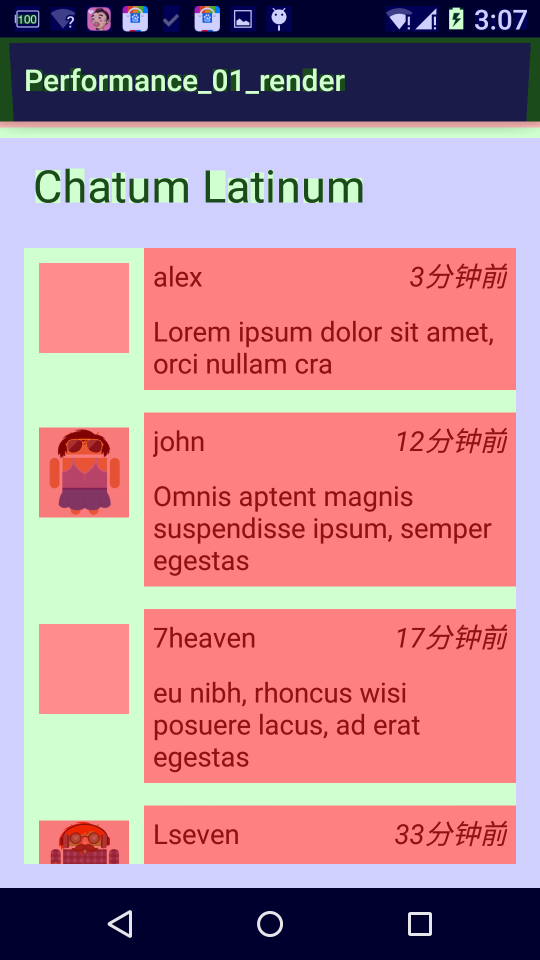
开启Show GPU Overdraw以后:

对比上面的参照图,可以发现一个简单的ListView展示Item,竟然很多地方被过度绘制了4X 。 那么,其实主要原因是由于该布局文件中存在很多不必要的背景,仔细看上述的布局文件,那么开始移除吧。
-
不必要的Background 1
我们主布局的文件已经是background为white了,那么可以移除ListView的白色背景
-
不必要的Background 2
Item布局中的LinearLayout的
android:background="@android:color/darker_gray" -
不必要的Background 3
Item布局中的RelativeLayout的
android:background="@android:color/white" -
不必要的Background 4
Item布局中id为id_msg的TextView的
android:background="@android:color/white"
这四个不必要的背景也比较好找,那么移除后的效果是:
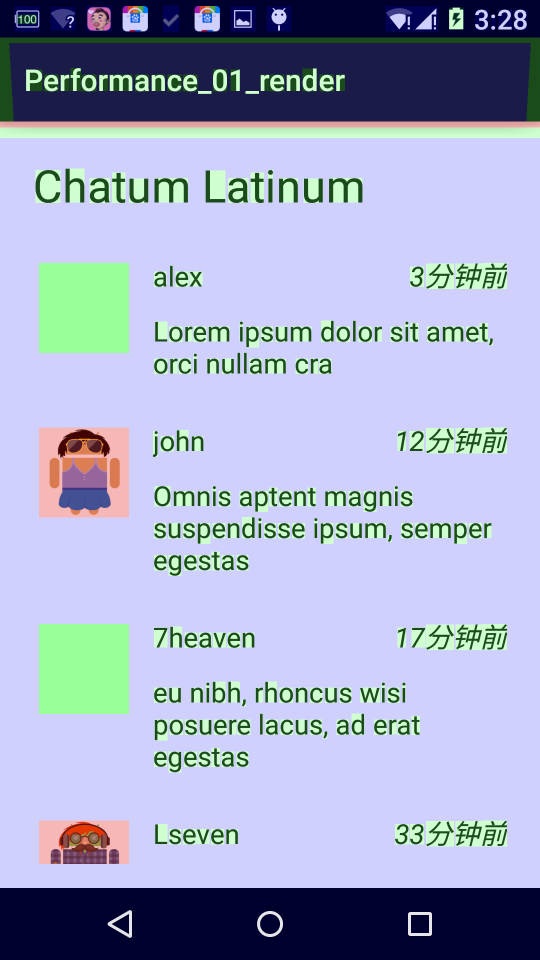
对比之前的是不是好多了~~~接下来还存在一些不必要的背景,你还能找到吗?
- 不必要的Background 5
这个背景比较难发现,主要需要看Adapter的getView的代码,上述代码你会发现,首先为每个icon设置了背景色(主要是当没有icon图的时候去显示),然后又设置了一个头像。那么就造成了overdraw,有头像的完全没必要去绘制背景,所有修改代码:
Droid droid = getItem(position);
                if(droid.imageId ==-1)
                {
                    holder.icon.setBackgroundColor(0x4400ff00);
                    holder.icon.setImageResource(android.R.color.transparent);
                }else
                {
                    holder.icon.setImageResource(droid.imageId);
                    holder.icon.setBackgroundResource(android.R.color.transparent);
                }
- 1
- 2
- 3
- 4
- 5
- 6
- 7
- 8
- 9
- 10
- 11
- 1
- 2
- 3
- 4
- 5
- 6
- 7
- 8
- 9
- 10
- 11
ok,还有最后一个,这个也是非常容易被忽略的。
- 不必要的Background 6
记得我们之前说,我们的这个Activity要求背景色是白色,我们的确在layout中去设置了背景色白色,那么这里注意下,我们的Activity的布局最终会添加在DecorView中,这个View会中的背景是不是就没有必要了,所以我们希望调用mDecor.setWindowBackground(drawable);,那么可以在Activity调用getWindow().setBackgroundDrawable(null);。
setContentView(R.layout.activity_overdraw_01);
        getWindow().setBackgroundDrawable(null);
- 1
- 2

- 1
- 2
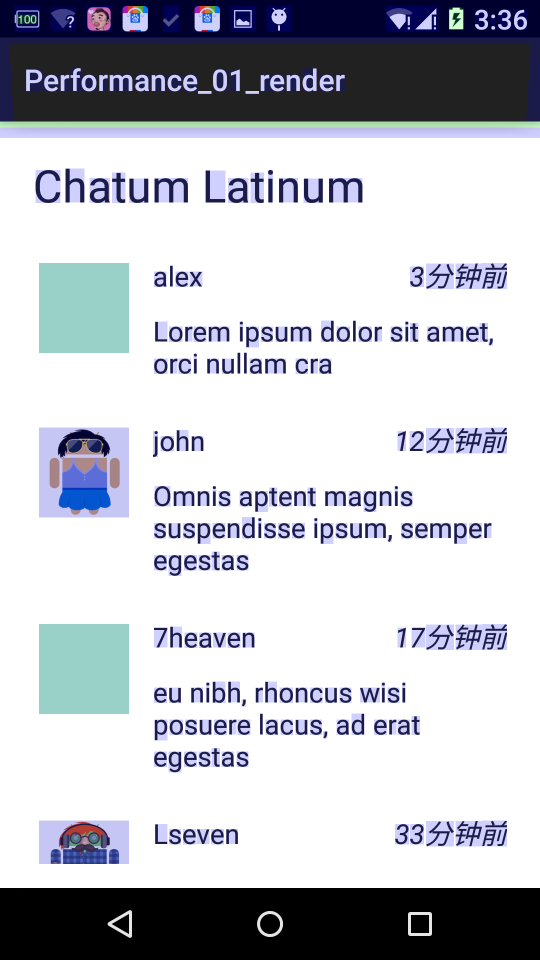
ok,一个简单的listview显示item,我们一共找出了6个不必要的背景,现在再看最后的Show GPU Overdraw 与最初的比较。
5、Overdraw 的处理方案二:clipRect的妙用
我们在自定义View的时候,经常会由于疏忽造成很多不必要的绘制,比如大家看下面这样的图:
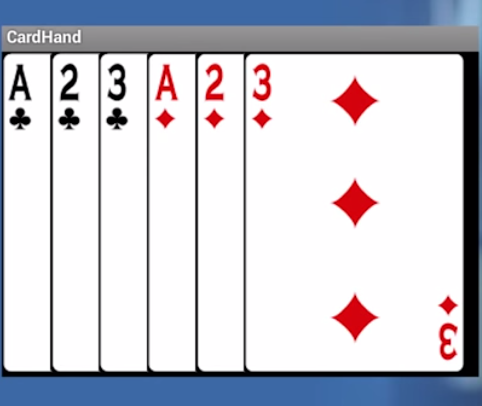
多张卡片叠加,那么如果你是一张一张卡片从左到右的绘制,效果肯定没问题,但是叠加的区域肯定是过度绘制了。
并且material design对于界面设计的新的风格更容易造成上述的问题。那么有什么好的方法去改善呢?
答案是有的,android的Canvas对象给我们提供了很便利的方法clipRect就可以很好的去解决这类问题。
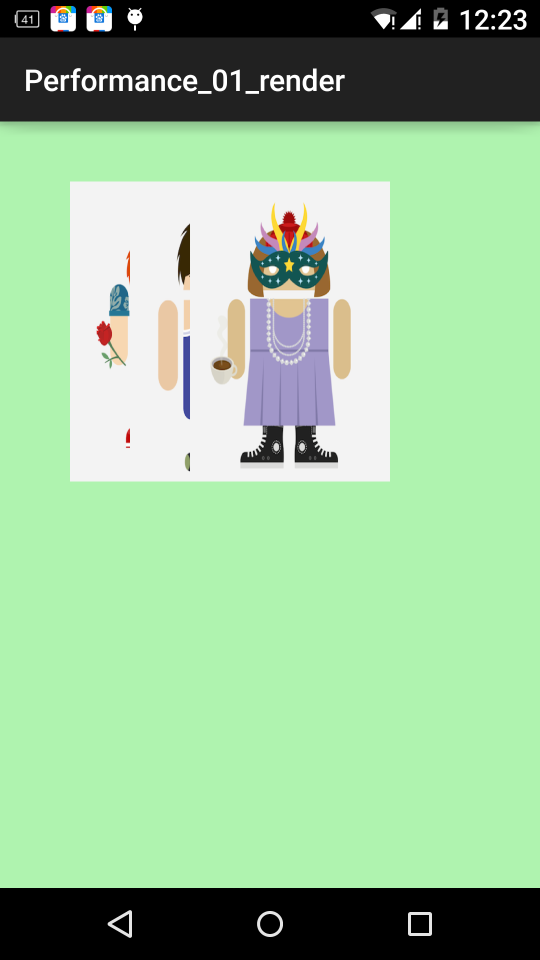
下面通过一个实例来展示,那么首先看一个效果图:
package com.zhy.performance_01_render;

import android.content.Context;
import android.graphics.Bitmap;
import android.graphics.BitmapFactory;
import android.graphics.Canvas;
import android.view.View;

/**
 * Created by zhy on 15/4/30.
 */
public class CardView extends View
{
    private Bitmap[] mCards = new Bitmap[3];

    private int[] mImgId = new int[]{R.drawable.alex, R.drawable.chris, R.drawable.claire};

    public CardView(Context context)
    {
        super(context);

        Bitmap bm = null;
        for (int i = 0; i < mCards.length; i++)
        {
            bm = BitmapFactory.decodeResource(getResources(), mImgId[i]);
            mCards[i] = Bitmap.createScaledBitmap(bm, 400, 600, false);
        }

        setBackgroundColor(0xff00ff00);
    }

    @Override
    protected void onDraw(Canvas canvas)
    {

        super.onDraw(canvas);

        canvas.save();
        canvas.translate(20, 120);
        for (Bitmap bitmap : mCards)
        {
            canvas.translate(120, 0);
            canvas.drawBitmap(bitmap, 0, 0, null);
        }
        canvas.restore();

    }
}
- 1
- 2
- 3
- 4
- 5
- 6
- 7
- 8
- 9
- 10
- 11
- 12
- 13
- 14
- 15
- 16
- 17
- 18
- 19
- 20
- 21
- 22
- 23
- 24
- 25
- 26
- 27
- 28
- 29
- 30
- 31
- 32
- 33
- 34
- 35
- 36
- 37
- 38
- 39
- 40
- 41
- 42
- 43
- 44
- 45
- 46
- 47
- 48
- 49
- 50
- 1
- 2
- 3
- 4
- 5
- 6
- 7
- 8
- 9
- 10
- 11
- 12
- 13
- 14
- 15
- 16
- 17
- 18
- 19
- 20
- 21
- 22
- 23
- 24
- 25
- 26
- 27
- 28
- 29
- 30
- 31
- 32
- 33
- 34
- 35
- 36
- 37
- 38
- 39
- 40
- 41
- 42
- 43
- 44
- 45
- 46
- 47
- 48
- 49
- 50
- Activity代码
/**
 * Created by zhy on 15/4/30.
 */
public class OverDrawActivity02 extends AppCompatActivity
{

    @Override
    protected void onCreate(@Nullable Bundle savedInstanceState)
    {
        super.onCreate(savedInstanceState);

        setContentView(new CardView(this));
    }
}
- 1
- 2
- 3
- 4
- 5
- 6
- 7
- 8
- 9
- 10
- 11
- 12
- 13
- 14
- 1
- 2
- 3
- 4
- 5
- 6
- 7
- 8
- 9
- 10
- 11
- 12
- 13
- 14
那么大家可以考虑下如何去优化,其实很明显哈,我们上面已经说了使用cliprect方法,那么我们目标直指
自定义View的onDraw方法。
修改后的代码:
 @Override
    protected void onDraw(Canvas canvas)
    {

        super.onDraw(canvas);

        canvas.save();
        canvas.translate(20, 120);
        for (int i = 0; i < mCards.length; i++)
        {
            canvas.translate(120, 0);
            canvas.save();
            if (i < mCards.length - 1)
            {
                canvas.clipRect(0, 0, 120, mCards[i].getHeight());
            }
            canvas.drawBitmap(mCards[i], 0, 0, null);
            canvas.restore();
        }
        canvas.restore();

    }
- 1
- 2
- 3
- 4
- 5
- 6
- 7
- 8
- 9
- 10
- 11
- 12
- 13
- 14
- 15
- 16
- 17
- 18
- 19
- 20
- 21
- 22
- 23
- 1
- 2
- 3
- 4
- 5
- 6
- 7
- 8
- 9
- 10
- 11
- 12
- 13
- 14
- 15
- 16
- 17
- 18
- 19
- 20
- 21
- 22
- 23
分析得出,除了最后一张需要完整的绘制,其他的都只需要绘制部分;所以我们在循环的时候,给i到n-1都添加了clipRect的代码。
最后的效果图:
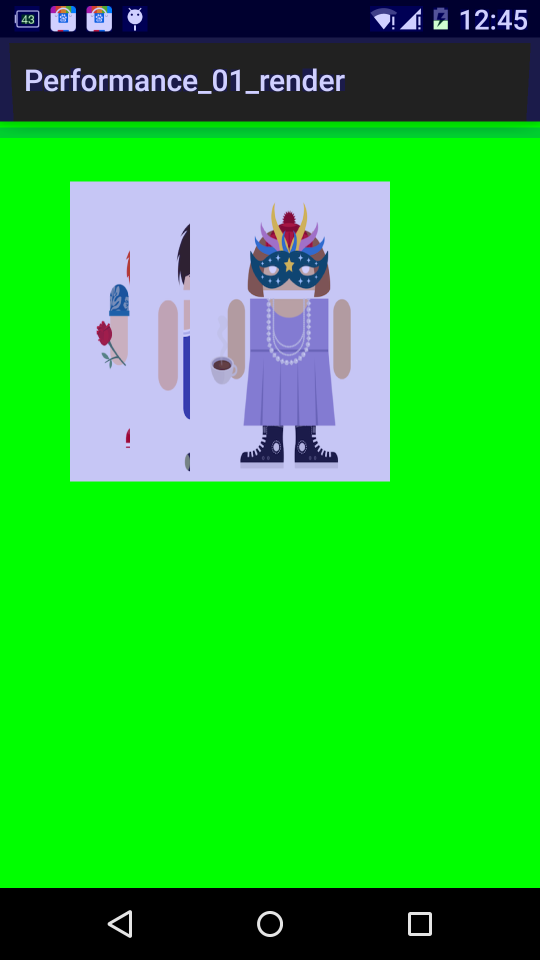
可以看到,所有卡片变为了淡紫色,对比参照图,都是1X过度绘制,那么是因为我的View添加了一个
ff00ff00的背景,可以说明已经是最优了。
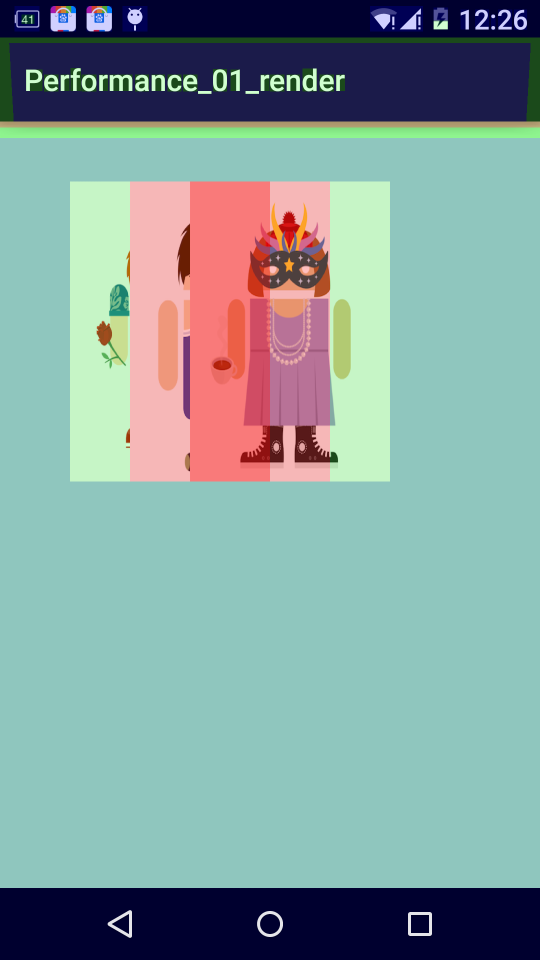
如果你按照上面的修改,会发现最终效果图不是淡紫色,而是青色(2X),那是为什么呢?因为你还忽略了
一个优化的地方,本View已经有了不透明的背景,完全可以移除Window的背景了,即在Activity中,添加getWindow().setBackgroundDrawable(null);代码。
好了,说完了Overdraw的检测与处理,那么还剩下一个layouts、invalidations过慢的问题,那么这类问题主要可能是你的XML层级过多导致的,当然也有很好的工具可以用来检测,那么就是Hierarchy Viewer。
6、减少不必要的层次:巧用Hierarchy Viewer
1、Hierarchy Viewer工具简介
Android SDK中包含这个工具,不过大家肯定也不陌生了~~~
那么就简单说一下它在哪,如何使用,以及真机无法使用该工具该怎么解决。
- Hierarchy Viewer在哪?
本博客使用IDE为Android Studio,那么只需要按照下图步骤即可找到:
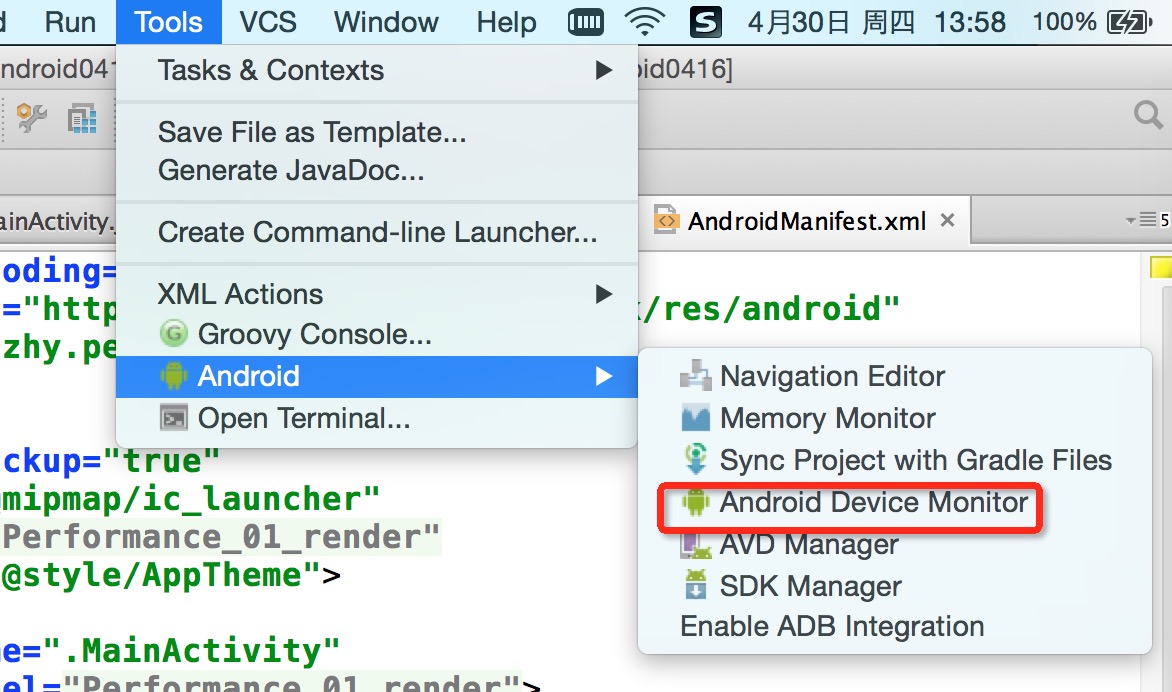
其他IDE的兄弟,找到这个肯定没问题,不过还是建议慢慢的转向AS。
- 如何使用?
一图胜千言:
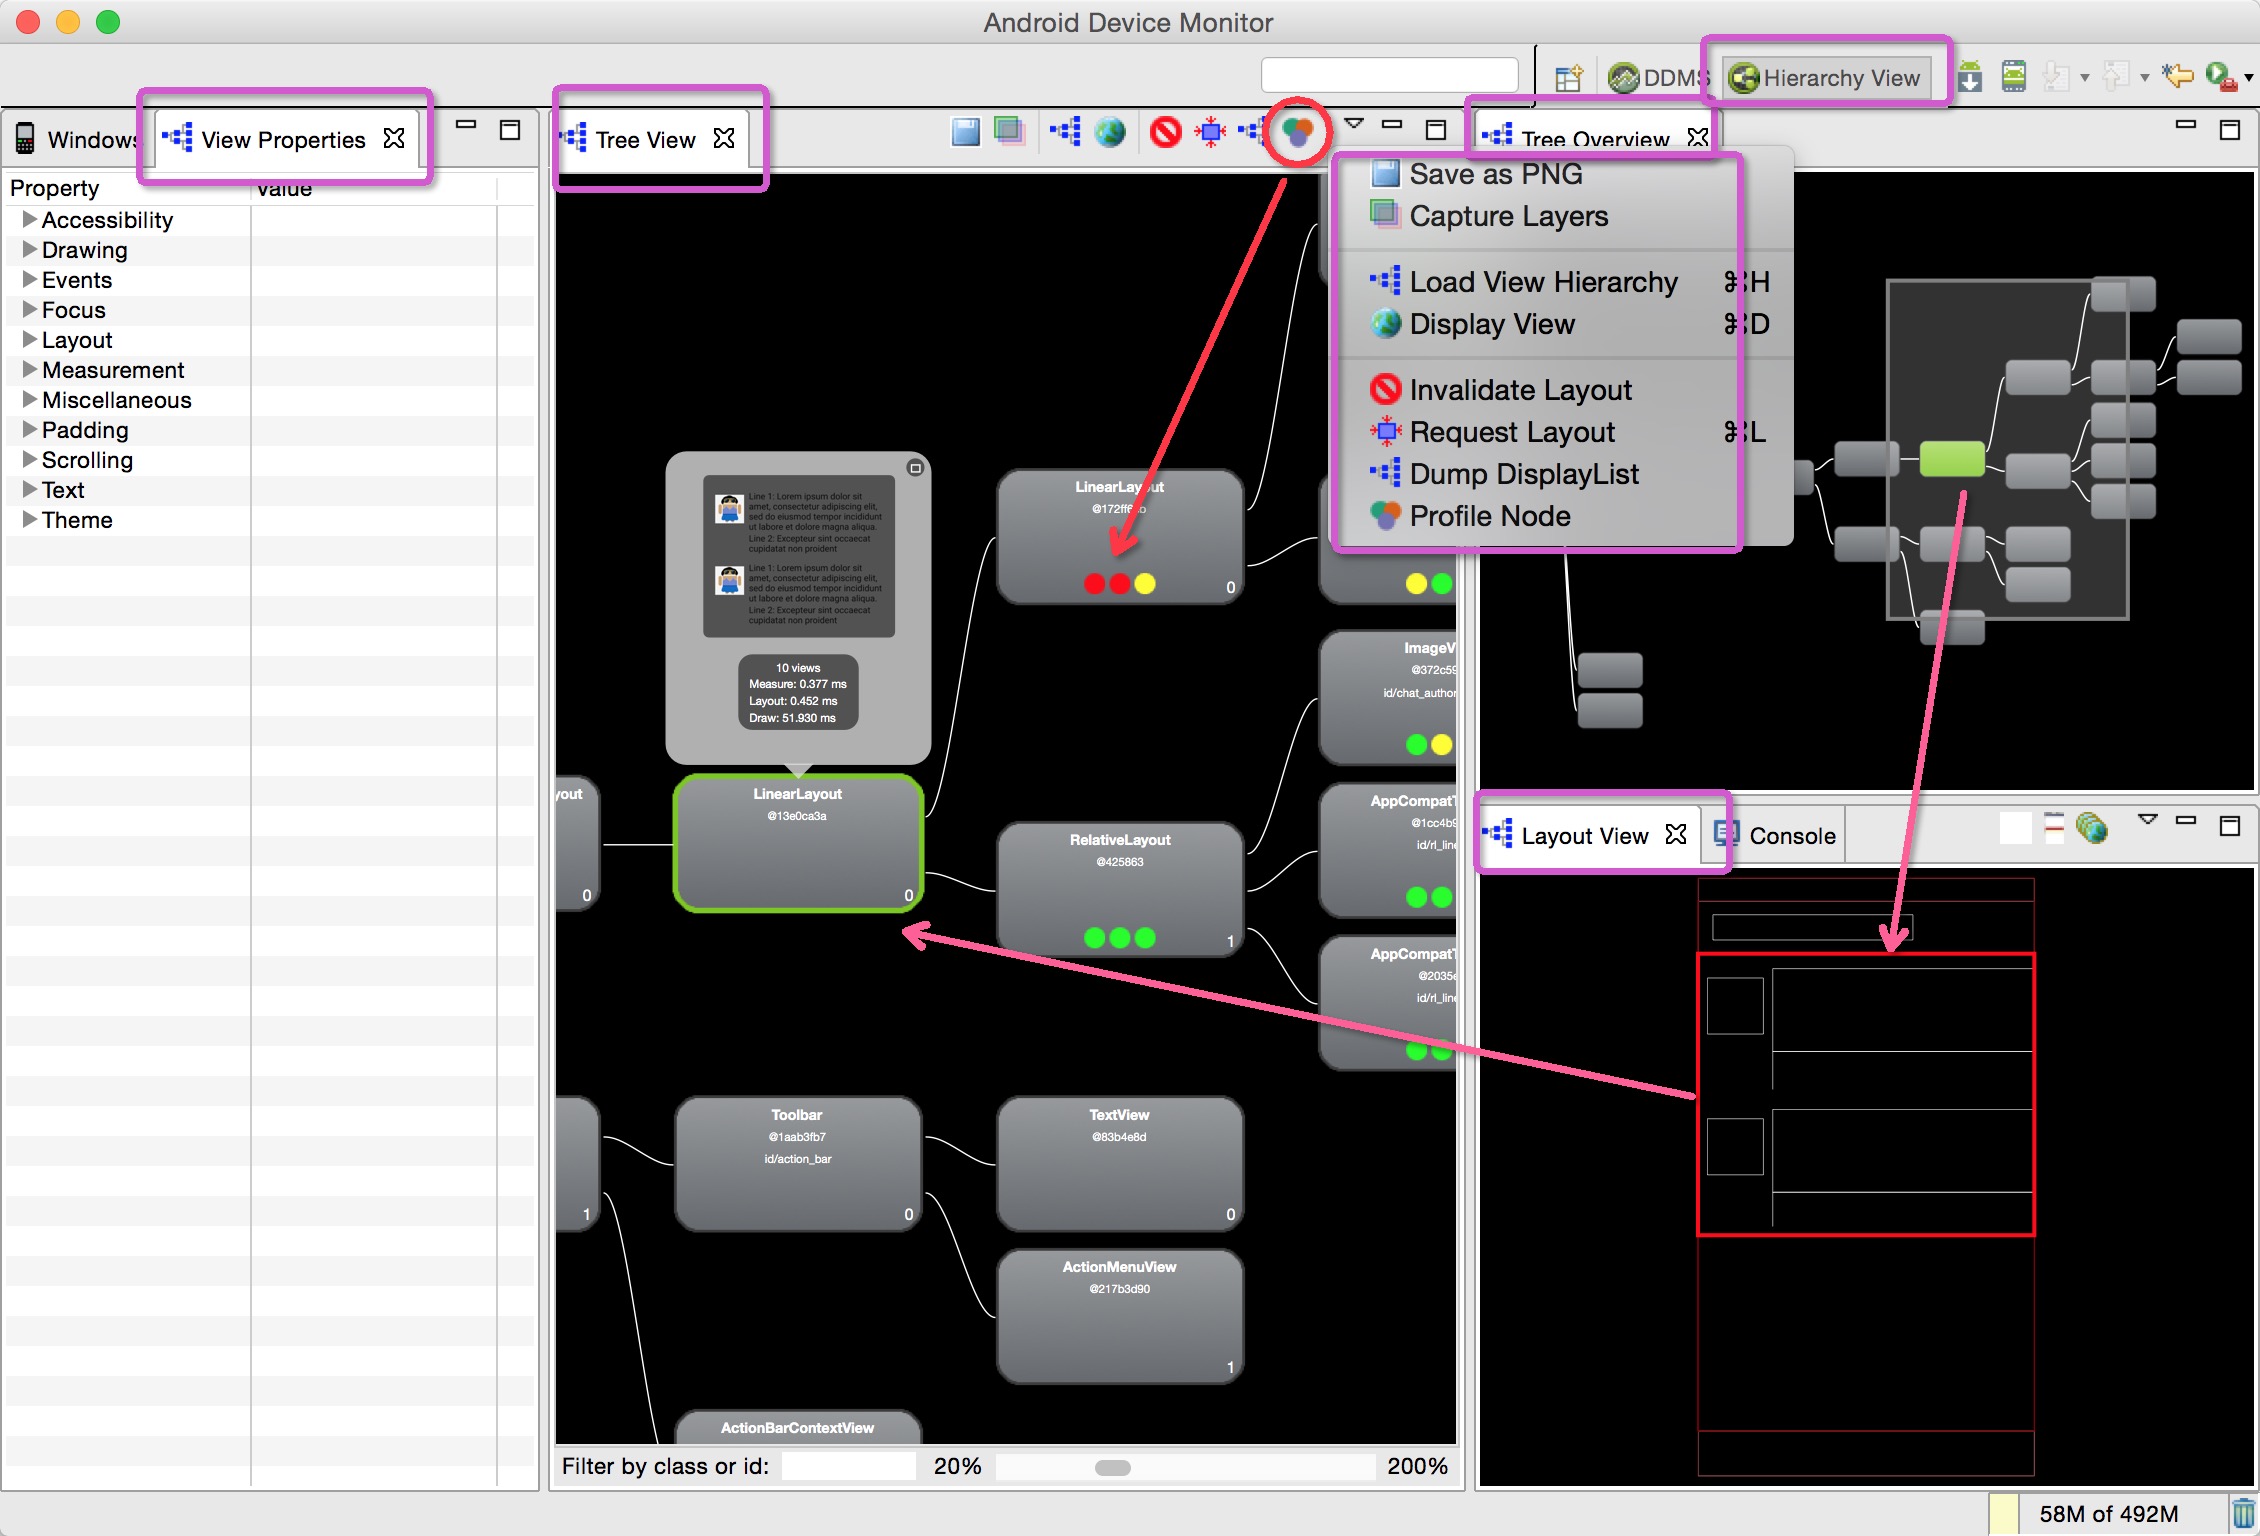
关注下,所有框住的区域~~
- 无法连接真机调试怎么办?
如果你不存在这样的问题,直接跳过本节。
Android的官方文档中,有这么一句话:
出于安全考虑,Hierarchy Viewer只能连接Android开发版手机或是模拟器
看来的确是存在这样的问题了,并且网上也有一些解决方案,修改源码神马的,有兴趣去试试。
这里推荐一种解决方案:romainguy在github上有个项目ViewServer,可以下载下来导入到IDE中,里面有个ViewServer的类,类注释上也标注了用法,在你希望调试的Activity以下该三个方法中,添加几行代码:
 * <pre>
 * public class MyActivity extends Activity {
 *     public void onCreate(Bundle savedInstanceState) {
 *         super.onCreate(savedInstanceState);
 *         // Set content view, etc.
 *         ViewServer.get(this).addWindow(this);
 *     }
 *
 *     public void onDestroy() {
 *         super.onDestroy();
 *         ViewServer.get(this).removeWindow(this);
 *     }
 *
 *     public void onResume() {
 *         super.onResume();
 *         ViewServer.get(this).setFocusedWindow(this);
 *     }
 * }
 * </pre>
- 1
- 2
- 3
- 4
- 5
- 6
- 7
- 8
- 9
- 10
- 11
- 12
- 13
- 14
- 15
- 16
- 17
- 18
- 19
- 1
- 2
- 3
- 4
- 5
- 6
- 7
- 8
- 9
- 10
- 11
- 12
- 13
- 14
- 15
- 16
- 17
- 18
- 19
记得先添加依赖,别问我怎么找不到ViewServer这个类,添加以上3行以后,手机运行至该Activity,重启下Android Device Moniter,然后就ok了,我就是这种方法调试的,哈~~
2、优化案例
好了,上面介绍完成了如何使用Hierarchy Viewer,下面使用一个案例来说明问题。
主要就是个布局文件:
- 布局文件
<?xml version="1.0" encoding="utf-8"?>

<LinearLayout xmlns:android="http://schemas.android.com/apk/res/android"
    android:orientation="vertical"
    android:layout_width="match_parent"
    android:layout_height="wrap_content">

    <!-- Version 1. Uses nested LinearLayouts -->
    <LinearLayout xmlns:android="http://schemas.android.com/apk/res/android"
        android:orientation="horizontal"
        android:layout_width="match_parent"
        android:layout_height="wrap_content"
        android:layout_marginTop="@dimen/activity_vertical_margin">

        <ImageView
            android:id="@+id/chat_author_avatar1"
            android:layout_width="@dimen/avatar_dimen"
            android:layout_height="@dimen/avatar_dimen"
            android:layout_margin="@dimen/avatar_layout_margin"
            android:src="@drawable/joanna"/>

        <LinearLayout
            android:layout_width="match_parent"
            android:layout_height="wrap_content"
            android:orientation="vertical">

            <TextView
                android:layout_width="match_parent"
                android:layout_height="wrap_content"
                android:text="@string/line1_text" />

            <TextView
                android:layout_width="match_parent"
                android:layout_height="wrap_content"
                android:text="@string/line2_text"/>
        </LinearLayout>
    </LinearLayout>


    <!-- Version 2: uses a single RelativeLayout -->
    <RelativeLayout xmlns:android="http://schemas.android.com/apk/res/android"
        android:orientation="horizontal"
        android:layout_width="match_parent"
        android:layout_height="wrap_content"
        android:layout_marginTop="@dimen/activity_vertical_margin">

        <ImageView
            android:id="@+id/chat_author_avatar2"
            android:layout_width="@dimen/avatar_dimen"
            android:layout_height="@dimen/avatar_dimen"
            android:layout_margin="@dimen/avatar_layout_margin"
            android:src="@drawable/joanna"/>


        <TextView
            android:id="@+id/rl_line1"
            android:layout_width="match_parent"
            android:layout_height="wrap_content"
            android:layout_toRightOf="@id/chat_author_avatar2"
            android:text="@string/line1_text" />

        <TextView
            android:id="@+id/rl_line2"
            android:layout_width="match_parent"
            android:layout_height="wrap_content"
            android:layout_below="@id/rl_line1"
            android:layout_toRightOf="@id/chat_author_avatar2"
            android:text="@string/line2_text" />
    </RelativeLayout>
</LinearLayout>
- 1
- 2
- 3
- 4
- 5
- 6
- 7
- 8
- 9
- 10
- 11
- 12
- 13
- 14
- 15
- 16
- 17
- 18
- 19
- 20
- 21
- 22
- 23
- 24
- 25
- 26
- 27
- 28
- 29
- 30
- 31
- 32
- 33
- 34
- 35
- 36
- 37
- 38
- 39
- 40
- 41
- 42
- 43
- 44
- 45
- 46
- 47
- 48
- 49
- 50
- 51
- 52
- 53
- 54
- 55
- 56
- 57
- 58
- 59
- 60
- 61
- 62
- 63
- 64
- 65
- 66
- 67
- 68
- 69
- 70
- 71
- Activity
package com.zhy.performance_01_render;

import android.os.Bundle;
import android.support.v7.app.ActionBarActivity;

import com.android.debug.hv.ViewServer;


public class CompareLayoutActivity extends ActionBarActivity
{

    @Override
    protected void onCreate(Bundle savedInstanceState)
    {
        super.onCreate(savedInstanceState);
        setContentView(R.layout.activity_compare_layouts);

        ViewServer.get(this).addWindow(this);
    }

    @Override
    protected void onResume()
    {
        super.onResume();
        ViewServer.get(this).setFocusedWindow(this);
    }

    @Override
    protected void onDestroy()
    {
        super.onDestroy();
        ViewServer.get(this).removeWindow(this);
    }
}
- 1
- 2
- 3
- 4
- 5
- 6
- 7
- 8
- 9
- 10
- 11
- 12
- 13
- 14
- 15
- 16
- 17
- 18
- 19
- 20
- 21
- 22
- 23
- 24
- 25
- 26
- 27
- 28
- 29
- 30
- 31
- 32
- 33
- 34
- 35
- 1
- 2
- 3
- 4
- 5
- 6
- 7
- 8
- 9
- 10
- 11
- 12
- 13
- 14
- 15
- 16
- 17
- 18
- 19
- 20
- 21
- 22
- 23
- 24
- 25
- 26
- 27
- 28
- 29
- 30
- 31
- 32
- 33
- 34
- 35
可以看到我们的Activity里面添加了ViewServer相关的几行代码。
然后手机打开此Activity,打开Android Device Moniter,切换到Hierarchy Viewer视图,可以看到:
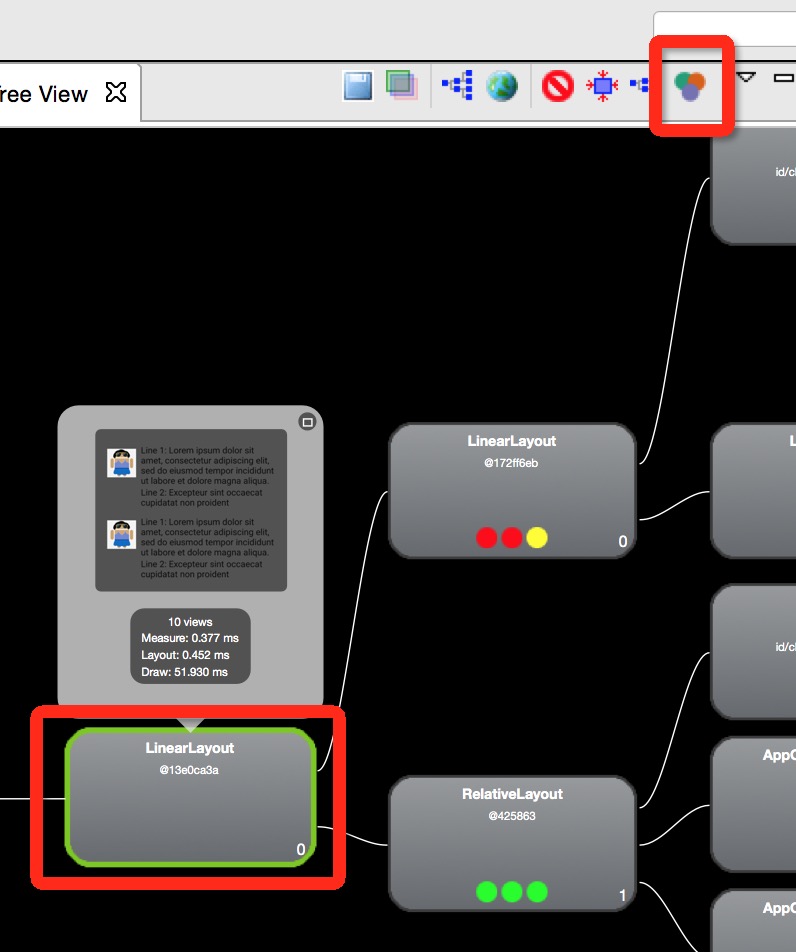
点击LinearLayout,然后点击Profile Node,你会发现所有的子View上面都有了3个圈圈,
(取色范围为红、黄、绿色),这三个圈圈分别代表measure 、layout、draw的速度,并且你也可以看到实际的运行的速度,如果你发现某个View上的圈是红色,那么说明这个View相对其他的View,该操作运行最慢,注意只是相对别的View,并不是说就一定很慢。
红色的指示能给你一个判断的依据,具体慢不慢还是需要你自己去判断的。
好了,上面的布局文件展示了ListView的Item的编写的两个版本,一个是Linearlayout嵌套的,一个是RelativeLayout的。上图也可以看出Linearlayout的版本相对RelativeLayout的版本要慢很多(请多次点击Profile Node取样)。即可说明RelativeLayout的版本更优于RelativeLayout的写法,并且Hierarchy Viewer可以帮助我们发现类似的问题。
恩,对了,第一个例子里面的ListView的Item的写法就是Liearlayout嵌套的,大家有兴趣可以修改为RelativeLayout的写法的~~~
到此我们就介绍完成了如何去对Android渲染进行优化,如果你的app有卡顿的情况,可以通过使用上述的工具首先去检测收集数据,然后按照上面提供的方法进行优化~~have a nice day ~~
群号:264950424,欢迎入群
下载地址
微信公众号:hongyangAndroid
(欢迎关注,第一时间推送博文信息)


 1825
1825

 被折叠的 条评论
为什么被折叠?
被折叠的 条评论
为什么被折叠?
 到【灌水乐园】发言


