


免密登陆
ssh可以用来远程linux主机,一般我们远程主机时都需要输入密码

我们也可以对其免登
SSH免密码登陆避免首次需要输入yes
ssh -o stricthostkeychecking=no
expect
expect是交互性很强的脚本语言,可以帮助运维人员实现批量管理成千上百台服务器操作,是一款很实用的批量部署工具!
sshpass
linux到linux
sshpass是一款自动为ssh填充密码的开源插件,并没有对ssh做任何修改,是从外部进行的操作。sshpass实现比较简单,但是非常易用,原理与expect类似
仅用于linux
1、本地主机(操作系统为centos,IP为192.168.0.12)下载sshpass
yum install sshpass
使用方法
$ sshpass -p密码 ssh 要连接的主机名@要连接的IP地址
2、连接到远程主机192.168.0.36:
$ sshpass -p1 ssh oceanstar@192.168.0.36
Last login: Fri Dec 11 15:19:16 2020 from 192.168.0.12
ps: 其他示例
实例1:直接远程连接某台主机:
命令:sshpass -p ‘密码’ ssh root@192.168.11.11 【默认为22端口】
实例2:远程连接指定ssh的端口:
命令:sshpass -p ‘密码’ ssh -p 1000 root@192.168.11.11 (当远程主机不是默认的22端口时候)
实例3:从密码文件读取文件内容作为密码去远程连接主机
命令:sshpass -f xxx.txt ssh root@192.168.11.11
实例4:从远程主机上拉取文件到本地
命令: sshpass -p ‘123456’ scp root@host_ip:/home/test/t ./tmp/
示例5: ssh也可以自己连自己
命令 : sshpass -p 123xhy ssh oceanstar@localhost
ssh-key-gen
linux到linux
节点1: 192.168.0.12
节点2:192.168.0.36
1、192.168.0.12终端使用ssh链接访问
$  ssh root@192.168.0.36
The authenticity of host '192.168.0.36 (192.168.0.36)' can't be established.
ECDSA key fingerprint is SHA256:6Mv/0RDHCNt0wGjPAWG6Pq5Xfr9XVMJE8ocgD+YLiF4.
ECDSA key fingerprint is MD5:43:03:84:00:01:6a:67:8e:ec:6f:a0:63:a2:fe:48:5e.
Are you sure you want to continue connecting (yes/no)? yes
Warning: Permanently added '192.168.0.36' (ECDSA) to the list of known hosts.
root@192.168.0.36's password:
Last login: Sun Nov 29 14:23:14 2020
从上面我们可以看出默认是需要使用密码登陆的,那么如果我们想要免密登陆,看下面
2、在192.168.0.12上使用 ssh-key-gen 命令生成公钥和私钥
$ ssh-keygen
Generating public/private rsa key pair.
Enter file in which to save the key (/root/.ssh/id_rsa):     // 回车即可
Created directory '/root/.ssh'.
Enter passphrase (empty for no passphrase):    // 回车即可
Enter same passphrase again:    // 回车即可
Your identification has been saved in /root/.ssh/id_rsa.
Your public key has been saved in /root/.ssh/id_rsa.pub.
The key fingerprint is:
45:38:a0:c2:be:de:aa:0a:a6:8d:1a:d6:09:48:5b:2a root@localhost.localdomain
The key's randomart image is:
+--[ RSA 2048]----+
|      .. ..      |
| .   .  o.       |
| .o..    ..      |
|o.+.     .       |
|E+.     S        |
|. o..            |
|oo.o             |
|== .             |
|O.+..            |
+-----------------+
3、将上面生成的密钥复制用 ssh-copy-id 命令将公钥复制或上传到远程主机,并将身份标识文件追加到节点2的 ~/.ssh/authorized_keys 中:
$ ssh-copy-id -i ~/.ssh/id_rsa.pub 192.168.0.36
The authenticity of host '192.168.0.36 (192.168.0.36)' can't be established.
ECDSA key fingerprint is 43:03:84:00:01:6a:67:8e:ec:6f:a0:63:a2:fe:48:5e.
Are you sure you want to continue connecting (yes/no)? yes
/usr/bin/ssh-copy-id: INFO: attempting to log in with the new key(s), to filter out any that are already installed
/usr/bin/ssh-copy-id: INFO: 1 key(s) remain to be installed -- if you are prompted now it is to install the new keys

root@192.168.0.36's password:

Number of key(s) added: 1

Now try logging into the machine, with:   "ssh '192.168.0.36'"
and check to make sure that only the key(s) you wanted were added.
4、接下来就可以免密登陆了
# ssh 192.168.0.36
Last login: Fri Dec 11 12:59:46 2020 from 192.168.0.12
window到linux
- 一般可以在cmd或者powershell上可以从windows登陆到linux
ssh ip -l用户名 -p端口
但是默认是需要输入密码的
那么如何 在windows上配置免密授权?
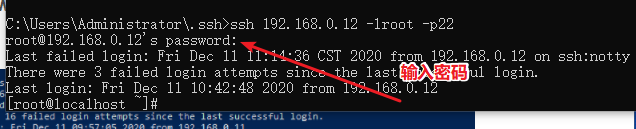
2、打开cmd命令行,ssh-keygen -t rsa,生成秘钥文件,id_rsa(私钥)、id_rsa.pub(公钥)

3、将生成的公钥使用scp命令传输到Linux服务器的 .ssh文件夹
scp ./id_rsa.pub 远程服务器用户名@IP:~/.ssh/windows_ras.pub

我们来看一下有没有传输成功

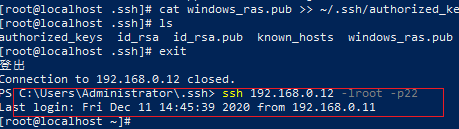
4、 在Linux shell中执行命令: cat id_dsa.pub >> ~/.ssh/authorized_keys

5、然后我们就可以免密登陆了(如果不想,就执行一下chmod 600 ~/.ssh/authorized_keys)
scp是secure copy的简写,用于在Linux下进行远程拷贝文件的命令,和它类似的命令有cp,不过cp只是在本机进行拷贝不能跨服务器,而且scp传输是加密的。可能会稍微影响一下速度。当你服务器硬盘变为只读 read only system时,用scp可以帮你把文件移出来。另外,scp还非常不占资源,不会提高多少系统负荷,在这一点上,rsync就远远不及它了。虽然 rsync比scp会快一点,但当小文件众多的情况下,rsync会导致硬盘I/O非常高,而scp基本不影响系统正常使用。
免密上传文件
有时候需要把Windows中的文件传给Linux, 或者把Linux中的文件传给Windows, 用Xftp就可以传输, 但是某天发现Xftp不能用了, 或者没有安装Xftp的话,在命令窗口中使用scp命令传输文件也是一个不错的选择
windows—>linux
输入密码上传文件
1、 尝试先ssh连接到linux,然后使用rz命令上传文件

从上面可以看出,除非使用XShell等工具,否则是无法rz上传命令的
如果我们想要将windows上的文件上传到linux服务器中,可以使用scp命令
在文件所在目录下shift + 右键打开powershell窗口, 输入命令
scp -p 端口  路径/文件名 远程用户名@远程IP:远程绝对路径
scp -P 端口  路径/文件名 远程用户名@远程IP:远程绝对路径+重命名文件  //如果我们想要重命名上传的文件,使用大写的P
例子:
相对路径
scp .\backup-platform.zip root@192.168.1.6:/opt/
绝对路径
scp E:\Scp_file\backup-platform.zip root@192.168.1.6:/opt/
scp -P 22  F:/MyCode/QSshT/QSshTest/build-QSshTest-Desktop_Qt_5_11_2_MinGW_32bit-Debug/a.txt root@192.168.0.12:/opt/b.txt
注意:
(1) Windows中的文件需要放在没有中文的目录下, 否则会报错 ./backup-platform: No such file or directory
(2) Windows中的传输的是文件夹的话需要打包成压缩包再发送, 否则会报错 ./backup-platform: not a regular file
(3) 确保XShell能够连上,否则会出现 ssh: connect to host 192.168.0.106 port 22: Connection timed out错误


免密上传文件
ps:推荐这个 “echo y | pscp.exe -pw 123xhy C:/Users/admin/Downloads/boguansdk.zip root@192.168.0.24:/home/oceanstar/workspace/”,下面的不用看了
ssh-key-gen
操作和window免密登陆ssh操作一样。
在Windows中下载文件到Linux

在Linux中复制文件到Windows
相对路径
scp sql_bak.sql root@192.168.1.4:e:\Scp_file\
绝对路径
scp /opt/sql_bak.sql root@192.168.1.4:e:\Scp_file\
注意:因为windows系统本身不支持ssh协议,所以,要想这个命令成功执行,必须在windows客户端安装ssh for windows的客户端软件,比如winsshd,使windows系统支持ssh协议才行。
参考了:


 3118
3118


 被折叠的 条评论
为什么被折叠?
被折叠的 条评论
为什么被折叠?
 到【灌水乐园】发言


