


1、布局重用 <include />
- 标签能够重用布局文件,简单的使用如下:
<LinearLayout xmlns:android="http://schemas.android.com/apk/res/android"
    android:orientation="vertical"
    android:layout_width=”match_parent”
    android:layout_height=”match_parent”
    android:background="@color/app_bg"
    android:gravity="center_horizontal">

    <include layout="@layout/titlebar"/>

    <TextView android:layout_width=”match_parent”
              android:layout_height="wrap_content"
              android:text="@string/hello"
              android:padding="10dp" />

    ...

</LinearLayout> - 1)
<include />标签可以使用单独的layout属性,这个也是必须使用的。 - 2)可以使用其他属性。
<include />标签若指定了ID属性,而你的layout也定义了ID,则你的layout的ID会被覆盖,解决方案。 - 3)在include标签中所有的android:layout_*都是有效的,前提是必须要写layout_width和layout_height两个属性。
- 4)布局中可以包含两个相同的include标签,引用时可以使用如下方法解决(参考):
View bookmarks_container_2 = findViewById(R.id.bookmarks_favourite);
bookmarks_container_2.findViewById(R.id.bookmarks_list);
2、减少视图层级 <ViewStub />
顾名思义,就是合并、融合的意思。使用它可以有效的将某些符合条件的多余的层级优化掉。使用merge的场合主要有两处:
(1) 自定义View中使用,父元素尽量是FrameLayout,当然如果父元素是其他布局,而且不是太复杂的情况下也是可以使用的
(2) Activity中的整体布局,根元素需要是FrameLayout
下面这个例子将融合这两种情况,来展示如何缩减布局层次。

总体显示界面如图所示:
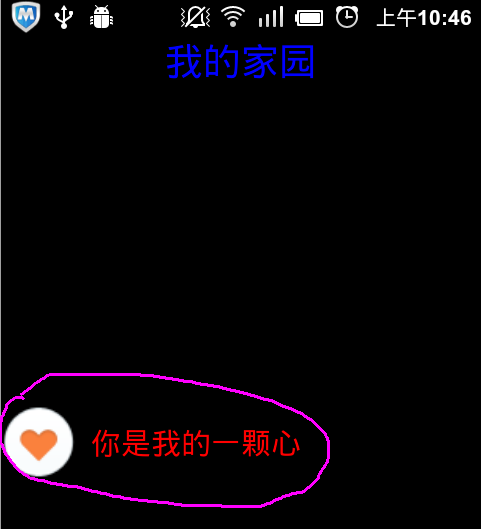
其中粉红色圈住的部分为我们的自定义View。
整个界面的布局layout_mergedemo.xml如下:
<FrameLayout xmlns:android="http://schemas.android.com/apk/res/android"
    xmlns:tools="http://schemas.android.com/tools"
    android:layout_width="fill_parent"
    android:layout_height="fill_parent">
    <TextView
        android:layout_width="fill_parent"
        android:layout_height="wrap_content"
        android:textSize="25sp"
        android:textColor="#FF0000FF"
        android:gravity="center_horizontal"
        android:text="我的家园"/>
    <com.example.myandroiddemo.MyItemView
        android:id="@+id/myitem_view"
        android:layout_width="fill_parent"
        android:layout_height="wrap_content"
        android:layout_gravity="center" />
</FrameLayout> - 自定义布局view_item.xml如下:
<LinearLayout xmlns:android="http://schemas.android.com/apk/res/android"
    xmlns:tools="http://schemas.android.com/tools"
    android:layout_width="fill_parent"
    android:layout_height="fill_parent"
    android:orientation="horizontal" >
    <ImageView
        android:id="@+id/view_item_img"
        android:layout_width="50dp"
        android:layout_height="50dp"
        android:scaleType="fitXY"/>
    <TextView
        android:id="@+id/view_item_txt"
        android:layout_width="fill_parent"
        android:layout_height="50dp"
        android:gravity="center_vertical"
        android:layout_marginLeft="10dp"
        android:textSize="20sp"
        android:textColor="#FFFF0000"/>
</LinearLayout> - 自定义View中使用下面来解析布局:
public class MyItemView extends LinearLayout {
    ......
    private void initView(Context context) {
        mContext = context;
        View view = LayoutInflater.from(mContext).inflate(R.layout.view_item, this, true);
        mMyItemImg = (ImageView)view.findViewById(R.id.view_item_img);
        mMyItemText = (TextView)view.findViewById(R.id.view_item_txt);
    }
    ......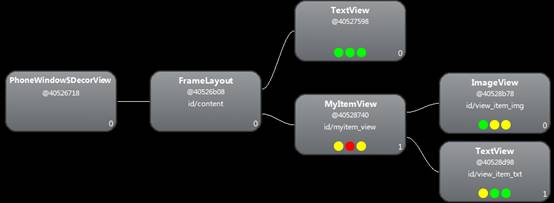
} - 整个功能开发完成之后,使用hierarchyviewer来看一下布局层次:

我们发现简单的一个功能竟然使用了六层布局,包括每个Window自动添加的PhoneWindow$DecorView和FrameLayout(id/content)。明显可以看到这个布局存在冗余,比如第二层和第三层的FrameLayout,比如第四层的MyItemView(LinearLayout子类)和第五层的LinearLayout,都可以缩减。
- 好了,该我们的merge标签大显身手了。将布局这样修改:
- 简化layout_mergedemo.xml:
<merge xmlns:android="http://schemas.android.com/apk/res/android"
    xmlns:tools="http://schemas.android.com/tools">
    <TextView
        android:layout_width="fill_parent"
        android:layout_height="wrap_content"
        android:textSize="25sp"
        android:textColor="#FF0000FF"
        android:gravity="center_horizontal"
        android:text="我的家园"/>
    <com.example.myandroiddemo.MyItemView
        android:id="@+id/myitem_view"
        android:layout_width="fill_parent"
        android:layout_height="wrap_content"
        android:layout_gravity="center" />
</merge> - 简化view_item.xml:
<merge xmlns:android="http://schemas.android.com/apk/res/android"
    xmlns:tools="http://schemas.android.com/tools" >
    <ImageView
        android:id="@+id/view_item_img"
        android:layout_width="50dp"
        android:layout_height="50dp"
        android:scaleType="fitXY"/>
    <TextView
        android:id="@+id/view_item_txt"
        android:layout_width="fill_parent"
        android:layout_height="50dp"
        android:gravity="center_vertical"
        android:layout_marginLeft="10dp"
        android:textSize="20sp"
        android:textColor="#FFFF0000"/>
</merge>
因为这里merge代替的布局元素为LinearLayout,而不是FrameLayout,所以我们需要在自定义布局代码中将LinearLayout的属性添加上,比如垂直或者水平布局,比如背景色等,此处设置为水平布局:
private void initView(Context context) {
        setOrientation(LinearLayout.HORIZONTAL);
        ……
} - OK,就是这么简单,再来看看布局层次吧:
哈哈,只有四层了,加载速度也明显加快,特别是如果布局比较复杂,子View较多的情况下,合理使用merge能大大提高程序的速度和流畅性。
但是使用merge标签还是有一些限制的,具体有以下几点:
(1)merge只能用在布局XML文件的根元素
(2)使用merge来inflate一个布局时,必须指定一个ViewGroup作为其父元素,并且要设置inflate的attachToRoot参数为true。(参照inflate(int, ViewGroup, boolean))
(3)不能在ViewStub中使用merge标签。最直观的一个原因就是ViewStub的inflate方法中根本没有attachToRoot的设置
说到这儿,merge的使用也就讲完了。还想唠叨一下做的演出项目,因为本人水平有限,并且产品提的这个显示需求确实比较BT,所以整个项目的显示框架做了很多嵌套,具体点就是ActivityGroup中嵌套ViewFlipper,然后再嵌套TabHost,然后再嵌套自己的Activity,大体数了一下,最多竟然有20几层,My God!知道Android布局设计的原则是什么吗?最好是10层以下,尽量不要超过15层,如果再多性能就会下降,也可能会出现问题,就是我们看到的StackOverFlow,这个项目被证实也确实在某些低端机上发生了这种错误,比如HTC的某某机型,OPPO的某某机型,(不要声讨我,没有恶意贬低的意思<_>),最终我使用merge缩呀缩呀,把大部分的布局都缩减到了15层以下,一测试,通过!
还要说一下,因为Window窗体(比如Activity)加载时会自动添加PhoneWindow$DecorView和FrameLayout(id/content)两层布局,所以如果我们在Activity的自定义布局根元素中使用merge,而且想设置总体背景什么的,可以用(id/content)将FrameLayout取出来,再设置属性,可以这样实现:
//setContentView(R.layout.layout_showset);
       FrameLayout frameLayout = (FrameLayout)this.getWindow().getDecorView().findViewById(android.R.id.content);
       frameLayout.setBackgroundResource(R.drawable.bg_repeated_main);
       LayoutInflater.from(this).inflate(R.layout.layout_showset, frameLayout, true);
3、需要时使用 <merge />
这是什么玩应儿呢?其实就是一个轻量级的页面,我们通常使用它来做预加载处理,来改善页面加载速度和提高流畅性,ViewStub本身不会占用层级,它最终会被它指定的层级取代。
还是说说演出项目吧,还说?对了,实践才能发现问题嘛,在哪儿发现问题就在那儿改进。由于项目中用到了比较多的动画,而且嵌套布局比较复杂,所以在Android低端机上进行页面切换时候经常让人感觉卡卡的,不怎么流畅,因为页面切换动画和标题旋转动画是同时进行的,所以为了达到更好的体验就需要使用一种方法,在动画进行时尽量的减少其他操作,特别是页面加载重绘。赶紧想办法,起初我想先将要加载的页面所有的组件都初始为gone显示状态,整个页面只留一下加载滚动条,后来发现这是不行滴,因为在Android的机制里,即使是将某一个控件的visibility属性设置为不可见的gone,在整个页面加载过程中还是会加载此控件的。再后来就用到了ViewStub,在做页面切换动画时,只在页面中放一个loading加载图标和一个ViewStub标签,像下面这样:
> layout_loading.xml布局文件:
<merge xmlns:android="http://schemas.android.com/apk/res/android">
    <ViewStub
        android:id="@+id/viewstub"
        android:layout_width="fill_parent"
        android:layout_height="fill_parent"/>
    <NetErrAndLoadView
        android:id="@+id/start_loading_lay"
        android:layout_width="fill_parent"
        android:layout_height="fill_parent" />
</merge>
这个页面是相当轻量级的,所以导致动画加载速度非常快、而且流畅。等页面切换动画完成之后,我们再指定ViewStub的资源,来加载实际的页面,这个资源就是实际要加载的页面的布局文件。比如要加载MainActivity的布局文件layout_main.xml,onCreate实现如下:
protected void onCreate(Bundle savedInstanceState) {
        super.onCreate(savedInstanceState);
        setContentView(R.layout.layout_loading);

        mLoadHandler = new Handler();
        mLoadingView = (NetErrAndLoadView)findViewById(R.id.start_loading_lay);
        mLoadingView.startLoading();
        mViewStub = (ViewStub)findViewById(R.id.viewstub);
        mViewStub.setLayoutResource(R.layout.layout_main);

        mLoadHandler.postDelayed(new Runnable() {
            @Override
            public void run() {
                mViewStub.inflate();
                mLoadingView.hide();
            }
        },500);
}
上面的500单位是ms,就是延迟加载的时间。上面使用的是动态添加ViewStub指向布局资源的方法(mViewStub.setLayoutResource(R.layout.layout_main)),当然根据需要可以直接在ViewStub的布局块儿中设置,需要设置ViewStub标签下的layout属性(android:layout=”@layout/ layout_main”)。
    ViewStub也是有少许缺点的,下面所说:
    1、  ViewStub只能Inflate一次,之后ViewStub对象会被置为空。按句话说,某个被ViewStub指定的布局被Inflate后,就不能够再通过ViewStub来控制它了。所以它不适用     于需要按需显示隐藏的情况。
   2、  ViewStub只能用来Inflate一个布局文件,而不是某个具体的View,当然也可以把View写在某个布局文件中。如果想操作一个具体的view,还是使用visibility属性吧。
   3、  VIewStub中不能嵌套merge标签。(前面好像说过)
不过这些确定都无伤大雅,我们还是能够用ViewStub来做很多事情。
有时候真的不得不佩服google的Android团队的远见性和架构性,这种细微的设计都能考虑的到,想用就有。


 2688
2688

 被折叠的 条评论
为什么被折叠?
被折叠的 条评论
为什么被折叠?
 到【灌水乐园】发言


