


记录mmdet建立过程的坑
由于研究bevformer的进一步实验需要用到mmdet,所以前置工作需要安装cuda torch mmcv-full
我的conda环境是cuda11.7 和 torch 2.0.1,在环境配置的时候遇到了很多坑,回头看来比较傻但是值得记录。
step1 安装mmcv-full
开始打算按照csdn上面的教程下载mmc-full,然后发现有大坑,这一步非常容易出错
(pytorch-gpu) C:\Windows\System32>nvcc -V
nvcc: NVIDIA (R) Cuda compiler driver
Copyright (c) 2005-2022 NVIDIA Corporation
Built on Wed_Jun__8_16:59:34_Pacific_Daylight_Time_2022
Cuda compilation tools, release 11.7, V11.7.99
Build cuda_11.7.r11.7/compiler.31442593_0
pip install mmcv
发生报错
      E:\Anaconda\envs\pytorch-gpu\lib\site-packages\torch\utils\cpp_extension.py:359: UserWarning: Error checking compiler version for cl: [WinError 2] 系统找不到指定的文件。
        warnings.warn(f'Error checking compiler version for {compiler}: {error}')
      building 'mmcv._ext' extension
      error: Microsoft Visual C++ 14.0 or greater is required. Get it with "Microsoft C++ Build Tools": https://visualstudio.microsoft.com/visual-cpp-build-tools/
      [end of output]
note: This error originates from a subprocess, and is likely not a problem with pip.
ERROR: Failed building wheel for mmcv-full
Running setup.py clean for mmcv-full

Failed to build mmcv-full
ERROR: Could not build wheels for mmcv-full, which is required to install pyproject.toml-based projects
从错误描述来看这里是缺失了Microsoft Visual C++ 14.0或更高版本的编译器。
参考文章error: Setup script exited with error: Microsoft Visual C++ 14.0 is required报错
直接选择方法三 下载visual studio

C++14工具下载完成后又遇到问题
        File "E:\Anaconda\envs\pytorch-gpu\lib\site-packages\torch\utils\cpp_extension.py", line 1574, in _write_ninja_file_and_compile_objects
          _run_ninja_build(
        File "E:\Anaconda\envs\pytorch-gpu\lib\site-packages\torch\utils\cpp_extension.py", line 1909, in _run_ninja_build
          raise RuntimeError(message) from e
      RuntimeError: Error compiling objects for extension
      [end of output]

  note: This error originates from a subprocess, and is likely not a problem with pip.
  ERROR: Failed building wheel for mmcv-full
  Running setup.py clean for mmcv-full
Failed to build mmcv-full
ERROR: Could not build wheels for mmcv-full, which is required to install pyproject.toml-based projects
该问题是由于编译mmcv-full扩展时出错了,在查询很多文章后发现,是因为mmcv-full只能在pytorch的1.x.0版本上进行编译,所以再确定需要版本为1.x.x时,要查看自己的pytorch版本,若不符合需要重新创建新环境。
这里我检查了
import torch
print(torch.__version__)
print(torch.cuda.is_available()) #False
print(torch.version.cuda)
导致我重新装了一次torch 还记录了一个坑,就是在pytorch官网里面的搜索的老版本下载命令,下载的可能是cpu版本,不管你是不是指定了torch+cu117这种,我是用了
pip install torch torchvision torchaudio --index-url https://download.pytorch.org/whl/cu117

python -c "import torch;print(torch.__version__);print(torch.cuda.is_available());print(torch.version.cuda)"
2.0.1+cu117
True
11.7
实现的,在wheel里面下载cu117对应的torch。
然后就是不要直接使用pip install mmcv这个命令
而是去mmcv官网找到以下命令进行安装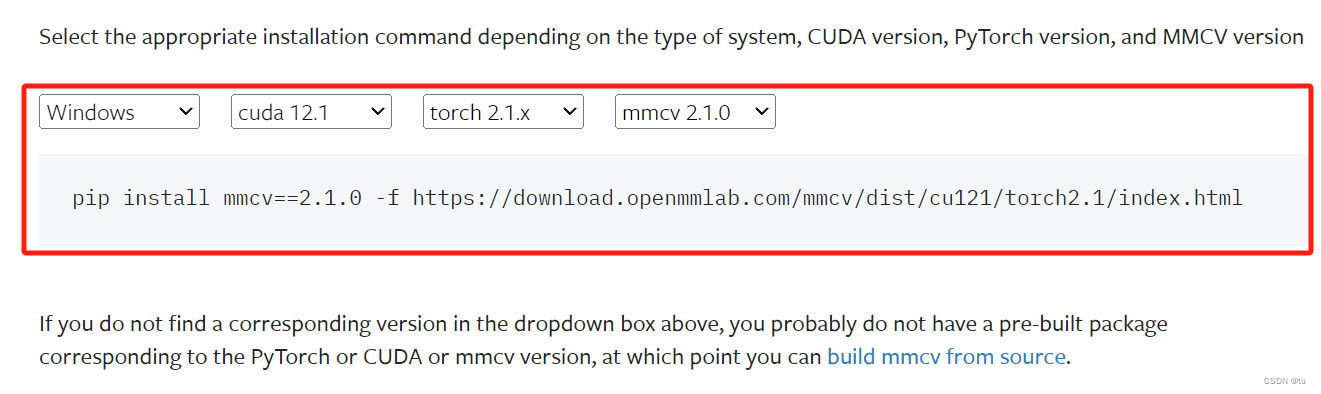
Installing collected packages: regex, yapf, mmengine, mmcv
Successfully installed mmcv-2.1.0 mmengine-0.10.3 regex-2023.12.25 yapf-0.40.2
step 2安装mmdet
这里我是作为依赖和包进行使用,如果需要从源代码进行开发和修改,请按照官网教程从源代码安装。
pip install mmdet

Installing collected packages: pycocotools, mmdet
Successfully installed mmdet-3.3.0 pycocotools-2.0.7
#安装测试
#Check Pytorch installation
import torch, torchvision
print(torch.__version__, torch.cuda.is_available())

#Check MMDetection installation
import mmdet
print(mmdet.__version__)

#Check mmcv installation
import mmcv
from mmcv.ops import get_compiling_cuda_version, get_compiler_version
print(get_compiling_cuda_version())
print(get_compiler_version())
print(mmcv.__version__)

2.0.1+cu117 True
3.3.0 #mmdet
11.7 #cuda
MSVC 192930148
2.1.0 #mmcv
说明整体安装是成功的,需要进一步测试。
step 3 验证mmdet安装成功
按照官网的内容先下载配置和检查点文件
mim download mmdet --config rtmdet_tiny_8xb32-300e_coco --dest .
然后自己创建一个demo文件夹,下面放上一张demo.jpg照片进行检验【官网没说自己摸索的】
,验证一开始发生了torch.meshgrid(tensors)错误,跳到报错的地方路径为:/site-packages\torch\functional.py:504, 在后面添加一个indexing = ‘ij’
    # Continue allowing call of old method that takes no indexing
    # kwarg for forward compatibility reasons.
    #
    # Remove this two weeks after landing.
    kwargs = {} if indexing is None else {'indexing': indexing}
    return _VF.meshgrid(tensors, **kwargs, indexing = 'ij')  # type: ignore[attr-defined]
这里解决后还是报错,最后错误出现在数据格式上,
Loads checkpoint by local backend from path: rtmdet_tiny_8xb32-300e_coco_20220902_112414-78e30dcc.pth
The model and loaded state dict do not match exactly

unexpected key in source state_dict: data_preprocessor.mean, data_preprocessor.std
错误消息表明加载的检查点的状态字典中存在意外的键,即“data_preprocessor.mean”和“data_preprocessor.std”。这表示mmdet框架已经更新,不使用于该验证教程。
后续我在《MMDetection安装踩坑教程,一次性安装成功》文章中找到了正确的测试方法。


 5128
5128


 被折叠的 条评论
为什么被折叠?
被折叠的 条评论
为什么被折叠?
 到【灌水乐园】发言


