


与服务器端通信是客户端的核心功能之一。本篇在Angular前端系统添加与后端进行HTTP通信的功能。
Angular中建议使用service来进行http操作,而不是直接操作http。下面以device组件为例,增加HTTP功能,从服务端获取数据。
服务器端准备好的请求路径与返回内容如下:

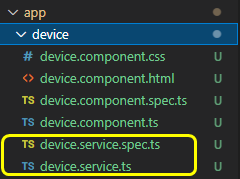
1. 添加device组件的service
ng generate service device/device可以看到device组件中多了service相关的两个文件:device.service.spec.ts和device.service.ts
2.在service中引入HttpClient
device.service.ts
...
import { HttpClient } from '@angular/common/http';
import { Observable } from 'rxjs';

@Injectable({
  providedIn: 'root'
})
export class DeviceService {
  constructor(private http: HttpClient) { }
}
3. 配置跨域代理
Angular默认用4200端口,后端应用使用8080,端口不一致就是跨域,因此要进行代理配置,需要三处变动:
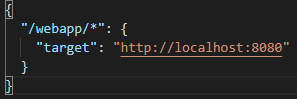
第一处:在应用根目录添加proxy.conf.json文件,内容如下,也就是遇到某个名称开头的后端路径,就转向另外一个地址。
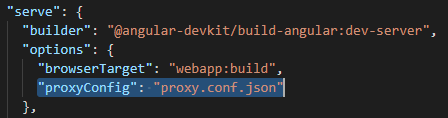
第二处:在angular.json中,找到projects > webapp(项目名称) > architect > serve > options, 添加属性:"proxyConfig": "proxy.conf.json"
第三处:package.json中,scripts > start, 改为ng serve --proxy-config proxy.config.json,也就是指定第一处的proxy文件。

注意点:前端路径不要和后端路径重名。我电脑上后端服务是webapp开头,那么前端项目名称就不要用webapp了,本例中前端路径改为kw。
//app-routing.module.ts
const routes: Routes = [
  { path: 'kw/device', component: DeviceComponent },
  { path: 'kw/sysuser', component: SysuserComponent }
];

//app.component.html
<button mat-button [routerLink]="'/kw'" style="font-family:微软雅黑;">小鹰信息技术服务部数据中心</button>
<button mat-button [routerLink]="'/kw/device'">设备</button>
<button mat-button [routerLink]="'/kw/sysuser'">用户</button>
4. 在service中添加getDevice()方法,从服务器端获取数据
此处,直接返回,不作处理,返回类型设置为Observable<any>,不考虑具体的返回格式。
device.service.ts
export class DeviceService {
  ...

  url = 'http://localhost:4200/webapp/device';

  getDevice():Observable<any> {
    return this.http.get(this.url);
  }

}
5. 在component中调用service
定义好有用数据devices, 调用service中的getDevice(),用在subscribe中处理返回内容。
device.component.ts
...
import { DeviceService } from './device.service';
...
export class DeviceComponent implements OnInit {

  constructor(private deviceService: DeviceService) { }

  devices = "";

  ngOnInit(): void {
    this.getDevice(); //调用
  }

  getDevice() {  调用service中的同名方法
    this.deviceService.getDevice().subscribe(
      data=>{this.devices = JSON.stringify(data);}
    );
  }

}
6. 在页面上展示返回内容
device.component.html
...
<p>{{devices}}</p>
效果:

至此,Angular前端与后端的HTTP通信功能实现了,为后续内容开发打下了一点基础。


 1367
1367


 被折叠的 条评论
为什么被折叠?
被折叠的 条评论
为什么被折叠?
 到【灌水乐园】发言


