


Directx通常采用顶点缓存和顶点索引缓存来绘制图形,使用函数CreateVertexBuffer和CreateIndexBuffer来分别创建顶点缓存和顶点索引缓存,为了访问顶点缓存和顶点索引缓存中的内容,采用Lock方法来获取指向缓存内容的指针。
绘制之前的准备步骤:
(1) 使用SetStreamSource函数将顶点缓存中的内容绑定到数据流输入源中。
(2) 使用SetFVF函数设置后续绘制中使用的顶点格式。
(3) 使用SetIndices函数设置后续绘制中使用的索引缓存,如果要使用不同的索引缓存必须重新进行设置。
最后使用DrawPrimitive和DrawIndexedPrimitive函数来进行绘制。前者用来绘制未使用索引缓存的图像。
下面是用来绘制立方体的部分代码:
//顶点的结构体
struct Vertex
{
    Vertex(){}

    Vertex(float x, float y, float z)
    {
        _x = x;  _y = y;  _z = z;
    }

    float _x, _y, _z;

    static const DWORD FVF;
};

Device->CreateVertexBuffer(
        8 * sizeof(Vertex),
        D3DUSAGE_WRITEONLY,
        Vertex::FVF,
        D3DPOOL_MANAGED,
        &VB,
        0);
//创建顶点缓存
    Device->CreateIndexBuffer(
        36 * sizeof(WORD),
        D3DUSAGE_WRITEONLY,
        D3DFMT_INDEX16,
        D3DPOOL_MANAGED,
        &IB,
        0);
//创建顶点索引缓存

    Vertex* vertices;
    VB->Lock(0, 0, (void**)&vertices, 0);

    // 指定立方体顶点信息
    vertices[0] = Vertex(-1.0f, -1.0f, -1.0f);
    vertices[1] = Vertex(-1.0f, 1.0f, -1.0f);
    vertices[2] = Vertex(1.0f, 1.0f, -1.0f);
    vertices[3] = Vertex(1.0f, -1.0f, -1.0f);
    vertices[4] = Vertex(-1.0f, -1.0f, 1.0f);
    vertices[5] = Vertex(-1.0f, 1.0f, 1.0f);
    vertices[6] = Vertex(1.0f, 1.0f, 1.0f);
    vertices[7] = Vertex(1.0f, -1.0f, 1.0f);

    VB->Unlock();

    // 指定立方体顶点索引信息
    WORD* indices = 0;
    IB->Lock(0, 0, (void**)&indices, 0);

    // front side
    indices[0] = 0; indices[1] = 1; indices[2] = 2;
    indices[3] = 0; indices[4] = 2; indices[5] = 3;

    // back side
    indices[6] = 4; indices[7] = 6; indices[8] = 5;
    indices[9] = 4; indices[10] = 7; indices[11] = 6;

    // left side
    indices[12] = 4; indices[13] = 5; indices[14] = 1;
    indices[15] = 4; indices[16] = 1; indices[17] = 0;

    // right side
    indices[18] = 3; indices[19] = 2; indices[20] = 6;
    indices[21] = 3; indices[22] = 6; indices[23] = 7;

    // top
    indices[24] = 1; indices[25] = 5; indices[26] = 6;
    indices[27] = 1; indices[28] = 6; indices[29] = 2;

    // bottom
    indices[30] = 4; indices[31] = 0; indices[32] = 3;
    indices[33] = 4; indices[34] = 3; indices[35] = 7;

    IB->Unlock();
//取景变换
    D3DXVECTOR3 position(0.0f, 0.0f, -5.0f);//相机位置
    D3DXVECTOR3 target(0.0f, 0.0f, 0.0f);//世界坐标系的被观察点
    D3DXVECTOR3 up(0.0f, 1.0f, 0.0f);//向上
    D3DXMATRIX V;
    D3DXMatrixLookAtLH(&V, &position, &target, &up);
    Device->SetTransform(D3DTS_VIEW, &V);
    //投影变换
    D3DXMATRIX proj;
    D3DXMatrixPerspectiveFovLH(
        &proj,
        D3DX_PI * 0.5f, // 90 - degree
        (float)Width / (float)Height,
        1.0f,
        1000.0f);
    Device->SetTransform(D3DTS_PROJECTION, &proj);

    //设置绘制状态
    Device->SetRenderState(D3DRS_FILLMODE, D3DFILL_WIREFRAME);
    //绘制图像在每一帧中调用下面的函数
    //在x轴上旋转45度
        D3DXMatrixRotationX(&Rx, 3.14f / 4.0f);
    //每隔一帧增大y轴的角度达到360度后置0
        static float y = 0.0f;
        D3DXMatrixRotationY(&Ry, y);
        y += timeDelta;
        if (y >= 6.28f)
            y = 0.0f;
        D3DXMATRIX p = Rx * Ry;
        Device->SetTransform(D3DTS_WORLD, &p);
    Device->SetStreamSource(0, VB, 0, sizeof(Vertex));
        Device->SetIndices(IB);
        Device->SetFVF(Vertex::FVF);
Device->DrawIndexedPrimitive(D3DPT_TRIANGLELIST, 0, 0, 8, 0, 12);
Directx中内置一些函数用来绘制几何图形,如D3DXCreateTeapot,D3DXCreateBox,D3DXCreateCylinder,D3DXCreateTorus,D3DXCreateSphere等,分别用来绘制茶壶,立方体,圆柱体,圆环体,球体。
带颜色物体的绘制:在顶点结构体中加入颜色信息
struct ColorVertex
{
ColorVertex(){}
ColorVertex(float x, float y, float z, D3DCOLOR c)
{
_x = x; _y = y; _z = z; _color = c;
}
float _x, _y, _z;
D3DCOLOR _color;
static const DWORD FVF;
};
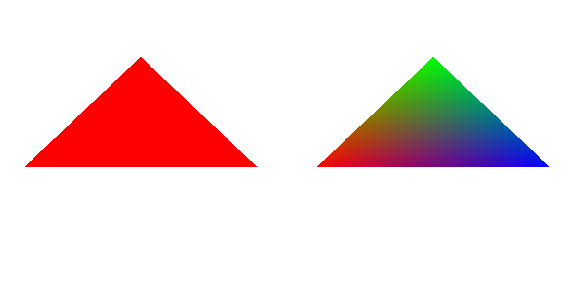
const DWORD ColorVertex::FVF = D3DFVF_XYZ | D3DFVF_DIFFUSE;在绘制之前关闭光照:
Device->SetRenderState(D3DRS_LIGHTING, false);绘制是有两种着色模式,平面着色和Gouraud着色,前者一种颜色,后者颜色渐变。效果如下:


 630
630

 被折叠的 条评论
为什么被折叠?
被折叠的 条评论
为什么被折叠?
 到【灌水乐园】发言


