


图片加载是Android程序中很常用的功能,这篇文章我们简要分析一下ImageLoader的过程
1. Bitmap的高效加载
Bitmap在Android中指的是一张图片,BitmapFactory提供了四种方法来获取Bitmap,分别是
decodeFile(String pathName)
decodeResource(R.xxx.xxx)
decodeStream()
decodeByteArray(byte[] bytes)
在获取到图片之后,就要通过ImageView把图片显示出来,但是
ImageView有时候并没有图片那么大,所以就需要通过BitmapFactory.Option按一定的采样率来压缩图片,这样就可以在一定程度长避免OOM,那么什么是采样率呢,
采样率:inSampleSize, 等于1时处理后的图片等于原图大小
为2时宽高均压缩为原来的1/2,像素变为1/4,内存变为1/4
那么怎样获取采样率呢

public int calculateInSampleSize(BitmapFactory.Options options,
            int reqWidth, int reqHeight) {
        if (reqWidth == 0 || reqHeight == 0) {
            return 1;
        }
        final int height = options.outHeight;
        final int width = options.outWidth;
        Log.d(TAG, "origin, w= " + width + " h=" + height);
        int inSampleSize = 1;
        if (height > reqHeight || width > reqWidth) {
            final int halfHeight = height / 2;
            final int halfWidth = width / 2;
            while ((halfHeight / inSampleSize) >= reqHeight
                    && (halfWidth / inSampleSize) >= reqWidth) {
                inSampleSize *= 2;
            }
        }
        Log.d(TAG, "sampleSize:" + inSampleSize);
        return inSampleSize;
}
按照上面的方法就可以把图片按照比例缩小了。
2. 缓存策略
a. 内存缓存 LruCache (support-v4包下)
b. 硬盘缓存 DiskLruCache (DiskLruCache)
1)内存缓存 : LruCache
初始化 :
LruCache<String, Bitmap> lruCache = new LruCache<String, Bitmap>(maxMemory){
    @Override
    protected int sizeOf(String key, Bitmap value) {
        return super.sizeOf(key, value);
    }
};
添加缓存对象 : lruCache.put(key, bitmap);
获取缓存对象 :lruCache.get(key);
其中key为图片url的hasCode值或者MD5值
删除缓存对象 :lruCache.remove(key); 需要重写entryRemoved()方法
2)硬盘缓存 :
初始化 : diskLruCache= DiskLruCache.open(File directory, int appVersion, int valueCount, longmaxSize);
directory指缓存的文件目录,appVersion指应用的版本号,一般设为1,当版本号发生改变时,之前的缓存会清除,但是一般应用在更新时缓存都还是有效的,所以这个参数一般就设为1
valueCount指单个节点对应的数据个数;
maxSize指缓存的最大值
添加缓存
DiskLruCache的缓存添加操作是通过Editor完成的,Editor表示一个缓存对象的编辑对象,通过diskLruCache对象的edit方法来获取
diskLruCache = DiskLruCache.open(diskCacheDir, 1, NODE_COUNT, DISK_SIZE);
String key = hashKeyFromUrl(url);
DiskLruCache.Editor editor = diskLruCache.edit(key);
if(editor != null){
	OutputStream outputStream = editor.newOutputStream(DISK_CACHE_INDEX);
}
下载文件到输出流
public boolean downloadUrlToStream(String urlString, OutputStream outputStream) {
        HttpURLConnection urlConnection = null;
        BufferedOutputStream out = null;
        BufferedInputStream in = null;

        try {
            final URL url = new URL(urlString);
            urlConnection = (HttpURLConnection) url.openConnection();
            in = new BufferedInputStream(urlConnection.getInputStream(),
                    IO_BUFFER_SIZE);
            out = new BufferedOutputStream(outputStream, IO_BUFFER_SIZE);

            int b;
            while ((b = in.read()) != -1) {
                out.write(b);
            }
            return true;
        } catch (IOException e) {
            Log.e(TAG, "downloadBitmap failed." + e);
        } finally {
            if (urlConnection != null) {
                urlConnection.disconnect();
            }
            MyUtils.close(out);
            MyUtils.close(in);
        }
        return false;
}
提交缓存 :
if (downloadUrlToStream(url, outputStream)) {
    editor.commit();
} else {
    editor.abort();
}
mDiskLruCache.flush();
查找缓存 :
Bitmap bitmap ;
String key = hashKeyFromUrl(url);
try {
    DiskLruCache.Snapshot snapshot = diskLruCache.get(key);
    if(snapshot != null){
        FileInputStream inputStream = (FileInputStream) snapshot.getInputStream(DISK_CACHE_INDEX);
        FileDescriptor fileDescriptor = inputStream.getFD();
        bitmap = BitmapFactory.decodeFileDescriptor(fileDescriptor);
        lruCache.put(key, bitmap);
        diskLruCache.remove(key);
    }
} catch (IOException e) {
    e.printStackTrace();
}
过程和添加过程类似,通过key得到snapShot对象,然后就可以得到文件的输入流了,再通过文件描述来加载bitmap,但是一般加载之前都要经过calculateInSampleSize处理。最后还要把Bitmap添加到LruCache中。
移除缓存 : diskLruCache.remove(key);
3. ImageLoader流程
a. 同步加载/异步加载-----框架
b. 图片压缩 必要手段
c. 内存缓存 核心
d. 硬盘缓存 核心
e. 网络获取
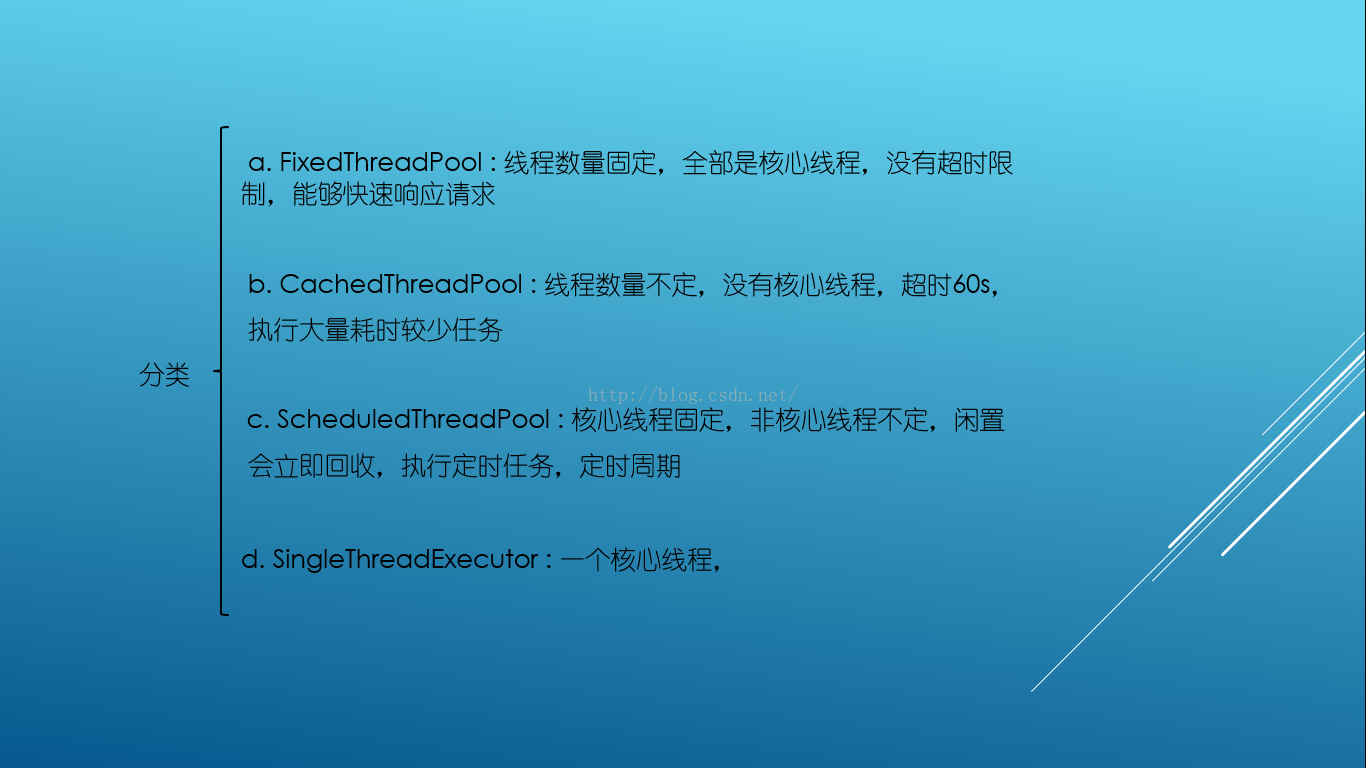
线程池:在Android中来源于接口Executor,实现类为ThreadPoolExecutor
corePoolSize:线程池的核心线程数
maximumPoolSize:最大线程数
KeepAliveTime:非核心线程的超时时长
unit:保活时间单位 workQueue:任务队列
threadFactory:创建新线程

关于ImageLoader的大概过程就是这样~~~~~~
参考资料 :Android开发艺术探索


 464
464


 被折叠的 条评论
为什么被折叠?
被折叠的 条评论
为什么被折叠?
 到【灌水乐园】发言


