


1、NSThread 创建线程的三种方式
1.NSThread 创建线程的第一种方式— alloc / init - start
这个方法主要的特点是需要启动线程
// 点击屏幕的时候执行示例代码
- (void)touchesBegan:(NSSet *)touches withEvent:(UIEvent *)event {
    [self threadDemo];
}
// 演示代码
- (void)threadDemo {
     // 打印当前的线程对象(获取当前线程数)
    NSLog(@"before %@", [NSThread currentThread]);

    // 实例化一个 NSThread 对象
    NSThread *thread = [[NSThread alloc] initWithTarget:self selector:@selector(longOperation:) object:@"NSThread"];

    // 启动线程
    [thread start];

    // 打印当前线程对象(获取当前线程数)
    NSLog(@"after %@", [NSThread currentThread]);
}

// 耗时操作
- (void)longOperation:(id)obj {
    for (int i = 0; i < 5; ++i) {
        NSLog(@"%@ %d -- %@", [NSThread currentThread], i, obj);
    }
}

打印的结果:
2015-04-02 02:09:49.821 03-创建 NSThread[14505:4674888] before <NSThread: 0x7f91e2e130e0>{number = 1, name = main}
2015-04-02 02:09:49.821 03-创建 NSThread[14505:4674888] after <NSThread: 0x7f91e2e130e0>{number = 1, name = main}
2015-04-02 02:09:49.821 03-创建 NSThread[14505:4675153] <NSThread: 0x7f91e2f39090>{number = 2, name = (null)} 0 -- NSThread
2015-04-02 02:09:49.821 03-创建 NSThread[14505:4675153] <NSThread: 0x7f91e2f39090>{number = 2, name = (null)} 1 -- NSThread
2015-04-02 02:09:49.822 03-创建 NSThread[14505:4675153] <NSThread: 0x7f91e2f39090>{number = 2, name = (null)} 2 -- NSThread
2015-04-02 02:09:49.822 03-创建 NSThread[14505:4675153] <NSThread: 0x7f91e2f39090>{number = 2, name = (null)} 3 -- NSThread
2015-04-02 02:09:49.822 03-创建 NSThread[14505:4675153] <NSThread: 0x7f91e2f39090>{number = 2, name = (null)} 4 -- NSThread
小结
1、[thread start];执行后,会在另外一个线程执行 demo 方法
2、在 OC 中,任何一个方法的代码都是从上向下顺序执行的
3、同一个方法内的代码,都是在相同线程执行的(block除外)
2.NSThread 创建线程的第二种方式—detachNewThreadSelector
// 点击屏幕的时候执行示例代码
- (void)touchesBegan:(NSSet *)touches withEvent:(UIEvent *)event {
    [self threadDemo];
}

// 演示代码
- (void)threadDemo {
     // 打印当前的线程对象(获取当前线程数)
    NSLog(@"before %@", [NSThread currentThread]);

    // detach -> "分离"
    // 直接新建线程,并且执行 @selector 方法
    [NSThread detachNewThreadSelector:@selector(longOperation:) toTarget:self withObject:@"DETACH"];

    // 打印当前线程对象(获取当前线程数)
    NSLog(@"after %@", [NSThread currentThread]);
}

// 耗时操作
- (void)longOperation:(id)obj {
    for (int i = 0; i < 5; ++i) {
        NSLog(@"%@ %d -- %@", [NSThread currentThread], i, obj);
    }
}


打印的结果:
2015-04-02 02:19:59.282 03-创建 NSThread[14579:4722314] before <NSThread: 0x7fbb4a711410>{number = 1, name = main}
2015-04-02 02:19:59.283 03-创建 NSThread[14579:4722314] after <NSThread: 0x7fbb4a711410>{number = 1, name = main}
2015-04-02 02:19:59.283 03-创建 NSThread[14579:4722556] <NSThread: 0x7fbb4a620f60>{number = 2, name = (null)} 0 -- DETACH
2015-04-02 02:19:59.283 03-创建 NSThread[14579:4722556] <NSThread: 0x7fbb4a620f60>{number = 2, name = (null)} 1 -- DETACH
2015-04-02 02:19:59.283 03-创建 NSThread[14579:4722556] <NSThread: 0x7fbb4a620f60>{number = 2, name = (null)} 2 -- DETACH
2015-04-02 02:19:59.283 03-创建 NSThread[14579:4722556] <NSThread: 0x7fbb4a620f60>{number = 2, name = (null)} 3 -- DETACH
2015-04-02 02:19:59.283 03-创建 NSThread[14579:4722556] <NSThread: 0x7fbb4a620f60>{number = 2, name = (null)} 4 -- DETACH
detachNewThreadSelector 类方法不需要启动,创建线程后自动启动线程执行 @selector 方。
3.NSThread 创建线程的第三种方式— NSObject 的类方法
// 点击屏幕的时候执行示例代码
- (void)touchesBegan:(NSSet *)touches withEvent:(UIEvent *)event {
    [self threadDemo];
}

// 演示代码
- (void)threadDemo {
     // 打印当前的线程对象(获取当前线程数)
    NSLog(@"before %@", [NSThread currentThread]);

    // detach -> "分离"
    // 直接新建线程,并且执行 @selector 方法
    [NSThread detachNewThreadSelector:@selector(longOperation:) toTarget:self withObject:@"DETACH"];

    // 打印当前线程对象(获取当前线程数)
    NSLog(@"after %@", [NSThread currentThread]);
}

// 耗时操作
- (void)longOperation:(id)obj {
    for (int i = 0; i < 5; ++i) {
        NSLog(@"%@ %d -- %@", [NSThread currentThread], i, obj);
    }
}
NSObject 的类方法可以创建线程意味着任何对象都具有创建线程的能力。
1、performSelectorInBackground 是 NSObject 的分类方法
2、没有 thread 字眼,会立即在后台线程执行 @selector 方法
3、所有 NSObject 都可以使用此方法,在其他线程执行方法!
2、线程的状态
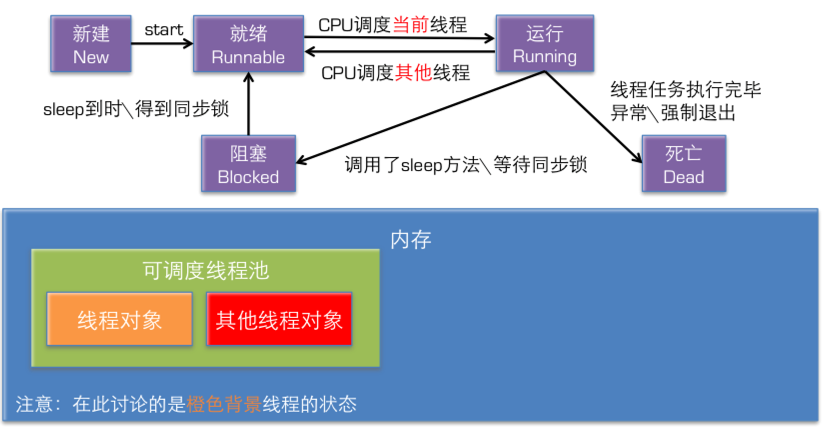
- (void)touchesBegan:(NSSet *)touches withEvent:(UIEvent *)event {
    // 退出当前线程
    // 一定注意,千万不要在主线程上 exit!(这样会直接将主线程干死)
    // [NSThread exit];

    NSLog(@"能来吗?");

    // 1. 实例化一个线程对象(新建)
    NSThread *thread = [[NSThread alloc] initWithTarget:self selector:@selector(run) object:nil];

    // 2. 启动线程(就绪状态,线程对象会被添加到可调度线程池,等待 CPU 调度)
    [thread start];
}

/**
 *  在后台执行的方法
 */
- (void)run {

    // 如果满足某一个条件,可以让线程进入"阻塞"状态
    // 休眠 - 让当前线程休眠
    NSLog(@"睡会");
    // 从现在开始睡几秒
    [NSThread sleepForTimeInterval:1.0];

    for (int i = 0; i < 20; ++i) {

        // 有可能满足另外一个条件后,再次进入休眠状态
        if (i == 8) {
            NSLog(@"再睡会");
            // 睡到指定的日期 - 从现在开始间隔 2 秒
            [NSThread sleepUntilDate:[NSDate dateWithTimeIntervalSinceNow:2.0]];
        }

        NSLog(@"%@ %d", [NSThread currentThread], i);

        // 一个 c 语言的东西
        CGMutablePathRef path = CGPathCreateMutable();

        // 死亡 - 满足某一个条件后,退出当前所在线程
        // 一旦退出了当前线程,后续的所有代码都不会执行!
        if (i == 12) {
            // Invoking this method should be avoided as it does not give your thread a chance to clean up any resources it allocated during its execution.  [NSThread exit] 的说明。
            // 调用此方法,需要注意,此方法不会给任何机会去清理线程执行过程中分配的资源
            // 注意:如果使用了 C 语言框架,尤其做了分配对象的工作,需要注意在何时的位置增加 release
            CGPathRelease(path);

            [NSThread exit];
        }

        CGPathRelease(path);
    }

    NSLog(@"结束了!");
}
在线程的状态的使用过程中,一定要注意 [NSThread exit]; 这个方法。不要把主线程干死了。
3、NSThread 线程的属性
属性
1. name - 线程名称
- 在大的商业项目中,通常需要在程序崩溃时,希望应用程序上架后,获取程序准确执行所在的线程,解决程序崩溃的问题。
// 点击的时候调用线程
- (void)touchesBegan:(NSSet *)touches withEvent:(UIEvent *)event {
    NSLog(@"%@", [NSThread currentThread]);

    // 开启线程调用
    [self threadProperty];
}

- (void)threadProperty {
    NSThread *thread = [[NSThread alloc] initWithTarget:self selector:@selector(demo) object:nil];

    // 线程的名称,通常在"大的商业应用"中,希望应用程序上架后,捕获到用户使用崩溃的一些场景
    // 如果知道程序是在哪一个线程中崩溃,能够辅助排查问题!
    // 如果线程非常多,而且在调试的时候,起到一定的辅助作用!
    t1.name = @"Thread AAA";

    // 开启线程
    [thread start];
}

 // %tu 是可以针对不同的 CPU 架构,自动调整 无符号整数的长度 NSUInteger
 // %zd 是可以针对不同的 CPU 架构,自动调整 有符号整数的长度 NSInteger
- (void)demo {
    for (int i = 0; i < 10; ++i) {

        NSLog(@"%@ %d %tuK", [NSThread currentThread], i);
    }
}


打印的数据:
2015-04-02 10:23:44.210 05-线程的属性[15199:5071930] <NSThread: 0x7fe5e842ccc0>{number = 1, name = main}
2015-04-02 10:23:44.212 05-线程的属性[15199:5072144] <NSThread: 0x7fe5e8521940>{number = 2, name = Thread AAA} 0
2015-04-02 10:23:44.212 05-线程的属性[15199:5072144] <NSThread: 0x7fe5e8521940>{number = 2, name = Thread AAA} 1
2015-04-02 10:23:44.212 05-线程的属性[15199:5072144] <NSThread: 0x7fe5e8521940>{number = 2, name = Thread AAA} 2
2015-04-02 10:23:44.212 05-线程的属性[15199:5072144] <NSThread: 0x7fe5e8521940>{number = 2, name = Thread AAA} 3
2015-04-02 10:23:44.213 05-线程的属性[15199:5072144] <NSThread: 0x7fe5e8521940>{number = 2, name = Thread AAA} 4
2015-04-02 10:23:44.213 05-线程的属性[15199:5072144] <NSThread: 0x7fe5e8521940>{number = 2, name = Thread AAA} 5
2015-04-02 10:23:44.213 05-线程的属性[15199:5072144] <NSThread: 0x7fe5e8521940>{number = 2, name = Thread AAA} 6
2015-04-02 10:23:44.213 05-线程的属性[15199:5072144] <NSThread: 0x7fe5e8521940>{number = 2, name = Thread AAA} 7
2015-04-02 10:23:44.214 05-线程的属性[15199:5072144] <NSThread: 0x7fe5e8521940>{number = 2, name = Thread AAA} 8
2015-04-02 10:23:44.285 05-线程的属性[15199:5072144] <NSThread: 0x7fe5e8521940>{number = 2, name = Thread AAA} 9


在这里面可以看到线程的名字:
2. threadPriority - 线程优先级
- 优先级,是一个浮点数,取值范围从
0~1.0
1.0表示优先级最高0.0表示优先级最低- 默认优先级是
0.5
- 优先级高只是保证 CPU 调度的可能性会高
- 刀哥个人建议,在开发的时候,不要修改优先级
- 多线程的目的:是将耗时的操作放在后台,不阻塞主线程和用户的交互!
- 多线程开发的原则:简单
- (void)touchesBegan:(NSSet *)touches withEvent:(UIEvent *)event {
    NSLog(@"%@", [NSThread currentThread]);

    // 修改主线程的栈区大小 => 1M
    [NSThread currentThread].stackSize = 1024 * 1024;

    // 开启线程调用
    [self threadProperty];
}


- (void)threadProperty {
    NSThread *t1 = [[NSThread alloc] initWithTarget:self selector:@selector(demo) object:nil];

    // 线程的名称,通常在"大的商业应用"中,希望应用程序上架后,捕获到用户使用崩溃的一些场景
    // 如果知道程序是在哪一个线程中崩溃,能够辅助排查问题!
    // 如果线程非常多,而且在调试的时候,起到一定的辅助作用!
    t1.name = @"Thread AAA";

    // The thread’s priority, which is specified by a floating point number from 0.0 to 1.0, where 1.0 is highest priority.
    // 线程的优先级,取值范围 0~1.0,1.0 的优先级最高
    // A “typical” thread priority might be 0.5
    // 默认的线程优先级是 0.5
    t1.threadPriority = 0; // 设置优先级是 0

    [t1 start];

    // --------------------------
    NSThread *t2 = [[NSThread alloc] initWithTarget:self selector:@selector(demo) object:nil];
    t2.name = @"Thread BBB";
    t2.threadPriority = 1.0; // 设置线程的优先级为 1

    [t2 start];
}

// %tu 是可以针对不同的 CPU 架构,自动调整 无符号整数的长度 NSUInteger
// %zd 是可以针对不同的 CPU 架构,自动调整 有符号整数的长度 NSInteger
- (void)demo {
    for (int i = 0; i < 10; ++i) {
        NSLog(@"%@ %d %tuK", [NSThread currentThread], i, [NSThread currentThread].stackSize / 1024);
    }
}


打印的结果:
2015-04-02 10:28:52.754 05-线程的属性[15243:5090994] <NSThread: 0x7fb06362cac0>{number = 1, name = main}
2015-04-02 10:28:52.756 05-线程的属性[15243:5091222] <NSThread: 0x7fb063522120>{number = 3, name = Thread BBB} 0 512K
2015-04-02 10:28:52.756 05-线程的属性[15243:5091222] <NSThread: 0x7fb063522120>{number = 3, name = Thread BBB} 1 512K
2015-04-02 10:28:52.756 05-线程的属性[15243:5091222] <NSThread: 0x7fb063522120>{number = 3, name = Thread BBB} 2 512K
2015-04-02 10:28:52.756 05-线程的属性[15243:5091222] <NSThread: 0x7fb063522120>{number = 3, name = Thread BBB} 3 512K
2015-04-02 10:28:52.756 05-线程的属性[15243:5091222] <NSThread: 0x7fb063522120>{number = 3, name = Thread BBB} 4 512K
2015-04-02 10:28:52.756 05-线程的属性[15243:5091222] <NSThread: 0x7fb063522120>{number = 3, name = Thread BBB} 5 512K
2015-04-02 10:28:52.756 05-线程的属性[15243:5091222] <NSThread: 0x7fb063522120>{number = 3, name = Thread BBB} 6 512K
2015-04-02 10:28:52.757 05-线程的属性[15243:5091222] <NSThread: 0x7fb063522120>{number = 3, name = Thread BBB} 7 512K
2015-04-02 10:28:52.757 05-线程的属性[15243:5091222] <NSThread: 0x7fb063522120>{number = 3, name = Thread BBB} 8 512K
2015-04-02 10:28:52.759 05-线程的属性[15243:5091222] <NSThread: 0x7fb063522120>{number = 3, name = Thread BBB} 9 512K
2015-04-02 10:28:52.755 05-线程的属性[15243:5091221] <NSThread: 0x7fb063521a80>{number = 2, name = Thread AAA} 0 512K
2015-04-02 10:28:52.766 05-线程的属性[15243:5091221] <NSThread: 0x7fb063521a80>{number = 2, name = Thread AAA} 1 512K
2015-04-02 10:28:52.767 05-线程的属性[15243:5091221] <NSThread: 0x7fb063521a80>{number = 2, name = Thread AAA} 2 512K
2015-04-02 10:28:52.768 05-线程的属性[15243:5091221] <NSThread: 0x7fb063521a80>{number = 2, name = Thread AAA} 3 512K
2015-04-02 10:28:52.769 05-线程的属性[15243:5091221] <NSThread: 0x7fb063521a80>{number = 2, name = Thread AAA} 4 512K
2015-04-02 10:28:52.771 05-线程的属性[15243:5091221] <NSThread: 0x7fb063521a80>{number = 2, name = Thread AAA} 5 512K
2015-04-02 10:28:52.771 05-线程的属性[15243:5091221] <NSThread: 0x7fb063521a80>{number = 2, name = Thread AAA} 6 512K
2015-04-02 10:28:52.785 05-线程的属性[15243:5091221] <NSThread: 0x7fb063521a80>{number = 2, name = Thread AAA} 7 512K
2015-04-02 10:28:52.785 05-线程的属性[15243:5091221] <NSThread: 0x7fb063521a80>{number = 2, name = Thread AAA} 8 512K
2015-04-02 10:28:52.785 05-线程的属性[15243:5091221] <NSThread: 0x7fb063521a80>{number = 2, name = Thread AAA} 9 512K
2015-04-02 10:29:05.556 05-线程的属性[15243:5090994] <NSThread: 0x7fb06362cac0>{number = 1, name = main}
2015-04-02 10:29:05.556 05-线程的属性[15243:5092741] <NSThread: 0x7fb06363fbd0>{number = 5, name = Thread BBB} 0 512K
2015-04-02 10:29:05.556 05-线程的属性[15243:5092741] <NSThread: 0x7fb06363fbd0>{number = 5, name = Thread BBB} 1 512K
2015-04-02 10:29:05.556 05-线程的属性[15243:5092741] <NSThread: 0x7fb06363fbd0>{number = 5, name = Thread BBB} 2 512K
2015-04-02 10:29:05.556 05-线程的属性[15243:5092741] <NSThread: 0x7fb06363fbd0>{number = 5, name = Thread BBB} 3 512K
2015-04-02 10:29:05.557 05-线程的属性[15243:5092741] <NSThread: 0x7fb06363fbd0>{number = 5, name = Thread BBB} 4 512K
2015-04-02 10:29:05.557 05-线程的属性[15243:5092741] <NSThread: 0x7fb06363fbd0>{number = 5, name = Thread BBB} 5 512K
2015-04-02 10:29:05.557 05-线程的属性[15243:5092741] <NSThread: 0x7fb06363fbd0>{number = 5, name = Thread BBB} 6 512K
2015-04-02 10:29:05.557 05-线程的属性[15243:5092741] <NSThread: 0x7fb06363fbd0>{number = 5, name = Thread BBB} 7 512K
2015-04-02 10:29:05.557 05-线程的属性[15243:5092741] <NSThread: 0x7fb06363fbd0>{number = 5, name = Thread BBB} 8 512K
2015-04-02 10:29:05.557 05-线程的属性[15243:5092741] <NSThread: 0x7fb06363fbd0>{number = 5, name = Thread BBB} 9 512K
2015-04-02 10:29:05.558 05-线程的属性[15243:5092738] <NSThread: 0x7fb063643910>{number = 4, name = Thread AAA} 0 512K
2015-04-02 10:29:05.558 05-线程的属性[15243:5092738] <NSThread: 0x7fb063643910>{number = 4, name = Thread AAA} 1 512K
2015-04-02 10:29:05.559 05-线程的属性[15243:5092738] <NSThread: 0x7fb063643910>{number = 4, name = Thread AAA} 2 512K
2015-04-02 10:29:05.559 05-线程的属性[15243:5092738] <NSThread: 0x7fb063643910>{number = 4, name = Thread AAA} 3 512K
2015-04-02 10:29:05.559 05-线程的属性[15243:5092738] <NSThread: 0x7fb063643910>{number = 4, name = Thread AAA} 4 512K
2015-04-02 10:29:05.560 05-线程的属性[15243:5092738] <NSThread: 0x7fb063643910>{number = 4, name = Thread AAA} 5 512K
2015-04-02 10:29:05.560 05-线程的属性[15243:5092738] <NSThread: 0x7fb063643910>{number = 4, name = Thread AAA} 6 512K
2015-04-02 10:29:05.560 05-线程的属性[15243:5092738] <NSThread: 0x7fb063643910>{number = 4, name = Thread AAA} 7 512K
2015-04-02 10:29:05.561 05-线程的属性[15243:5092738] <NSThread: 0x7fb063643910>{number = 4, name = Thread AAA} 8 512K
2015-04-02 10:29:05.561 05-线程的属性[15243:5092738] <NSThread: 0x7fb063643910>{number = 4, name = Thread AAA} 9 512K
// MARK: - 线程的属性
/**
 优先级高只能说明 CPU 在调度的时候,会优先调度,并不意味着,优先级低的就不被调用!

 在多线程开发的时候,有几点提示:

 1. 不要相信一次运行的结果!
 2. 不要去做不同线程之间执行的比较!线程内部的方法都是各自独立执行的
 3. 刀哥个人建议:不要修改优先级!

 多线程开发有一个宝典:简单!优先级反转!

 在 iOS 开发中,多线程最主要的目的:就是把耗时操作放在后台执行!
 */
3. stackSize - 栈区大小
- 默认情况下,无论是主线程还是子线程,栈区大小都是
512K - 栈区大小可以设置
栈区大小的设置见上例代码:
[NSThread currentThread].stackSize = 1024 * 1024;
主要要了解的是栈区的大小是可以自己设置的。
4. isMainThread - 是否主线程
[NSThread isMainThread]4、多线程操作的隐患
1.多线程资源共享的隐患
1 块资源可能会被多个线程共享,也就是多个线程可能会访问同一块资源。
(多个线程访问同一个对象,同一个变量,同一个文件)
当多个线程访问同一块资源时,很容易引发数据的错乱和数据安全问题。
取钱的例子:

当一个人存钱,存钱的时候看到的是1000。一个人同时取钱的,取钱的时候看到的余额也是1000,同时取了500。存钱的人同时存了1000。但是得到的余额显示是500.
2. 消除资源共享的隐患
我们使用的解决方法是加一个锁
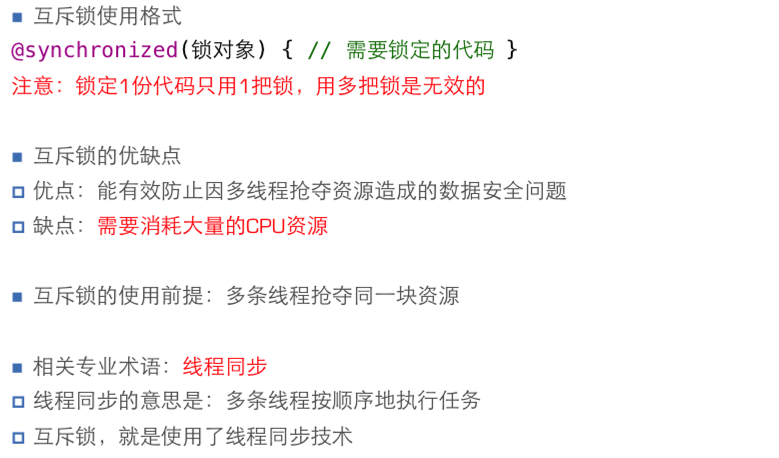
互斥锁的使用的原则:
    尽量减少锁锁的代码的范围。
    锁的范围越大,效率就越差。
使用锁之后,程序的性能都会受到影响
在 ios 开发中,使用锁的机会极少,一般是从服务器获取数据直线显示到手机上。
// 买票方法
- (void)sale {
    while (YES) {
        // 一个线程进到锁里面,另外的线程是在锁外面休眠等待
        @synchronized(self) {
            // 1. 确认是否还有票
            if (self.tickets > 0) {
                // 2. 卖一张
                self.tickets--;

                // 3. 输出剩余票数
                NSLog(@"剩余票数 %d %@", self.tickets, [NSThread currentThread]);
            } else {
                NSLog(@"没票了 %@", [NSThread currentThread]);
                break;
            }
        }
    }
}
要注意的问题:
1. 写多线程程序之前,先保证一条线程执行正确!
2. 保证每一个线程都能够把所有的票卖完(窗口)
3. 添加线程
互斥锁能够保证锁定范围的代码,同一时间,只有一条线程能够执行
互斥锁使用原则:尽量减少锁定代码的范围
锁的范围越大,效率越差!
** 速记
synchronize 能够保证数据第一时间写入到用户偏好
[[NSUserDefaults standardUserDefaults] synchronize];
@ - synchronize - d
因为:互斥锁的性能非常差,苹果不推荐使用,因此,Xcode没有提供职能提示!
互斥锁的参数:
1> self 本质上是任意一个 NSObject 都可以当成锁!
2> 锁对象必须能够保证所有线程都能够访问
3> 如果在程序中,只有一个位置需要加锁,self是一个 UIViewController,OC中最重都会继承自 NSObject
4> 很多代码中,会使用 self 直接当锁对象,不需要额外实例化一个锁对象


 731
731

 被折叠的 条评论
为什么被折叠?
被折叠的 条评论
为什么被折叠?
 到【灌水乐园】发言


