


title: 020《树莓派4B家庭服务器搭建指南》第二十期:在树莓派运行rsnapshot, 实现对服务器数据低成本增量本地备份
我的天翼云服务器有/opt 和 /usr/share/nginx两个目录, 用来存储网站的内容, 数据无价, 为了避免珍贵的数据丢失,我决定使用树莓派运行 rsnapshot, 为网站内容做定期备份。
为什么选择rsnapshot ?
- rsnapshot是基于rsync的开源软件, 原理简单,无后门, 无需强制加密, 备份后的数据所见即所得
- rsnapshot通过硬链接管理文件, 处于不同文件夹的同一个文件, 只占用一份存储空间, 节省磁盘
- rsnapshot默认进行增量备份, 节省带宽。
- rsnapshot长期维护(从2015年开始维护), 功能稳定,在Github的开源仓库
https://github.com/rsnapshot/rsnapshot有2.9k Star,广受好评
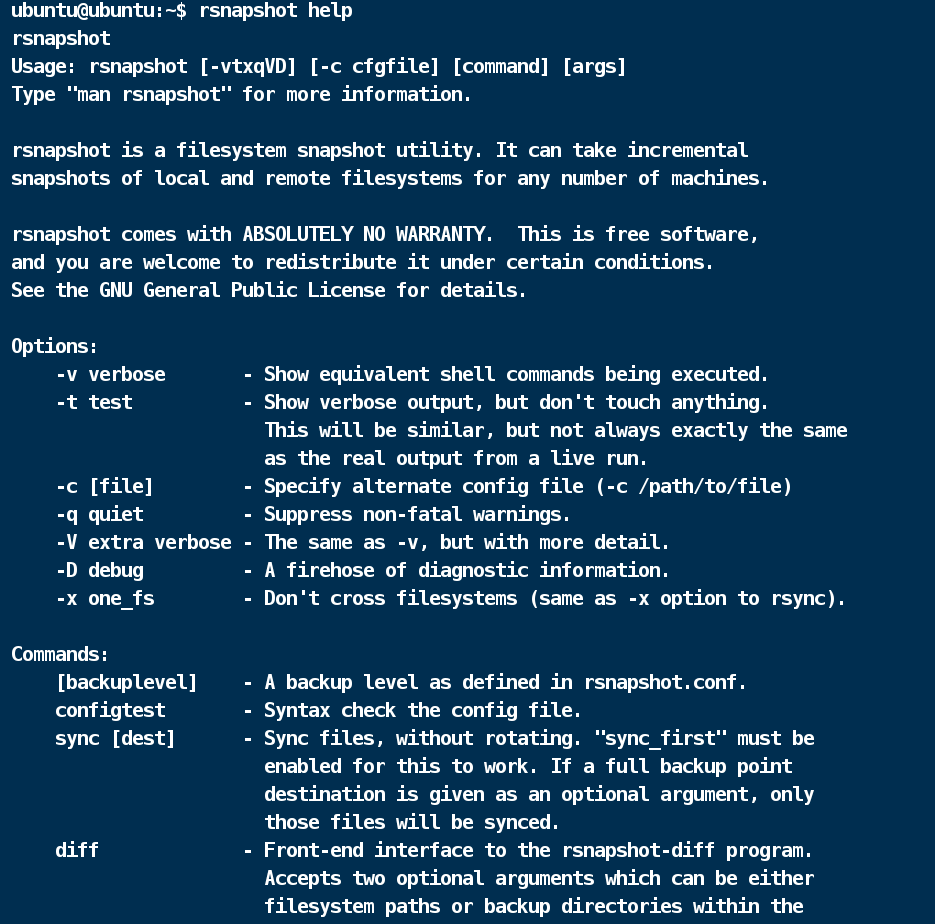
安装rsnapshot
sudo apt install rsnapshot
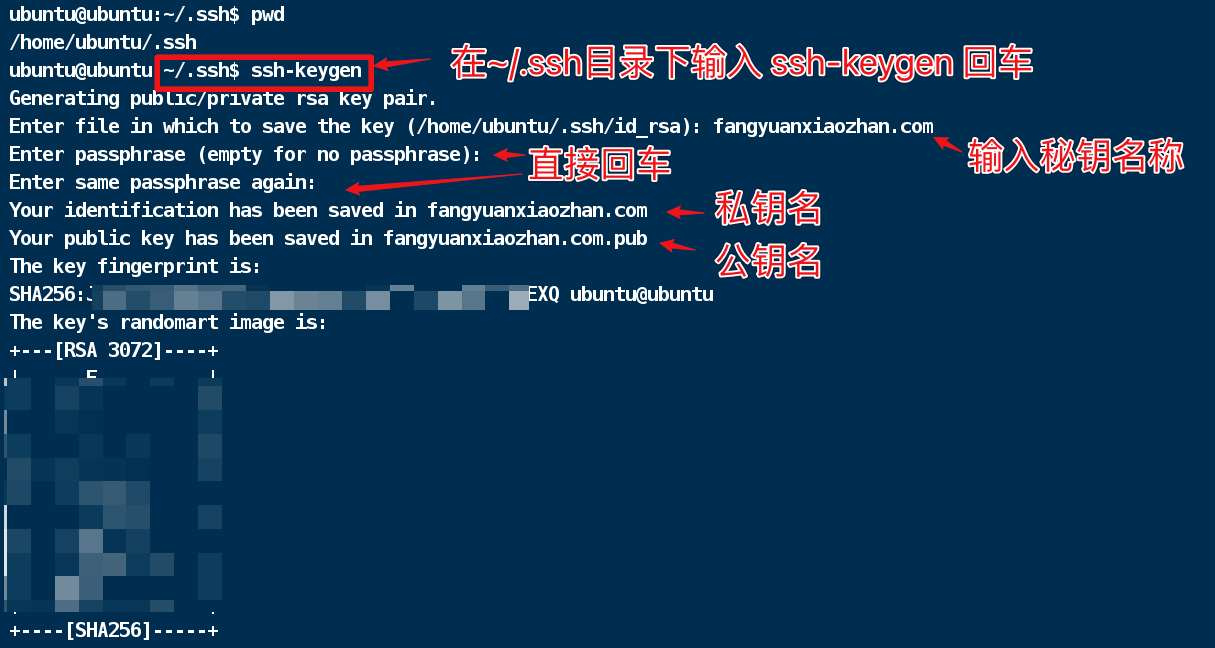
配置树莓派免密登录云服务器
cd ~/.ssh
ssh-keygen
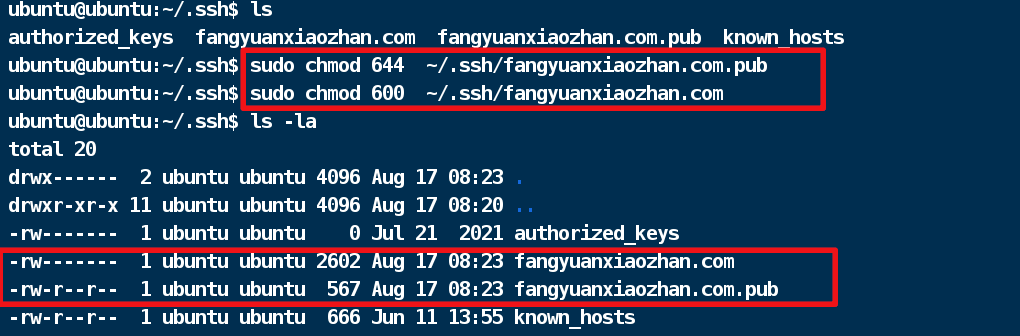
# 设置密钥权限
# 公钥644
sudo chmod 644  ~/.ssh/fangyuanxiaozhan.com.pub
# 私钥600
sudo chmod 600  ~/.ssh/fangyuanxiaozhan.com
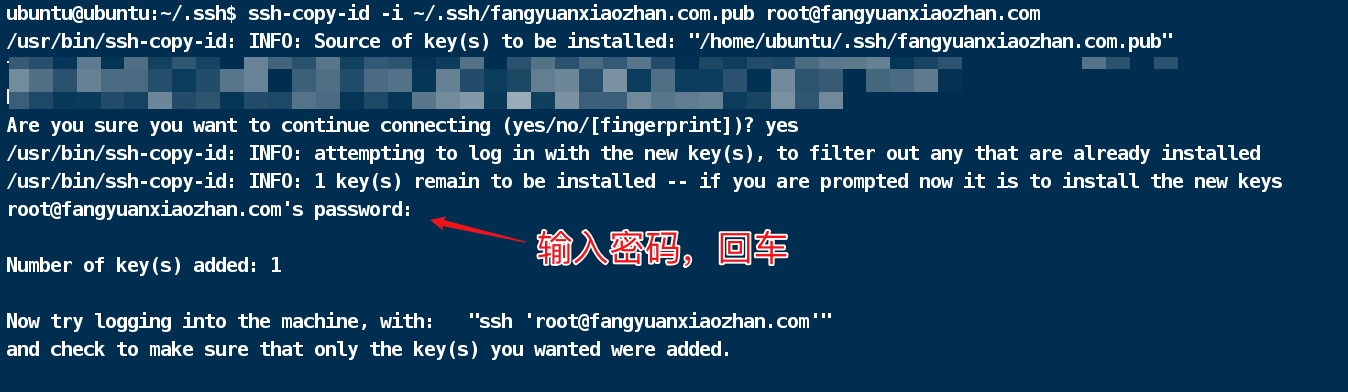
将公钥发送的远程主机
ssh-copy-id -i ~/.ssh/fangyuanxiaozhan.com.pub 远程主机用户名@远程主机ip或域名
在树莓派创建 ~/.ssh/config 并给与权限600
# 如果已经存在~/.ssh/config 则无需创建
touch ~/.ssh/config
chmod 600 ~/.ssh/config
在~/.ssh/config 中填入以下内容
Host 主机ip或域名
HostName 主机ip或域名
User root
IdentityFile ~/.ssh/fangyuanxiaozhan.com
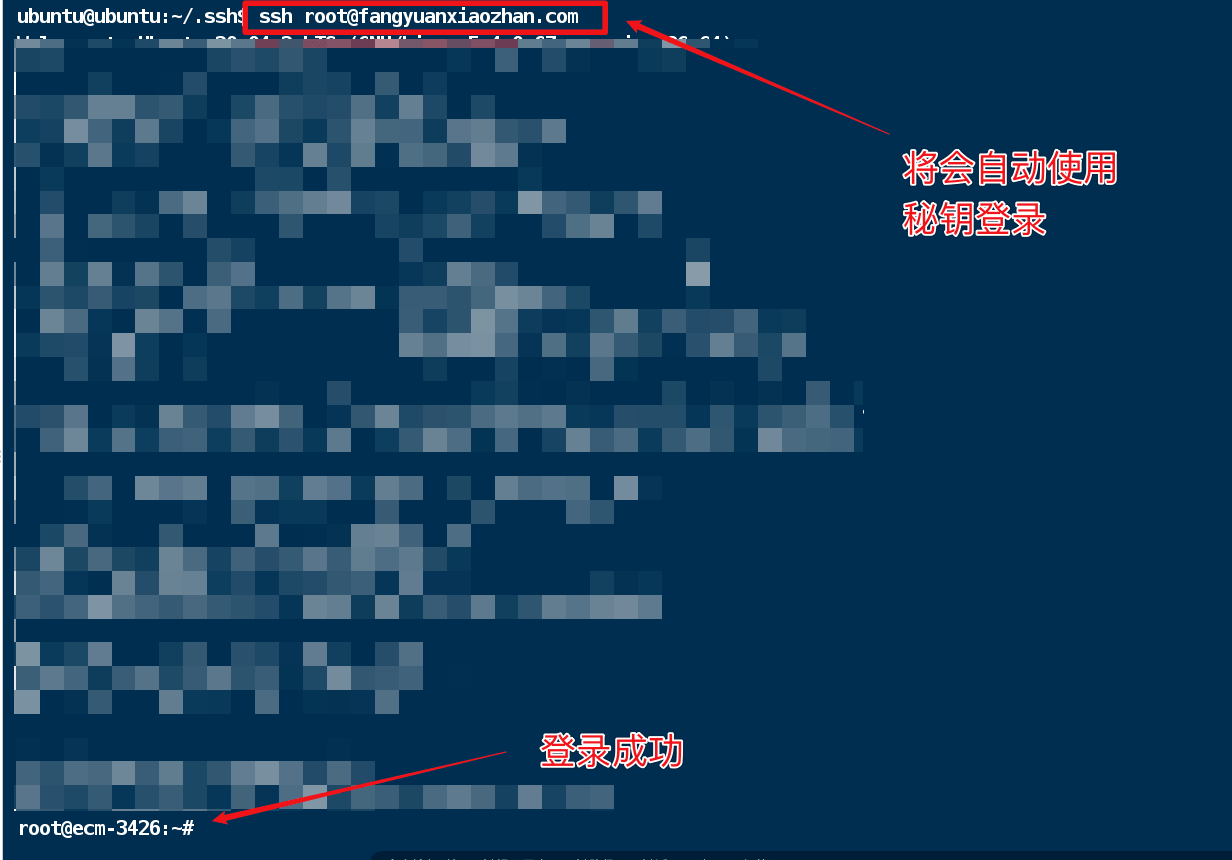
ssh可以免密登录,基于rsync的rsnapshot也可以免密从服务器传输文件了。
按需求修改配置文件
- 在树莓派创建rsnapshot备份文件夹
# 创建rsnapshot存储数据的根目录
mkdir /opt/rsnapshot
# 创建存储我天翼云服务器数据的目录
mkdir /opt/rsnapshot/CTYun
- 设置根目录
修改rsnapshot配置文件/etc/rsnapshot.conf, 将snapshot_root对应的字段修改为在树莓派创建的根目录
snapshot_root /opt/rsnapshot/
配置文件配置行之间使用Tab填充,空格会报错,比如snapshot_root(这里用Tab填充)/opt/rsnapshot/
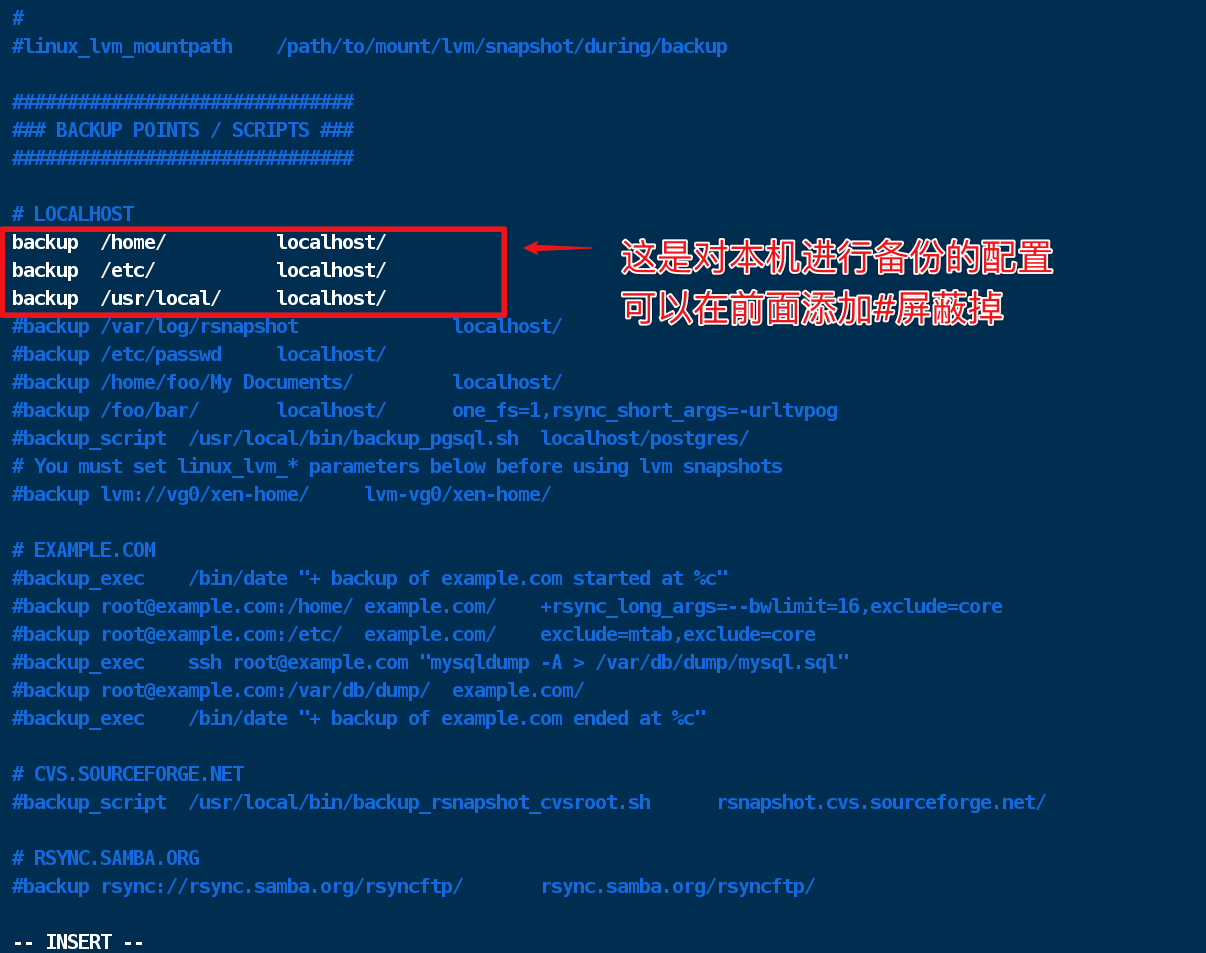
- 屏蔽本机备份配置
查看/etc/rsnapshot.conf 的底部,我们可以看到很多backup开头的配置行,其中默认的几行,是对树莓派本机的几个目录备份,可以前面添加#屏蔽掉
- 移除对ssh绝对路径的注释
由于rsnapshot从服务器备份数据依赖了rsync,而rsync又依赖了ssh,所以我们需要将ssh的绝对路径告诉rsnapshot, 也就是将cmd_ssh 所在行开头的#去掉
cmd_ssh /usr/bin/ssh
- 改变锁文件的位置
lockfile的作用是防止同时运行两个rsnapshot实例,相当于一把锁,这把锁的位置可以由我们自己定义,lockfile的默认位置为/var/run/rsnapshot.pid ,我想以用户名ubuntu的身份运行rsnapshot实例,就要把锁文件位置配置到 ubuntu用户有权限修改的位置,我的处理方式是,新建 /home/ubuntu/.rsnapshot 文件夹
mkdir /home/ubuntu/.rsnapshot
然后将lockfile改为
lockfile /home/ubuntu/.rsnapshot/rsnapshot.pid
- 备份文件夹的配置
在配置文件尾部追加
# CTYun
backup  root@fangyuanxiaozhan.com:/etc/nginx    ./
backup  root@fangyuanxiaozhan.com:/opt  ./      exclude=/opt/before,exclude=/opt/EasyTypora/node_modules
backup  root@fangyuanxiaozhan.com:/usr/share/nginx/fangyuanxiaozhan.com ./
测试配置文件格式是否正确
rsnapshot configtest

我最终的配置文件(供参考)
#################################################
# rsnapshot.conf - rsnapshot configuration file #
#################################################
#                                               #
# PLEASE BE AWARE OF THE FOLLOWING RULE:        #
#                                               #
# This file requires tabs between elements      #
#                                               #
#################################################

#######################
# CONFIG FILE VERSION #
#######################

config_version  1.2

###########################
# SNAPSHOT ROOT DIRECTORY #
###########################

# All snapshots will be stored under this root directory.
#
snapshot_root   /opt/rsnapshot/CTYun/

# If no_create_root is enabled, rsnapshot will not automatically create the
# snapshot_root directory. This is particularly useful if you are backing
# up to removable media, such as a FireWire or USB drive.
#
#no_create_root 1

#################################
# EXTERNAL PROGRAM DEPENDENCIES #
#################################

# LINUX USERS:   Be sure to uncomment "cmd_cp". This gives you extra features.
# EVERYONE ELSE: Leave "cmd_cp" commented out for compatibility.
#
# See the README file or the man page for more details.
#
cmd_cp          /bin/cp

# uncomment this to use the rm program instead of the built-in perl routine.
#
cmd_rm          /bin/rm

# rsync must be enabled for anything to work. This is the only command that
# must be enabled.
#
cmd_rsync       /usr/bin/rsync

# Uncomment this to enable remote ssh backups over rsync.
#
cmd_ssh /usr/bin/ssh

# Comment this out to disable syslog support.
#
cmd_logger      /usr/bin/logger

# Uncomment this to specify the path to "du" for disk usage checks.
# If you have an older version of "du", you may also want to check the
# "du_args" parameter below.
#
#cmd_du         /usr/bin/du

# Uncomment this to specify the path to rsnapshot-diff.
#
#cmd_rsnapshot_diff     /usr/bin/rsnapshot-diff

# Specify the path to a script (and any optional arguments) to run right
# before rsnapshot syncs files
#
#cmd_preexec    /path/to/preexec/script

# Specify the path to a script (and any optional arguments) to run right
# after rsnapshot syncs files
#
#cmd_postexec   /path/to/postexec/script

# Paths to lvcreate, lvremove, mount and umount commands, for use with
# Linux LVMs.
#
#linux_lvm_cmd_lvcreate /sbin/lvcreate
#linux_lvm_cmd_lvremove /sbin/lvremove
#linux_lvm_cmd_mount    /bin/mount
#linux_lvm_cmd_umount   /bin/umount

#########################################
#     BACKUP LEVELS / INTERVALS         #
# Must be unique and in ascending order #
# e.g. alpha, beta, gamma, etc.         #
#########################################

retain  alpha   6
retain  beta    7
retain  gamma   4
#retain delta   3

############################################
#              GLOBAL OPTIONS              #
# All are optional, with sensible defaults #
############################################

# Verbose level, 1 through 5.
# 1     Quiet           Print fatal errors only
# 2     Default         Print errors and warnings only
# 3     Verbose         Show equivalent shell commands being executed
# 4     Extra Verbose   Show extra verbose information
# 5     Debug mode      Everything
#
verbose         2

# Same as "verbose" above, but controls the amount of data sent to the
# logfile, if one is being used. The default is 3.
# If you want the rsync output, you have to set it to 4
#
loglevel        3

# If you enable this, data will be written to the file you specify. The
# amount of data written is controlled by the "loglevel" parameter.
#
#logfile        /var/log/rsnapshot.log

# If enabled, rsnapshot will write a lockfile to prevent two instances
# from running simultaneously (and messing up the snapshot_root).
# If you enable this, make sure the lockfile directory is not world
# writable. Otherwise anyone can prevent the program from running.
#
lockfile        /home/ubuntu/.rsnapshot/rsnapshot.pid

# By default, rsnapshot check lockfile, check if PID is running
# and if not, consider lockfile as stale, then start
# Enabling this stop rsnapshot if PID in lockfile is not running
#
#stop_on_stale_lockfile         0

# Default rsync args. All rsync commands have at least these options set.
#
#rsync_short_args       -a
#rsync_long_args        --delete --numeric-ids --relative --delete-excluded

# ssh has no args passed by default, but you can specify some here.
#
#ssh_args       -p 22

# Default arguments for the "du" program (for disk space reporting).
# The GNU version of "du" is preferred. See the man page for more details.
# If your version of "du" doesn't support the -h flag, try -k flag instead.
#
#du_args        -csh

# If this is enabled, rsync won't span filesystem partitions within a
# backup point. This essentially passes the -x option to rsync.
# The default is 0 (off).
#
#one_fs         0

# The include and exclude parameters, if enabled, simply get passed directly
# to rsync. If you have multiple include/exclude patterns, put each one on a
# separate line. Please look up the --include and --exclude options in the
# rsync man page for more details on how to specify file name patterns.
#
#include        ???
#include        ???
#exclude        ???
#exclude        ???

# The include_file and exclude_file parameters, if enabled, simply get
# passed directly to rsync. Please look up the --include-from and
# --exclude-from options in the rsync man page for more details.
#
#include_file   /path/to/include/file
#exclude_file   /path/to/exclude/file

# If your version of rsync supports --link-dest, consider enabling this.
# This is the best way to support special files (FIFOs, etc) cross-platform.
# The default is 0 (off).
#
#link_dest      0

# When sync_first is enabled, it changes the default behaviour of rsnapshot.
# Normally, when rsnapshot is called with its lowest interval
# (i.e.: "rsnapshot alpha"), it will sync files AND rotate the lowest
# intervals. With sync_first enabled, "rsnapshot sync" handles the file sync,
# and all interval calls simply rotate files. See the man page for more
# details. The default is 0 (off).
#
#sync_first     0

# If enabled, rsnapshot will move the oldest directory for each interval
# to [interval_name].delete, then it will remove the lockfile and delete
# that directory just before it exits. The default is 0 (off).
#
#use_lazy_deletes       0

# Number of rsync re-tries. If you experience any network problems or
# network card issues that tend to cause ssh to fail with errors like
# "Corrupted MAC on input", for example, set this to a non-zero value
# to have the rsync operation re-tried.
#
#rsync_numtries 0

# LVM parameters. Used to backup with creating lvm snapshot before backup
# and removing it after. This should ensure consistency of data in some special
# cases
#
# LVM snapshot(s) size (lvcreate --size option).
#
#linux_lvm_snapshotsize 100M

# Name to be used when creating the LVM logical volume snapshot(s).
#
#linux_lvm_snapshotname rsnapshot

# Path to the LVM Volume Groups.
#
#linux_lvm_vgpath       /dev

# Mount point to use to temporarily mount the snapshot(s).
#
#linux_lvm_mountpath    /path/to/mount/lvm/snapshot/during/backup

###############################
### BACKUP POINTS / SCRIPTS ###
###############################

# LOCALHOST
#backup /home/          localhost/
#backup /etc/           localhost/
#backup /usr/local/     localhost/
#backup /var/log/rsnapshot              localhost/
#backup /etc/passwd     localhost/
#backup /home/foo/My Documents/         localhost/
#backup /foo/bar/       localhost/      one_fs=1,rsync_short_args=-urltvpog
#backup_script  /usr/local/bin/backup_pgsql.sh  localhost/postgres/
# You must set linux_lvm_* parameters below before using lvm snapshots
#backup lvm://vg0/xen-home/     lvm-vg0/xen-home/

# EXAMPLE.COM
#backup_exec    /bin/date "+ backup of example.com started at %c"
#backup root@example.com:/home/ example.com/    +rsync_long_args=--bwlimit=16,exclude=core
#backup root@example.com:/etc/  example.com/    exclude=mtab,exclude=core
#backup_exec    ssh root@example.com "mysqldump -A > /var/db/dump/mysql.sql"
#backup root@example.com:/var/db/dump/  example.com/
#backup_exec    /bin/date "+ backup of example.com ended at %c"

# CVS.SOURCEFORGE.NET
#backup_script  /usr/local/bin/backup_rsnapshot_cvsroot.sh      rsnapshot.cvs.sourceforge.net/

# RSYNC.SAMBA.ORG
#backup rsync://rsync.samba.org/rsyncftp/       rsync.samba.org/rsyncftp/
# CTYun
backup  root@fangyuanxiaozhan.com:/etc/nginx    ./
backup  root@fangyuanxiaozhan.com:/opt  ./      exclude=/opt/before,exclude=/opt/EasyTypora/node_modules
backup  root@fangyuanxiaozhan.com:/usr/share/nginx/fangyuanxiaozhan.com ./
配置行内的空余部分,不要用空格,一定要用Tab填充
- 关于备份数量上限的解释
在以上配置文件中,有以下几行
retain  alpha   6
retain  beta    7
retain  gamma   4
以alpah为例, retain alpha 6代表最多进行六个备份,比如alpha.0 alpha.1 alpha.2 alpha.3 alpha.4 alpha.5 , 其中alpha.0为最新的备份,alpha.5为最老的备份,超过了6次备份,最早的一份将会从磁盘清除,首次运行备份指令后,alpha.0 文件夹会生成在根目录下面,也就是/opt/rsnapshot/CTYun/alpha.0, /opt/rsnapshot/CTYun/alpha.0文件夹里存放着备份好的文件目录。
- 手动进行备份
rsnapshot -c /etc/rsnapshot.conf alpha
上面命令汇总,我们使用alpha策略进行备份,并指定了配置文件的位置。
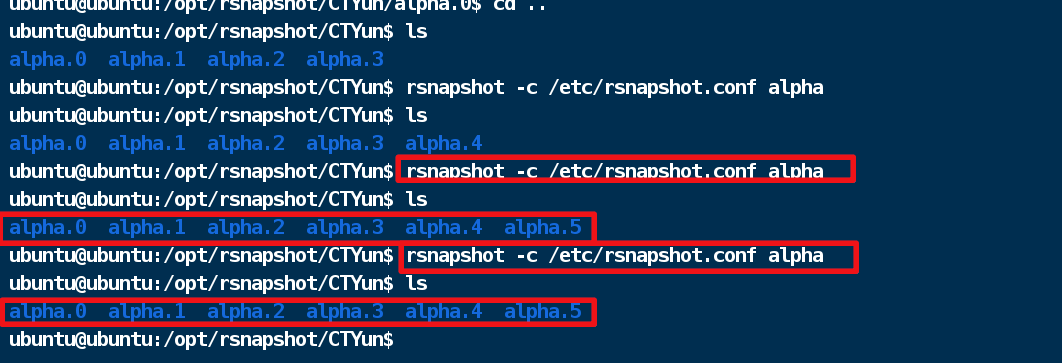
执行完成后,查看目录结构

可以看到alpha.0成了真的的根目录。
我们多运行几次rsnapshot -c /etc/rsnapshot.conf alpha , 可以看到在/opt/rsnapshot/CTYun 文件夹下有几个并列的alpha.* 文件夹

由于配置了retain alpha 6,无论我们运行多少次,alpha.*都不会超过六个
自动化备份
crontab是一款可以创建定时任务的工具,我们可以在crontab中添加每四小时运行rsnapshot -c /etc/rsnapshot.conf alpha 的任务,这样就相当于每天执行了6次备份。
在ubuntu中crontab默认对所有用户进行了安装,所以我们无需sudo权限就能创建任务,操作方法如下, 打开cron表
crontab -e
首次打开可以选择编辑器,我选择了vim 打开,添加每四小时运行一次命令的配置
0 */4 * * * rsnapshot -c /etc/rsnapshot.conf alpha
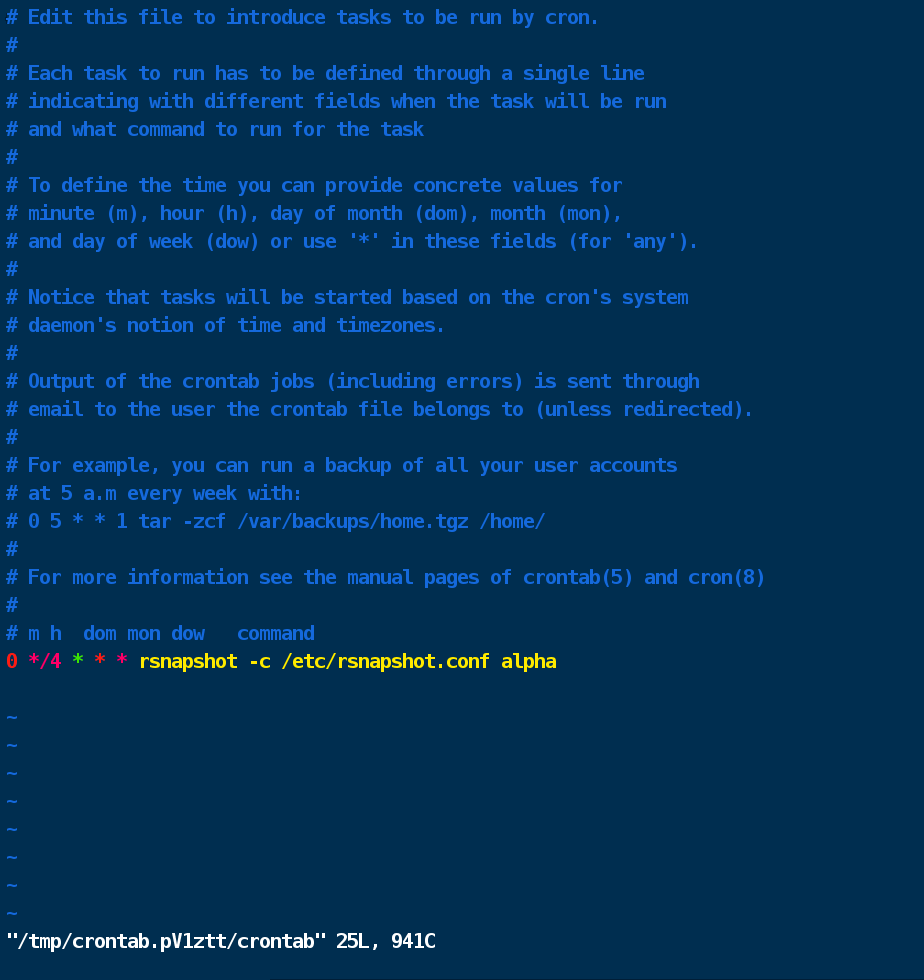
写入配置后,退出编辑器即可;
优化: 创建每日执行,保留31天的备份任务
我希望每天凌晨4点能生成新备份,保留31天,但又不希望和每隔4小时的的备份有冲突(两个任务共用logfile会相互影响)。
于是我新开一个配置文件/home/ubuntu/.rsnapshot/mouthly.conf, 添加retain monthly 31, 修改filelock 为lockfile /home/ubuntu/.rsnapshot/monthly.pid
这里的monthly 完全可以自定义,并没有特殊性,可以是monthly001 或 monthly002, 只要运行命令时,对应即可。
内容为
#################################################
# rsnapshot.conf - rsnapshot configuration file #
#################################################
#                                               #
# PLEASE BE AWARE OF THE FOLLOWING RULE:        #
#                                               #
# This file requires tabs between elements      #
#                                               #
#################################################

#######################
# CONFIG FILE VERSION #
#######################

config_version  1.2

###########################
# SNAPSHOT ROOT DIRECTORY #
###########################

# All snapshots will be stored under this root directory.
#
snapshot_root   /opt/rsnapshot/CTYun/

# If no_create_root is enabled, rsnapshot will not automatically create the
# snapshot_root directory. This is particularly useful if you are backing
# up to removable media, such as a FireWire or USB drive.
#
#no_create_root 1

#################################
# EXTERNAL PROGRAM DEPENDENCIES #
#################################

# LINUX USERS:   Be sure to uncomment "cmd_cp". This gives you extra features.
# EVERYONE ELSE: Leave "cmd_cp" commented out for compatibility.
#
# See the README file or the man page for more details.
#
cmd_cp          /bin/cp

# uncomment this to use the rm program instead of the built-in perl routine.
#
cmd_rm          /bin/rm

# rsync must be enabled for anything to work. This is the only command that
# must be enabled.
#
cmd_rsync       /usr/bin/rsync

# Uncomment this to enable remote ssh backups over rsync.
#
cmd_ssh /usr/bin/ssh

# Comment this out to disable syslog support.
#
cmd_logger      /usr/bin/logger

# Uncomment this to specify the path to "du" for disk usage checks.
# If you have an older version of "du", you may also want to check the
# "du_args" parameter below.
#
#cmd_du         /usr/bin/du

# Uncomment this to specify the path to rsnapshot-diff.
#
#cmd_rsnapshot_diff     /usr/bin/rsnapshot-diff

# Specify the path to a script (and any optional arguments) to run right
# before rsnapshot syncs files
#
#cmd_preexec    /path/to/preexec/script

# Specify the path to a script (and any optional arguments) to run right
# after rsnapshot syncs files
#
#cmd_postexec   /path/to/postexec/script

# Paths to lvcreate, lvremove, mount and umount commands, for use with
# Linux LVMs.
#
#linux_lvm_cmd_lvcreate /sbin/lvcreate
#linux_lvm_cmd_lvremove /sbin/lvremove
#linux_lvm_cmd_mount    /bin/mount
#linux_lvm_cmd_umount   /bin/umount

#########################################
#     BACKUP LEVELS / INTERVALS         #
# Must be unique and in ascending order #
# e.g. alpha, beta, gamma, etc.         #
#########################################

retain	monthly	31
retain  alpha   6
retain  beta    7
retain  gamma   4
#retain delta   3

############################################
#              GLOBAL OPTIONS              #
# All are optional, with sensible defaults #
############################################

# Verbose level, 1 through 5.
# 1     Quiet           Print fatal errors only
# 2     Default         Print errors and warnings only
# 3     Verbose         Show equivalent shell commands being executed
# 4     Extra Verbose   Show extra verbose information
# 5     Debug mode      Everything
#
verbose         2

# Same as "verbose" above, but controls the amount of data sent to the
# logfile, if one is being used. The default is 3.
# If you want the rsync output, you have to set it to 4
#
loglevel        3

# If you enable this, data will be written to the file you specify. The
# amount of data written is controlled by the "loglevel" parameter.
#
#logfile        /var/log/rsnapshot.log

# If enabled, rsnapshot will write a lockfile to prevent two instances
# from running simultaneously (and messing up the snapshot_root).
# If you enable this, make sure the lockfile directory is not world
# writable. Otherwise anyone can prevent the program from running.
#
lockfile        /home/ubuntu/.rsnapshot/monthly.pid

# By default, rsnapshot check lockfile, check if PID is running
# and if not, consider lockfile as stale, then start
# Enabling this stop rsnapshot if PID in lockfile is not running
#
#stop_on_stale_lockfile         0

# Default rsync args. All rsync commands have at least these options set.
#
#rsync_short_args       -a
#rsync_long_args        --delete --numeric-ids --relative --delete-excluded

# ssh has no args passed by default, but you can specify some here.
#
#ssh_args       -p 22

# Default arguments for the "du" program (for disk space reporting).
# The GNU version of "du" is preferred. See the man page for more details.
# If your version of "du" doesn't support the -h flag, try -k flag instead.
#
#du_args        -csh

# If this is enabled, rsync won't span filesystem partitions within a
# backup point. This essentially passes the -x option to rsync.
# The default is 0 (off).
#
#one_fs         0

# The include and exclude parameters, if enabled, simply get passed directly
# to rsync. If you have multiple include/exclude patterns, put each one on a
# separate line. Please look up the --include and --exclude options in the
# rsync man page for more details on how to specify file name patterns.
#
#include        ???
#include        ???
#exclude        ???
#exclude        ???

# The include_file and exclude_file parameters, if enabled, simply get
# passed directly to rsync. Please look up the --include-from and
# --exclude-from options in the rsync man page for more details.
#
#include_file   /path/to/include/file
#exclude_file   /path/to/exclude/file

# If your version of rsync supports --link-dest, consider enabling this.
# This is the best way to support special files (FIFOs, etc) cross-platform.
# The default is 0 (off).
#
#link_dest      0

# When sync_first is enabled, it changes the default behaviour of rsnapshot.
# Normally, when rsnapshot is called with its lowest interval
# (i.e.: "rsnapshot alpha"), it will sync files AND rotate the lowest
# intervals. With sync_first enabled, "rsnapshot sync" handles the file sync,
# and all interval calls simply rotate files. See the man page for more
# details. The default is 0 (off).
#
#sync_first     0

# If enabled, rsnapshot will move the oldest directory for each interval
# to [interval_name].delete, then it will remove the lockfile and delete
# that directory just before it exits. The default is 0 (off).
#
#use_lazy_deletes       0

# Number of rsync re-tries. If you experience any network problems or
# network card issues that tend to cause ssh to fail with errors like
# "Corrupted MAC on input", for example, set this to a non-zero value
# to have the rsync operation re-tried.
#
#rsync_numtries 0

# LVM parameters. Used to backup with creating lvm snapshot before backup
# and removing it after. This should ensure consistency of data in some special
# cases
#
# LVM snapshot(s) size (lvcreate --size option).
#
#linux_lvm_snapshotsize 100M

# Name to be used when creating the LVM logical volume snapshot(s).
#
#linux_lvm_snapshotname rsnapshot

# Path to the LVM Volume Groups.
#
#linux_lvm_vgpath       /dev

# Mount point to use to temporarily mount the snapshot(s).
#
#linux_lvm_mountpath    /path/to/mount/lvm/snapshot/during/backup

###############################
### BACKUP POINTS / SCRIPTS ###
###############################

# LOCALHOST
#backup /home/          localhost/
#backup /etc/           localhost/
#backup /usr/local/     localhost/
#backup /var/log/rsnapshot              localhost/
#backup /etc/passwd     localhost/
#backup /home/foo/My Documents/         localhost/
#backup /foo/bar/       localhost/      one_fs=1,rsync_short_args=-urltvpog
#backup_script  /usr/local/bin/backup_pgsql.sh  localhost/postgres/
# You must set linux_lvm_* parameters below before using lvm snapshots
#backup lvm://vg0/xen-home/     lvm-vg0/xen-home/

# EXAMPLE.COM
#backup_exec    /bin/date "+ backup of example.com started at %c"
#backup root@example.com:/home/ example.com/    +rsync_long_args=--bwlimit=16,exclude=core
#backup root@example.com:/etc/  example.com/    exclude=mtab,exclude=core
#backup_exec    ssh root@example.com "mysqldump -A > /var/db/dump/mysql.sql"
#backup root@example.com:/var/db/dump/  example.com/
#backup_exec    /bin/date "+ backup of example.com ended at %c"

# CVS.SOURCEFORGE.NET
#backup_script  /usr/local/bin/backup_rsnapshot_cvsroot.sh      rsnapshot.cvs.sourceforge.net/

# RSYNC.SAMBA.ORG
#backup rsync://rsync.samba.org/rsyncftp/       rsync.samba.org/rsyncftp/
# CTYun
backup  root@fangyuanxiaozhan.com:/etc/nginx    ./
backup  root@fangyuanxiaozhan.com:/opt  ./      exclude=/opt/before,exclude=/opt/EasyTypora/node_modules
backup  root@fangyuanxiaozhan.com:/usr/share/nginx/fangyuanxiaozhan.com ./
测试月度备份配置文件
rsnapshot -c /home/ubuntu/.rsnapshot/monthly.conf configtest

运行crontab -e ,将以下配置添加为每日凌晨四点运行的定时任务
0 4 * * * rsnapshot -c /home/ubuntu/.rsnapshot/monthly.conf monthly
monthly任务备份后,会产生以monthly开头的文件夹
rsnapshot -c /home/ubuntu/.rsnapshot/monthly.conf monthly

小结
云服务商的硬盘还是蛮贵的,对于个人开发者而言,同时能省一些钱总是好的。
2023年的机械硬盘算是很便宜了,1千块能买16TB的全新盘,搞一块插到树莓派,定期对服务器数据做增量备份,成本比云服务商的低很多。
如果你是一个上班族,办公室和家里各部署一套rsnapshot备份,也算是支持数据分布式异地容灾了。
为什么要把服务器数据备份到本地?目前的ICP备案搞的风风火火,买了服务器,由于备案的限制,也不能马上使用80,443等端口,即使服务器备了案,解析的域名也会受到限制,如果有一天,由于某种不可抗力,把个人备案关联的服务器的数据全部封存,也不是不可能,所以,做好本地数据备份,总是没错的,反正成本也不高。
本文属于《树莓派不吃灰》系列的第二十期,《树莓派不吃灰》系列教程开源地址 github.com/zhaoolee/pi


 1203
1203


 被折叠的 条评论
为什么被折叠?
被折叠的 条评论
为什么被折叠?
 到【灌水乐园】发言


