定时任务服务开发笔记(1)——Quartz2+Spring3+Struts2整合

一转眼又有半年多没有更新了,我对于记录总缺少一些恒心。

这次是在公司有自己的需求,想要开发一个定时执行相应任务的服务,由于这方面平时比较少接触,很容易忘记,就稍微记录一下开发的过程吧。


计划中是使用Quartz进行开发,使用sqlserver数据库进行持久化,定时完成相应任务的操作。

一、数据库建表

首先需要搭建Quartz使用的数据库及表,这里使用的是Quartz2.2.3,网上下载解压后的目录\quartz-2.2.3\docs\dbTables下就有各种数据库对应的建表脚本,我在这里选用的是sqlserver数据库。

运行相应的建表语句后得到如下结构的数据库。

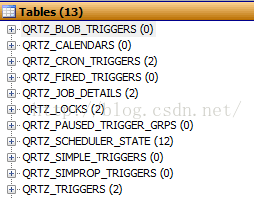
这里已经有几条测试数据,忽略之,刚刚建表应该是没有任何数据的。

二、创建项目,导入所需jar包

我这里使用的是Quartz2+Spring3+Struts2,使用MyEclipse2015进行开发,由于我对jar包并没有什么研究,所以导入的jar包难免有多或者缺少,还请海涵哈,导入一下jar包。

三、配置quartz.properties

使用Quartz,需要编写quartz.properties配置文件,我对这个配置也没多少研究,基本可以看懂,但没有进行深入研究。贴出来参考。

#============================================================================ 
# Configure Main Scheduler Properties   
#============================================================================ 
org.quartz.scheduler.instanceName = TestScheduler 
org.quartz.scheduler.instanceId = AUTO 
#============================================================================ 
# Configure ThreadPool   
#============================================================================ 
org.quartz.threadPool.class = org.quartz.simpl.SimpleThreadPool 
org.quartz.threadPool.threadCount = 10
org.quartz.threadPool.threadPriority = 5 
org.quartz.threadPool.threadsInheritContextClassLoaderOfInitializingThread = true
#============================================================================ 
# Configure JobStore   
#============================================================================ 
org.quartz.jobStore.misfireThreshold = 60000 
org.quartz.jobStore.class = org.quartz.impl.jdbcjobstore.JobStoreTX
org.quartz.jobStore.driverDelegateClass=org.quartz.impl.jdbcjobstore.StdJDBCDelegate
org.quartz.jobStore.tablePrefix = QRTZ_
org.quartz.jobStore.maxMisfiresToHandleAtATime=10
org.quartz.jobStore.isClustered = true
org.quartz.jobStore.clusterCheckinInterval = 1000
org.quartz.jobStore.selectWithLockSQL=select * from {0}LOCKS UPDLOCK WHERE LOCK_NAME\=?


四、配置applicationContext.xml

因为使用spring,所以自然必须编写相应的applicationContext.xml配置文件,这里面也没有什么好说的,贴出来记录一下。

<?xml version="1.0" encoding="UTF-8"?>
<beans
	xmlns="http://www.springframework.org/schema/beans"
	xmlns:xsi="http://www.w3.org/2001/XMLSchema-instance"
	xmlns:p="http://www.springframework.org/schema/p"
	xsi:schemaLocation="http://www.springframework.org/schema/beans http://www.springframework.org/schema/beans/spring-beans-3.0.xsd">
 
 
<!-- 配置数据源 -->
	<bean id="quartzDataSource" class="org.apache.commons.dbcp.BasicDataSource">
		<property name="driverClassName"
			value="com.microsoft.sqlserver.jdbc.SQLServerDriver">
		</property>
		<property name="url"
			value="jdbc:sqlserver://127.0.0.1:1433;databaseName=master">
		</property>
		<property name="username" value="sa"></property>
		<property name="password" value="123456"></property>
		
	</bean>
 
 <!-- 配置调度器工厂(SchedulerFactoryBean) -->  
 	<bean name="schedulerFactoryBean"  class="org.springframework.scheduling.quartz.SchedulerFactoryBean">
		<property name="dataSource">
			<ref bean="quartzDataSource" />
	    </property>     	    
		<property name="applicationContextSchedulerContextKey" value="applicationContextKey" />
		<property name="configLocation" value="classpath:quartz.properties" />
	</bean>

	
</beans>


五、配置web.xml

这个相信也并不陌生,照记录一下就是了。

<?xml version="1.0" encoding="UTF-8"?>
<web-app version="2.5" 
	xmlns="http://java.sun.com/xml/ns/javaee" 
	xmlns:xsi="http://www.w3.org/2001/XMLSchema-instance" 
	xsi:schemaLocation="http://java.sun.com/xml/ns/javaee 
	http://java.sun.com/xml/ns/javaee/web-app_2_5.xsd">
  <welcome-file-list>
    <welcome-file>index.jsp</welcome-file>
  </welcome-file-list>
  
  <context-param>
  	<param-name>contextConfigLocation</param-name>
  	<param-value>classpath:applicationContext.xml</param-value>
  </context-param>
  
  <listener>
    <listener-class>
    org.springframework.web.context.ContextLoaderListener
   </listener-class>
  </listener>
  
  <filter>
    <filter-name>struts2</filter-name>
    <filter-class>org.apache.struts2.dispatcher.ng.filter.StrutsPrepareAndExecuteFilter</filter-class>
  </filter>
  <filter-mapping>
    <filter-name>struts2</filter-name>
    <url-pattern>*.action</url-pattern>
  </filter-mapping>
  
  <filter>
    <filter-name>encoding</filter-name>
    <filter-class>org.springframework.web.filter.CharacterEncodingFilter</filter-class>
    <init-param>
      <param-name>encoding</param-name>
      <param-value>UTF-8</param-value>
    </init-param>
  </filter>
  <filter-mapping>
    <filter-name>encoding</filter-name>
    <url-pattern>/*</url-pattern>
  </filter-mapping>
  
</web-app>


六、编写记录任务的polo类及任务执行工厂

完成上述操作后,基本就算是完成整合方面的工作了,现在编写有关任务的类。

定义一个简单类SDDataJob来记录任务执行时需要的信息。

package QuartzJob;

import java.io.Serializable;

public class SDDataJob implements Serializable {
	/**
	 * 
	 */
	private static final long serialVersionUID = -949527211051969248L;
	
	/** 任务id */
	private String jobId;
	/** 任务名称 */
	private String jobName;
	/** 任务分组 */
	private String jobGroup;
	/** 任务状态 0禁用 1启用 2删除*/
	private String jobStatus;
	/** 任务运行时间表达式 */
	private String cronExpression;
	/** 任务描述 */
	private String desc;
	
	
	public String getJobId() {
		return jobId;
	}
	public void setJobId(String jobId) {
		this.jobId = jobId;
	}
	public String getJobName() {
		return jobName;
	}
	public void setJobName(String jobName) {
		this.jobName = jobName;
	}
	public String getJobGroup() {
		return jobGroup;
	}
	public void setJobGroup(String jobGroup) {
		this.jobGroup = jobGroup;
	}
	public String getJobStatus() {
		return jobStatus;
	}
	public void setJobStatus(String jobStatus) {
		this.jobStatus = jobStatus;
	}
	public String getCronExpression() {
		return cronExpression;
	}
	public void setCronExpression(String cronExpression) {
		this.cronExpression = cronExpression;
	}
	public String getDesc() {
		return desc;
	}
	public void setDesc(String desc) {
		this.desc = desc;
	}
}


还需要定义任务执行工厂SDDataJobFactory来统一执行任务。

package QuartzJob;

import java.text.SimpleDateFormat;
import java.util.Date;

import org.quartz.Job;
import org.quartz.JobExecutionContext;
import org.quartz.JobExecutionException;

public class SDDataJobFactory implements Job {
	
	SimpleDateFormat dataFormat = new SimpleDateFormat("yyyy-MM-dd HH:mm:ss");

	public void execute(JobExecutionContext context) throws JobExecutionException {
		SDDataJob scheduleJob = (SDDataJob)context.getMergedJobDataMap().get("SDDataJob");
		System.out.println("任务成功运行:任务名称 = [" + scheduleJob.getJobName() + "] --> 执行时间=[" + dataFormat.format(new Date()) + "]");
	}

}


七、编写测试类进行测试。

package zaki.test;


import org.quartz.CronScheduleBuilder;
import org.quartz.CronTrigger;
import org.quartz.JobBuilder;
import org.quartz.JobDetail;
import org.quartz.Scheduler;
import org.quartz.SchedulerException;
import org.quartz.TriggerBuilder;
import org.springframework.context.ApplicationContext;
import org.springframework.context.support.ClassPathXmlApplicationContext;

import QuartzJob.SDDataJob;
import QuartzJob.SDDataJobFactory;


public class test {

	public static void main(String[] args) {
		@SuppressWarnings("resource")
		ApplicationContext context = new ClassPathXmlApplicationContext("applicationContext.xml"); 
    	
		//schedulerFactoryBean 由spring创建注入
		Scheduler scheduler = (Scheduler)context.getBean("schedulerFactoryBean");
		
		//生成测试数据		
		SDDataJob job = new SDDataJob();
		job.setJobId("101");
		job.setJobName("SDData定时任务01");
		job.setJobGroup("SDData测试任务组");
		job.setJobStatus("1");
		job.setCronExpression("0/3 * * * * ?");
		job.setDesc("测试SDData定时任务01");
					
		try {
			//创建任务
			JobDetail jobDetail = JobBuilder.newJob(SDDataJobFactory.class).withIdentity(job.getJobName(), job.getJobGroup()).build();
			jobDetail.getJobDataMap().put("SDDataJob", job);
			//表达式调度构建器
			CronScheduleBuilder scheduleBuilder = CronScheduleBuilder.cronSchedule(job.getCronExpression());
			//按新的cronExpression表达式构建一个新的trigger
			CronTrigger trigger = TriggerBuilder.newTrigger().withIdentity(job.getJobName(), job.getJobGroup()).withSchedule(scheduleBuilder).build();
			scheduler.scheduleJob(jobDetail, trigger);

		} catch (SchedulerException e) {
			e.printStackTrace();
		}			
		
	}

}


完成上述任务后,就可以将项目部署到Tomcat下进行测试了。

部署完成后,运行test.java 没有报错,并且在后台输出如下内容。


至此,任务已经按照我们之前设置的表达式进行定时调用了。

Quartz2+Spring3+Struts2的整合到这里就告一段落,接下来就是需要添加个一个简单的web端管理页面,来对任务执行的各个阶段进行控制并且动态生成任务。

这一部分将在下面继续进行!


  • 1
    点赞
  • 1
    收藏
    觉得还不错? 一键收藏
  • 0
    评论

“相关推荐”对你有帮助么?

  • 非常没帮助
  • 没帮助
  • 一般
  • 有帮助
  • 非常有帮助
提交
评论
添加红包

请填写红包祝福语或标题

红包个数最小为10个

红包金额最低5元

当前余额3.43前往充值 >
需支付:10.00
成就一亿技术人!
领取后你会自动成为博主和红包主的粉丝 规则
hope_wisdom
发出的红包
实付
使用余额支付
点击重新获取
扫码支付
钱包余额 0

抵扣说明:

1.余额是钱包充值的虚拟货币,按照1:1的比例进行支付金额的抵扣。
2.余额无法直接购买下载,可以购买VIP、付费专栏及课程。

余额充值