


重定向-查找-压缩
linux IO重定向
一、重定向基础概述
什么是重定向
将原本要输出到屏幕中的数据信息,重新定向到某个指定的文件中,或者定向到黑洞中。
为什么需要重定向
1.当屏幕输出的信息很重要,而且希望保存重要的信息时
2.后台执行中的程序,不希望他干扰屏幕正常的输出结果时
3.系统的例行命令,例如定时任务的执行结果,希望可以留存下来时
4.一些执行命令,我们已经知道他可能出现错误信息,想将他直接丢弃时
5.错误日志于正确日志需要分别输出至不同的文件保存时
标准输入与输出
- 当进程操作一个文件时:
- 1.首先程序是无法直接访问硬件,需要借助内核来访问文件
- 2.而内核kernel需要利用文件描述(file descriptor)来访问
- 总结:进程使用文件描述符来管理打开的文件对应关系
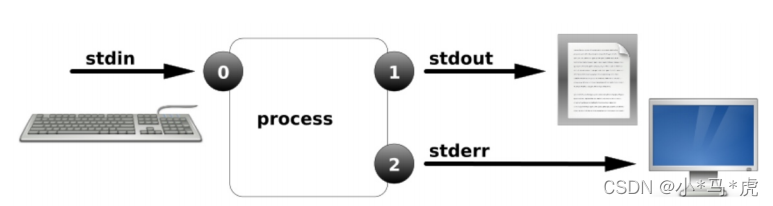
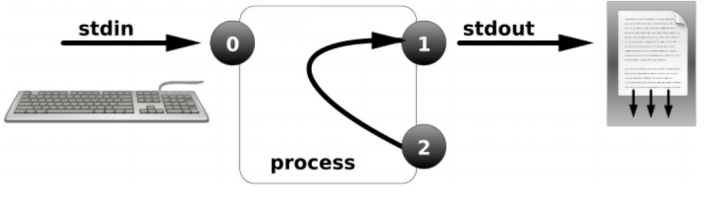
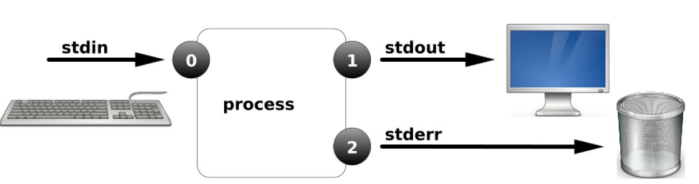
- 通常程序访问一个文件至少会打开三个标准文件,分别是标准输入,标准输出,错误输出
- 进程将从标准输入中的到数据,将正常输出打印至屏幕终端,将错误的输出信息也打印至屏幕终端

| 名称 | 文件描述符 | 作用 |
|---|---|---|
| 标准输入 | 0 | 默认是键盘,也可以是文件或者其他命令的输出 |
| 标准输出 | 1 | 默认输出到屏幕 |
| 错误输出 | 2 | 默认输出到屏幕 |
| 文件名称 | 3+ |
输出重定向案例
- 输出重定向,改变输出内容的位置。输出重定向有如下几种方式
| 类型 | 操作符 | 用途 |
|---|---|---|
| 标准覆盖输出重定向 | > | 将程序输出的正确结果输出到指定的文件中,会覆盖文件原有的内容 |
| 标准追加输出重定向 | >> | 将程序输出的正确结果以追加的方式输出到指定的文件中,不会覆盖文件原有的内容 |
| 错误覆盖输出重定向 | 2 > | 将程序的错误结果输出到指定的文件中,会覆盖文件原有的内容 |
| 错误追加输出重定向 | 2>> | 将程序的错误结果以追加的方式输出到指定的文件中,不会覆盖文件原有的内容 |
标准输出重定向
- 标准输出重定向示例:
- 1.如果文件不存在则会创建
- 2.如果文件存在则会清空内容
[root@localhost ~]# > test.txt
[root@localhost ~]# ifconfig ens33 > test.txt
标准追加输出重定向
- 标准追加输出重定向
- 1.如果文件不存在则会创建
- 2.如果文件存在则在文件尾部添加内容
[root@localhost ~]# echo "Hello" >> test.txt
错误输出重定向
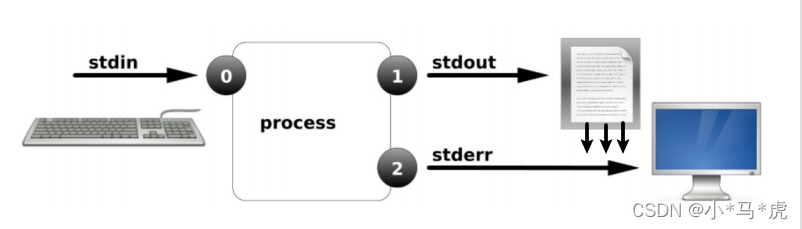
- 标准错误输出重定向
- 1.正确输出及错误输出至相同文件
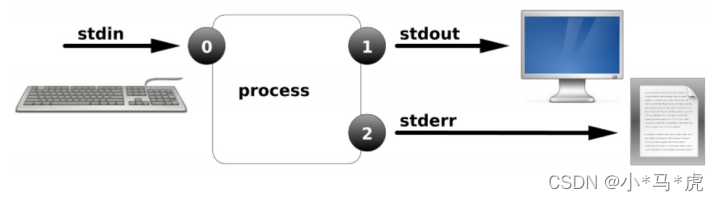
- 2.正确输出及错误输出至不同的文件
[root@localhost ~]# find /etc -name "*.conf" 1>ok 2>ok
[root@localhost ~]# find /etc -name	"*.conf" 1>ok 2>err
混合和输出重定向
- 混合输出重定向
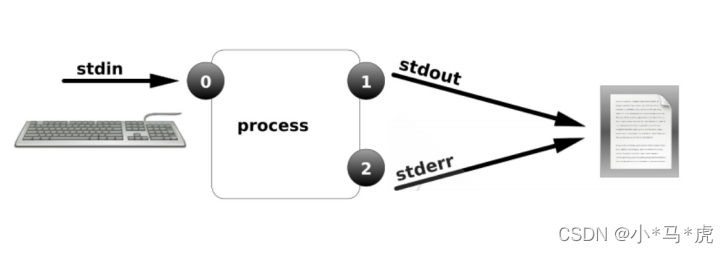
- 1.将正确输出和错误输出混合至同一文件
- 2.将两个文件内容组合为一个文件
[root@localhost ~]# find /etc -name "*.conf" &>test.txt
[root@localhost ~]# cat a b > c
- 正确和错误都输出到相同位置
[root@localhost ~]# ls /root/error >ab 2>&1
将内容输出至黑洞
[root@localhost ~]# ls /root/error>ab 2>/dev/null

[root@localhost ~]# ls /root/error>ab &>/dev/null
- 标准输出重定向覆盖与追加
命令 > 文件
命令 >> 文件
错误文件 2>文件
错误文件 2>>文件- 正确和错误同时输出
命令>文件 2>&1
命令>>文件 2>&1 同时输入到一个文件里面
命令&>文件
命令 &>>文件
命令>>文件1 2>>文件2 正确的输入1文件,错误的输入2文件
ls &> /dev/null 执行命令丢入黑洞
< 输入重定向
<< 输入重定向
二、进程管道技术
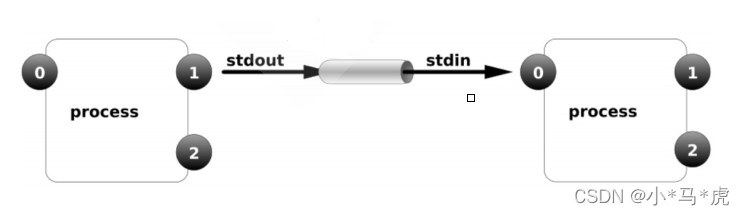
什么是管道
- 管道操作符“ | ”,主要用来连接左右两个命令,将左侧的命令的标准输出,交给右侧命令的标准输入
- 注意事项:无法传递标准错误输出至后者命令
管道流程示意图
- 格式:cmd1 | cmd2 […| cmdn]
管道使用范例
范例1
- 1.将/etc/passwd中的UID大小排序
[root@localhost ~]# sort -t ":" -k3 -n /etc/passwd
[root@localhost ~]# sort -t ":" -k3 -n /etc/passwd -r
[root@localhost ~]# sort -t":" -k3 -n /etc/passwd|head
范例2
- 打印当前所有IP
[root@localhost ~]# ip ad | grep "inet " | awk '{print $2}'|awk -F "/" '{print $1}'
127.0.0.1
10.0.0.9
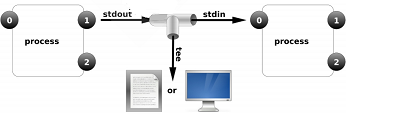
tee与xarge
管道中使用tee
[root@localhost ~]# ip ad | grep "inet " | tee ip.txt|awk -F "/" '{print $1}'|awk '{print $2}'
127.0.0.1
10.0.0.9

[root@localhost ~]# cat ip.txt
    inet 127.0.0.1/8 scope host lo
    inet 10.0.0.9/24 brd 10.0.0.255 scope global dynamic ens33

重定向与tee有他们在使用过程中的区别

#直接将内容写入date.txt文件中
[root@localhost ~]# date > date.txt

# 命令执行会输出至屏幕,但会同时保存一份至date.txt文件中
[root@localhost ~]# date |tee date.txt
2021年 12月 06日 星期一 19:18:40 CST
[root@localhost ~]# cat date.txt
2021年 12月 06日 星期一 19:18:40 CST
管道中使用xargs
- xargs参数传递,主动让一些不支持管道的命令可以使用管道技术
[root@localhost ~]# which cat | xargs ls -l
-rwxr-xr-x. 1 root root 54160 10月 31 2018 /usr/bin/cat

[root@localhost ~]# ls | xargs rm -fv
三,linux文件查找
find查找概述
为什么需要查找
- 1.很多时候我们可能会忘记文件所在位置,此时就需要通过find来查找
- 2.有时候需要通过内容查找到对应的文件,此时就需要通过find来查找
-
为什么是find
-
- 因为find命令可以根据不同的条件进行查找文件
- 比如
- 文件名称
- 文件大小
- 文件时间
- 属主属组
- 权限
- 等等
- 可以通过以上方式查找文件,从而实现精准定位
find命令语法
| 命令 | 路径 | 选项 | 表达式 | 动作 |
|---|---|---|---|---|
| find | [path…] | [options] | [expression] | [action] |
| 查找 | 地区 | 妹子 | 18-25岁 | ???? |
find查找示例
find基于名称查找
1.创建文件
[root@localhost ~]# touch /etc/sysconfig/network-scripts/{ifcfg-eth1,IFCFG-ETH1}

2.查找/etc目录下包含ifcfg-eth1名称的文件
[root@localhost network-scripts]# find /etc -name "ifcfg-eth1"

3.-i 忽略大小写
[root@localhost network-scripts]# find /etc -iname "ifcfg-eth1"
/etc/sysconfig/network-scripts/ifcfg-eth1
/etc/sysconfig/network-scripts/IFCFG-ETH1

4.查找/etc目录下包含ifcfg-eth名称所有文件
[root@localhost network-scripts]# find /etc/ -name "ifcfg-eth*"
/etc/sysconfig/network-scripts/ifcfg-eth1
[root@localhost network-scripts]# find /etc/ -iname "ifcfg-eth*"
/etc/sysconfig/network-scripts/ifcfg-eth1
/etc/sysconfig/network-scripts/IFCFG-ETH1
find基于大小查找
1.查找大于5M的文件
[root@localhost ~]# find /etc/ -size +5M

2.查找等于5M的文件
[root@localhost ~]# find /etc/ -size 5M

3.查找小于5M的文件
[root@localhost ~]# find /etc/ -size -5M
find基于类型查找
# f 文件
[root@localhost ~]# find /dev -type f

#d目录
[root@localhost ~]# find /dev -type d

#l链接
[root@localhost ~]# find /dev -type l

#b块设备
[root@localhost ~]# find /dev -type d

#c字符设备
[root@localhost ~]# find /dev -type c

#s套接字
[root@localhost ~]# find /etc/ -type s

#管道文件
[root@localhost ~]# find /etc/ -type p
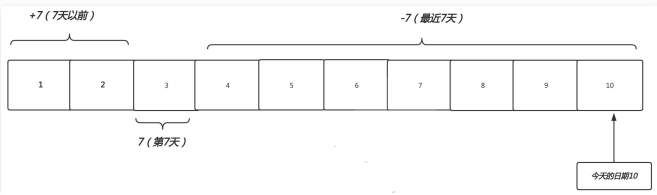
find基于时间查找
1.创建测试文件
[root@localhost ~]# for i in {01..10};do date -s 201904$i && touch file-$i;done
2019年 04月 01日 星期一 00:00:00 CST
2019年 04月 02日 星期二 00:00:00 CST
2019年 04月 03日 星期三 00:00:00 CST
2019年 04月 04日 星期四 00:00:00 CST
2019年 04月 05日 星期五 00:00:00 CST
2019年 04月 06日 星期六 00:00:00 CST
2019年 04月 07日 星期日 00:00:00 CST
2019年 04月 08日 星期一 00:00:00 CST
2019年 04月 09日 星期二 00:00:00 CST
2019年 04月 10日 星期三 00:00:00 CST

2.查找7天以前的文件,不会打印当天的文件
[root@localhost ~]# find ./ -iname "file-*" -mtime +7
./file-01
./file-02

3.查找最近7天的文件,不建议使用,会打印当天的文件
[root@localhost ~]# find ./ -iname "file-*" -mtime -7
./file-04
./file-05
./file-06
./file-07
./file-08
./file-09
./file-10

4.查找第七天的文件,不会打印当天文件
[root@localhost ~]# find ./ -iname "file-*" -mtime 7
./file-03

5.查找/var/log下所有。log结尾的文件,并且保留最近7天的log文件``
[root@localhost ~]# find /var/log  -type f -iname “*.log” -mtime +7 -delete(-type f 文件) (-iname 不区分大小写的.log文件)(-mtime7天以前的文件)(-delete删除)
find基于用户查找
1.查找属主jack
[root@localhost home]# find /home/ -user jack
[root@localhost home]# find /home/ -user jack

2.查找属主是jack,并且属组是admin
[root@localhost home]# find /home/ -user jack -a -group admin

3.查找属主是jack 或者属组是admin
[root@localhost home]# find /home/ -user jack -o -group admin

4.查找没有属组
[root@localhost home]# find /home/ -nogroup

5.查找没有属主或没有属组
[root@localhost home]# find /home/ -ngroup -o -nouser
find基于权限查找
#精确,并输出详细信息
[root@localhost home]# find /root -type f -perm 644 -ls

#包含,并输出详细信息
[root@localhost home]# find /root -type f -perm -644 -ls

#特殊权限,并输出详细信息
[root@localhost home]# find /root -type f -perm -4000 -ls
[root@localhost home]# find /root -type f -perm -2000 -ls
[root@localhost home]# find /root -type f -perm -1000 -ls
find逻辑运算符
| 符号 | 作用 |
|---|---|
| -a | 与 |
| -o | 或 |
| -not | ! |
1.查找当前目录下,属主不是root的所有文件
[root@localhost home]# find . -not -user root
[root@localhost home]# find . -! -user root

2.查找当前目录下,属主属于hdfs ,并且大于1k的文件
[root@localhost home]# find . -type f -user hdfs -a -size +1k

3.查找当前目录下的属主为root或者以xml结尾的普通文件
[root@localhost home]# find . -type f -a \( -user root -o -name '*.xml' \)
find动作处理
| 动作 | 含义 |
|---|---|
| 打印查找到内容默认 | |
| -ls | 以长格式显示的方式打印查找到的内容 |
| -delete | 删除查找到的文件(仅仅删除空目录) |
| -ok | 后面自定义shell命令()会提示是否操作 |
| -exec | 后面跟随自定义shell命令(标准写法-exec ;) |
find结合exec
1.使用-exce实现文件拷贝和文件删除
[root@localhost home]# find /etc -name "ifcfg*" -exec cp -rvf {} /tmp \;

[root@localhost home]# find /etc -name "ifcfg*" -exec rm -f {} \;
find结合xargs
xargs将前者的命令查找的文件为一个整体传递给后者命令输入
root@localhost home]# find . -name "file.txt" |xargs rm -f
find 结合grep
[root@localhost home]# find ./ type f |xargs grep -R "zzl"
linux文件压缩
- 将多个或目录合并成为一个特殊的文件.。比如搬家
为什么要对文件进行压缩
- 当我们在传输大量的文件时,通常都会选择将该文件进行压缩,然后在进行传输。
- 首先:压缩后的文件会比压缩前的文件小
- 其次:多个文件传输很慢,单个文件传输会很快,同时还能节省网络的消耗
linux下常见压缩包类型
| 格式 | 压缩工具 |
|---|---|
| .zip | zip压缩工具 |
| .gz | gzip压缩工具,只能压缩文件,会删除原文件(配合tar使用) |
| .bz2 | bzip2压缩工具,只能压缩文件,会删除原文件(配合tar使用) |
| .tar.gz | 先使用tar命令归档打包,然后使用gzip压缩 |
| .tar.bz2 | 先使用tar命令归档打包,然后在使用bzio压缩 |
文件打包与压缩 -gzip
使用gzip方式进行压缩文件
[root@localhost ~]# yum install -y gzip				#安装gzip
[root@localhost ~]# gzip file.txt					#对“文件”gz压缩
[root@localhost ~]# zcat file.txt.gz 				#查看gz压缩后的文件内容
[root@localhost ~]# gzip -d file.txt.gz 			#解压gzip的压缩包
使用场景:当需要让某个文件不生效时
[root@localhost ~]# gzip CentOS-Vault.repo --> CentOS-Vault.repo.gz
[root@localhost ~]# zcat CentOS-Vault.repo.gz --> 查看不想解压的压缩包文件内容
文件打包与压缩-zip
- 使用zip命令可以对文件进行压缩打包,解压则需要使用unzip
默认情况下没有zip和unzip,需要安装
[root@localhost ~]# yum install -y zip unzip
1.压缩“文件”为zip
[root@localhost ~]# zip file.zip file.txt

2.压缩“目录”为zip包
[root@localhost ~]# zip zhaojie2021.zip file

3.查看zip压缩包是否是完整的
[root@localhost ~]# zip -T zhaojie2021.zip
test of zhaojie2021.zip OK

4.不解压压缩查看压缩包中的内容
  -l 显示压缩文件内所包含的文件
[root@localhost ~]# unzip -l zhaojie2021.zip
Archive:  zhaojie2021.zip
  Length      Date    Time    Name
---------  ---------- -----   ----
        0  12-07-2021 13:28   file/
---------                     -------
        0                     1 file

5.解压zip文件包,默认解压至当前目录
[root@localhost tmp]# unzip zj.zip

6.解压zip内容至/opt目录
[root@localhost tmp]# unzip zj.zip -d /tmp/
文件打包与压缩-tar
tar是linux下最常用的压缩与解压缩,支持文件和目录的压缩归档
语法:tar [-zjxcvfpP] filename
-c	创建新的归档文件
-x	对归档文件解包
-t	列出归档文件里的文件列表
-v	显示操作过程
-f	指定包文件名,多参数f写后面

-z	通过gzip指令归档后的文件,文件名最好为*.tar.gz
-j	通过bzip2指令归档后的文件,文件名最好为*.tar.bz2
-J	使用xz压缩归档后的文件夹,文件名最好为“.tar.xz”
-C 	指定解压位置
-X	排除多个文件(写入需要排除的文件名称)
-h	打包软连接
	--hard-dereference	#打包硬连接
	--exclude	#在打包的时候写入需要排除文件或目录
=============================================================================================
常用打包与压缩组合
czf		#打包tar.gz格式
cjf		#打包tar.bz格式
cJf		#打包tar.xz格式
=============================================================================================
zxf		#解压tar.gz
jxf		#解压tar.bz格式
xf		#自动选择解压模式
tf		#查看压缩包后的内容
- 1.将文件或目录进行打包压缩
1.以gzip归档方式打包并压缩
[root@localhost tmp]# tar czf test.tar.gz test1/  test2/

2.以bz2方式压缩
[root@localhost tmp]# tar cjf test.tar.bz test1/  test2/

3.以打包连接文件,打包连接文件的真实文件
 [root@localhost /]# tar czfh local.tar.gz etc/rc.local

4.打包/tmp下的所有文件
[root@localhost /]# find tmp/ -type f |xargs tar czf tmp.gs

5.打包/tmp下所有文件
[root@localhost /]# tar tmp.tar.gz $(find /tmp/ -type f)
- 2.排除文件,并打包压缩
1.排除单个文件
[root@localhost ~]# tar czf etc.tar.gz --exclude=etc/services etc/

2.排除多个文件
tar czf etc.tar.gz --exclude=etc/services --exclude=etc/rc.local etc/

3.将需要排除的文件写入文件中

4.指定需要排除的文件列表,最后进行打包压缩
[root@localhost ~]# tar czfX etc.tar.gz paichu.list etc/
- 3.查看压缩文件
[root@localhost ~]# tar tf etc.tar.gz
- 4.解压文件
1.解压至当前目录
[root@localhost ~]# tar xf etc.tar.gz

2.将解压内容储存在指定的/tmp目录
[root@localhost ~]# tar xf etc.tar.gz -C /tmp


 569
569


 被折叠的 条评论
为什么被折叠?
被折叠的 条评论
为什么被折叠?
 到【灌水乐园】发言


