


接webpack - 自动化生成项目中的html页面(上)
1.如果我们需要在html-webpack-plugin插件中传参数,在模板中根目录下的index.html模板中引用怎么办?我们可以在webpack.config.js文件中写入这么一行代码:title:'webpack is good'
webpack.config.js代码如下:
var htmlWebpackPlugin = require('html-webpack-plugin');

module.exports = {

    entry:{                             //打包入口文件
        main:'./src/script/main.js',
        a:'./src/script/a.js'
    },
    output:{
        path:__dirname + '/dist',    //打包后的文件路径
        filename:'js/[name]-[chunkhash].js'            //打包后的文件名
    },
    plugins:[
        new htmlWebpackPlugin({
            //注意传的参数是一个对象
            filename:'index-[hash].html',
            template:'index.html',   //传一个模板,就是根目录下的index.html
            inject:'head',
            title:'webpack is good'             //这个是传递的参数
        })
    ]
}
然后我们通过模板获取到参数,那我们应该怎么做呢?
修改根目录下index.html代码如下:
<!DOCTYPE html>
<html lang="zh-CN">
  <head>
    <meta charset="utf-8">
    <meta http-equiv="X-UA-Compatible" content="IE=edge">
    <meta name="viewport" content="width=device-width, initial-scale=1">
    <!-- 上述3个meta标签*必须*放在最前面,任何其他内容都*必须*跟随其后! -->

    <!-- 接收参数 -->
    <title><%=htmlWebpackPlugin.options.title %></title>


  </head>
  <body>
    <script src="bundle.js"></script>
  </body>
</html>没错,接收参数就用这行代码来实现:<%=htmlWebpackPlugin.options.title %>
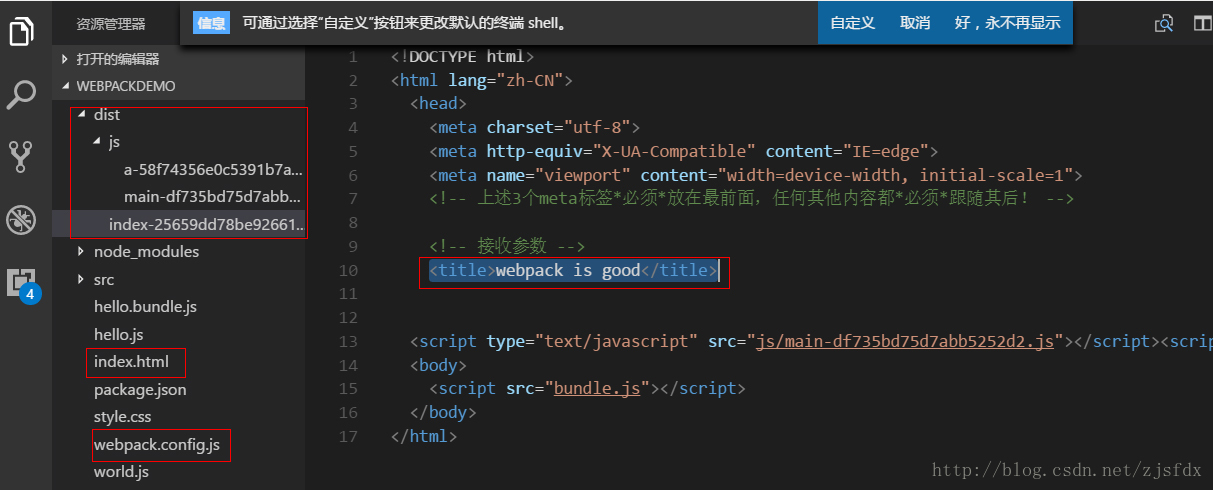
2.然后在终端输入npm run webpack
3.查看生成的dist/js下的index-25659dd78be926614658.html文件,看到<title>webpack is good</title>说明打包 成功!
该案例设计截图效果如下:
4.那是不是任意的参数都能被模板接收呢?我们在webpack.config.js文件里面加入这行代码:data:new Date()
webpack.config.js代码如下:
var htmlWebpackPlugin = require('html-webpack-plugin');

module.exports = {

    entry:{                             //打包入口文件
        main:'./src/script/main.js',
        a:'./src/script/a.js'
    },
    output:{
        path:__dirname + '/dist',    //打包后的文件路径
        filename:'js/[name]-[chunkhash].js'            //打包后的文件名
    },
    plugins:[
        new htmlWebpackPlugin({
            //注意传的参数是一个对象
            filename:'index-[hash].html',
            template:'index.html',   //传一个模板,就是根目录下的index.html
            inject:'head',
            title:'webpack is good',             //这个是传递的参数
            date:new Date()
        })
    ]
}
接下来在根目录模板index.html中引入属性
根目录index.html代码如下:
<!DOCTYPE html>
<html lang="zh-CN">
  <head>
    <meta charset="utf-8">
    <meta http-equiv="X-UA-Compatible" content="IE=edge">
    <meta name="viewport" content="width=device-width, initial-scale=1">
    <!-- 上述3个meta标签*必须*放在最前面,任何其他内容都*必须*跟随其后! -->

    <!-- 接收参数 -->
    <title><%=htmlWebpackPlugin.options.title %></title>


  </head>
  <body>
    <%= htmlWebpackPlugin.options.date %>
  </body>
</html>
5.然后在终端输入npm run webpack
6.查看截图效果如下:
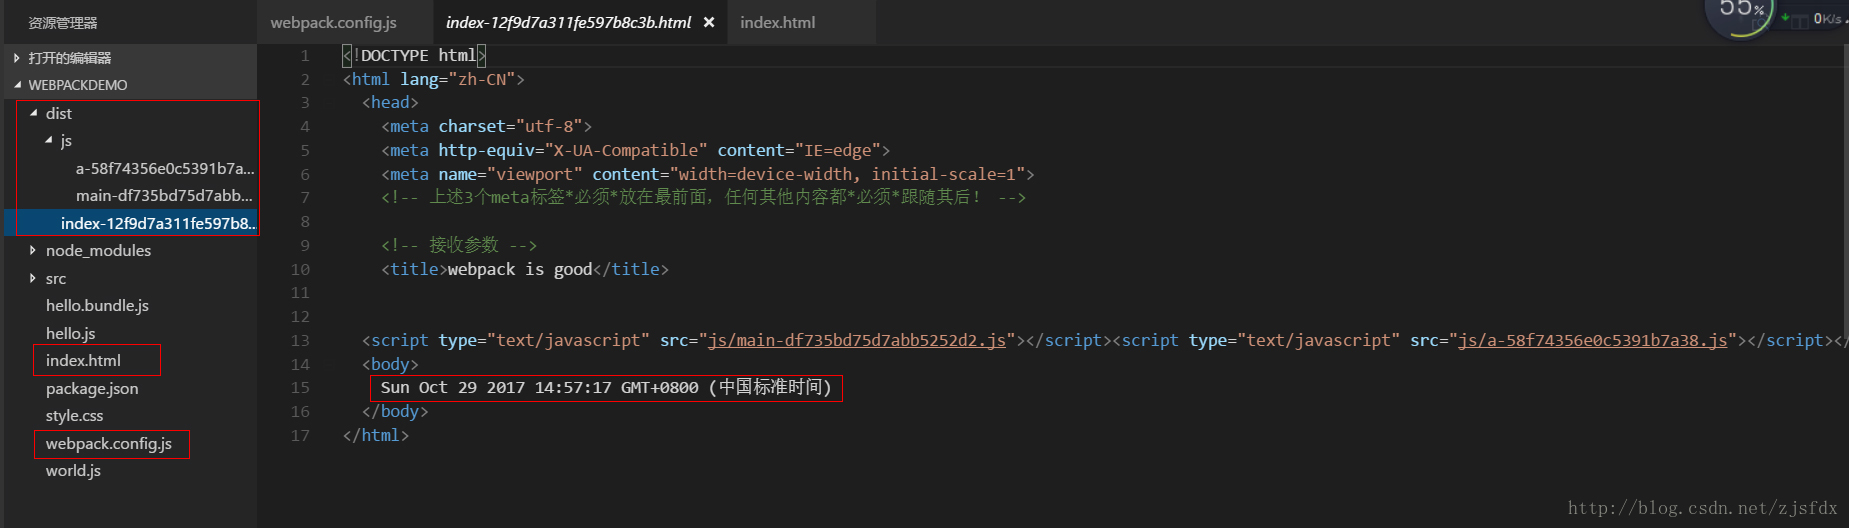
说明打包成功!
7.那这里有一个疑问,到底我们究竟能在这个htmlWebpackPlugin取到哪些信息呢?我们可以遍历,
在根目录模板index.html下面增加如下代码
<% for (var key in htmlWebpackPlugin){ %>
      <%= key  %>
    <% } %>
根目录模板index.html代码如下:
<!DOCTYPE html>
<html lang="zh-CN">
  <head>
    <meta charset="utf-8">
    <meta http-equiv="X-UA-Compatible" content="IE=edge">
    <meta name="viewport" content="width=device-width, initial-scale=1">
    <!-- 上述3个meta标签*必须*放在最前面,任何其他内容都*必须*跟随其后! -->

    <!-- 接收参数 -->
    <title><%=htmlWebpackPlugin.options.title %></title>


  </head>
  <body>
    <!-- 注意这里的等号代表输出 -->
    <%= htmlWebpackPlugin.options.date %>

    <!-- 遍历htmlWebpackPlugin -->
    <% for (var key in htmlWebpackPlugin){ %>
      <%= key  %>
    <% } %>
  </body>
</html>
webpack.config.js代码如下:
var htmlWebpackPlugin = require('html-webpack-plugin');

module.exports = {

    entry:{                             //打包入口文件
        main:'./src/script/main.js',
        a:'./src/script/a.js'
    },
    output:{
        path:__dirname + '/dist',    //打包后的文件路径
        filename:'js/[name]-[chunkhash].js'            //打包后的文件名
    },
    plugins:[
        new htmlWebpackPlugin({
            //注意传的参数是一个对象
            filename:'index.html',
            template:'index.html',   //传一个模板,就是根目录下的index.html
            inject:'head',
            title:'webpack is good',             //这个是传递的参数
            date:new Date()
        })
    ]
}
8.然后在终端输入npm run webpack
9.效果截图如下:
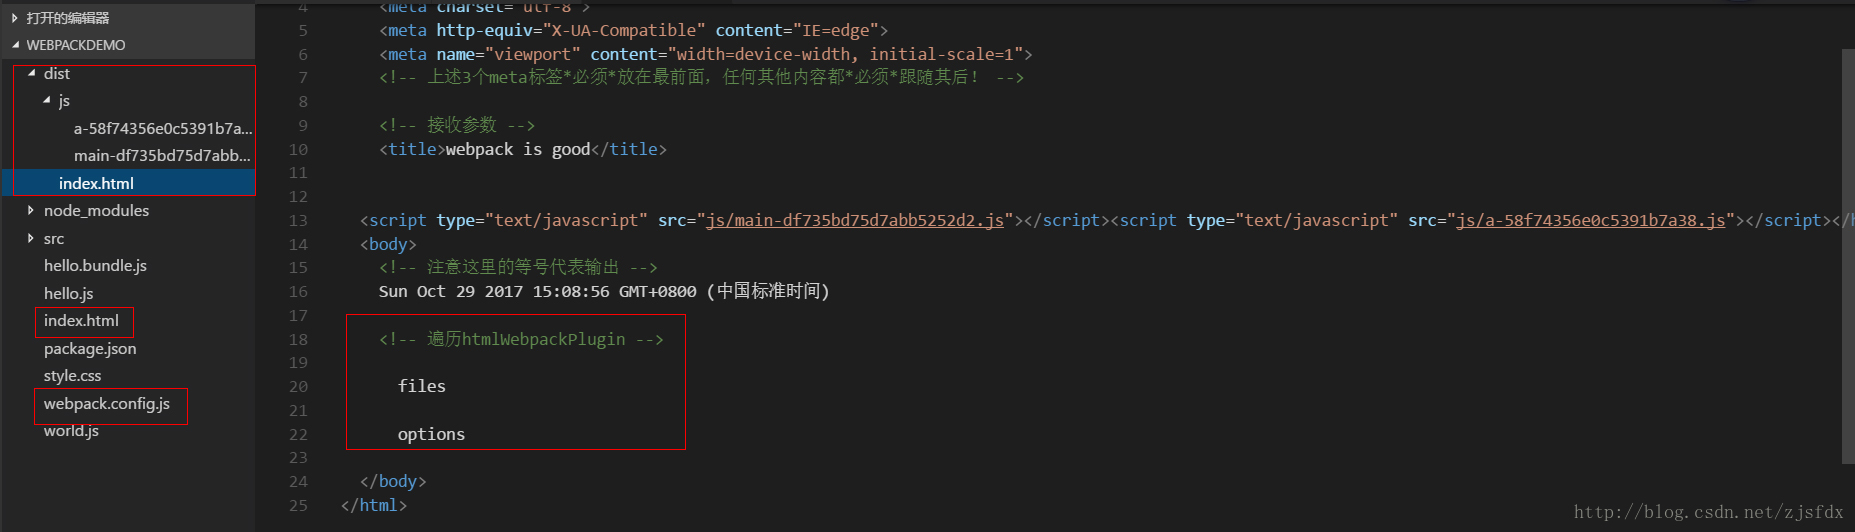
我们发现有2个key,一个是files,一个是options
10.然后我们再对files和options进行遍历
根目录模板index.html代码如下:
<!DOCTYPE html>
<html lang="zh-CN">
<head>
<meta charset="utf-8">
<meta http-equiv="X-UA-Compatible" content="IE=edge">
<meta name="viewport" content="width=device-width, initial-scale=1">
<!-- 上述3个meta标签*必须*放在最前面,任何其他内容都*必须*跟随其后! -->
<!-- 接收参数 -->
<title><%=htmlWebpackPlugin.options.title %></title>
</head>
<body>
<!-- 注意这里的等号代表输出 -->
<%= htmlWebpackPlugin.options.date %>
<!-- 遍历htmlWebpackPlugin.files -->
<% for (var key in htmlWebpackPlugin.files){ %>
<%= key %> : <%= JSON.stringify(htmlWebpackPlugin.files[key]) %>
<% } %>
<!-- 遍历htmlWebpackPlugin.options -->
<% for (var key in htmlWebpackPlugin.options){ %>
<%= key %> : <%= JSON.stringify(htmlWebpackPlugin.options[key]) %>
<% } %>
</body>
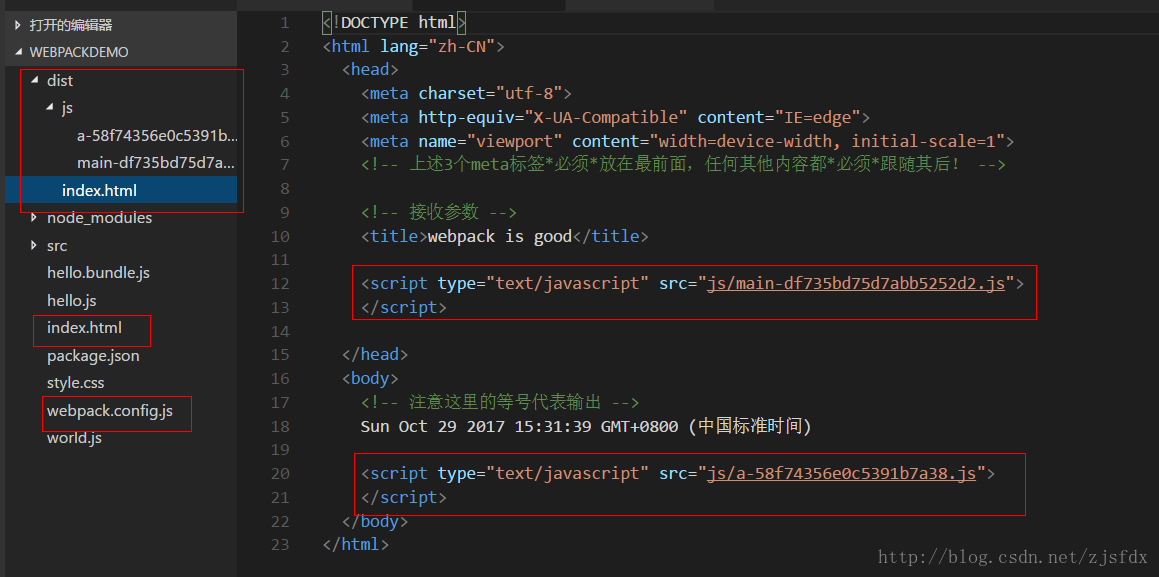
</html>11.在终端输入npm run webpack进行打包
12.dist/js/index.html打包后生成的文件代码如下:
<!DOCTYPE html>
<html lang="zh-CN">
  <head>
    <meta charset="utf-8">
    <meta http-equiv="X-UA-Compatible" content="IE=edge">
    <meta name="viewport" content="width=device-width, initial-scale=1">
    <!-- 上述3个meta标签*必须*放在最前面,任何其他内容都*必须*跟随其后! -->

    <!-- 接收参数 -->
    <title>webpack is good</title>


  <script type="text/javascript" src="js/main-df735bd75d7abb5252d2.js"></script><script type="text/javascript" src="js/a-58f74356e0c5391b7a38.js"></script></head>
  <body>
    <!-- 注意这里的等号代表输出 -->
    Sun Oct 29 2017 15:16:17 GMT+0800 (中国标准时间)

    <!-- 遍历htmlWebpackPlugin.files -->

      publicPath : ""

      chunks : {"main":{"size":23,"entry":"js/main-df735bd75d7abb5252d2.js","hash":"df735bd75d7abb5252d2","css":[]},"a":{"size":31,"entry":"js/a-58f74356e0c5391b7a38.js","hash":"58f74356e0c5391b7a38","css":[]}}

      js : ["js/main-df735bd75d7abb5252d2.js","js/a-58f74356e0c5391b7a38.js"]

      css : []

      manifest :


    <!-- 遍历htmlWebpackPlugin.options -->

      template : "C:\\Users\\I love ljj\\Desktop\\webpackDemo\\node_modules\\_html-webpack-plugin@2.30.1@html-webpack-plugin\\lib\\loader.js!C:\\Users\\I love ljj\\Desktop\\webpackDemo\\index.html"

      filename : "index.html"

      hash : false

      inject : "head"

      compile : true

      favicon : false

      minify : false

      cache : true

      showErrors : true

      chunks : "all"

      excludeChunks : []

      title : "webpack is good"

      xhtml : false

      date : "2017-10-29T07:16:17.048Z"

  </body>
</html>
13.比如我们的需求再复杂些,让打包之后的js文件一部分在head标签中,一部分在body标签中。
webpack.config.js代码如下:
var htmlWebpackPlugin = require('html-webpack-plugin');

module.exports = {

    entry:{                             //打包入口文件
        main:'./src/script/main.js',
        a:'./src/script/a.js'
    },
    output:{
        path:__dirname + '/dist',    //打包后的文件路径
        filename:'js/[name]-[chunkhash].js'            //打包后的文件名
    },
    plugins:[
        new htmlWebpackPlugin({
            //注意传的参数是一个对象
            filename:'index.html',
            template:'index.html',   //传一个模板,就是根目录下的index.html
            inject:false,
            title:'webpack is good',             //这个是传递的参数
            date:new Date()
        })
    ]
}
我们可以在根目录模板index.html中的head标签中加入这行代码,
<script type="text/javascript" src="<%=
    htmlWebpackPlugin.files.chunks.main.entry %>">
    </script>
在根目录模板index.html中的body标签中加入这行代码,
<script type="text/javascript" src="<%=
    htmlWebpackPlugin.files.chunks.a.entry %>">
    </script>
根目录模板index.html代码如下:
<!DOCTYPE html>
<html lang="zh-CN">
  <head>
    <meta charset="utf-8">
    <meta http-equiv="X-UA-Compatible" content="IE=edge">
    <meta name="viewport" content="width=device-width, initial-scale=1">
    <!-- 上述3个meta标签*必须*放在最前面,任何其他内容都*必须*跟随其后! -->

    <!-- 接收参数 -->
    <title><%=htmlWebpackPlugin.options.title %></title>

    <script type="text/javascript" src="<%=
    htmlWebpackPlugin.files.chunks.main.entry %>">
    </script>

  </head>
  <body>
    <!-- 注意这里的等号代表输出 -->
    <%= htmlWebpackPlugin.options.date %>

    <script type="text/javascript" src="<%=
    htmlWebpackPlugin.files.chunks.a.entry %>">
    </script>
  </body>
</html>
14.在终端输入npm run webpack进行打包
15.打包后截图效果如下:
16.如果我们打包之后需要上线怎么办,显然上线后的地址跟本地的相对路径显示是不一样是,那怎么办呢?其实我们可以在output中加入一行代码:publicPath:'http://cdn.com/',注意这里的http://cdn.com/地址需要改成你自己的地址
webpack.config.js代码如下:
var htmlWebpackPlugin = require('html-webpack-plugin');

module.exports = {

    entry:{                             //打包入口文件
        main:'./src/script/main.js',
        a:'./src/script/a.js'
    },
    output:{
        path:__dirname + '/dist',    //打包后的文件路径
        filename:'js/[name]-[chunkhash].js',            //打包后的文件名
        publicPath:'http://cdn.com/'
    },
    plugins:[
        new htmlWebpackPlugin({
            //注意传的参数是一个对象
            filename:'index.html',
            template:'index.html',   //传一个模板,就是根目录下的index.html
            inject:false,
            title:'webpack is good',             //这个是传递的参数
            date:new Date()
        })
    ]
}
结果 怎样呢?
17.在终端输入npm run webpack
18.打包后的效果截图如下:
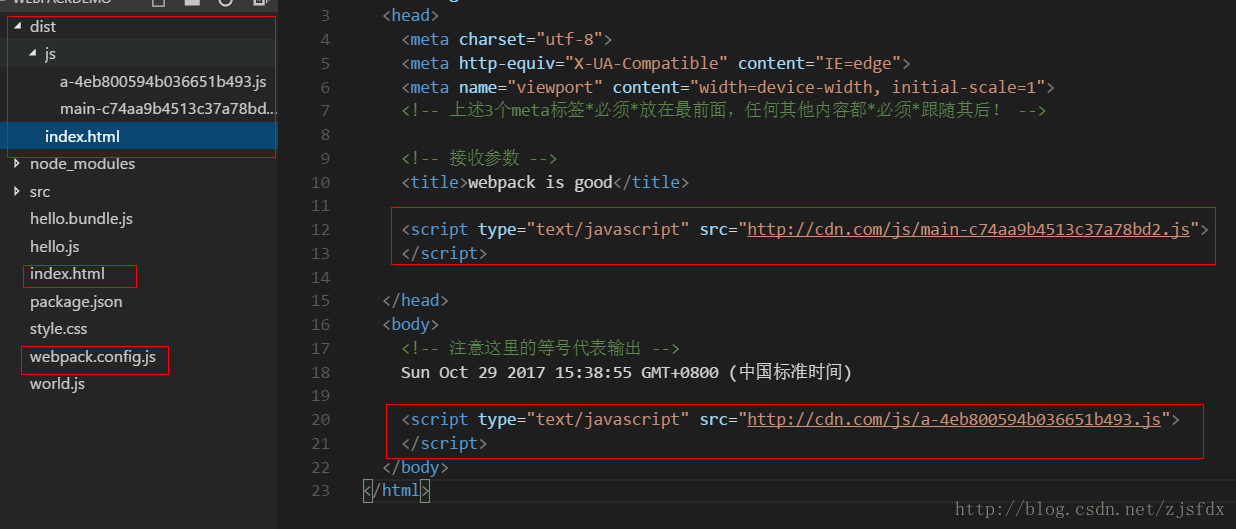
这时候我们的地址都换成线上地址了,非常符合我们的需求!
18.如果需要上线,一般需要对HTML文件进行压缩,可以在webpack.config.js加入如下代码:
minify:{            //对打包后的HTML文件进行压缩
                removeComments:true,    //删除注释
                collapseWhitespace:true //删除空格
            }
webpack.config.js代码如下:
var htmlWebpackPlugin = require('html-webpack-plugin');

module.exports = {

    entry:{                             //打包入口文件
        main:'./src/script/main.js',
        a:'./src/script/a.js'
    },
    output:{
        path:__dirname + '/dist',    //打包后的文件路径
        filename:'js/[name]-[chunkhash].js',            //打包后的文件名
        publicPath:'http://cdn.com/'
    },
    plugins:[
        new htmlWebpackPlugin({
            //注意传的参数是一个对象
            filename:'index.html',
            template:'index.html',   //传一个模板,就是根目录下的index.html
            inject:false,
            title:'webpack is good',             //这个是传递的参数
            date:new Date(),
            minify:{            //对打包后的HTML文件进行压缩
                removeComments:true,    //删除注释
                collapseWhitespace:true //删除空格
            }
        })
    ]
}
19.在终端输入npm run webpack进行打包
20.截图效果如下:
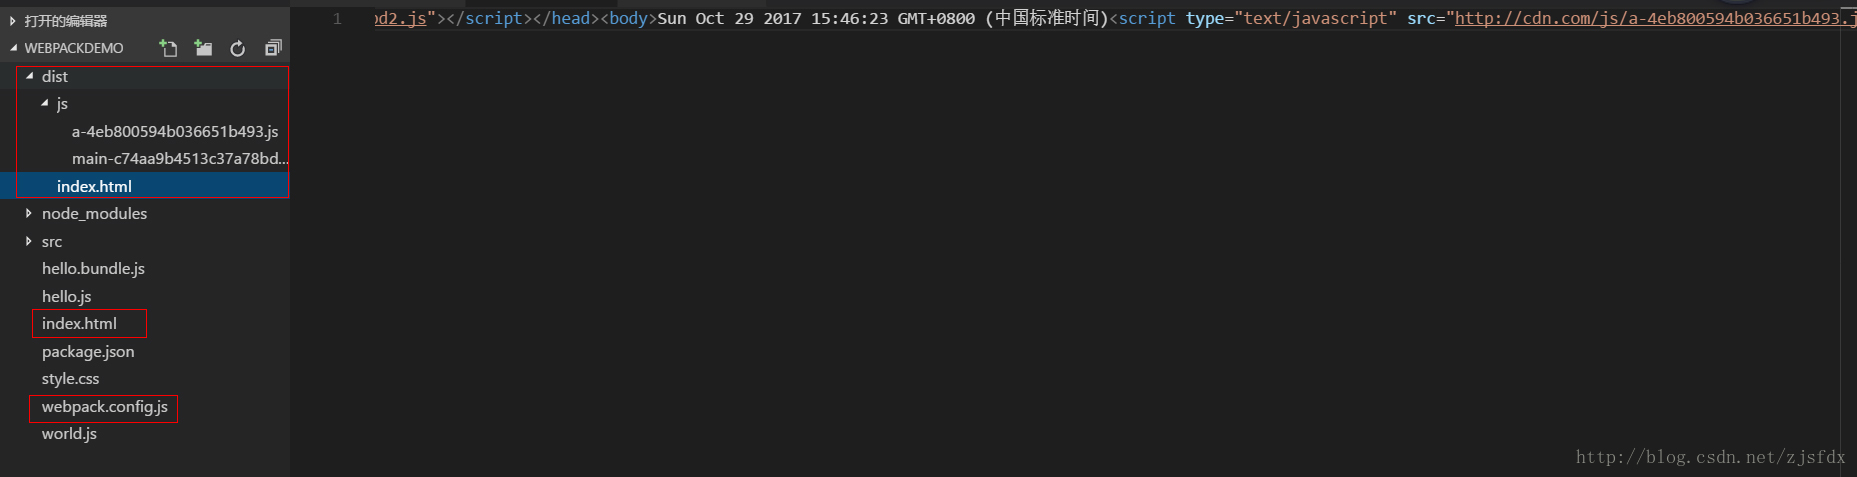
显然打包后的index.html文件被压缩了,符合我们的需求!


 1002
1002

 被折叠的 条评论
为什么被折叠?
被折叠的 条评论
为什么被折叠?
 到【灌水乐园】发言


