


RCP 开发环境
Eclipse 的重要特征就是他的插件架构, eclipse 的内核比较小,主要是由许多功能插件组合而成。 Rich client platform ( RCP )也是基于这种插件机制的,与 eclipse workbench 的结构模式一样,程序是由若干个插件组成,通过扩展点的的方式,提供扩展功能的编程接口。
Eclipse RCP 程序通常由主应用程序( org.eclipse.core.runtime.application ),视窗( org.eclipse.ui.perspective )和 workbench advisor 组成。一般一个 RCP 程序至少需要 "org.eclipse.core.runtime" 和 "org.eclipse.ui" 两个的插件支持,包含在 required plugins 选项中。
两个重要的文件
MANIFEST.MF : OSGI 的 manifest 文件,用来描述插件的依赖关系和 build 环境等;
Plugin.xml : eclipse 的配置文件,描述插件扩展点等。
PDE 插件提供了这两个文件的图形化编辑器。
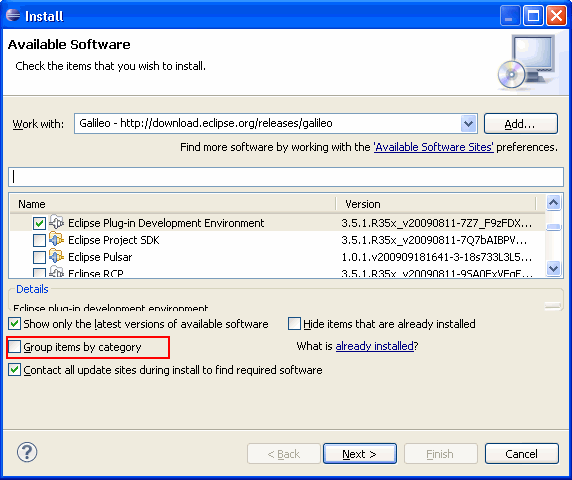
配置环境
如果 Eclipse IDE 不是 RCP/Plug-in 的开发版本,则通过 eclipse 的在线更新插件功能,下载“ Eclipse for RCP/Plug-in Developers ”软件包。

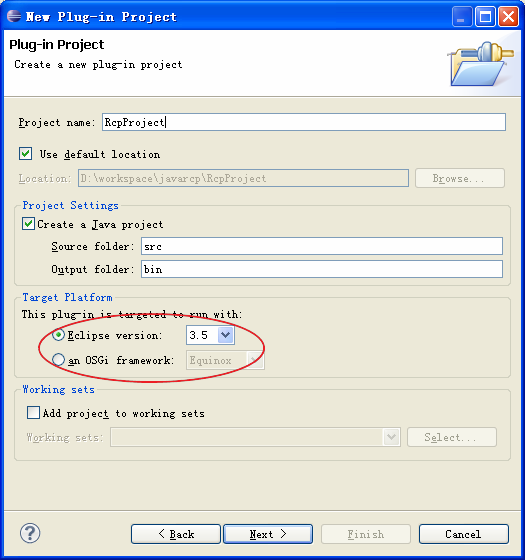
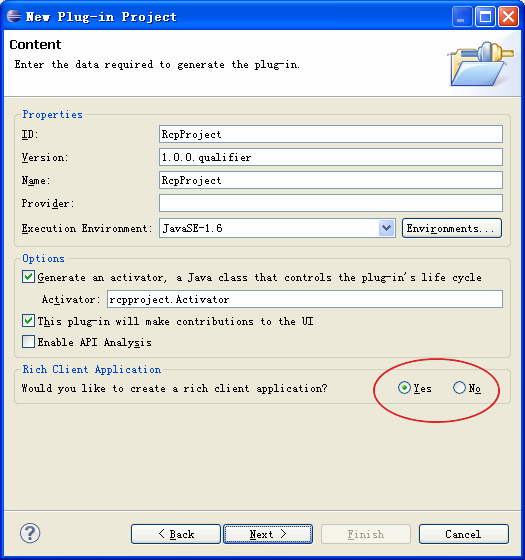
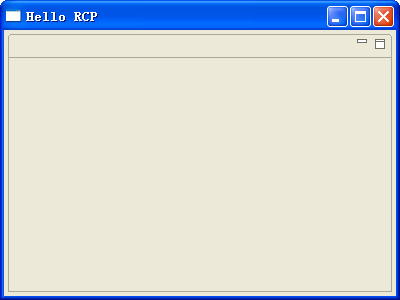
新建 RCP 程序,命名为 RcpProject :

RCP 应用程序启动的过程中, eclipse 会寻找扩展点 "org.eclipse.core.runtime.application" 对应的类,然后这个类被加载运行。在这个类中,创建一个 Display ,创建并运行一个 Workbench ,通过 WorkbenchAdviso r 配置这个 Workbench , WorkbenchAdvisor 又是通过 WorkbenchWindowAdvisor 来实现界面的显示的,然后在这个类里面实现菜单、工具栏等。
正常运行程序:
配置 Run configuration
可以在 Run as — Run configuration 中, Plug-in 选项中检查程序的依赖关系,通过 Add Required Plug-ins ,自动把依赖的插件添加进去。增加运行选项 –consoleLog ,这些可以在命令行中看到 RCP 程序的错误信息:

或者可以在 Windows -> Preference -> Plug-in Development -> Target Platform 中设置:

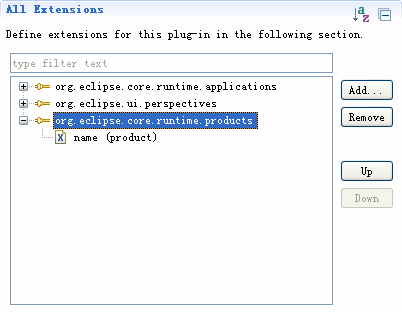
双击 plugin.xml 或 MANIFEST.MF 文件,进入 PDE 的图形化编辑界面的 extensiton, 增加扩展点 org.eclipse.core.runtime.products.
plugin.xml 文件:
<?xml version="1.0" encoding="UTF-8"?>
<?eclipse version="3.4"?>
<plugin>
<extension
id= "application"
point= "org.eclipse.core.runtime.applications" >
<application>
<run
class= "rcpproject.Application" >
</run>
</application>
</extension>
<extension
point= "org.eclipse.ui.perspectives" >
<perspective
name= "RCP Perspective"
class= "rcpproject.Perspective"
id= "RcpProject.perspective" >
</perspective>
</extension>
<extension
point="org.eclipse.core.runtime.products">
<product
application="RcpProject.product"
name="name">
</product>
</extension>
</plugin>
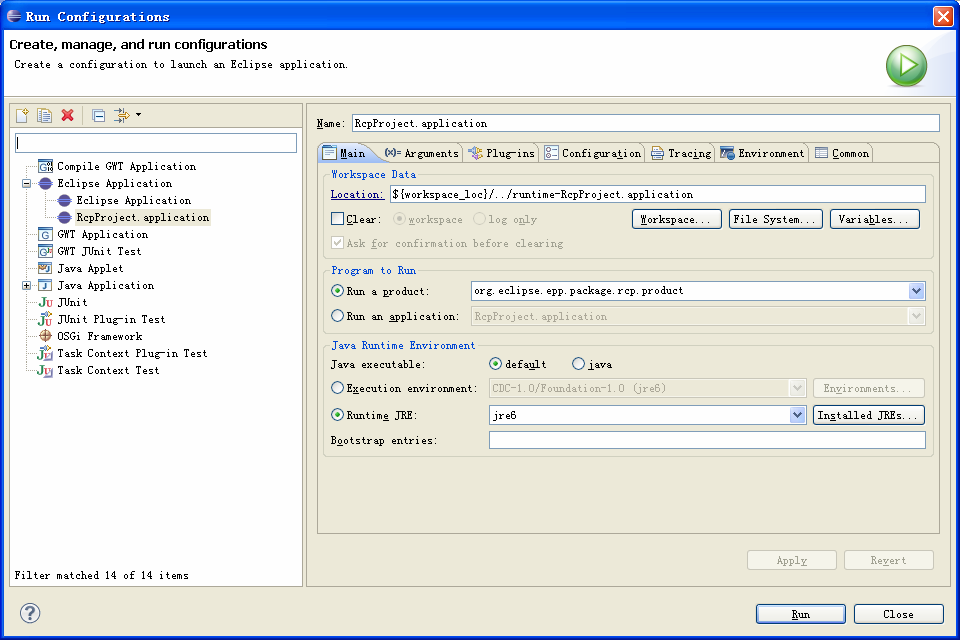
打开工程的 Run as — Run configuration ,修改配置从 Run an application 到 Run a product ,如图所示:
运行程序( Run as a product ),如果提示“ org.eclipse.epp.package.rcp is missing ”:
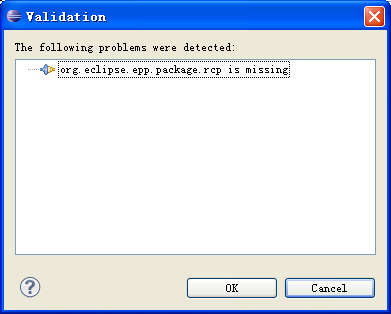
那么,在 Run as — Run configuration 中, Plug-in 选项中检查程序的依赖关系,通过 Add Required Plug-ins ,自动把依赖的插件添加进去,然后运行程序。
事件响应
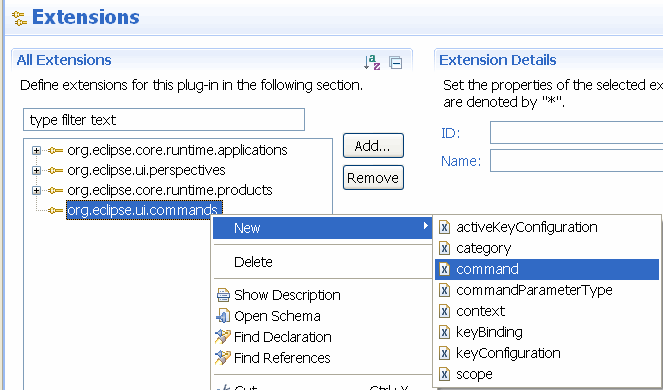
Eclipse RCP 开发中事件响应机制是通过声明 command 组件来实现的,他把 UI 中的菜单、按钮等与事件响应函数或者类关联起来。 Comand 组件在 plugin.xml 文件中以 org.eclipse.ui.commands 作为扩展点。因此,一个事件响应的基本过程,需要三个方面参与: UI , command 组件和事件处理函数。
添加事件到菜单
双击 plugin.xml 或 MANIFEST.MF 文件,进入 PDE 的图形化编辑界面的 extensiton, 增加扩展点 org.eclipse.ui.commands.
添加 command 的 default handler 类,双击 defaultHandler 超链接,新建这个类,继承自 org.eclipse.core.commands.AbstractHandler ,代码如下:
package rcpproject.commands;
import org.eclipse.core.commands.AbstractHandler;
import org.eclipse.core.commands.ExecutionEvent;
import org.eclipse.core.commands.ExecutionException;
import org.eclipse.core.commands.IHandler;
import org.eclipse.ui.handlers.HandlerUtil;
public class ExitHandler extends AbstractHandler implements IHandler {
@Override
public Object execute(ExecutionEvent event) throws ExecutionException {
HandlerUtil.getActiveWorkbenchWindow (event).close();
return null ;
}
}
这样就建立了一个 command 组件和事件处理函数的关联,下面把他们与菜单事件连接起来。增加 "org.eclipse.ui.menus" 扩展点,并新建一个 menuContribution ,设置其 localURI 为“ menu:org.eclipse.ui.main.menu ”。
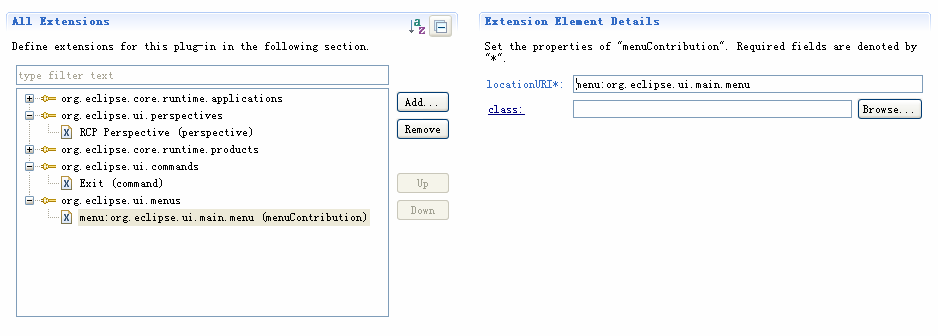
在 menuContribution 下新建一个菜单( menu ),命名为 File :

为 File 菜单创建一个 command ,设置这个 command 为之前创建的 command 组件,通过 commandId 关联起来,并设置提示内容( tooltip )。

新建一个 command ,绑定一个事件处理函数 Handler ,弹出一个消息框。

添加 command 的 default handler 类,双击 defaultHandler 超链接,新建这个类,继承自 org.eclipse.core.commands.AbstractHandler ,代码如下:
public class HelloWordHandler extends AbstractHandler implements IHandler {
public Object execute(ExecutionEvent event) throws ExecutionException {
MessageDialog.openInformation (HandlerUtil.getActiveWorkbenchWindow (
event).getShell(), "Info", "Info for you");
return null ;
}
}
添加事件到工具栏
这样就建立了一个 command 组件和事件处理函数的关联,下面把他们与工具栏事件连接起来。增加 "org.eclipse.ui.menus" 扩展点,并新建一个 menuContribution ,设置其 localURI 为
toolbar:org.eclipse.ui.main.toolbar
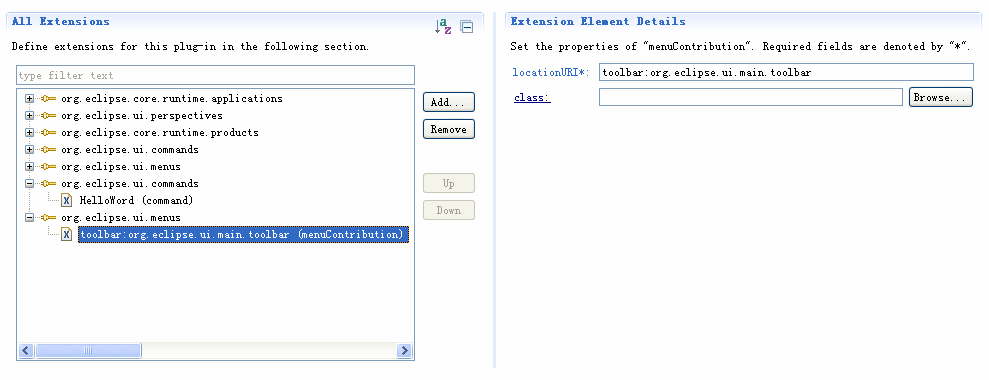
在 menuContribution 下创建 toolbar ,并把它与 HelloWorld 的 command 组件关联:

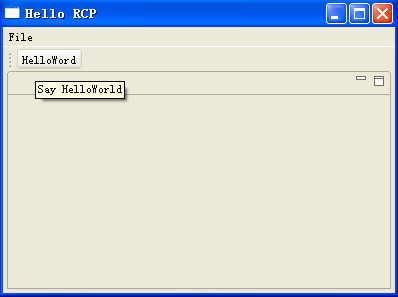
需要修改 ApplicationWorkbenchWindowAdvisor.java 文件中的代码,显示 RCP 程序的工具栏:
configurer.setShowCoolBar( true );
运行程序:
添加事件到 View toolbar
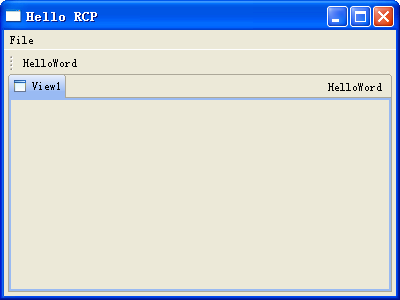
首先,在 extension 中增加扩展点 org.eclipse.ui.views, 并新建一个 view ,命名 id 为“ rcpproject.views.View1” ,并与类名称 rcpproject.ViewPart1 关联,双击 class 超链接,新建这个类。

修改 Perspective.java 代码,增加一个 ViewPart ,红色部分是这个 ViewPart 实例的 id (字符串类型),即是之前在 plugin.xml 中创建的 ViewPart 。
public class Perspective implements IPerspectiveFactory {
public void createInitialLayout(IPageLayout layout) {
String editroArea = layout.getEditorArea();
layout.setEditorAreaVisible( false );
layout.setFixed( true );
layout.addView( "rcpproject.views.View1" , IPageLayout. LEFT , 1.0f, editroArea);
}
}
在之前创建的扩展点 org.eclipse.ui.menus 下,新建一个 menuContribution ,设置其 locationURI 为“ toolbar:rcpproject.views.View1” ,即 toolbar + 冒号 + id 名称,然后在其下创建一个 command ,并关联到事件响应函数 HelloWorldHandler 上。

运行程序:
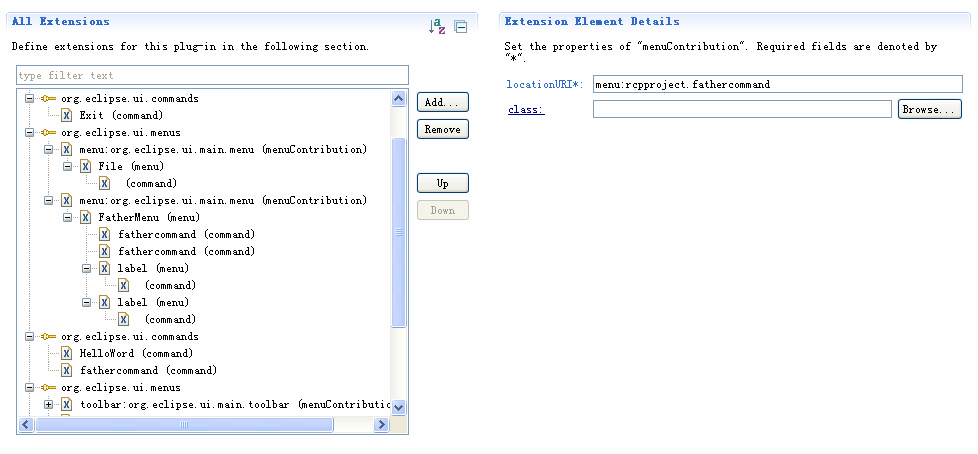
添加事件到下拉菜单
在 File 菜单相同的扩展点,增加 menuContribution ,其 locationURI 与 File 相同,建立 menu ,命名为 FatherMenu ,在 FatherMenu 下,建立两个 command ,都链接到 HelloWorld 事件 Handler ,同时,也建立两个 menu ,每个 menu 下面建立一个 command ,也链接到 HelloWorld 事件 Handler 。
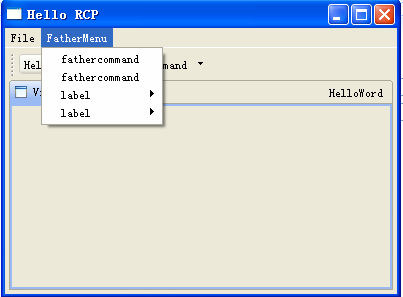
运行程序:
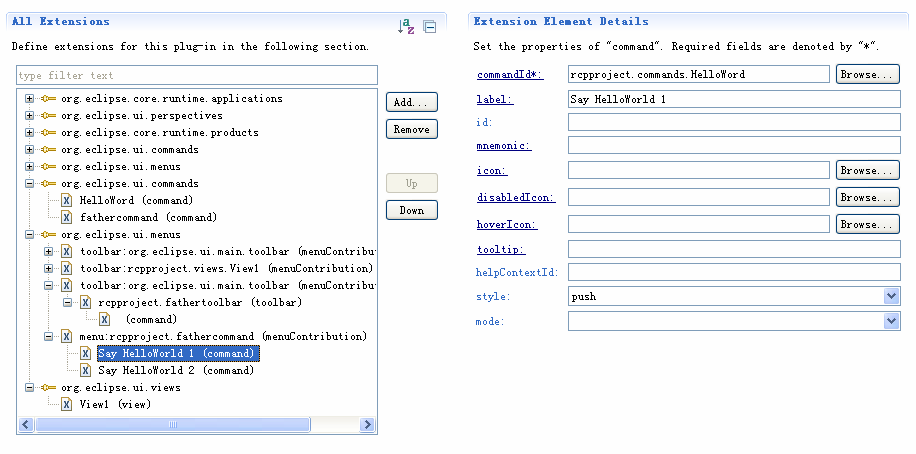
添加事件到工具栏下拉菜单
按照“添加事件到工具栏”的步骤,建立 fathercommand 按钮,也链接到事件 HelloWorld 。
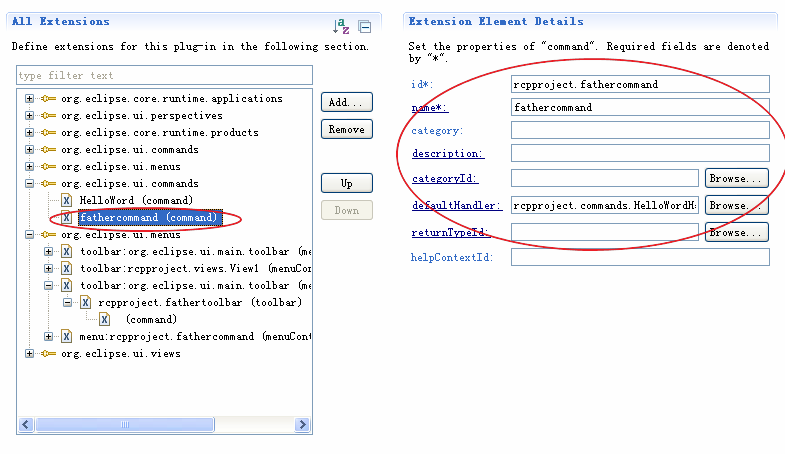

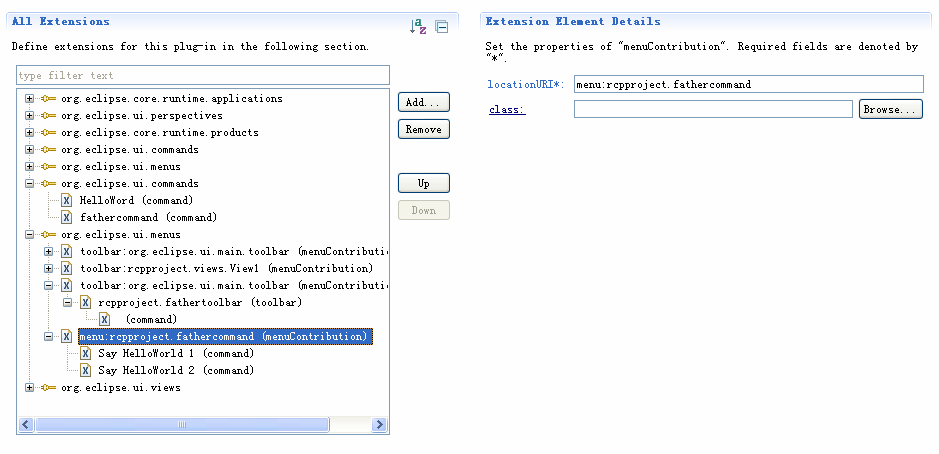
不同之处在于,添加的 toolbar 下的 command 的 style 选择 pulldown 类型。然后还是在 org.eclipse.ui.menus 扩展点下,新建一个 menuContribution ,设置其 locationURI 为“ menu:rcpproject.fathercommand ”, 即 menu + 冒号 + id. 在他下面建立两个 command ,设置他们的 label 为“ Say HelloWorld 1” ,“ Say HelloWorld 2” ,并且都链接到 HelloWorld 事件响应上,这样点击 fathercommand ,或者下面两个按钮都会激发 HelloWorld 事件。
运行程序:


 967
967

 被折叠的 条评论
为什么被折叠?
被折叠的 条评论
为什么被折叠?
 到【灌水乐园】发言


