


Oracle数据库11g有多个版本可供选择:
标准版1、标准版和企业版。所有这些版本都使用相同的通用代码库构建,这意味着企业的数据库管理软件可以轻松地从规模较小的单一处理器服务器扩展到多处理器服务器集群,而无需更改一行代码。Oracle数据库11g企业版还有许多其他增强了性能、可伸缩性、可用性、安全性和可管理性的功能选项。
首先请下载软件包:
p10404530_112030_Linux-x86-64_1of7.zip
p10404530_112030_Linux-x86-64_2of7.zip
环境准备
[root@oracle ~]# hostname
oracle
[root@oracle ~]# /etc/init.d/iptables stop     #防火墙
[root@oracle ~]# getenforce                    #selinux
Disabled
[root@oracle ~]# cat /etc/sysconfig/i18n     #字符集请调整为英文,否则后期乱码
LANG="en_US.UTF-8"
安装Oracle 11G
1.创建用户和组
groupadd oinstall
groupadd dba
useradd  -g oinstall -G dba oracle
echo 123456 |passwd --stdin oracle
2.创建Oracle目录文件夹
mkdir -p /u01/app
chown -R oracle:oinstall /u01
chmod -R 755 /u01
3.修改配置文件
vi /etc/hosts
ip hostname
4.其他参数设置
设置/etc/profile
cat >> /etc/profile << EOF
if [ \$USER = "oracle" ];then
    if [ \$SHELL = "/bin/ksh" ];then
        ulimit -p 16384
        ulimit -n 65536
else
        ulimit -u 16384 -n 65536
    fi
fi
EOF
设置.bash_profile
cat >> /home/oracle/.bash_profile <<EOF

HISTTIMEFORMAT='[%F %T]'
ORACLE_BASE=/u01/app
ORACLE_SID=orcl
ORACLE_HOME=\$ORACLE_BASE/oracle/product/11.2.0.3/db_1
NLS_LANG=AMERICAN_CHINA.ZHS16GBK
LD_LIBRARY_PATH=\$ORACLE_HOME/lib:/lib:/usr/lib
PATH=\$ORACLE_HOME/bin:\$PATH
export ORACLE_BASE ORACLE_HOME  ORACLE_SID NLS_LANG PATH
EOF
设置systctl
cat >> /etc/sysctl.conf <<EOF
kernel.shmmni = 4096
kernel.sem = 250 32000 100 128
fs.file-max = 6815744
net.ipv4.ip_local_port_range = 9000 65500
net.core.rmem_default = 262144
net.core.rmem_max = 4194304
net.core.wmem_default= 262144
net.core.wmem_max = 1048576
fs.aio-max-nr = 1048576
EOF
sysctl -p       #查看生效情况
设置/etc/security/limits.conf
cat >> /etc/security/limits.conf <<EOF
oracle soft nproc 2047
oracle hard nproc 16384
oracle soft nofile 1024
oracle hard nofile 65536
EOF
设置/etc/pam.d/login
cat >> /etc/pam.d/login <<EOF
session    required     /lib64/security/pam_limits.so
EOF
上传软件包并解压
[root@oracle ~]# mkdir /tmp/oracle && cd /tmp/oracle
[root@oracle oracle]# ls
p10404530_112030_Linux-x86-64_1of7.zip
p10404530_112030_Linux-x86-64_2of7.zip
#我们需要使用unzip进行解压,解压之后会在当前目录下生成database文件夹
配置yum源
[root@oracle oracle]# cd /etc/yum.repos.d/
[root@oracle yum.repos.d]# mkdir test && mv * test
mv: cannot move `test' to a subdirectory of itself, `test/test'
[root@oracle yum.repos.d]# cat CentOS-Base.repo
[local]
name=local
baseurl=file:///mnt
enable=1
gpgcheck=0
[root@oracle ~]# mount /dev/cdrom /mnt/
[root@oracle ~]# yum clean all
[root@oracle ~]# yum makecache
安装包组
[root@oracle ~]# yum groupinstall desktop  -y  (找不到包,装了一个gnome桌面)
[root@oracle ~]# yum install xorg-x11-utils -y
[root@oracle ~]# yum groupinstall  "Compatibility libraries" "Base" "Development tools" "debugging Tools" -y
设置环境变量(因为这个变量是临时的,所有的会话必须在一个窗口,闹心,试过两种方法)
正常返回信息为:
access control disabled,clients can connect from any host

如果xhost +不能执行,报错:xhost :  unable to open display ""

可以输入命令export DISPLAY=:0执行一下

再执行xhost +

xhost + ip (name表示该ip机器可以使用该服务)

//将安装环境变成英文
export LANG=en_US.UTF-8
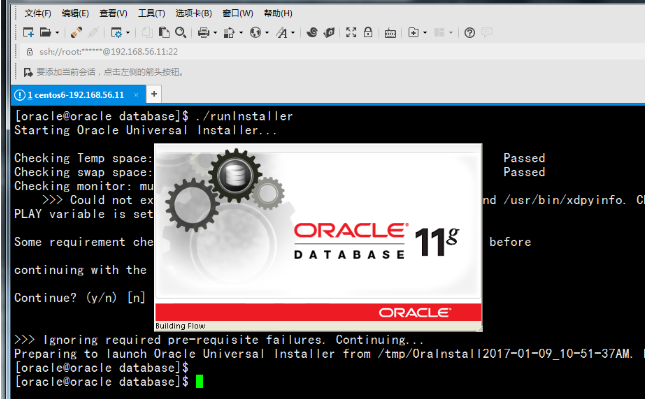
设置完成后我们切换Oracle用户,执行安装脚本
[root@oracle ~]# su - oracle
[oracle@oracle ~]$ cd /tmp/oracle/database/
[oracle@oracle database]$ ./runInstaller
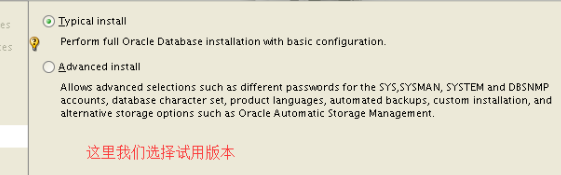
我们选择创建并配置数据库
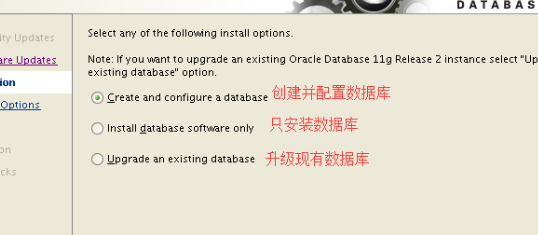
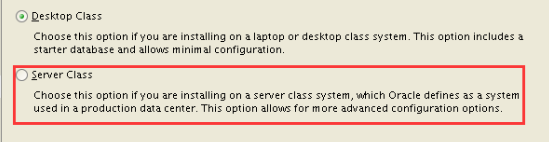
我们选择Server版本,Desktop是桌面版本,Server是服务器版本
我们选择安装单实例数据库

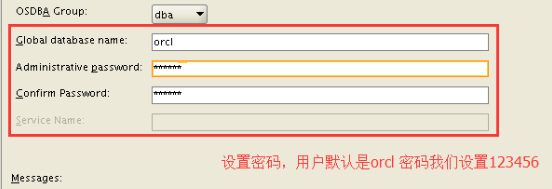
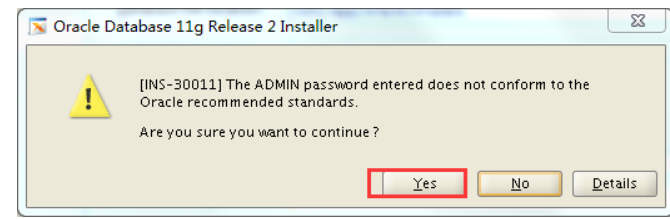
设置账户密码
生成swap分区
[root@oracle ~]#cd /tmp &&  dd if=/dev/zero of=swap bs=1M count=2048
[root@oracle tmp]# mkswap /tmp/swap -f
[root@oracle tmp]# swapon /tmp/swap
[root@oracle tmp]# free -m
             total       used       free     shared    buffers     cached
Mem:          1861       1780         81          0         93       1433
-/+ buffers/cache:        253       1607
Swap:         4031          0       4031
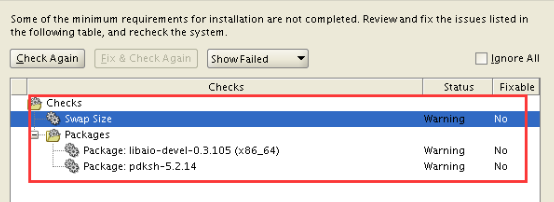
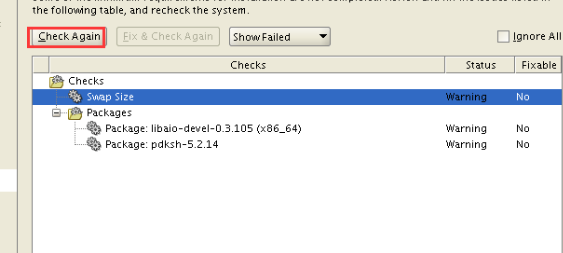
因为还缺少软件包,我们还需要在安装软件包(可能缺少多个,方法一样装)
[root@oracle ~]# yum install -y libaio-devel
上传后安装软件包
[root@oracle tmp]# rpm -ivh pdksh-5.2.14-37.el5_8.1.x86_64.rpm
warning: pdksh-5.2.14-37.el5_8.1.x86_64.rpm: Header V3 DSA/SHA1 Signature, key ID e8562897: NOKEY
Preparing...                ########################################### [100%]
   1:pdksh                  ########################################### [100%]
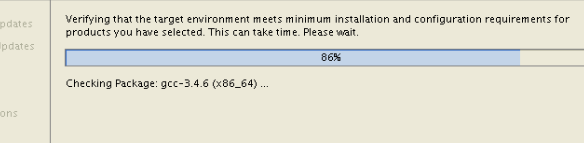
进行重新检查
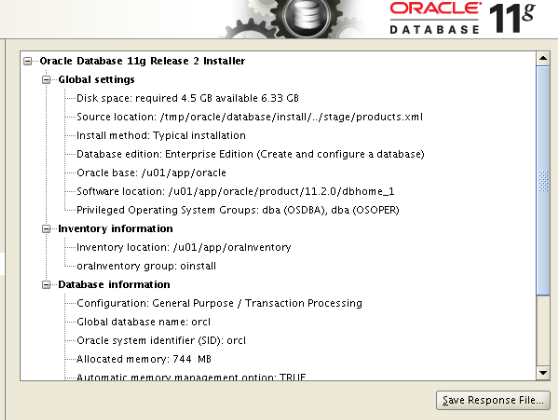
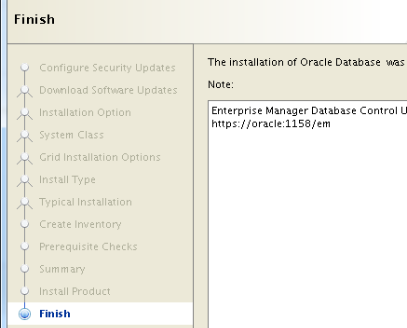
最后环境都通过之后会有下图,我们可以将它保存一份
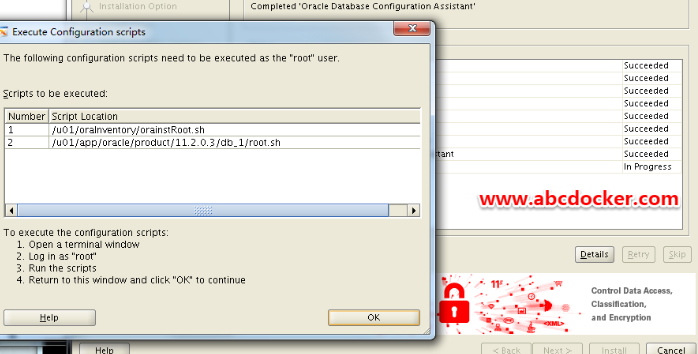
使用Root用户执行2个脚本
[root@oracle ~]# sh /u01/oraInventory/orainstRoot.sh
[root@oracle ~]# sh /u01/app/oracle/product/11.2.0.3/db_1/root.sh
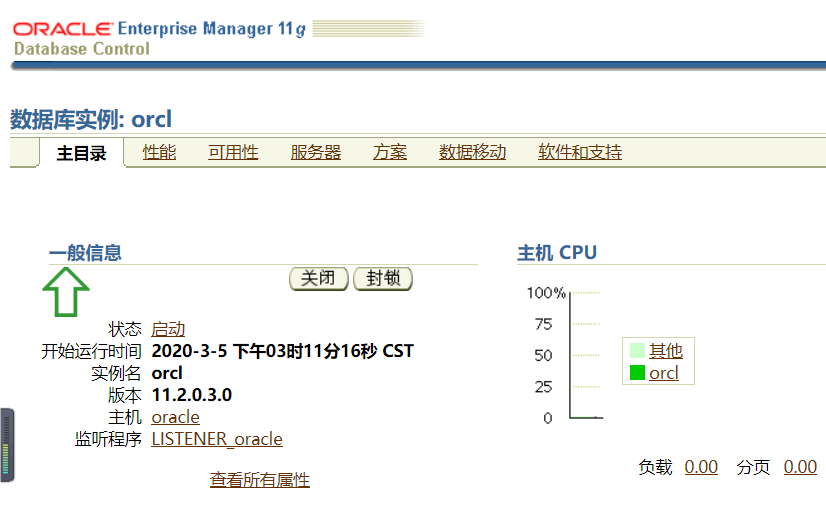
企业版Oracle已经安装完成,管理界面是ip:1158/em
我们点击关闭
我们可以查看是否有oracle进程
[root@oracle ~]# netstat -lntup
Active Internet connections (only servers)
Proto Recv-Q Send-Q Local Address               Foreign Address             State       PID/Program name
tcp        0      0 0.0.0.0:22                  0.0.0.0:*                   LISTEN      6741/sshd
tcp        0      0 127.0.0.1:25                0.0.0.0:*                   LISTEN      6845/master
tcp        0      0 127.0.0.1:6010              0.0.0.0:*                   LISTEN      6923/sshd
tcp        0      0 0.0.0.0:37919               0.0.0.0:*                   LISTEN      1093/rpc.statd
tcp        0      0 0.0.0.0:3938                0.0.0.0:*                   LISTEN      15166/emagent
tcp        0      0 0.0.0.0:111                 0.0.0.0:*                   LISTEN      1073/rpcbind
tcp        0      0 :::1521                     :::*                        LISTEN      12265/tnslsnr
tcp        0      0 :::38065                    :::*                        LISTEN      1093/rpc.statd
tcp        0      0 :::22                       :::*                        LISTEN      6741/sshd
tcp        0      0 ::1:25                      :::*                        LISTEN      6845/master
tcp        0      0 ::1:6010                    :::*                        LISTEN      6923/sshd
tcp        0      0 :::58049                    :::*                        LISTEN      13105/ora_d000_orcl
tcp        0      0 :::1158                     :::*                        LISTEN      15140/java
其中1521就是oracle进程,1158就是Web端的端口
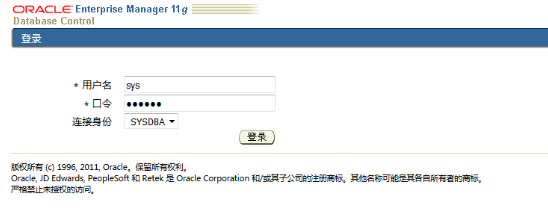
我们如果还想登陆的话就需要进行授权,需要给em设置用户名密码
[oracle@oracle ~]$ sqlplus / as sysdba           #需要进入到oracle用户下,否则会没有sqlplus命令
SQL> alter user sys identified by 123456;
授权完之后使用浏览器进行访问,URL如下
https://192.168.56.11:1158/em (如果进不去就换成http://192.168.56.11:1158/em)
用户名:sys 密码:123456
原文链接:https://i4t.com/2090.html
https://blog.51cto.com/lizhenliang/1343804 图形化
官方操作文档和包下载地址
https://www.oracle.com/cn/database/technologies/enterprise-edition/documentation/database.html


 996
996


 被折叠的 条评论
为什么被折叠?
被折叠的 条评论
为什么被折叠?
 到【灌水乐园】发言


