


一、LinearLayout(线性布局)
提供了控件水平垂直排列的模型,同时可以通过设置子控件的weight布局参数控制各个控件在布局中的相对大小。有水平布局(vertical)和垂直布局(horizontal)。
- fill-parent:占满整个屏幕,
- wrap-content:刚好适合控件内容的大小
- 对齐方式gravity取值:
- top:不改变大小,位置置于容器的顶部
- bottom:不改变大小,位置置于容器的底部
- left:不改变大小,位置置于容器的左边
- right:不改变大小,位置置于容器的右边
- center_vertical:不改变大小,位置置于容器的纵向中央部分
- center_horizontal:不改变大小,位置置于容器的横向中央部分
- center:不改变大小,位置置于容器的横向和纵向的中央部分
- fill_vertical:可能的话,纵向延伸可以填满容器
- fiil_horizontal:可能的话,横向延伸可以填满容器
- fiil:可能的话,纵向和横向延伸填满容器
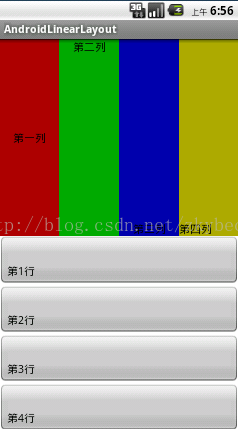
<LinearLayout xmlns:android="http://schemas.android.com/apk/res/android"
    xmlns:tools="http://schemas.android.com/tools"
    android:layout_width="match_parent"
    android:layout_height="match_parent"
    android:orientation="vertical"
    tools:context=".LinearLayoutActivity" >

    <LinearLayout
        android:layout_width="match_parent"
        android:layout_height="match_parent"
        android:layout_weight="1"
        android:orientation="horizontal" >

        <Button
            android:layout_width="wrap_content"
            android:layout_height="match_parent"
            android:layout_weight="1"
            android:background="#aa0000"
            android:gravity="center_horizontal|center_vertical"
            android:text="第一列"
            android:textSize="15sp" >
        </Button>

        <Button
            android:layout_width="wrap_content"
            android:layout_height="match_parent"
            android:layout_weight="1"
            android:background="#00aa00"
            android:gravity="center_horizontal"
            android:text="第二列"
            android:textSize="15sp" >
        </Button>

        <Button
            android:layout_width="wrap_content"
            android:layout_height="match_parent"
            android:layout_weight="1"
            android:background="#0000aa"
            android:gravity="center|bottom"
            android:text="第三列"
            android:textSize="15sp" >
        </Button>

        <Button
            android:layout_width="wrap_content"
            android:layout_height="match_parent"
            android:layout_weight="1"
            android:background="#aaaa00"
            android:gravity="bottom"
            android:text="第四列"
            android:textSize="15sp" >
        </Button>
    </LinearLayout>

    <LinearLayout
        android:layout_width="match_parent"
        android:layout_height="match_parent"
        android:layout_weight="1"
        android:orientation="vertical" >

        <Button
            android:layout_width="match_parent"
            android:layout_height="match_parent"
            android:layout_weight="1"
            android:gravity="bottom"
            android:text="第1行"
            android:textSize="15sp" >
        </Button>

        <Button
            android:layout_width="match_parent"
            android:layout_height="match_parent"
            android:layout_weight="1"
            android:gravity="bottom"
            android:text="第2行"
            android:textSize="15sp" >
        </Button>

        <Button
            android:layout_width="match_parent"
            android:layout_height="match_parent"
            android:layout_weight="1"
            android:gravity="bottom"
            android:text="第3行"
            android:textSize="15sp" >
        </Button>

        <Button
            android:layout_width="match_parent"
            android:layout_height="match_parent"
            android:layout_weight="1"
            android:gravity="bottom"
            android:text="第4行"
            android:textSize="15sp" >
        </Button>
    </LinearLayout>
</LinearLayout>
二、AbsoluteLayout(坐标布局)
可以让子元素指定准确的x/y坐标值,并显示在屏幕上。(0, 0)为左上角,当向下或向右移动时,坐标值将变大。AbsoluteLayout没有页边框,允许元素之间互相重叠(尽管不推荐)。我们通常不推荐使用AbsoluteLayout,除非你有正当理由要使用它,因为它使界面代码太过刚性,以至于在不同的设备上可能不能很好地工作。
- Android:layout_x/layout_y=”56px”确定控件位置
三、RelativeLayout(相对布局)
允许子元素指定他们相对于其它元素或父元素的位置(通过ID指定)。因此,你可以以右对齐,或上下,或置于屏幕中央的形式来排列两个元素。元素按顺序排列,因此如果第一个元素在屏幕的中央,那么相对于这个元素的其它元素将以屏幕中央的相对位置来排列。如果使用XML来指定这个layout,在你定义它之前,被关联的元素必须定义。
- Android:layout_centerInparent,将当前控件放置于起父控件的横向和纵向的中央部分
- Android:layout_centerHorizontal,使当前控件置于父控件横向的中央部分
- Android:layout_centerVertival,使当前控件置于父控件纵向的中央部分
- Android:layout_alignParentBottom,使当前控件的底端和父控件底端对齐
- Android:layout_alignParentLeft,使当前控件的左端和父控件左端对齐
- Android:layout_alignParentRight,使当前控件的右端和父控件右端对齐
- Android:layout_alignParentTop,使当前控件的顶端和父控件顶端对齐
- Android:layout_alignParentBottom,使当前控件的底端和父控件底端对齐
- Android:layout_below/layout_above/ layout_toLeftOf/ layout_toRightOf =“@id/”使当前控件置于给出id的空间的下方/上方/左边/右边
- Android:layout_marginBottom/layout_marginLeft/layout_marginRight/layout_marginTop=”30px”使当前控件底部/左边/右边/顶部空出相应像素空间
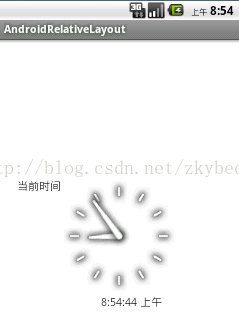
<RelativeLayout xmlns:android="http://schemas.android.com/apk/res/android"
    xmlns:tools="http://schemas.android.com/tools"
    android:layout_width="match_parent"
    android:layout_height="match_parent"
    tools:context=".AndroidRelativeLayoutActivity" >

    <AnalogClock
        android:id="@+id/aclock"
        android:layout_width="wrap_content"
        android:layout_height="wrap_content"
        android:layout_centerInParent="true" >
    </AnalogClock>

        <!--
android:layout_below="@id/aclock" 位于模拟时钟下面。如果没有设置属性layout_alignLeft和layout_marginLeft ,
该数字时钟会顶到左屏幕边显示;alignLeft="@id/aclock" 和属性layout_below 配合使用,使得该数字时钟和上面的模拟时钟的左边距对齐,
如果没有设置marginLeft 属性的话和上面的两个属性配合使用,使得数字时钟距模拟时钟的左边距40个像素

-->

    <DigitalClock
        android:id="@+id/dclock"
        android:layout_width="wrap_content"
        android:layout_height="wrap_content"
        android:layout_alignLeft="@id/aclock"
        android:layout_below="@id/aclock"
        android:layout_marginLeft="40px" >
    </DigitalClock>

    <TextView
        android:layout_width="wrap_content"
        android:layout_height="wrap_content"
        android:layout_alignTop="@id/aclock"
        android:layout_toLeftOf="@id/dclock"
        android:text="当前时间" >
    </TextView>

</RelativeLayout>
四、FrameLayout(单帧布局)
最简单的一个布局对象。它被定制为你屏幕上的一个空白备用区域,之后你可以在其中填充一个单一对象 — 比如,一张你要发布的图片。所有的子元素将会固定在屏幕的左上角;你不能为FrameLayout中的一个子元素指定一个位置。后一个子元素将会直接在前一个子元素之上进行覆盖填充,把它们部份或全部挡住(除非后一个子元素是透明的)。
- Android:src=”@drawable/”属性指定所需图片的文件位置,用ImageView显示图片时,也应当用android:src指定要显示的图片
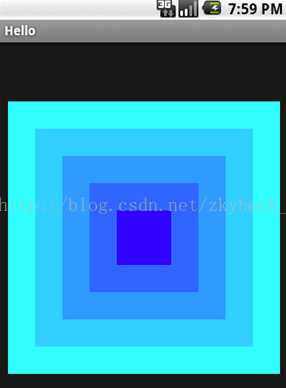
<FrameLayout xmlns:android="http://schemas.android.com/apk/res/android"
    android:layout_width="fill_parent"
    android:layout_height="fill_parent">
    <TextView android:id="@+id/textview1"
        android:layout_width="300dp"
        android:layout_height="300dp"
        android:layout_gravity="center"
        android:background="#FF33ffff" />
    <TextView android:id="@+id/textview2"
        android:layout_width="240dp"
        android:layout_height="240dp"
        android:layout_gravity="center"
        android:background="#FF33ccff" />
    <TextView android:id="@+id/textview3"
        android:layout_width="180dp"
        android:layout_height="180dp"
        android:layout_gravity="center"
        android:background="#FF3399ff" />
    <TextView android:id="@+id/textview4"
        android:layout_width="120dp"
        android:layout_height="120dp"
        android:layout_gravity="center"
        android:background="#FF3366ff" />
    <TextView android:id="@+id/textview5"
        android:layout_width="60dp"
        android:layout_height="60dp"
        android:layout_gravity="center"
        android:background="#FF3300ff" />
</FrameLayout>
五、TableLayout(表格布局)
以行列的形式管理子控件,每一行为一个TableRow的对象,TableRow也可以添加子控件
- android:collapseColumns=“n”隐藏TableLayout里面的TableRow的列n
- android:stretchColumns=“n”设置列n为可延伸的列
- android:shrinkColumns=“n”设置列n为可收缩的列

<LinearLayout xmlns:android="http://schemas.android.com/apk/res/android"
    xmlns:tools="http://schemas.android.com/tools"
    android:layout_width="match_parent"
    android:layout_height="match_parent"
    android:orientation="vertical"
    tools:context=".AndroidTableLayoutActivity" >

    <!-- 定义第一个表格,指定第2列允许收缩,第3列允许拉伸 -->

    <TableLayout
        android:id="@+id/tablelayout01"
        android:layout_width="match_parent"
        android:layout_height="wrap_content"
        android:shrinkColumns="1"
        android:stretchColumns="2" >

        <!-- 直接添加按钮,自己占用一行 -->

        <Button
            android:id="@+id/btn01"
            android:layout_width="wrap_content"
            android:layout_height="wrap_content"
            android:text="独自一行" >
        </Button>

        <TableRow>

            <Button
                android:id="@+id/btn02"
                android:layout_width="wrap_content"
                android:layout_height="wrap_content"
                android:text="普通" >
            </Button>

            <Button
                android:id="@+id/btn03"
                android:layout_width="wrap_content"
                android:layout_height="wrap_content"
                android:text="允许被收缩允许被收缩允许被收缩允许被收缩" >
            </Button>

            <Button
                android:id="@+id/btn04"
                android:layout_width="wrap_content"
                android:layout_height="wrap_content"
                android:text="允许被拉伸" >
            </Button>
        </TableRow>
    </TableLayout>
    <!-- 定义第2个表格,指定第2列隐藏 -->

    <TableLayout
        android:id="@+id/tablelayout02"
        android:layout_width="match_parent"
        android:layout_height="wrap_content"
        android:collapseColumns="1" >

        <TableRow>

            <Button
                android:id="@+id/btn05"
                android:layout_width="wrap_content"
                android:layout_height="wrap_content"
                android:text="普通" >
            </Button>

            <Button
                android:id="@+id/btn06"
                android:layout_width="wrap_content"
                android:layout_height="wrap_content"
                android:text="被隐藏列" >
            </Button>

            <Button
                android:id="@+id/btn07"
                android:layout_width="wrap_content"
                android:layout_height="wrap_content"
                android:text="允许被拉伸" >
            </Button>
        </TableRow>
    </TableLayout>
    <!-- 定义第3个表格,指定第2列填满空白-->

    <TableLayout
        android:id="@+id/tablelayout03"
        android:layout_width="match_parent"
        android:layout_height="wrap_content"
        android:stretchColumns="1"
         >

        <TableRow>

            <Button
                android:id="@+id/btn08"
                android:layout_width="wrap_content"
                android:layout_height="wrap_content"
                android:text="普通" >
            </Button>

            <Button
                android:id="@+id/btn09"
                android:layout_width="wrap_content"
                android:layout_height="wrap_content"
                android:text="填满剩余空白" >
            </Button>
        </TableRow>
    </TableLayout>
    <!-- 定义第3个表格,指定第2列横跨2列-->

    <TableLayout
        android:id="@+id/tablelayout04"
        android:layout_width="match_parent"
        android:layout_height="wrap_content"
         >

        <TableRow>

            <Button
                android:id="@+id/btn10"
                android:layout_width="wrap_content"
                android:layout_height="wrap_content"
                android:text="普通" >
            </Button>

            <Button
                android:id="@+id/btn11"
                android:layout_column="2"
                android:layout_width="wrap_content"
                android:layout_height="wrap_content"
                android:text="填满剩余空白" >
            </Button>
        </TableRow>
    </TableLayout>
</LinearLayout>


 527
527

 被折叠的 条评论
为什么被折叠?
被折叠的 条评论
为什么被折叠?
 到【灌水乐园】发言


