


在前面我们一步一步的把我们的MVC封装过程进行了跟踪记录。虽然比较详细但是知识点都比较零散缺乏一个系统性的汇总。今天我们来把前面的所有流程来做一个汇总。
先来看一下我们自己的目录结构:
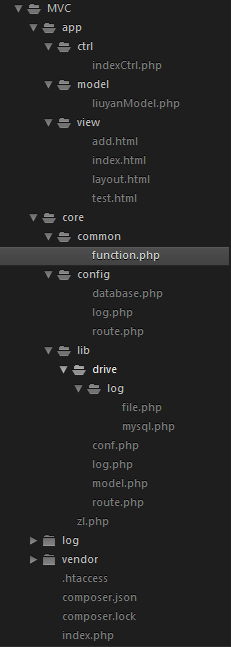
入口文件
入口文件为index.PHP所在位置应该为项目更目录下
编程代码为:
<?php
/**
* 入口文件
* 1.定义常量
* 2.加载函数库
* 3.启动框架
*/
/**
* 定义常量
*/
//当前框架所在的根目录
define('ZL',realpath('./'));
//定义核心文件所在的根目录
define('CORE',ZL.'/core');
//定义项目目录
define('APP',ZL.'/app');
define('MODULE','app');
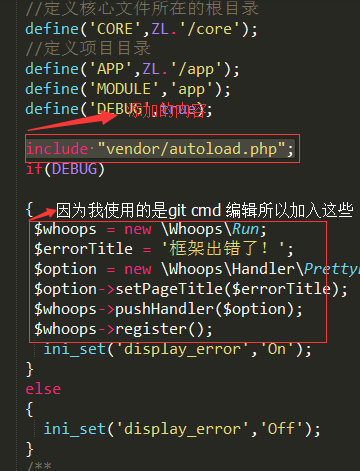
define('DEBUG',true);
include "vendor/autoload.php";
if(DEBUG)
{
$whoops = new \Whoops\Run;
$errorTitle = '框架出错了!';
$option = new \Whoops\Handler\PrettyPageHandler();
$option->setPageTitle($errorTitle);
$whoops->pushHandler($option);
$whoops->register();
ini_set('display_error','On');
}
else
{
ini_set('display_error','Off');
}
/**
* 加载函数
*/
include CORE.'/common/function.php';
include CORE.'/ZL.php';
/**
* 启动框架
*/
spl_autoload_register('\core\zl::load');//当加载的类不存在时加载zl下的load方法
\core\zl::run();
?>基类文件
基类文件为根目录下的zl.php文件:
<?php
  namespace core;

  class zl
  {
    public static $classMap = array();
    public $assign;
    static public function run()
     {
        \core\lib\log::init();//启动初始化方法
      \core\lib\log::log($_SERVER,'server');
        $route = new \core\lib\route();
        $ctrlClass =  $route->ctrl;
        $action = $route->action;
         $ctrlfile = APP.'/ctrl/'.$ctrlClass.'Ctrl.php';
         $ctrlClass = '\\'.MODULE.'\ctrl\\'.$ctrlClass.'Ctrl';

        if(is_file($ctrlfile))
        {
          include $ctrlfile;
          $ctrl = new $ctrlClass;
          $ctrl->$action();
          \core\lib\log::log('ctrl:'.$ctrlClass.'  '.'action:'.$action);
        }
        else
        {
         throw new \Exception('找不到控制器'.$ctrlClass);
        }

     }

     static public function load($class)
     {
        //自动加载类
        //加载路由(new\core\route();)
        //$class='\core\route';
        //ZL.'/core/route.php';
        // p($class);
        // p(ZL.$class.'.php');
        if(isset($classMap[$class]))
        {
            return true;
        }
        else
        {
            $class=str_replace('\\', '/', $class);
            $file=ZL.'/'.$class.'.php';
            if(is_file($file))
            {
                include $file;
                self::$classMap[$class] = $class;
            }
            else
            {
              return false;
            }
        }
     }

     public function assign($name,$value)
     {
        //p($value);
       $this->assign[$name] = $value;
     }

     public function display($file)
     {

         $files = APP.'/view/'.$file;

         if(is_file($files))
         {
            \Twig_Autoloader::register();
            $loader = new \Twig_Loader_Filesystem(APP.'/view');
            $twig = new \Twig_Environment($loader, array(
                'cache' => ZL.'/log/twig',
                'debug' => DEBUG
            ));
            $template = $twig->loadTemplate($file);

            $template->display($this->assign?$this->assign:array());

         }
     }
  }
?>
路由文件
框架的正常运行离不开路由的设定所以任何框架都需要有路由文件。我的路由文件在./core/lib/route.php文件中。
<?php
 namespace core\lib;
 use core\lib\conf;
 class route
 {
    public $ctrl;
    public $action;
    public function __construct()
    {
        /**
         * 网站访问格式xxx.com/index/index
         * 1.隐藏index.php
         * 2.获取URL 参数部分
         * 3.返回对应控制器和方法
         */
        if(isset($_SERVER['REQUEST_URI'])&&$_SERVER['REQUEST_URI']!='/')
        {
          $path =$_SERVER['REQUEST_URI'];
          $patharr=explode('/',trim($path,'/'));
          if(isset($patharr[1]))
          {
            $this->ctrl = $patharr[1];
            unset($patharr[1]);
          }
          if(isset($patharr[2]))
          {
            $this->action = $patharr[2];
            unset($patharr[2]);
          }
          else
          {
            $this->action = conf::get('ACTION','route');
          }
          //url多余部分转换成GET值
          $count = count($patharr)+2;
          //p($count);
          $i=3;
          while($i < $count)
          {
            if(isset($patharr[$i + 1]))
            {
                $_GET[$patharr[$i]] = $patharr[$i + 1];
            }
               $i = $i + 2;
          }


        }
        else
        {
            $this->ctrl=conf::get('CTRL','route');
            $this->action=conf::get('ACTION','route');
        }
    }
 }
?>
函数库
所在位置:./core/common/function.php
<?php
  function p($var)
   {
      if(is_bool($var))
      {
        var_dump($var);
      }
      else if(is_null($var))
      {
        var_dump(NULL);
      }
      else
      {
        echo "<pre style='position:relative;z-index:1000;padding:10px;
        border-radius:5px;background:#CCCCCC;border:1px splid:#aaa;font-size:14px;
        line-height:18px;opacity:0.9'>".print_r($var,true)."</pre>";
      }
    }
    /**
     * [post description]
     * @param  [type] $name    [对应值]
     * @param  string $default [默认值]
     * @param  string $fitt    [过滤方法]
     * @return [type]          [description]
     */
    function post($name,$default=false,$fitt=false)
    {
      if(isset($_POST[$name]))
      {
        if($fitt)
        {
            switch ($fitt)
            {
                case 'int':
                    if(is_numeric($_POST[$name]))
                    {
                        return $_POST[$name];
                    }
                    else
                    {
                        return $default;
                    }
                    break;
                default: ;
                    # code...
                    break;
            }
        }
        else
        {
            return $_POST[$name];
        }
      }
      else
      {
        return $default;
      }
    }
    /**
     * [post description]
     * @param  [type] $name    [对应值]
     * @param  string $default [默认值]
     * @param  string $fitt    [过滤方法]
     * @return [type]          [description]
     */
    function get($name,$default=false,$fitt=false)
    {
      if(isset($_GET[$name]))
      {
        if($fitt)
        {
            switch ($fitt)
            {
                case 'int':
                    if(is_numeric($_GET[$name]))
                    {
                        return $_GET[$name];
                    }
                    else
                    {
                        return $default;
                    }
                    break;
                default: ;
                    # code...
                    break;
            }
        }
        else
        {
            return $_GET[$name];
        }
      }
      else
      {
        return $default;
      }
    }
    function jump($url)
    {
      header('Location:'.$url);
      exit();
    }
?>
模型(M)->视图(V)->控制器(C)的加载
模型(M)
模型所在位置如图中所示是:./core/lib/model.php
<?php
  namespace core\lib;
  use core\lib\conf;
   //class model extends \PDO  pdo方式
   class model extends \medoo  //插件MEDOO方式
   {
      public function __construct()
      {

         $option = conf::all('database');

        /*try
        {
            parent::__construct($database['DSN'], $database['USERNAME'], $database['PASSWD']);
        }catch(\PDOException $e)
        {
            p($e->getMessage());
        }*/
        parent::__construct($option);
      }
   }
?>
通过上面的程序中我们不难看出模型(M)层的主要作用是进行一些比较复杂的逻辑运算。对于一些简单的处理为了方便我们都会直接在控制器(C)层直接处理。
视图(V)层
视图所在位置如图中所示是:./app/view/index.html
测试代码为:
<h1>这是视图文件</h1>

<h3><?php echo $data ?></h3>
视图(V)层就是将数据以视图的形式展示出来
控制器(C)层
控制器所在位置如图中所示是:./app/ctrl/indexCtrl.php
<?php
namespace app\ctrl;
use app\model\liuyanModel;
class indexCtrl extends \core\ZL
{
//所有留言
    public function index()
    {
        $model = new liuyanModel();
        $data=$model->all();
        $this->assign('data',$data);
        $this->display('index.html');
    }


//添加留言
    public function add()
    {

        $this->display('add.html');
    }
//保存留言
    public function save()
    {

      $data['title']=post('title');
      $data['content']=post('content');
      $data['creattime']=time();
      $model=new liuyanModel();
      $re=$model->addOne($data);
      if($re)
      {
        jump('/');
      }
      else
      {
       jump('/index.php/index/add');
      }
    }
    public function del()
    {
        $id=get('id','0','int');
        if($id)
        {
            $model=new liuyanModel();
            $re=$model->delOne($id);
            if($re)
            {
               jump('/');
            }
            else
            {
                exit('删除失败');
            }
        }
        else
        {
           exit('参数错误');
        }
    }
}
配置类和日志类
配置类:
首先我们需要定义一个配置文件的路由,主要目的是定义一个默认情况下的路由,所在位置为./core/config/route.php
<?php
  //定义默认情况下的路由
  return array(
     'CTRL'=>'index',
     'ACTION'=>'index'
    );
?>
配置文件所在位置为./core/lib/conf.php
<?php
  namespace core\lib;

  class conf
  {
     //缓存配置项
      static public $conf = array();
     //由于经常使用所以定义一个静态的方法
     //加载单个类
     //$name 加载的配置名称 $file 加载的文件

    static public function get($name,$file)
    {
     /**
      * 1.判断配置文件是否存在
      * 2.判断配置是否存在
      * 3.缓存配置
      */

     if(isset(self::$conf[$file]))
     {
        return self::$conf[$file][$name];
     }
     else
     {

        $path=ZL.'\core\config\\'.$file.'.php';
         if(is_file($path))
         {
           $conf = include $path;
           if(isset($conf[$name]))
           {
             self::$conf[$file] = $conf;
             return $conf[$name];
           }
           else
           {
             throw new \Exception('找不到配置项'.$name);
           }
         }
         else
         {
            throw new \Exception('找不到配置文件'.$file);
         }
      }
    }

    /**
     * 加载所有类的函数
     */
    static public function all($file)
    {
           if(isset(self::$conf[$file]))
         {
            return self::$conf[$file];
         }
         else
         {

            $path=ZL.'\core\config\\'.$file.'.php';
             if(is_file($path))
             {
               $conf = include $path;
               self::$conf[$file] = $conf;
               return $conf;
             }
             else
             {
                throw new \Exception('找不到配置文件'.$file);
             }
          }
    }
  }

?>
数据库配置类所在位置./core/config/database.php
<?php
   return array(
        // 'DSN'=>'mysql:host=localhost;dbname=test',
        // 'USERNAME'=>'root',
        // 'PASSWD'=>'root'
    'database_type' => 'mysql',
    'database_name' => 'test',
    'server' => 'localhost',
    'username' => 'root',
    'password' => 'root',
    'charset' => 'utf8'
    );
?>
日志类:
日志类与其他类的加载有所不同,日志类的加载需要有日志类的加载驱动,简单来说我们的日志分为两个部分,即日志驱动文件和日志加载文件。
驱动文件所在位置为:./core/drive/log/file.php
<?php
namespace core\lib\drive\log;
use core\lib\conf;
 //将日志存储在文件系统中
class file
{

  public $path;//日志存储位置
  public function __construct()
  {
    $conf = conf::get('OPTION','log');
    $this->path = $conf['PATH'];
  }
  /**
   * 写日志功能
   *
   */
  public function log($message,$file='log')
  {
    /**
     * 1.确定文件存储位置是否存在
     *   不存在新建目录
     * 2.写日志
     */
    if(!is_dir($this->path.date('YmdH')))
    {
      mkdir($this->path.date('YmdH'),'0777',true);
    }

    return file_put_contents($this->path.date('YmdH').'/'.$file.'.php',date('Y-m-d H:i:s').json_encode($message).PHP_EOL,FILE_APPEND);
  }
}
?>
日志文件所在位置为:./core/lib/log.php
<?php
 namespace core\lib;
 use core\lib\conf;
 class log
 {
    /**
     * 1.确定日志的存储方式
     *
     * 2.写日志
     */
    static $class;
    //初始化方式
   static public function init()
    {
     //确定存储方式
     $drive = conf::get('DRIVE','log');//加载驱动模型
     $class = '\core\lib\drive\log\\'.$drive;//加载类
     self::$class = new $class;
    }

    static public function log($name,$file = 'log')
    {
        self::$class->log($name,$file);
    }
 }
?>
composer加载第三方类库
前面我们进行了对MVC框架的一系列封装。可以说我们的框架还是一个特别简陋的框架,与其他成熟的框架比起来我们现在的的框架最缺少的还是对类库扩展的支持,今天我们就通过composer来加载第三方类库。
什么是composer?
Composer是PHP中用来管理依赖(dependency)关系的工具。你可以在自己的项目中声明所依赖的外部工具库(libraries),Composer会帮你安装这些依赖的库文件。
composer的安装
windowds安装:
http://jingyan.baidu.com/article/4f34706ed04013e386b56d72.html
需要先创建一个文件,在文件中写入相关的配置信息。
在根目录下新建一个composer.json的文件
{
   "name":"MVC PHP",
   "description":"PHP Framework",
   "type":"Framework",
   "keywords":[
      "PHP","PHP Framework "
    ],
   "require":{
        "php":">=5.3.0",
        "filp/whoops":"*",
        "symfony/var-dumper":"*",
        "catfan/medoo":"*",
    "twig/twig":"*"
    },
  "repositories": {
    "packagist": {
        "type": "composer",
        "url": "https://packagist.phpcomposer.com"
    }
}
}
在使用composer之前需要先在根目录下创建一个vendor的文件夹
并在
接值使用Git Bash Here在composer.json文件所在目录下键入以下命令
composer install
composer update
twig模板引擎加载和使用
加载
其加载方式我们还是要借助composer来实现,我们首先需要在composer.json文件中加入:
"symfony/var-dumper":"*"使用Git Bash Here在composer.json文件所在目录下键入
composer update然后就可以使用了
样式库代码:
样式库所在位置./app/layout.html
<html>
    <body>
        <header>haeder</header>
          <content>
            {% block content %}
            {% endblock %}
          </content>
        <footer>footer</footer>
    </body>
</html>
控制器代码:
<?php
  namespace app\ctrl;
  use core\lib\model;
  class indexCtrl extends \core\zl
  {
    public function index()
    {
      $data = 'hllow word';
      $this->assign('data',$data);
      $this->display('index.html');

    }
    public function test()
      {
        $data = 'dsadd';
        $this->assign('data',$data);
        $this->display('test.html');
      }
  }
?>
视图层代码:
{% extends "layout.html" %}
{% block content %}
{{ data }}
{% endblock %}


 2559
2559

 被折叠的 条评论
为什么被折叠?
被折叠的 条评论
为什么被折叠?
 到【灌水乐园】发言


