


今天我们来分析Spring中AOP的源码,主要是关于SpringAOP是如何发挥作用的。
前期准备
首先我们需要有一个Spring AOP项目,添加好了SpringAOP的依赖。
<dependency>
            <groupId>org.springframework</groupId>
            <artifactId>spring-context</artifactId>
            <version>6.0.2</version>
        </dependency>

<!--spring aop依赖-->
        <dependency>
            <groupId>org.springframework</groupId>
            <artifactId>spring-aop</artifactId>
            <version>6.0.2</version>
        </dependency>
        <!--spring aspects依赖-->
        <dependency>
            <groupId>org.springframework</groupId>
            <artifactId>spring-aspects</artifactId>
            <version>6.0.2</version>
        </dependency>
开始分析
首先我们肯定是需要先定义一个我们启动类,这里我采用AnnotationConfigApplicationContext来进行测试,当然还需要一个AppConfig。
@ComponentScan("com.zly.aop.learn")
@Configuration
@EnableAspectJAutoProxy
public class AppConfig {
我这里主要是为了扫包而已,然后使用Aop还得开启EnableAspectJAutoProxy,这个就和我们在以往的xml开启aop:aspectj-autoproxy是一样的作用,这里也支持xml的所有配置。
切面的定义
关于切面的定义和对应的通知,我就不再解释了,实在不了解可以看我之前写的博客或者去网上进行了解。
@Component
@Aspect
public class AopAspect {

    /**
     * 设置切入点和通知类型
     * 切入点表达式 execution(访问修饰符 返回值类型 方法所在类的全路径 方法名 参数列表
     * 通知类型:
     * 前置@Before
     * 返回@AfterReturning
     * 异常@AfterThrowing
     * 后置@After
     * 环绕@Around()
     */
    @Before(value = "pointCut()")
    public void beforeMethod(JoinPoint joinPoint) {
        String methodName = joinPoint.getSignature().getName();
        Object[] args = joinPoint.getArgs();
        System.out.println("Logger-->前置通知,方法名称:" + methodName + "参数:" + Arrays.toString(args));
    }

    @After(value = "pointCut()")
    public void afterMethod(JoinPoint joinPoint) {
        String methodName = joinPoint.getSignature().getName();
        System.out.println("Logger-->后置通知,方法名称:" + methodName);
    }

    @AfterReturning(value = "pointCut()", returning = "result")
    public void afterReturningMethod(JoinPoint joinPoint, Object result) {
        String methodName = joinPoint.getSignature().getName();

        System.out.println("Logger-->返回前置通知,方法名称:" + methodName + "返回值:" + result.toString());
    }

    @AfterThrowing(value = "pointCut())", throwing = "exception")
    public void afterThrowingMethod(JoinPoint joinPoint, Throwable exception) {
        String methodName = joinPoint.getSignature().getName();
        System.out.println("Logger-->异常通知,方法名称:" + methodName + "异常:" + exception.toString());
    }

    @Around(value = "pointCut()")
    public Object aroundMethod(ProceedingJoinPoint joinPoint) {
        String methodName = joinPoint.getSignature().getName();
        String argsString = joinPoint.getArgs().toString();
        Object result = null;
        try {
            System.out.println("环绕通知");
            // 调用目标方法
            result = joinPoint.proceed();
            System.out.println("环绕通知==目标方法返回值之后");
        } catch (Throwable ex) {
            System.out.println("环绕通知==目标方法出现异常之后");
        } finally {
            System.out.println("环绕通知==目标方法执行完毕");
        }
        return result;
    }

    /**
     * 重用切入点表达式
     */
    @Pointcut(value = "execution(* com.zly.aop.learn.service.*.*(..))")
    public void pointCut() {

    }
}
业务类
这里我们先以有实现接口为示例:
public interface UserService {

    void add(String name);
}

@Component
public class UserServiceImpl implements UserService {

    @Override
    public void add(String name) {
        System.out.println("add ===>" + name);
    }
}
关于Spring的动态代理,我们知道有JDK的动态代理和CgLib的动态代理,那么我们的对象是在Bean生命周期中的那个阶段被代理的呢?或者说,我们SpringAOP的运行时织入还是初始化时就已经织入了呢?
对于后面的这个问题很好回答,我们可以跟下源码getBean方法,最后你会发现它最后是从singletonObjects中获取出来的,也就是我们常说的三级缓存。所以后面的这个问题就很好解答了,代理在ApplicationContext初始化时就已经创建完成了,然后再通过代码定位,我们就可以容易知道,这个对象是在下面的这个方法就已经添加入三级缓存了。
protected void addSingleton(String beanName, Object singletonObject) {
        synchronized (this.singletonObjects) {
            this.singletonObjects.put(beanName, singletonObject);
            this.singletonFactories.remove(beanName);
            this.earlySingletonObjects.remove(beanName);
            this.registeredSingletons.add(beanName);
        }
    }
源碼技巧:看堆栈,然后我们通过条件判断和堆栈定位到是在Bean生命周期中哪个方法
这里我已经找到了,是在org.springframework.beans.factory.support.AbstractBeanFactory#doGetBean中
sharedInstance = getSingleton(beanName, () -> {
						try {
							return createBean(beanName, mbd, args);
						}
						catch (BeansException ex) {
							// Explicitly remove instance from singleton cache: It might have been put there
							// eagerly by the creation process, to allow for circular reference resolution.
							// Also remove any beans that received a temporary reference to the bean.
							destroySingleton(beanName);
							throw ex;
						}
					});
然后跟进doCreateBean方法,我们可以看到下面这段代码,然后它是在initializeBean方法做的,我们也知道BeanPostProcessor的扩展
// Initialize the bean instance.
		Object exposedObject = bean;
		try {
			populateBean(beanName, mbd, instanceWrapper);
			exposedObject = initializeBean(beanName, exposedObject, mbd);
		}
其实它是通过AnnotationAwareAspectJAutoProxyCreator这个处理器来实现的,主要看applyBeanPostProcessorsAfterInitialization方法,然后会通过遍历BeanPostProcessor找到AbstractAutoProxyCreator#postProcessAfterInitialization方法,最后进入wrapIfNecessary方法。
protected Object initializeBean(String beanName, Object bean, @Nullable RootBeanDefinition mbd) {
		invokeAwareMethods(beanName, bean);

		Object wrappedBean = bean;
		if (mbd == null || !mbd.isSynthetic()) {
			wrappedBean = applyBeanPostProcessorsBeforeInitialization(wrappedBean, beanName);
		}

		try {
			invokeInitMethods(beanName, wrappedBean, mbd);
		}
		catch (Throwable ex) {
			throw new BeanCreationException(
					(mbd != null ? mbd.getResourceDescription() : null), beanName, ex.getMessage(), ex);
		}
		if (mbd == null || !mbd.isSynthetic()) {
			wrappedBean = applyBeanPostProcessorsAfterInitialization(wrappedBean, beanName);
		}

		return wrappedBean;
	}
跟进这个方法,我们可以看到通知最后都会被解析放到specificInterceptors中,其中主要逻辑在createProxy中。
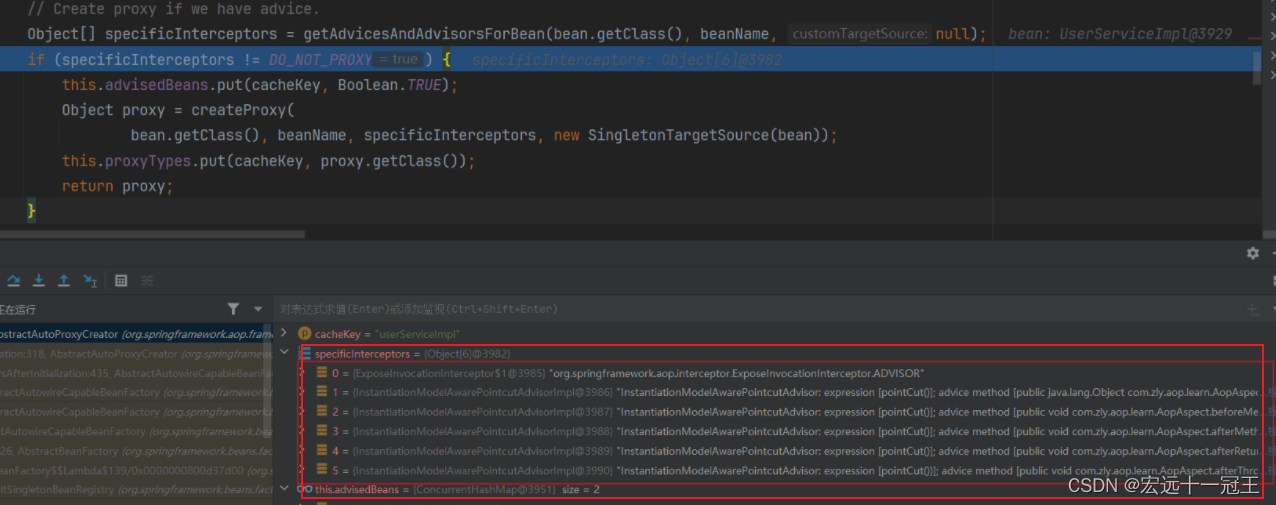
protected Object wrapIfNecessary(Object bean, String beanName, Object cacheKey) {
		if (StringUtils.hasLength(beanName) && this.targetSourcedBeans.contains(beanName)) {
			return bean;
		}
		if (Boolean.FALSE.equals(this.advisedBeans.get(cacheKey))) {
			return bean;
		}
		if (isInfrastructureClass(bean.getClass()) || shouldSkip(bean.getClass(), beanName)) {
			this.advisedBeans.put(cacheKey, Boolean.FALSE);
			return bean;
		}

		// Create proxy if we have advice.
		Object[] specificInterceptors = getAdvicesAndAdvisorsForBean(bean.getClass(), beanName, null);
		if (specificInterceptors != DO_NOT_PROXY) {
			this.advisedBeans.put(cacheKey, Boolean.TRUE);
			Object proxy = createProxy(
					bean.getClass(), beanName, specificInterceptors, new SingletonTargetSource(bean));
			this.proxyTypes.put(cacheKey, proxy.getClass());
			return proxy;
		}

		this.advisedBeans.put(cacheKey, Boolean.FALSE);
		return bean;
	}
然后跟进到AopFactory的创建时,主要是看这段代码,看到这里,相信就能理解为什么说提供了JDK代理和Cglib动态代理了。
public Object getProxy(@Nullable ClassLoader classLoader) {
		return createAopProxy().getProxy(classLoader);
	}
public AopProxy createAopProxy(AdvisedSupport config) throws AopConfigException {
		if (config.isOptimize() || config.isProxyTargetClass() || hasNoUserSuppliedProxyInterfaces(config)) {
			Class<?> targetClass = config.getTargetClass();
			if (targetClass == null) {
				throw new AopConfigException("TargetSource cannot determine target class: " +
						"Either an interface or a target is required for proxy creation.");
			}
			if (targetClass.isInterface() || Proxy.isProxyClass(targetClass) || ClassUtils.isLambdaClass(targetClass)) {
				return new JdkDynamicAopProxy(config);
			}
			return new ObjenesisCglibAopProxy(config);
		}
		else {
			return new JdkDynamicAopProxy(config);
		}
	}
再看getProxy方法,这里JDK动态代理和Cglib动态代理分别是自己实现的形式。
JDK 可以看到是通过Proxy来实现的。
public Object getProxy(@Nullable ClassLoader classLoader) {
		if (logger.isTraceEnabled()) {
			logger.trace("Creating JDK dynamic proxy: " + this.advised.getTargetSource());
		}
		return Proxy.newProxyInstance(classLoader, this.proxiedInterfaces, this);
	}
Cglib
private Object buildProxy(@Nullable ClassLoader classLoader, boolean classOnly) {
		if (logger.isTraceEnabled()) {
			logger.trace("Creating CGLIB proxy: " + this.advised.getTargetSource());
		}

		try {
			Class<?> rootClass = this.advised.getTargetClass();
			Assert.state(rootClass != null, "Target class must be available for creating a CGLIB proxy");

			Class<?> proxySuperClass = rootClass;
			if (rootClass.getName().contains(ClassUtils.CGLIB_CLASS_SEPARATOR)) {
				proxySuperClass = rootClass.getSuperclass();
				Class<?>[] additionalInterfaces = rootClass.getInterfaces();
				for (Class<?> additionalInterface : additionalInterfaces) {
					this.advised.addInterface(additionalInterface);
				}
			}

			// Validate the class, writing log messages as necessary.
			validateClassIfNecessary(proxySuperClass, classLoader);

			// Configure CGLIB Enhancer...
			Enhancer enhancer = createEnhancer();
			if (classLoader != null) {
				enhancer.setClassLoader(classLoader);
				if (classLoader instanceof SmartClassLoader &&
						((SmartClassLoader) classLoader).isClassReloadable(proxySuperClass)) {
					enhancer.setUseCache(false);
				}
			}
			enhancer.setSuperclass(proxySuperClass);
			enhancer.setInterfaces(AopProxyUtils.completeProxiedInterfaces(this.advised));
			enhancer.setNamingPolicy(SpringNamingPolicy.INSTANCE);
			enhancer.setAttemptLoad(true);
			enhancer.setStrategy(new ClassLoaderAwareGeneratorStrategy(classLoader));

			Callback[] callbacks = getCallbacks(rootClass);
			Class<?>[] types = new Class<?>[callbacks.length];
			for (int x = 0; x < types.length; x++) {
				types[x] = callbacks[x].getClass();
			}
			// fixedInterceptorMap only populated at this point, after getCallbacks call above
			enhancer.setCallbackFilter(new ProxyCallbackFilter(
					this.advised.getConfigurationOnlyCopy(), this.fixedInterceptorMap, this.fixedInterceptorOffset));
			enhancer.setCallbackTypes(types);

			// Generate the proxy class and create a proxy instance.
			return (classOnly ? createProxyClass(enhancer) : createProxyClassAndInstance(enhancer, callbacks));
		}
		catch (CodeGenerationException | IllegalArgumentException ex) {
			throw new AopConfigException("Could not generate CGLIB subclass of " + this.advised.getTargetClass() +
					": Common causes of this problem include using a final class or a non-visible class",
					ex);
		}
		catch (Throwable ex) {
			// TargetSource.getTarget() failed
			throw new AopConfigException("Unexpected AOP exception", ex);
		}
	}
当然在Spring中,我们是可以指定使用Cglib动态代理的(通过设置proxyTargetClass),但是JDK动态代理要求代理类是一定要实现接口的,但是为什么呢?我想应该和Java不支持多继承有关,具体还是留给大家自己思考吧。
总结
今天主要分享了Spring中AOP机制的作用原理和具体作用位置,提供了哪些动态代理方式,上面主要是我学习时留下的笔记,如果有哪些流程和写的不清楚,欢迎大致指正。


 117
117

 被折叠的 条评论
为什么被折叠?
被折叠的 条评论
为什么被折叠?
 到【灌水乐园】发言


