


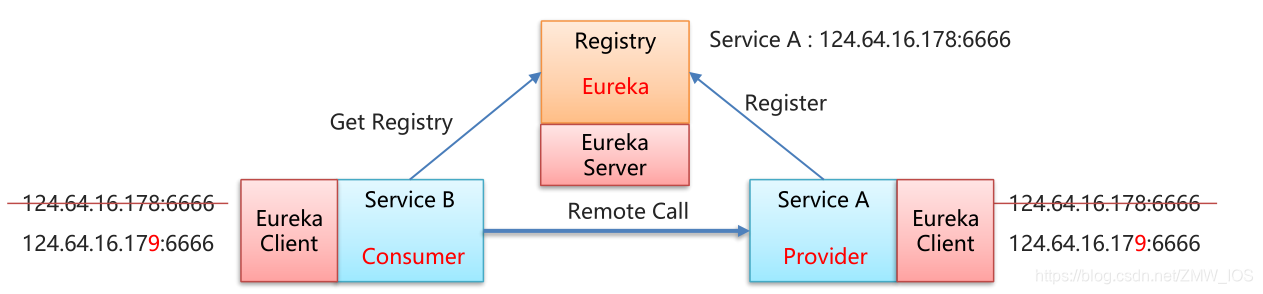
Eureka介绍
Eureka
• Eureka 是 Netflix 公司开源的一个服务注册与发现的组件 。
• Eureka 和其他 Netflix 公司的服务组件(例如负载均衡、熔断器、网关等) 一起,被 Spring Cloud 社区整合为
Spring-Cloud-Netflix 模块。
• Eureka 包含两个组件:Eureka Server (注册中心) 和 Eureka Client (服务提供者、服务消费者)。
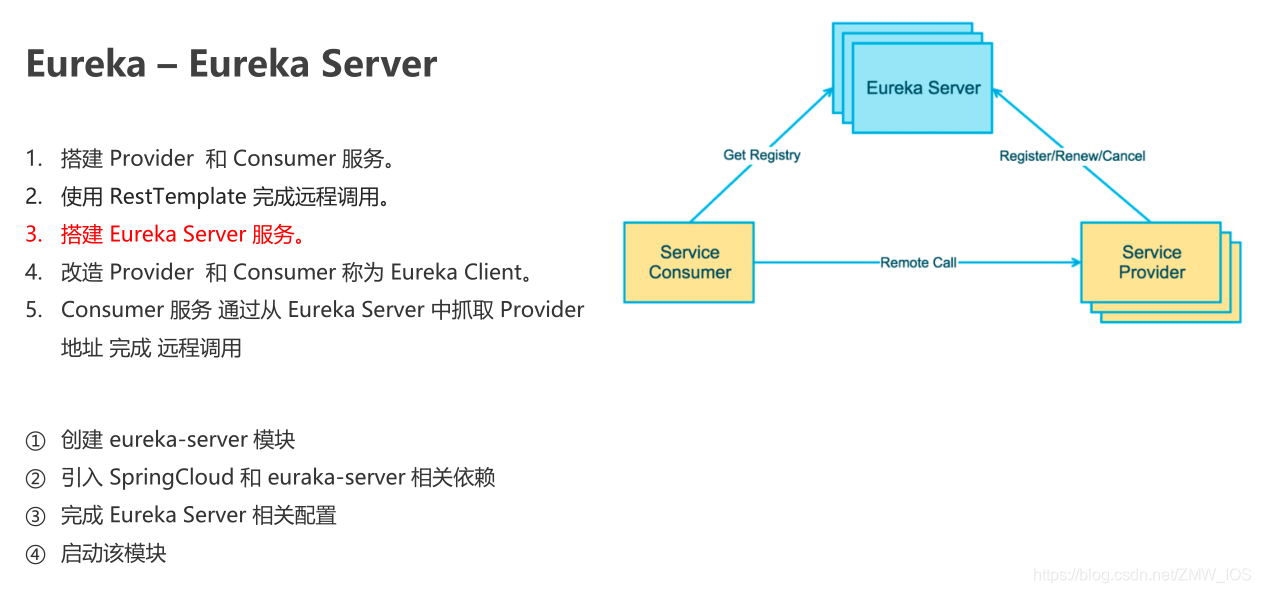
1. Eureka快速入门-环境搭建
1、搭建eureka-provider 提供者
2、搭建eureka-consumer消费者
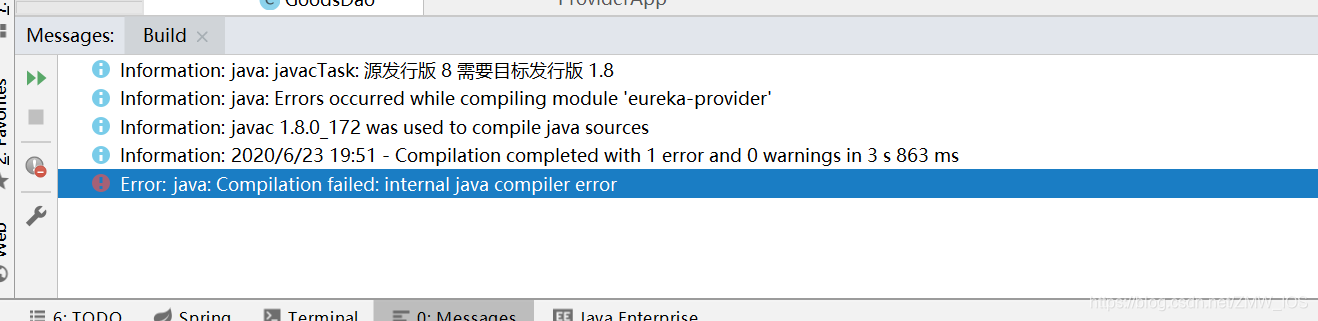
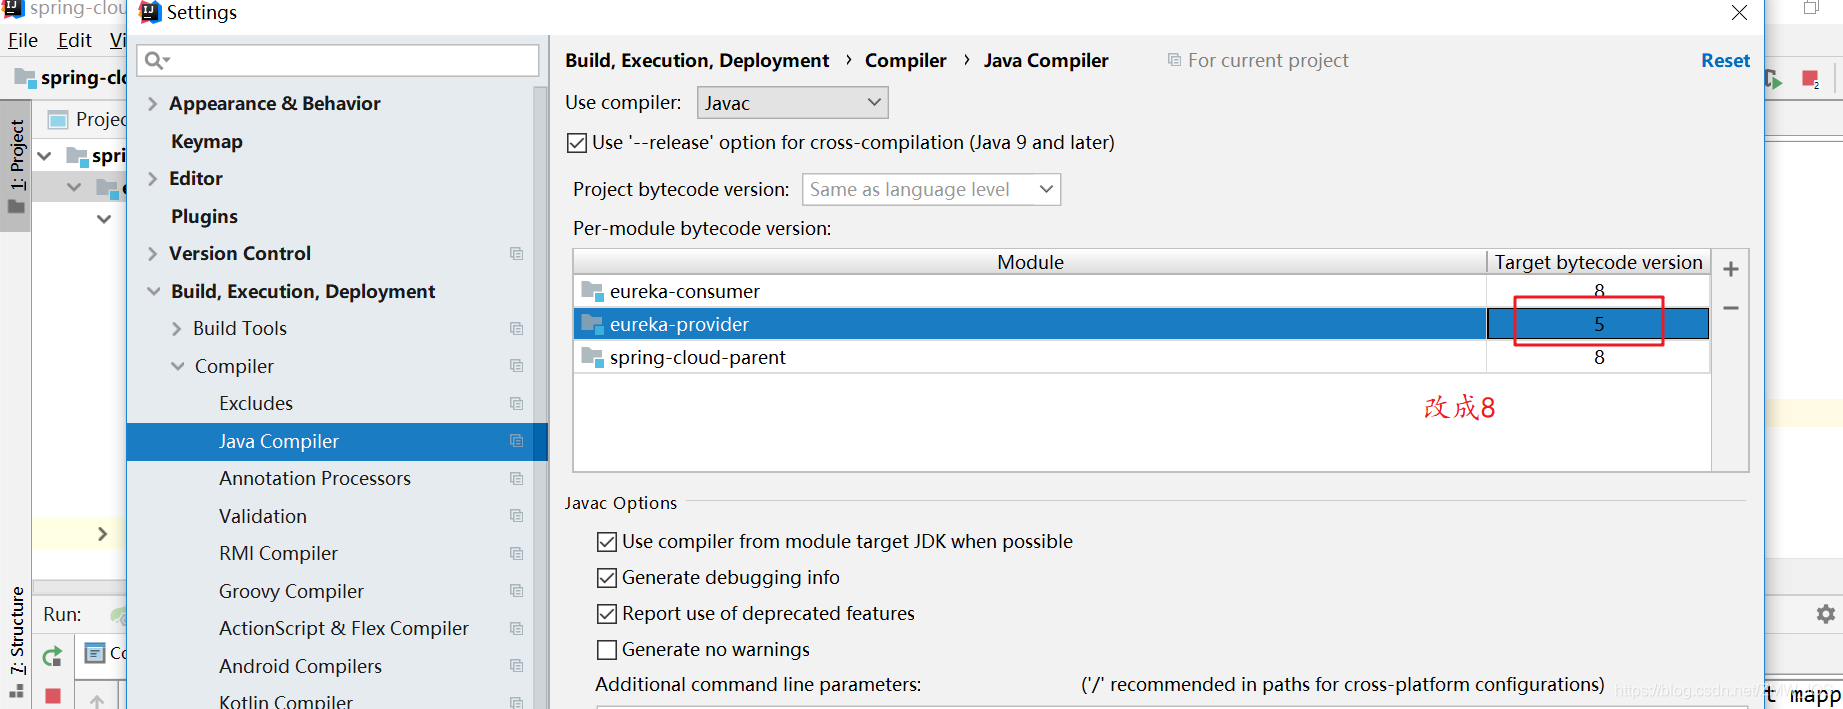
如果导入示例代码启动 报以下错误
2. RestTemplate远程调用
声明redisTemplate bean
@Configuration
public class RestTemplateConfig {
    @Bean
    public RestTemplate restTemplate(){
        return new RestTemplate();
    }
}
注入RestTemplate 完成调用
@RestController
@RequestMapping("/order")
public class OrderController {

    @Autowired
    private RestTemplate restTemplate;

    @GetMapping("/goods/{id}")
    public Goods findGoodsById(@PathVariable("id") int id){
        System.out.println("findGoodsById..."+id);
        String url = "http://localhost:8000/goods/findOne/"+id;
        // 3. 调用方法
        Goods goods = restTemplate.getForObject(url, Goods.class);
        return goods;
    }
}
扩展1、
底层采用JDK原生的URLConnection(默认的),使用okhttp客户端性能会高一点
<dependency>
	<groupId>com.squareup.okhttp3</groupId>
	<artifactId>okhttp</artifactId>
	<version>3.14.2</version>
</dependency>
代码
@Configuration
public class RestTemplateConfig {
    @Bean
    public RestTemplate restTemplate(){
        return new RestTemplate(new OkHttp3ClientHttpRequestFactory());
    }
}
扩展2
RestTemplate其他api用法
被调用方
User
public class User {
    private int id;
    private String username;
    private String password;
    private int age;
    //getter  setter
UserController
package com.ittest.provider.controller;

import com.ittest.provider.domain.User;
import org.springframework.web.bind.annotation.*;

@RestController
@RequestMapping("/")
public class UserController {
    @GetMapping("/user/{id}")
    public User queryById(@PathVariable Long id, String name){
        System.out.println(id+"----"+name);
        User user = new User();
            user.setId(1);
            user.setUsername("zhangsan");
            user.setPassword("123456");
            user.setAge(11);
        return user;
    }
    @PostMapping("/user/add")
    public User add(@RequestBody User user){
        System.out.println(user);
        return user;
    }
    @PostMapping("/user/add2")
    public User add2(User user){
        System.out.println(user);
        return user;
    }
}
调用方
UserRestTemplateTestController
package com.ittest.consumer.controller;

import com.ittest.consumer.domain.User;
import org.springframework.beans.factory.annotation.Autowired;
import org.springframework.http.*;
import org.springframework.util.LinkedMultiValueMap;
import org.springframework.util.MultiValueMap;
import org.springframework.web.bind.annotation.RequestMapping;
import org.springframework.web.bind.annotation.RestController;
import org.springframework.web.client.RestTemplate;

import java.util.HashMap;
import java.util.Map;

@RestController
@RequestMapping("/")
public class UserRestTemplateTestController {

    @Autowired
    RestTemplate restTemplate;


    @RequestMapping("/testGet")
    public void test(){
        String url = "http://localhost:8000/user/1";
        //restTemplate可以对json格式字符串进行反序列化
        User user = restTemplate.getForObject(url, User.class);
        System.out.println("user:"+user);

        ResponseEntity<Map> forEntity = restTemplate.getForEntity(url, Map.class);
        Map map = forEntity.getBody();
        System.out.println("forEntity:"+map);

        ResponseEntity<User> get = restTemplate.exchange(url+"?name=lisi", HttpMethod.GET, null, User.class);
        System.out.println("get exchange:"+ get.getBody());
    }
    //提交json数据
    @RequestMapping("/testPostJsonData")
    public void testPostJsonData(){
        String addUrl = "http://localhost:8000/user/add";

        User user = new User();
        user.setUsername("王五");
        user.setAge(1);
        user.setPassword("wangwu");
        ResponseEntity<Map> postForEntity = restTemplate.postForEntity(addUrl, user, Map.class);
        Map forEntityBody = postForEntity.getBody();
        System.out.println("postForEntity:"+forEntityBody);

        HttpHeaders headers = new HttpHeaders();
        headers.setContentType(MediaType.APPLICATION_JSON_UTF8);
        Map bodyMap = new HashMap();
        bodyMap.put("userName","zhangsan");
        bodyMap.put("password","123456");
        bodyMap.put("name","张三");
        bodyMap.put("age","15");
        HttpEntity<Map> httpEntity = new HttpEntity<Map>(bodyMap, headers);

        ResponseEntity<User> post = restTemplate.exchange(addUrl, HttpMethod.POST, httpEntity, User.class);
        System.out.println("post exchange:"+ post.getBody());
    }
    //提交表单数据
    @RequestMapping("/testPostFormData")
    public void testPostFormData(){
        String addUrl = "http://localhost:8000/user/add2";

        HttpHeaders headers = new HttpHeaders();
        headers.setContentType(MediaType.APPLICATION_FORM_URLENCODED);
        //Map bodyMap = new HashMap();
        //bodyMap.put("userName","zhaoliu");
        //bodyMap.put("password","123456");
        //bodyMap.put("name","赵六");
        //bodyMap.put("age","15");
        //HttpEntity<Map> requestEntity = new HttpEntity<Map>(bodyMap, headers);

        //封装参数,不要替换为Map与HashMap,否则参数无法传递
        MultiValueMap<String, String> params= new LinkedMultiValueMap<String, String>();
        params.add("userName", "zhaoliu");
        params.add("password", "123456");
        params.add("name", "赵六");
        params.add("age", "37");
        HttpEntity<MultiValueMap<String, String>> requestEntity = new HttpEntity<MultiValueMap<String, String>>(params, headers);

        ResponseEntity<User> post = restTemplate.exchange(addUrl, HttpMethod.POST, requestEntity, User.class);
        System.out.println("post exchange:"+ post.getBody());
    }
}
3. Eureka Server 搭建
搭建eureka-server 服务端
①导入eureka服务端起步依赖
spring-cloud-parent的pom
<!--引入Spring Cloud 依赖-->
    <dependencyManagement>
        <dependencies>
            <dependency>
                <groupId>org.springframework.cloud</groupId>
                <artifactId>spring-cloud-dependencies</artifactId>
                <version>${spring-cloud.version}</version>
                <type>pom</type>
                <scope>import</scope>
            </dependency>
        </dependencies>
    </dependencyManagement>
eureka-server的pom
<!-- eureka-server -->
<dependency>
	<groupId>org.springframework.cloud</groupId>
<artifactId>spring-cloud-starter-netflix-eureka-server</artifactId>
</dependency>
②配置eureka相关配置
server:
  port: 8761

eureka:
  instance:
    hostname: localhost # 主机名
  client:
    service-url:
      defaultZone: http://${eureka.instance.hostname}:${server.port}/eureka # eureka服务端地址,将来客户端使用该地址和eureka进行通信
    register-with-eureka: false # 是否将自己的路径 注册到eureka上。eureka server 不需要的,eureka provider client 需要
    fetch-registry: false # 是否需要从eureka中抓取路径。eureka server 不需要的,eureka consumer client 需要
③引导类加@EnableEurekaServer注解
@SpringBootApplication
// 启用EurekaServer
@EnableEurekaServer
public class EurekaApp {

    public static void main(String[] args) {
        SpringApplication.run(EurekaApp.class,args);
    }
}
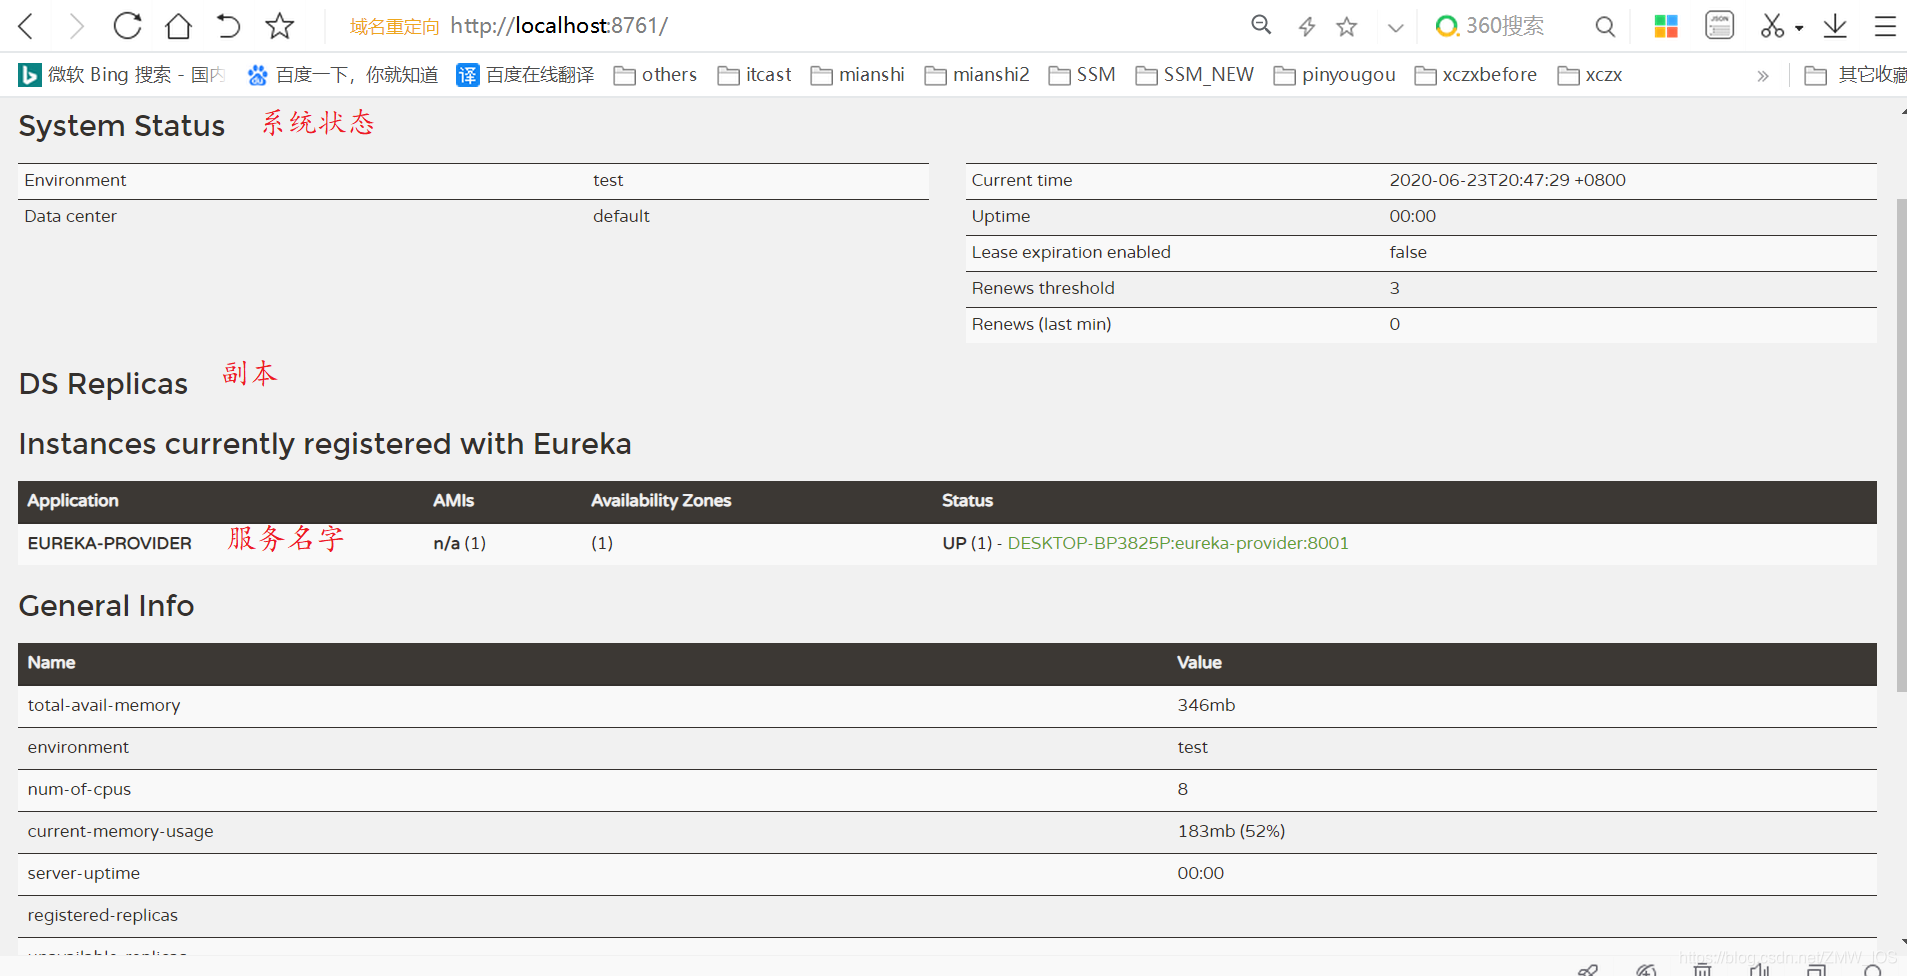
4. Eureka控制台
5. Eureka Client
①导入eureka客户端的起步依赖
<!-- eureka-client -->
<dependency>
	<groupId>org.springframework.cloud</groupId>
	<artifactId>spring-cloud-starter-netflix-eureka-client</artifactId>
</dependency>
②配置eureka相关配置
server:
  port: 8001

eureka:
  instance:
    hostname: localhost # 主机名
  client:
    service-url:
      defaultZone: http://localhost:8761/eureka # eureka服务端地址,将来客户端使用该地址和eureka进行通信
    fetch-registry: true
    register-with-eureka: true
spring:
  application:
    name: eureka-provider # 设置当前应用的名称。将来会在eureka中Application显示。将来需要使用该名称来获取路径
③引导类加@EnableEurekaClient注解
package com.ittest.provider;

import org.springframework.boot.SpringApplication;
import org.springframework.boot.autoconfigure.SpringBootApplication;
import org.springframework.cloud.netflix.eureka.EnableEurekaClient;

@EnableEurekaClient //该注解 在新版本中可以省略
@SpringBootApplication
public class ProviderApp {
    public static void main(String[] args) {
        SpringApplication.run(ProviderApp.class,args);
    }
}
6. 动态获取路径
①导入起步依赖包
<!-- eureka-client -->
<dependency>
	<groupId>org.springframework.cloud</groupId>
	<artifactId>spring-cloud-starter-netflix-eureka-client</artifactId>
</dependency>
②使用DiscoveryClient动态从注册中心获取服务相应实例
package com.ittest.consumer.controller;


import com.ittest.consumer.domain.Goods;
import org.springframework.beans.factory.annotation.Autowired;
import org.springframework.cloud.client.ServiceInstance;
import org.springframework.cloud.client.discovery.DiscoveryClient;
import org.springframework.web.bind.annotation.GetMapping;
import org.springframework.web.bind.annotation.PathVariable;
import org.springframework.web.bind.annotation.RequestMapping;
import org.springframework.web.bind.annotation.RestController;
import org.springframework.web.client.RestTemplate;

import java.util.List;

/**
 * 服务的调用方
 */
@RestController
@RequestMapping("/order")
public class OrderController {

    @Autowired
    private RestTemplate restTemplate;

    @Autowired
    private DiscoveryClient discoveryClient;

    @GetMapping("/goods/{id}")
    public Goods findGoodsById(@PathVariable("id") int id){
        System.out.println("findGoodsById..."+id);


        /*
            //远程调用Goods服务中的findOne接口
            使用RestTemplate
            1. 定义Bean  restTemplate
            2. 注入Bean
            3. 调用方法
         */
        /*
            动态从Eureka Server 中获取 provider 的 ip 和端口
             1. 注入 DiscoveryClient 对象.激活
             2. 调用方法
         */

        //演示discoveryClient 使用
        List<ServiceInstance> instances = discoveryClient.getInstances("EUREKA-PROVIDER");

        //判断集合是否有数据
        if(instances == null || instances.size() == 0){
            //集合没有数据
            return null;
        }

        ServiceInstance instance = instances.get(0);
        String host = instance.getHost();//获取ip
        int port = instance.getPort();//获取端口
        System.out.println(host);
        System.out.println(port);

        String url = "http://"+host+":"+port+"/goods/findOne/"+id;
        // 3. 调用方法
        Goods goods = restTemplate.getForObject(url, Goods.class);

        return goods;
    }
}
③引导类加@EnableDiscoveryClient注解
package com.ittest.consumer;

import org.springframework.boot.SpringApplication;
import org.springframework.boot.autoconfigure.SpringBootApplication;
import org.springframework.cloud.client.discovery.EnableDiscoveryClient;
import org.springframework.cloud.netflix.eureka.EnableEurekaClient;

@EnableDiscoveryClient // 激活DiscoveryClient
@EnableEurekaClient
@SpringBootApplication
public class ConsumerApp {
    public static void main(String[] args) {
        SpringApplication.run(ConsumerApp.class,args);
    }
}
7. Eureka属性-instance相关属性
eureka:
  instance:
    hostname: localhost # 主机名
    prefer-ip-address: true # 将当前实例的ip注册到eureka server 中。默认是false 注册主机名
    ip-address: 127.0.0.1 # 设置当前实例的ip
    instance-id: ${eureka.instance.ip-address}:${spring.application.name}:${server.port} # 设置web控制台显示的 实例id
    lease-renewal-interval-in-seconds: 3 # 每隔3 秒发一次心跳包
    lease-expiration-duration-in-seconds: 9 # 如果9秒没有发心跳包,服务器呀,你把我干掉吧~
  client:
    service-url:
      defaultZone: http://localhost:8761/eureka # eureka服务端地址,将来客户端使用该地址和eureka进行通信
回环ip 和 私有ip
私有IP地址:
	不需要向有关IP管理机构申请,但只能供内网使用,而且同一内网中不能将同一IP分配给不同的主机。不能	用在互联网上的路由。

回环ip:
	127.0.0.1 ---> 127.255.255.254
	网络号全为0表示:该IP是一个保留IP,本网络保留作为本地软件环回测试(loopback test)本主机的进程间的通信之用。若主机发送一个目的地址为环回地址的IP数据报,则本主机中的协议软件就处理该数据报中数据,而不会将数据报发送到任何网络。目的地址为环回地址的IP数据报永远不会出现在任何网络上,因为网络号为127的地址根本不是网络地址。
8. Eureka属性-server相关属性
eureka:
  instance:
    hostname: localhost # 主机名
  client:
    service-url:
      defaultZone: http://${eureka.instance.hostname}:${server.port}/eureka # eureka服务端地址,将来客户端使用该地址和eureka进行通信
    register-with-eureka: false # 是否将自己的路径 注册到eureka上。eureka server 不需要的,eureka provider client 需要
    fetch-registry: false # 是否需要从eureka中抓取路径。eureka server 不需要的,eureka consumer client 需要
  server:
    enable-self-preservation: true # 关闭自我保护机制 true是开启(默认,线上环境) false是关闭(开发环境)
    eviction-interval-timer-in-ms: 3000 # 检查服务的时间间隔
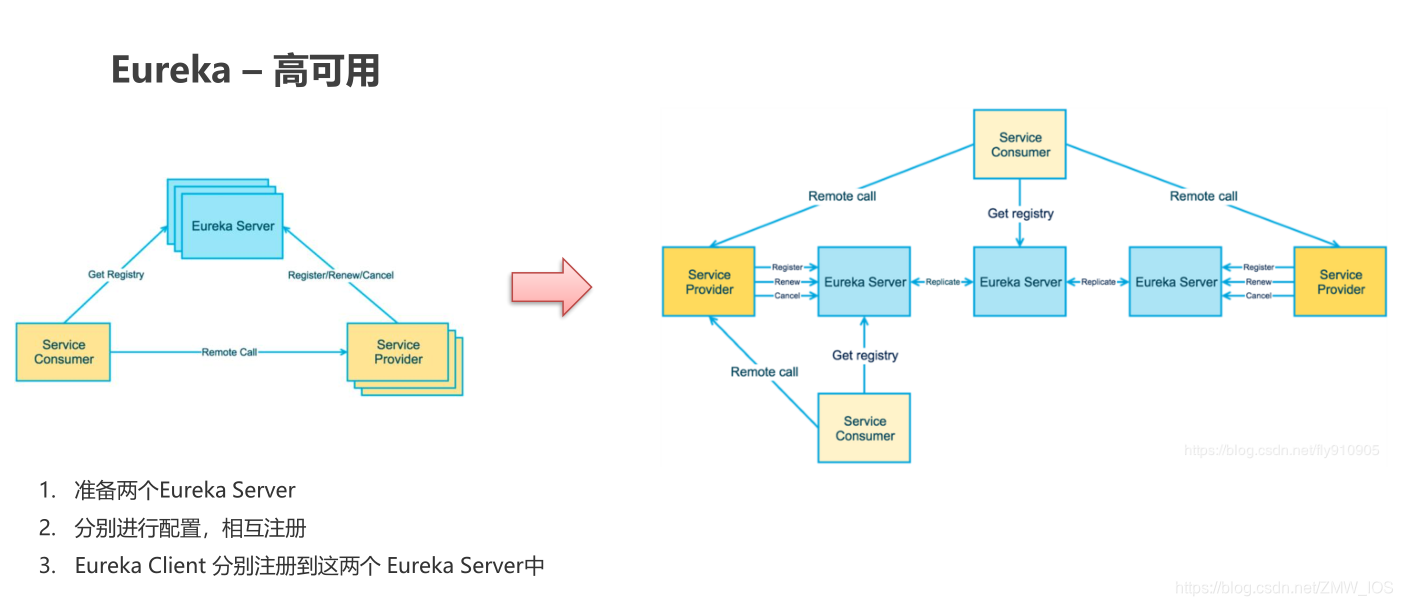
8.Eureka高可用
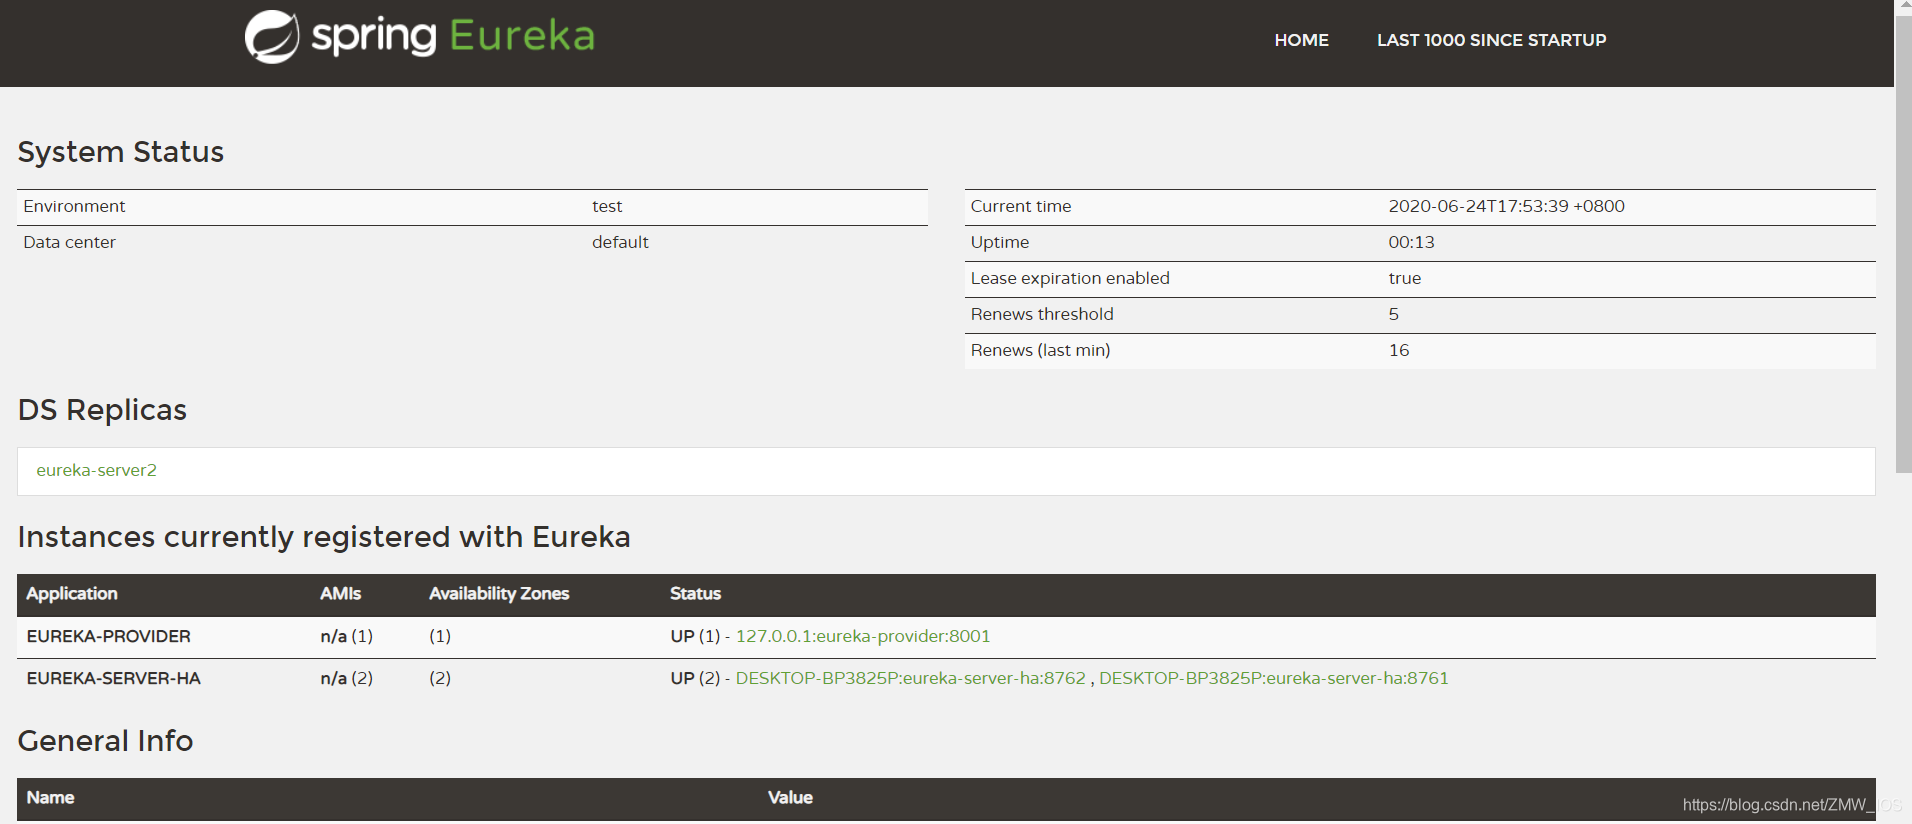
搭建 eureka-server-1 和 eureka-server-2
相互注册
eureka-server-1 application.yml配置文件
server:
  port: 8761

eureka:
  instance:
    hostname: eureka-server1 # 主机名
  client:
    service-url:
      defaultZone: http://eureka-server2:8762/eureka
    register-with-eureka: true # 是否将自己的路径 注册到eureka上。eureka server 不需要的,eureka provider client 需要
    fetch-registry: true # 是否需要从eureka中抓取路径。eureka server 不需要的,eureka consumer client 需要

spring:
  application:
    name: eureka-server-ha
eureka-server-2 application.yml配置文件
server:
  port: 8762

eureka:
  instance:
    hostname: eureka-server2 # 主机名
  client:
    service-url:
      defaultZone: http://eureka-server1:8761/eureka

    register-with-eureka: true # 是否将自己的路径 注册到eureka上。eureka server 不需要的,eureka provider client 需要
    fetch-registry: true # 是否需要从eureka中抓取路径。eureka server 不需要的,eureka consumer client 需要
spring:
  application:
    name: eureka-server-ha
配置hosts文件

9. Eureka高可用-客户端测试
server:
  port: 8001

eureka:
  instance:
    hostname: localhost # 主机名
    prefer-ip-address: true # 将当前实例的ip注册到eureka server 中。默认是false 注册主机名
    ip-address: 127.0.0.1 # 设置当前实例的ip
    instance-id: ${eureka.instance.ip-address}:${spring.application.name}:${server.port} # 设置web控制台显示的 实例id
    lease-renewal-interval-in-seconds: 3 # 每隔3 秒发一次心跳包
    lease-expiration-duration-in-seconds: 9 # 如果9秒没有发心跳包,服务器呀,你把我干掉吧~
  client:
    service-url:
      defaultZone: http://eureka-server1:8761/eureka,http://eureka-server2:8762/eureka # eureka服务端地址,将来客户端使用该地址和eureka进行通信
spring:
  application:
    name: eureka-provider # 设置当前应用的名称。将来会在eureka中Application显示。将来需要使用该名称来获取路径


 1万+
1万+


 被折叠的 条评论
为什么被折叠?
被折叠的 条评论
为什么被折叠?
 到【灌水乐园】发言


