EditText简介:
ED(EditText的简称)在开发中也是经常使用到的一个控件, 也是一个比较重要的组件,可以说它是用户跟应用进行数据传输的窗口,比如实现一个登陆界面, 需要用户输入账号和密码,然后我们开发者获取到用户输入的内容,提交给服务区进行判断再做相应的处理。
EditText 支持的XML 属性及相关方法:
setText(CharSequence text) 设置文本内容

setTextColor(int color) 设置字体颜色值

setHint(int resid) 内容为空时候显示的文本

void setHintTextColor(int color) 内容为空时候显示的文本颜色值

setInputType(int type)      限制输入类型
number:整数类型
numberDecimal:小数点类型
date:日期类型
text:文本类型(默认值)
phone:拨号键盘
textPassword:密码
textVisiblePassword:可见密码
textUri:网址

setMaxLines(int maxlines) 设置文本的最小行数

setGravity(int gravity) 设置文本位置,如设置成“center”,文本将居中显示。

setLines(int lines) 设置文本的行数,设置两行就显示两行,即使第二行没有数据。

setSingleLine()     true:单行显示 false:可以多行
EditText 示例: 开发中常用的登陆界面
首先我们来看布局文件:activity_main.xml
<?xml version="1.0" encoding="utf-8"?>
<LinearLayout xmlns:android="http://schemas.android.com/apk/res/android"
    android:layout_width="match_parent"
    android:layout_height="match_parent"
    android:orientation="vertical">

    <EditText
        android:id="@+id/et_phone"
        android:layout_width="match_parent"
        android:layout_height="wrap_content"
        android:layout_marginLeft="20dp"
        android:layout_marginRight="20dp"
        android:background="@null"
        android:inputType="number"
        android:maxLength="11"
        android:hint="请输入手机号"
        android:drawablePadding="10dp"
        android:padding="10dp"
        android:drawableLeft="@mipmap/icon_phone"
        android:drawableBottom="@drawable/shape_et_bottom_line"
        android:layout_marginTop="20dp"/>

    <EditText
        android:id="@+id/et_password"
        android:layout_width="match_parent"
        android:layout_height="wrap_content"
        android:layout_marginLeft="20dp"
        android:layout_marginRight="20dp"
        android:layout_marginTop="10dp"
        android:background="@null"
        android:inputType="textPassword"
        android:maxLength="16"
        android:padding="10dp"
        android:drawablePadding="10dp"
        android:hint="请输入密码"
        android:drawableBottom="@drawable/shape_et_bottom_line"
        android:drawableLeft="@mipmap/icon_password"/>

    <TextView
        android:id="@+id/tv_login"
        style="@style/Widget.AppCompat.Button.Colored"
        android:layout_width="match_parent"
        android:layout_height="50dp"
        android:layout_marginLeft="10dp"
        android:layout_marginRight="10dp"
        android:layout_marginTop="30dp"
        android:text="登 录"
        android:textColor="#ffffffff"
        android:textSize="18sp" />
</LinearLayout>
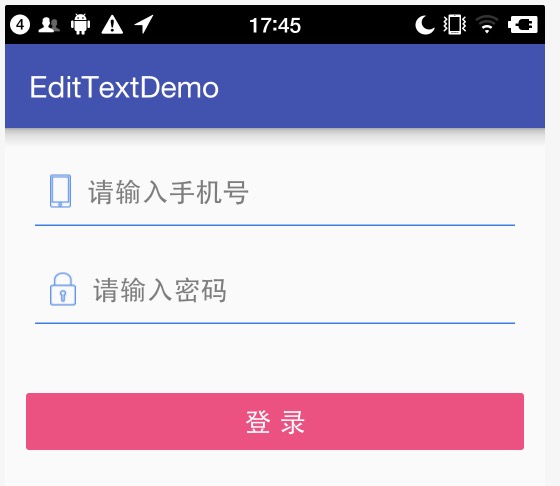
运行效果图如下:
这两个输入框的用的的大部分属性都在上面的表格中了,我这里解决下没有说过的属性。
android:background=”@null” 输入框无背景
android:drawableBottom=”@drawable/shape_et_bottom_line” 底部引入一个shape布局文件,这个布局文件就是输入框的下划线。
shape_et_bottom_line.xml内容如下:
<shape xmlns:android="http://schemas.android.com/apk/res/android"
    android:shape="rectangle" >

    <solid android:color="#1E7EE3" />
    <size android:height="1dp" android:width="500dp"/>

</shape>
EditeText还有哪些功能?
监听用户输入的内容.
有这样一个场景,一个搜索框,只要用户输入了内容就去请求服务器,于是我们在Activity里面监听EditeText文本改变事件。
EditText etOne= (EditText) findViewById(R.id.et_phone);
etOne.addTextChangedListener(new TextWatcher() {
            @Override
            public void beforeTextChanged(CharSequence s, int start, int count, int after) {
                Log.i("Ansen","内容改变之前调用:"+s);
            }

            @Override
            public void onTextChanged(CharSequence s, int start, int before, int count) {
                Log.i("Ansen","内容改变,可以去告诉服务器:"+s);
            }

            @Override
            public void afterTextChanged(Editable s) {
                Log.i("Ansen","内容改变之后调用:"+s);
            }


 1216
1216

 被折叠的 条评论
为什么被折叠?


