


快照就是将当时的系统信息记录下来,就好像照相记录一般! 未来若有任何资料更动了,则原始资料会被搬移到快照区,没有被更动的区域则由快照区与文件系统共享。 用讲的好像很难懂,我们用图解说明一下好了:

左图为最初建置系统快照区的状况,LVM 会预留一个区域 (左图的左侧三个 PE 区块) 作为数据存放处。 此时快照区内并没有仸何数据,而快照区与系统区共享所有的 PE 数据, 因此你会看到快照区的内容与文件系统是一模一样的。 等到系统运作一阵子后,假设 A 区域的数据被更动了 (上面右图所示),则更动前系统会将该区域的数据移动到忚照区, 所以在右图的快照区被占用了一块 PE 成为 A,而其他 B 到 I 的区块则还是与文件系统共享!
照这样的情况杢看,LVM 的系统快照是非常棒的『备份工具』,因为他只有备份有被更动到的数据, 文件系统内没有被变更的数据依旧保持在原本的区块内,但是 LVM 快照功能会知道那些数据放置在哪里, 因此『快照』当时的文件系统就得以『备份』下来,并且快照所占用的容量又非常小!所以您说,这不是很棒的工具又是什么?
那么快照区要如何建立不使用呢?首先,由于快照区与原本的 LV 共享很多 PE 区块,因此快照区与被快照的 LV 必项要在同一个 VG 上头。
快照区的建立
#1.先查看VG还剩下多少容量 [root@linux ~]# vgdisplay --- Volume group --- VG Name ingvg System ID Format lvm2 Metadata Areas 4 Metadata Sequence No 9 VG Access read/write VG Status resizable MAX LV 0 Cur LV 1 Open LV 1 Max PV 0 Cur PV 4 Act PV 4 VG Size 31.94 GB PE Size 16.00 MB Total PE 2044 Alloc PE / Size 2044 / 31.94 GB Free PE / Size 0 / 0 --没有多余的PE可以用。 VG UUID NOdo5r-CHA0-W9D8-wBRj-ydV0-3UGm-XJx0vI #2.增加VG [root@linux ~]# pvcreate /dev/sdf Physical volume "/dev/sdf" successfully created [root@linux ~]# vgextend ingvg /dev/sdf /dev/cdrom: open failed: 只读文件系统 Attempt to close device '/dev/cdrom' which is not open. Volume group "ingvg" successfully extended [root@linux ~]# vgdisplay --- Volume group --- VG Name ingvg System ID Format lvm2 Metadata Areas 5 Metadata Sequence No 10 VG Access read/write VG Status resizable MAX LV 0 Cur LV 1 Open LV 1 Max PV 0 Cur PV 5 Act PV 5 VG Size 39.92 GB PE Size 16.00 MB Total PE 2555 Alloc PE / Size 2044 / 31.94 GB Free PE / Size 511 / 7.98 GB --多出了511个PE。 VG UUID NOdo5r-CHA0-W9D8-wBRj-ydV0-3UGm-XJx0vI #3.新建快照区。 [root@linux ~]# lvcreate -l 250 -s -n ingss /dev/ingvg/inglv Logical volume "ingss" created # 上述的指令中最重要的是那个 -s 的选顷!代表是 snapshot 快照功能之意! # -n 后面接快照区的装置名称, /dev/.... 则是要被快照的 LV 完整檔名。 # -l 后面则是接使用多少个 PE 来作为这个快照区使用。 [root@linux ~]# lvdisplay --- Logical volume --- LV Name /dev/ingvg/inglv VG Name ingvg LV UUID 4KbMKd-AJkf-z0fi-KtWP-zT5C-qirS-IkVFDv LV Write Access read/write LV snapshot status source of /dev/ingvg/ingss [active] LV Status available # open 1 LV Size 31.94 GB Current LE 2044 Segments 4 Allocation inherit Read ahead sectors auto - currently set to 256 Block device 253:1 --- Logical volume --- LV Name /dev/ingvg/ingss VG Name ingvg LV UUID jdBXbr-A9h8-00U8-oEhi-vC9n-MfRX-mY57ON LV Write Access read/write LV snapshot status active destination for /dev/ingvg/inglv LV Status available # open 0 LV Size 31.94 GB --被快照的原LV磁盘容量 Current LE 2044 COW-table size 3.91 GB --快照区的实际容量 COW-table LE 250 --快照区占用的PE数量 Allocated to snapshot 0.00% Snapshot chunk size 4.00 KB Segments 1 Allocation inherit Read ahead sectors auto - currently set to 256 Block device 253:0 #/dev/ingvg/ingss快照被建立起来了,他的容量与VG相同。 #4.挂载/dev/ingvg/ingss [root@linux mnt]# mkdir /mnt/snapshot [root@linux mnt]# mount /dev/ingvg/ingss /mnt/snapshot/ [root@linux mnt]# df 文件系统 1K-块 已用 可用 已用% 挂载点 /dev/sda3 5991232 2656912 3025072 47% / /dev/sda1 101086 11373 84494 12% /boot tmpfs 517548 0 517548 0% /dev/shm /dev/mapper/ingvg-inglv 32172936 180292 30685204 1% /mnt/lvm /dev/mapper/ingvg-ingss 32172936 180292 30685204 1% /mnt/snapshot [root@linux snapshot]# ll 总计 40 drwxr-xr-x 101 root root 12288 02-17 20:36 etc drwxr-xr-x 16 root root 4096 02-17 18:09 log drwx------ 2 root root 16384 02-17 00:38 lost+found #注意etc和log是/dev/ingvg/inglv里面的内容。[root@linux mnt]# umount /mnt/snapshot/
利用快照区复原系统
为什么要备份呢?为什么不可以直接格式化 /dev/ingvg/inglv 然后将 /dev/ingvg/ingss 直接复制给 inglv 呢? 要知道 ingss 其实是 inglv 的快照,因此如果你格式化整个 inglv 时,原本的文件系统所有数据都会被搬移到 ingss。 那如果 ingss 的容量不够大 (通常也真的不够大),那么部分数据将无法复制到 ingss 内,数据当然无法全部还原啊! 所以才要在上面表格中制作出一个备份文件的!了解乎?接下来让我们准备还原 inglv 的内容吧!#1.先将原本的 /dev/ingvg/inglv 内容作些变更,增增减减一些目录吧! [root@linux mnt]# cd /mnt/lvm/ [root@linux lvm]# ll 总计 40 drwxr-xr-x 101 root root 12288 02-17 20:36 etc drwxr-xr-x 16 root root 4096 02-17 18:09 log drwx------ 2 root root 16384 02-17 00:38 lost+found [root@linux lvm]# rm -rf /mnt/lvm/log/ [root@linux lvm]# cp -a /boot/ /lib/ /sbin/ . [root@linux lvm]# ll 总计 64 drwxr-xr-x 4 root root 4096 02-15 23:55 boot drwxr-xr-x 101 root root 12288 02-17 20:36 etc drwxr-xr-x 13 root root 4096 02-16 18:24 lib drwx------ 2 root root 16384 02-17 00:38 lost+found drwxr-xr-x 2 root root 12288 02-16 18:24 sbin [root@linux lvm]# lvdisplay /dev/ingvg/ingss --- Logical volume --- LV Name /dev/ingvg/ingss VG Name ingvg LV UUID HnpL5n-3mEu-afIq-jCCL-62ss-ElDy-N90beh LV Write Access read/write LV snapshot status active destination for /dev/ingvg/inglv LV Status available # open 0 LV Size 31.94 GB Current LE 2044 COW-table size 3.91 GB COW-table LE 250 Allocated to snapshot 2.85% --从这里可以看出快照区已经被使用了。 Snapshot chunk size 4.00 KB Segments 1 Allocation inherit Read ahead sectors auto - currently set to 256 Block device 253:0 #2.利用快照区将原本的文件系统备份。 [root@linux ~]# mount /dev/ingvg/ingss /mnt/snapshot [root@linux ~]# cd /mnt/snapshot [root@linux snapshot]# ll 总计 40 drwxr-xr-x 101 root root 12288 02-17 20:36 etc drwxr-xr-x 16 root root 4096 02-17 18:09 log drwx------ 2 root root 16384 02-17 00:38 lost+found [root@linux snapshot]# df 文件系统 1K-块 已用 可用 已用% 挂载点 /dev/sda3 5991232 2664400 3017584 47% / /dev/sda1 101086 11373 84494 12% /boot tmpfs 517548 0 517548 0% /dev/shm /dev/mapper/ingvg-inglv 32172936 395048 30470448 2% /mnt/lvm /dev/mapper/ingvg-ingss 32172936 284352 30581144 1% /mnt/snapshot # 看吧!两者确实不一样了!开始将快照区内容复制出来吧! [root@linux snapshot]# mkdir /mnt/backups [root@linux snapshot]# tar -jcv -f /mnt/backups/lvm.tar.bz2 * # 此时你就会有一个备份资料,亦即是 /backups/lvm.tar.bz2 了!换个角度来想想,我们将原本的 inglv 当作备份数据,然后将 ingss 当作实际在运作中的数据, 任何测试的动作都在 ingss 这个快照区当中测试,那么当测试完毕要将测试的数据删除时,只要将快照区除去即可! 而要复制一个 inglv 的系统,再作另外一个快照区即可!这样是否非常方便啊? 这对于教学环境中每年都要帮学生制作一个练习环境主机的测试,非常有帮助呢!# 3. 将 ingss 卸除并移除 (因为里面的内容已经备份起来了) [root@linux ~]# umount /mnt/snapshot [root@linux ~]# lvremove /dev/ingvg/ingss Do you really want to remove active logical volume "vbirdss"? [y/n]: y Logical volume "vbirdss" successfully removed [root@linux ~]# umount /mnt/lvm [root@linux ~]# mkfs -t ext3 /dev/ingvg/inglv [root@linux ~]# mount /dev/ingvg/inglv /mnt/lvm [root@linux ~]# tar -jxv -f /mnt/backups/lvm.tar.bz2 -C /mnt/lvm [root@linux ~]# ll /mnt/lvm drwxr-xr-x 105 root root 12288 Mar 11 16:59 etc drwxr-xr-x 17 root root 4096 Mar 11 14:17 log drwx------ 2 root root 16384 Mar 11 16:59 lost+found # 是否与最初的内容相同啊!这就是透过快照杢还原的一个简单的方法啰!
#1.新建一个大一些的快照 [root@linux lvm]# df 文件系统 1K-块 已用 可用 已用% 挂载点 /dev/sda3 5991232 2664408 3017576 47% / /dev/sda1 101086 11373 84494 12% /boot tmpfs 517548 0 517548 0% /dev/shm /dev/mapper/ingvg-inglv 32963440 284052 31004944 1% /mnt/lvm [root@linux lvm]# lvdisplay --- Logical volume --- LV Name /dev/ingvg/inglv VG Name ingvg LV UUID 4KbMKd-AJkf-z0fi-KtWP-zT5C-qirS-IkVFDv LV Write Access read/write LV Status available # open 1 LV Size 31.94 GB Current LE 2044 Segments 4 Allocation inherit Read ahead sectors auto - currently set to 256 Block device 253:1 [root@linux lvm]# vgdisplay --- Volume group --- VG Name ingvg System ID Format lvm2 Metadata Areas 5 Metadata Sequence No 16 VG Access read/write VG Status resizable MAX LV 0 Cur LV 1 Open LV 1 Max PV 0 Cur PV 5 Act PV 5 VG Size 39.92 GB PE Size 16.00 MB Total PE 2555 Alloc PE / Size 2044 / 31.94 GB Free PE / Size 511 / 7.98 GB VG UUID NOdo5r-CHA0-W9D8-wBRj-ydV0-3UGm-XJx0vI [root@linux lvm]# lvcreate -s -l 511 -n ingss /dev/ingvg/inglv Logical volume "ingss" created [root@linux lvm]# vgdisplay --- Volume group --- VG Name ingvg System ID Format lvm2 Metadata Areas 5 Metadata Sequence No 18 VG Access read/write VG Status resizable MAX LV 0 Cur LV 2 Open LV 1 Max PV 0 Cur PV 5 Act PV 5 VG Size 39.92 GB PE Size 16.00 MB Total PE 2555 Alloc PE / Size 2555 / 39.92 GB Free PE / Size 0 / 0 VG UUID NOdo5r-CHA0-W9D8-wBRj-ydV0-3UGm-XJx0vI [root@linux lvm]# lvdisplay --- Logical volume --- LV Name /dev/ingvg/inglv VG Name ingvg LV UUID 4KbMKd-AJkf-z0fi-KtWP-zT5C-qirS-IkVFDv LV Write Access read/write LV snapshot status source of /dev/ingvg/ingss [active] LV Status available # open 1 LV Size 31.94 GB Current LE 2044 Segments 4 Allocation inherit Read ahead sectors auto - currently set to 256 Block device 253:1 --- Logical volume --- LV Name /dev/ingvg/ingss VG Name ingvg LV UUID oIDgZj-TkjC-wb9e-N93F-6n0m-KivT-pHECUp LV Write Access read/write LV snapshot status active destination for /dev/ingvg/inglv LV Status available # open 0 LV Size 31.94 GB Current LE 2044 COW-table size 7.98 GB COW-table LE 511 Allocated to snapshot 0.00% Snapshot chunk size 4.00 KB Segments 1 Allocation inherit Read ahead sectors auto - currently set to 256 Block device 253:0 #2.隐藏inglv 挂载ingss [root@linux ~]# umount /mnt/lvm/ [root@linux ~]# mount /dev/ingvg/ingss /mnt/snapshot/ [root@linux ~]# df 文件系统 1K-块 已用 可用 已用% 挂载点 /dev/sda3 5991232 2664412 3017572 47% / /dev/sda1 101086 11373 84494 12% /boot tmpfs 517548 0 517548 0% /dev/shm /dev/mapper/ingvg-ingss 32963440 284052 31004944 1% /mnt/snapshot #3.开始恶搞 [root@linux mnt]# cd /mnt/snapshot/ [root@linux snapshot]# ll 总计 32 drwxr-xr-x 101 root root 12288 02-17 20:36 etc drwxr-xr-x 16 root root 4096 02-17 18:09 log drwx------ 2 root root 16384 02-17 00:38 lost+found [root@linux snapshot]# rm -rf etc/ log/ [root@linux snapshot]# ll 总计 16 drwx------ 2 root root 16384 02-17 00:38 lost+found #4.还原本快照区 [root@linux ~]# umount /mnt/snapshot/ [root@linux ~]# lvremove /dev/ingvg/ingss Do you really want to remove active logical volume ingss? [y/n]: y Logical volume "ingss" successfully removed [root@linux ~]# lvcreate -s -l 511 -n ingss /dev/ingvg/inglv Logical volume "ingss" created [root@linux ~]# mount /dev/ingvg/ingss /mnt/snapshot/ [root@linux ~]# ll /mnt/snapshot/ 总计 32 drwxr-xr-x 101 root root 12288 02-17 20:36 etc drwxr-xr-x 16 root root 4096 02-17 18:09 log drwx------ 2 root root 16384 02-17 00:38 lost+found
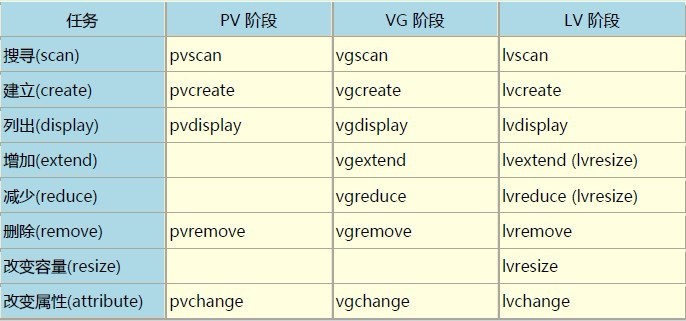
LVM 相关指令汇整与 LVM 的关闭
1. 先卸除系统上面的 LVM 文件系统 (包括快照与所有 LV);
2. 使用 lvremove 移除 LV ;
3. 使用 vgchange -a n VGname 让 VGname 这个 VG 不具有 Active 的标志;
4. 使用 vgremove 移除 VG:
5. 使用 pvremove 移除 PV;
6. 最后,使用 fdisk 修改 ID 回来啊!
[root@linux ~]# umount /mnt/lvm/ [root@linux ~]# umount /mnt/snapshot/ [root@linux ~]# lvremove /dev/ingvg/ingss Do you really want to remove active logical volume ingss? [y/n]: y Logical volume "ingss" successfully removed [root@linux ~]# lvremove /dev/ingvg/inglv /dev/cdrom: open failed: 只读文件系统 Attempt to close device '/dev/cdrom' which is not open. Do you really want to remove active logical volume inglv? [y/n]: y Logical volume "inglv" successfully removed [root@linux ~]# vgchange -a n ingvg /dev/cdrom: read failed after 0 of 2048 at 0: 输入/输出错误 /dev/cdrom: read failed after 0 of 2048 at 4294836224: 输入/输出错误 /dev/cdrom: read failed after 0 of 2048 at 4294955008: 输入/输出错误 /dev/cdrom: read failed after 0 of 2048 at 0: 输入/输出错误 /dev/cdrom: read failed after 0 of 2048 at 4096: 输入/输出错误 /dev/cdrom: read failed after 0 of 2048 at 0: 输入/输出错误 0 logical volume(s) in volume group "ingvg" now active [root@linux ~]# vgremove ingvg /dev/cdrom: open failed: 只读文件系统 Volume group "ingvg" successfully removed [root@linux ~]# pvremove /dev/sdb1 /dev/sdc1 /dev/sdd1 /dev/sde1 /dev/sdf /dev/cdrom: open failed: 只读文件系统 Attempt to close device '/dev/cdrom' which is not open. Labels on physical volume "/dev/sdb1" successfully wiped /dev/cdrom: open failed: 只读文件系统 Attempt to close device '/dev/cdrom' which is not open. Labels on physical volume "/dev/sdc1" successfully wiped /dev/cdrom: open failed: 只读文件系统 Attempt to close device '/dev/cdrom' which is not open. Labels on physical volume "/dev/sdd1" successfully wiped /dev/cdrom: open failed: 只读文件系统 Attempt to close device '/dev/cdrom' which is not open. Labels on physical volume "/dev/sde1" successfully wiped /dev/cdrom: open failed: 只读文件系统 Attempt to close device '/dev/cdrom' which is not open. Labels on physical volume "/dev/sdf" successfully wiped [root@linux ~]# pvscan /dev/cdrom: open failed: 只读文件系统 Attempt to close device '/dev/cdrom' which is not open. No matching physical volumes found [root@linux ~]# pvdisplay [root@linux ~]# vgscan Reading all physical volumes. This may take a while... /dev/cdrom: open failed: 只读文件系统 Attempt to close device '/dev/cdrom' which is not open. [root@linux ~]# vgdisplay [root@linux ~]# lvscan [root@linux ~]# lvdisplay


 558
558


 被折叠的 条评论
为什么被折叠?
被折叠的 条评论
为什么被折叠?
 到【灌水乐园】发言


