


什么是OAuth2.0?解决了什么问题?
有关 OAuth2.0 的设计思想网上教程较多,此处不再重复赘述,详细可参考博客:OAuth 2.0 的一个简单解释 - 阮一峰的网络日志 (ruanyifeng.com)
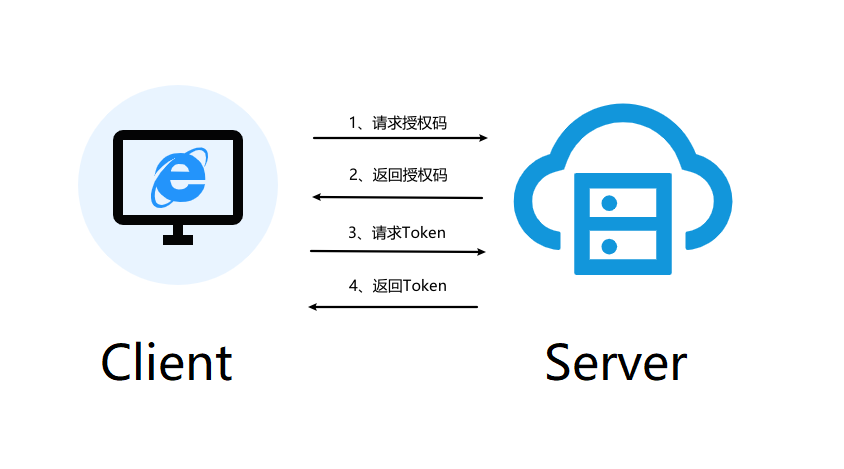
四种模式:
- 授权码(Authorization Code):OAuth2.0 标准授权步骤,Server 端向 Client 端下放
Code码,Client 端再用Code码换取授权Access-Token。 - 隐藏式(Implicit):无法使用授权码模式时的备用选择,Server 端使用 URL 重定向方式直接将
Access-Token下放到 Client 端页面。 - 密码式(Password):Client 端直接拿着用户的账号密码换取授权
Access-Token。 - 客户端凭证(Client Credentials):Server 端针对 Client 级别的 Token,代表应用自身的资源授权。
OAuth2.0第三方登录:
导入依赖:
 <!-- https://mvnrepository.com/artifact/cn.hutool/hutool-http -->
        <dependency>
            <groupId>cn.hutool</groupId>
            <artifactId>hutool-http</artifactId>
            <version>5.8.32</version>
        </dependency>
在发送请求的时候通过hutool里的httprequest来获取accesstoken,还有解析json字符串
hutool的参考连接:Hutool常用工具类_hutool工具包-CSDN博客
授权码模式:
package com.example.demo.controller;


import cn.dev33.satoken.stp.SaTokenInfo;
import cn.dev33.satoken.stp.StpUtil;
import cn.hutool.http.HttpRequest;
import cn.hutool.json.JSONObject;
import cn.hutool.json.JSONUtil;
import com.example.demo.mapper.GiteeUserMapper;
import com.example.demo.pojo.vo.Result;
import com.example.demo.service.GiteeUserService;
import com.example.demo.service.UserService;
import com.example.demo.service.impl.GiteeUserServiceImpl;
import lombok.extern.slf4j.Slf4j;
import org.springframework.beans.factory.annotation.Autowired;
import org.springframework.stereotype.Controller;
import org.springframework.web.bind.annotation.GetMapping;
import org.springframework.web.bind.annotation.RequestParam;
import org.springframework.web.bind.annotation.ResponseBody;
import java.net.URLEncoder;
import java.util.HashMap;
import java.util.Map;
import java.util.Optional;


/**
 * gitee 登陆测试
 */
@Slf4j
@Controller
public class OAuthController {

    private static final String CLIENT_ID = "你的clientid";
    private static final String CLIENT_SECRET = "你的clientscrete";
    private static final String CALLBACK_URI = "http://localhost:8080/callback";
    private static final String AUTHORIZE_URL = "https://gitee.com/oauth/authorize";
    private static final String TOKEN_URL = "https://gitee.com/oauth/token";

    private static final String GET_USER_INFO_URL = "https://gitee.com/api/v5/user";


    @Autowired
    private GiteeUserService giteeUserService;

    @Autowired
    private UserService userService;

    /**
     * gitee 请求授权页面
     */
    @GetMapping(value = "/gitee/auth")
    public String qqAuth() {

        // Step1:获取Authorization Code
        StringBuilder urlBuilder = new StringBuilder(AUTHORIZE_URL);
        urlBuilder.append("?response_type=code")
                .append("&client_id=").append(CLIENT_ID)
                .append("&redirect_uri=").append(URLEncoder.encode(CALLBACK_URI))
                .append("&scope=user_info");

        //重定向
        return "redirect:" + urlBuilder.toString();
    }

    /**
     * 授权回调,程序会自动调用,不是人来访问的
     */
    @GetMapping(value = "/callback")
    @ResponseBody
    public Result giteeCallback(@RequestParam("code") String code) throws Exception {

        try {
            // 得到Authorization Code
            System.out.println("code = " + code);

            // Step2:通过Authorization Code获取Access Token
            Map<String, Object> params = new HashMap<>();
            params.put("grant_type", "authorization_code");
            params.put("client_id", CLIENT_ID);
            params.put("client_secret", CLIENT_SECRET);
            params.put("code", code);
            params.put("redirect_uri", CALLBACK_URI);

            String s1 = HttpRequest.post(TOKEN_URL)
                    .form(params)//表单内容
                    .timeout(20000)//超时,毫秒
                    .execute().body();

            JSONObject accessTokenJson = Optional.ofNullable(s1).map(x -> JSONUtil.parseObj(x)).get();
            System.out.println("accessTokenJson = " + accessTokenJson);
            if (!accessTokenJson.containsKey("access_token")) {
                throw new RuntimeException("获取accessToken失败");
            }

            System.out.println("accessTokenJson = " + accessTokenJson);
            System.out.println();
            String accessTokenStr = accessTokenJson.get("access_token").toString();

            // Step3: 获取用户信息
            HttpRequest httpRequest = HttpRequest.get(GET_USER_INFO_URL + "?access_token=" + accessTokenStr);
            System.out.println("httpRequest = " + httpRequest);
            System.out.println(httpRequest.execute().body());
            JSONObject jsonObject = JSONUtil.parseObj(httpRequest.execute().body());
            String id = jsonObject.get("id").toString();
            System.out.println("id = " + id);
            Integer userId = giteeUserService.isGiteeUser(Integer.valueOf(id));
            if (userId == null) {
                userId = userService.RegisterByGitee(Integer.valueOf(id));
                StpUtil.login(userId);
                SaTokenInfo saTokenInfo = StpUtil.getTokenInfo();
                return new Result(200, "登陆成功", saTokenInfo);
            }
            StpUtil.login(userId);
            SaTokenInfo saTokenInfo = StpUtil.getTokenInfo();
            return new Result(200, "登陆成功", saTokenInfo);

        } catch (Exception e) {
            throw new RuntimeException(e);
        }
    }
}
流程(以gitee为例):
准备:


应用主页写一个可以访问到的:百度就可以
回调地址:在用户确定授权以后,会调用回调地址,并且附加授权码code在请求行中
1:用户在前端点击第三方登录的图标,后端将请求重定向到第三方应用的授权接口.
@GetMapping(value = "/gitee/auth")
    public String qqAuth() {

        // Step1:获取Authorization Code
        StringBuilder urlBuilder = new StringBuilder(AUTHORIZE_URL);
        urlBuilder.append("?response_type=code")
                .append("&client_id=").append(CLIENT_ID)
                .append("&redirect_uri=").append(URLEncoder.encode(CALLBACK_URI))
                .append("&scope=user_info");

        //重定向
        return "redirect:" + urlBuilder.toString();
    }
2:在第三方应用上完成登录和授权


3:调用回调地址获取access-token,并且通过access-token获取用户信息完成登录
 /**
     * 授权回调,程序会自动调用,不是人来访问的
     */
    @GetMapping(value = "/callback")
    @ResponseBody
    public Result giteeCallback(@RequestParam("code") String code) throws Exception {

        try {
            // 得到Authorization Code
            System.out.println("code = " + code);

            // Step2:通过Authorization Code获取Access Token
            Map<String, Object> params = new HashMap<>();
            params.put("grant_type", "authorization_code");
            params.put("client_id", CLIENT_ID);
            params.put("client_secret", CLIENT_SECRET);
            params.put("code", code);
            params.put("redirect_uri", CALLBACK_URI);

            String s1 = HttpRequest.post(TOKEN_URL)
                    .form(params)//表单内容
                    .timeout(20000)//超时,毫秒
                    .execute().body();

            JSONObject accessTokenJson = Optional.ofNullable(s1).map(x -> JSONUtil.parseObj(x)).get();
            System.out.println("accessTokenJson = " + accessTokenJson);
            if (!accessTokenJson.containsKey("access_token")) {
                throw new RuntimeException("获取accessToken失败");
            }

            System.out.println("accessTokenJson = " + accessTokenJson);
            System.out.println();
            String accessTokenStr = accessTokenJson.get("access_token").toString();

            // Step3: 获取用户信息
            HttpRequest httpRequest = HttpRequest.get(GET_USER_INFO_URL + "?access_token=" + accessTokenStr);
            System.out.println("httpRequest = " + httpRequest);
            System.out.println(httpRequest.execute().body());
            JSONObject jsonObject = JSONUtil.parseObj(httpRequest.execute().body());
            String id = jsonObject.get("id").toString();
            System.out.println("id = " + id);
            Integer userId = giteeUserService.isGiteeUser(Integer.valueOf(id));
            if (userId == null) {
                userId = userService.RegisterByGitee(Integer.valueOf(id));
                StpUtil.login(userId);
                SaTokenInfo saTokenInfo = StpUtil.getTokenInfo();
                return new Result(200, "登陆成功", saTokenInfo);
            }
            StpUtil.login(userId);
            SaTokenInfo saTokenInfo = StpUtil.getTokenInfo();
            return new Result(200, "登陆成功", saTokenInfo);

        } catch (Exception e) {
            throw new RuntimeException(e);
        }
    }
access-token是第三方应用给用户发的令牌,可以通过这个令牌来获取用户的信息
用户获取access-token以后可以通过它向gitee发送请求来获取用户的信息
创建一个gitee-user的表做映射,
如果用户是第一次登录就给他注册一个用户并且和他的gitee的id做一个映射
/**
 * Sa-Token OAuth2 Server端 控制器
 */
@RestController
public class SaOAuth2ServerController {

    // OAuth2-Server 端:处理所有 OAuth2 相关请求
    @RequestMapping("/oauth2/*")
    public Object request() {
        System.out.println("------- 进入请求: " + SaHolder.getRequest().getUrl());
        return SaOAuth2ServerProcessor.instance.dister();
    }

    // Sa-Token OAuth2 定制化配置
    @Autowired
    public void configOAuth2Server(SaOAuth2ServerConfig oauth2Server) {

        // 添加 client 信息
        oauth2Server.addClient(
            new SaClientModel()
                .setClientId("1001")    // client id
                .setClientSecret("aaaa-bbbb-cccc-dddd-eeee")    // client 秘钥
                .addAllowRedirectUris("*")    // 所有允许授权的 url
                .addContractScopes("openid", "userid", "userinfo")    // 所有签约的权限
                .addAllowGrantTypes(     // 所有允许的授权模式
                        GrantType.authorization_code, // 授权码式
                        GrantType.implicit,  // 隐式式
                        GrantType.refresh_token,  // 刷新令牌
                        GrantType.password,  // 密码式
                        GrantType.client_credentials  // 客户端模式
                )
        );

        // 可以添加更多 client 信息,只要保持 clientId 唯一就行了
        // oauth2Server.addClient(...)

        // 配置:未登录时返回的View
        oauth2Server.notLoginView = () -> {
            String msg = "当前会话在OAuth-Server端尚未登录,请先访问"
                        + "<a href='/oauth2/doLogin?name=sa&pwd=123456' target='_blank'> doLogin登录 </a>"
                        + "进行登录之后,刷新页面开始授权";
            return msg;
        };

        // 配置:登录处理函数
        oauth2Server.doLoginHandle = (name, pwd) -> {
            if("sa".equals(name) && "123456".equals(pwd)) {
                StpUtil.login(10001);
                return SaResult.ok();
            }
            return SaResult.error("账号名或密码错误");
        };

        // 配置:确认授权时返回的 view
        oauth2Server.confirmView = (clientId, scopes) -> {
            String scopeStr = SaFoxUtil.convertListToString(scopes);
            String yesCode =
                    "fetch('/oauth2/doConfirm?client_id=" + clientId + "&scope=" + scopeStr + "', {method: 'POST'})" +
                    ".then(res => res.json())" +
                    ".then(res => location.reload())";
            String res = "<p>应用 " + clientId + " 请求授权:" + scopeStr + ",是否同意?</p>"
                    + "<p>" +
                    "        <button onclick=\"" + yesCode + "\">同意</button>" +
                    "        <button onclick='history.back()'>拒绝</button>" +
                    "</p>";
            return res;
        };
    }

}
Satoken-OAuth2.0:
我感觉这个我暂时是用不到,satoken关于OAuth2.0的方法,是我们开发的server作为第三方应用,来授权其他服务的信息请求.(下面的也是以授权码模式为例)
先来看看官方示例的代码:
package com.pj.oauth2;

import cn.dev33.satoken.context.SaHolder;
import cn.dev33.satoken.oauth2.SaOAuth2Manager;
import cn.dev33.satoken.oauth2.config.SaOAuth2ServerConfig;
import cn.dev33.satoken.oauth2.processor.SaOAuth2ServerProcessor;
import cn.dev33.satoken.oauth2.template.SaOAuth2Util;
import cn.dev33.satoken.stp.StpUtil;
import cn.dev33.satoken.util.SaResult;
import org.springframework.beans.factory.annotation.Autowired;
import org.springframework.web.bind.annotation.RequestMapping;
import org.springframework.web.bind.annotation.RestController;
import org.springframework.web.servlet.ModelAndView;

import java.util.HashMap;
import java.util.LinkedHashMap;
import java.util.Map;

/**
 * Sa-Token-OAuth2 Server端 Controller
 *
 * @author click33
 */
@RestController
public class SaOAuth2ServerController {

	// OAuth2-Server 端:处理所有 OAuth2 相关请求
	@RequestMapping("/oauth2/*")
	public Object request() {
		System.out.println("------- 进入请求: " + SaHolder.getRequest().getUrl());
		return SaOAuth2ServerProcessor.instance.dister();
	}

	// Sa-Token OAuth2 定制化配置
	@Autowired
	public void configOAuth2Server(SaOAuth2ServerConfig oauth2Server) {
		// 未登录的视图
		oauth2Server.notLoginView = ()->{
			return new ModelAndView("login.html");
		};

		// 登录处理函数
		oauth2Server.doLoginHandle = (name, pwd) -> {
			if("sa".equals(name) && "123456".equals(pwd)) {
				StpUtil.login(10001);
				return SaResult.ok();
			}
			return SaResult.error("账号名或密码错误");
		};

		// 授权确认视图
		oauth2Server.confirmView = (clientId, scopes)->{
			Map<String, Object> map = new HashMap<>();
			map.put("clientId", clientId);
			map.put("scope", scopes);
			return new ModelAndView("confirm.html", map);
		};

	}


	// ---------- 开放相关资源接口: Client端根据 Access-Token ,置换相关资源 ------------

	// 获取 userinfo 信息:昵称、头像、性别等等
	@RequestMapping("/oauth2/userinfo")
	public SaResult userinfo() {
		// 获取 Access-Token 对应的账号id
		String accessToken = SaOAuth2Manager.getDataResolver().readAccessToken(SaHolder.getRequest());
		Object loginId = SaOAuth2Util.getLoginIdByAccessToken(accessToken);
		System.out.println("-------- 此Access-Token对应的账号id: " + loginId);

		// 校验 Access-Token 是否具有权限: userinfo
		SaOAuth2Util.checkAccessTokenScope(accessToken, "userinfo");

		// 模拟账号信息 (真实环境需要查询数据库获取信息)
		Map<String, Object> map = new LinkedHashMap<>();
		// map.put("userId", loginId);  一般原则下,oauth2-server 不能把 userId 返回给 oauth2-client
		map.put("nickname", "林小林");
		map.put("avatar", "http://xxx.com/1.jpg");
		map.put("age", "18");
		map.put("sex", "男");
		map.put("address", "山东省 青岛市 城阳区");
		return SaResult.ok().setMap(map);
	}

}
1:首先客户端向我们第三方发送请求到{host}:{port}/oauth2/authorize路径上。
2:如果用户没有登录我们第三方应用会触发未登录视图和登录处理函数点击登陆后会调用/oauth2/dologin接口,
        // 未登录的视图
		oauth2Server.notLoginView = ()->{
			return new ModelAndView("login.html");
		};

		// 登录处理函数
		oauth2Server.doLoginHandle = (name, pwd) -> {
			if("sa".equals(name) && "123456".equals(pwd)) {
				StpUtil.login(10001);
				return SaResult.ok();
			}
			return SaResult.error("账号名或密码错误");
		};
//官方案例采用的是前后端不分离模式,代码看起来也比较难受。

3:在登录成功以后,会进入授权界面:
// 授权确认视图
		oauth2Server.confirmView = (clientId, scopes)->{
			Map<String, Object> map = new HashMap<>();
			map.put("clientId", clientId);
			map.put("scope", scopes);
			return new ModelAndView("confirm.html", map);
		};
在点击选项后会调用/oauth2/doconfirm接口来处理

4:同意授权后会重定向到回调路径并且附加code参数

5:用户可以根据code来获取access-token:


 1767
1767

 被折叠的 条评论
为什么被折叠?
被折叠的 条评论
为什么被折叠?
 到【灌水乐园】发言


