Toolbox and assembly options
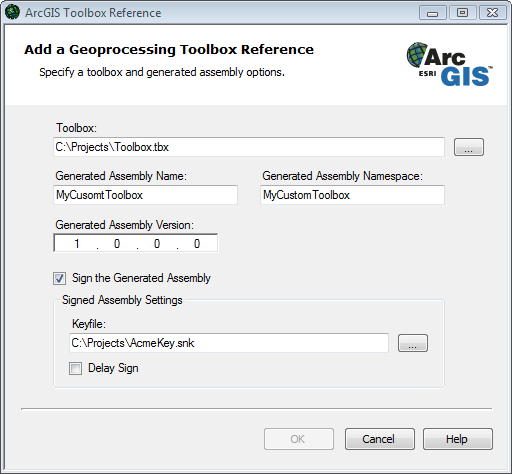
To open the ArcGIS Toolbox Reference dialog box, select ArcGIS Toolbox Reference from the Project menu. Alternatively, right-click the Project node in Solution Explorer (you can also right-click the References node). See the following screen shot:

The following explains the toolbox and assembly options in the dialog box:
- Toolbox—The path name of the toolbox for the generated assembly. Click the browse button (…) to navigate to the location of the toolbox file (.tbx).
- Generated Assembly Name—Choose the output file name for the generated assembly; by default, the file name is the name of the selected toolbox.
- Generated Assembly Namespace—Specify the default namespace of the assembly and its types; by default, it is the same as the assembly name.
- Generated Assembly Version—Choose the version number for the generated assembly. The version must use the standard .NET four-part version string format. For more information, see Assembly Versioning on the Microsoft Developer Network (MSDN) Web site.
- Sign the Generated Assembly—Select this check box to sign the generated assembly with a strong name. In general, you should sign your assemblies with a strong name. For more information, see the previously mentioned Assembly Versioning on the MSDN Web site.
- Keyfile—The path name of the keyfile for the signed assembly. Click the browse button (…) to navigate to the keyfile.
- Delay Sign—Select this check box to indicate if the generated assembly should be delay signed.
If you do not select the Delay Sign check box, the keyfile should contain a public and private key pair. Otherwise, the keyfile only needs to contain the public key of the key pair and must be fully signed at a later stage. For more information about signing and delay signing assemblies, see
Programming with Assemblies on the MSDN Web site.
Once the managed assembly for the custom ArcGIS toolbox is generated and added as a reference to your project, you can start writing .NET code to use the classes that have been mapped to the appropriate geoprocessing tools defined in the toolbox file. The created geoprocessing classes are used in conjunction with the geoprocessor class in the managed
ESRI.ArcGIS.Geoprocessor Namespace. For more information, see
Using geoprocessing.


 872
872


 被折叠的 条评论
为什么被折叠?


