


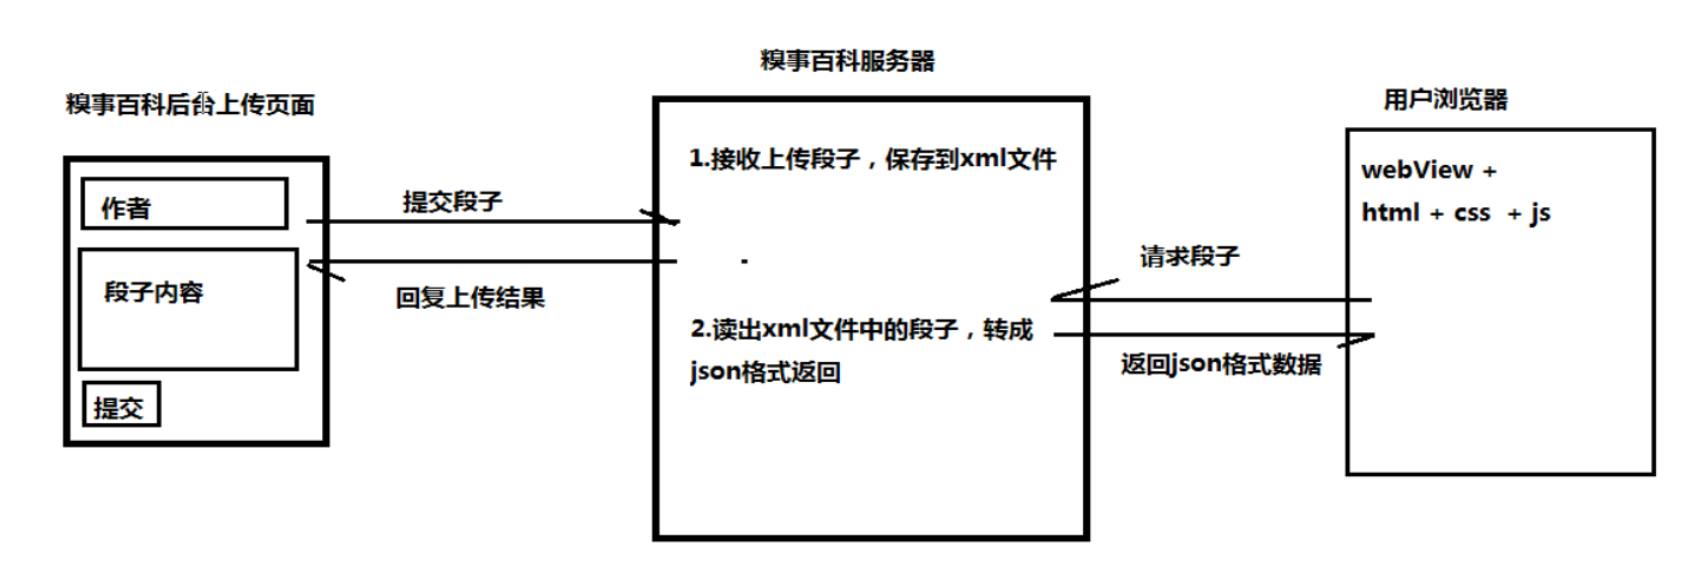
前端 后台 andriod整个项目流程
mui的使用
1,拷贝需要的源码
2,在Hbuilder里面创建一个移动项目,将里面的css,js,font目录拷贝过来
3,在自己的源码中使用link导入css,使用script导入mui的js
jqurey的使用
一,为什么要使用jquery
    1,使用jquery保证页面元素加载完毕
    2,使用jquery获取json数据,并解析成相应的数据
二,怎么使用jquery
    1,导入jquery的js包,或者直接使用百度的jquery包
    2,使用jquery的ready的方法,保证文档加载完毕
        $(document).ready();
    3,使用jquery的get方法获取json数据
        $(document).ready(
            function(){
                 $.get("json的url地址,要保存ip地址一致",function(data,state){

                });
       } );
    4,使用eval将json数据data转换为json数组,并遍历
        var arr = eval(data);
        for(var i = 0; i < arr.length; i++){
            //获取json对象的属性值
            var name = arr[i].name;
        }
DOM模型
一,为什么要使用DOM
    通过脚本来修改网页内容,将jquery从json数据填充到标签中
二,怎么使用DOM
    1,通过Id获取网标签元素
        var parent = document.getElementById("container");
    2,创建一个标签元素
        var liTag = document.createElement("li");
    3,设置标签的属性
        liTag.setAttribute("class","value");
    4,设置标签的文本
        liTag.InnerHtml = arr[i].name;
    5,创建的标签一定要添加到父标签,只能从小的往大的添加
        parent.appendChild(liTag);
表单
一,作用
    提交数据
    提交方式:method= "GET"
    提交的地址,action="http://192.168.18.90:8080/Pro3/SubmitServlet"

二,实例
    <form action="http://192.168.18.90:8080/Pro3/SubmitServlet" method="GET">
        <input type="submit" value="提交" />
    </form>
Servlet
Servlet的作用
    1,对提交的数据进行处理,并作出相应的响应
实例一:上传数据,并以xml格式写出保存到相应的文件夹
    1,通过request对象获取参数author和detail的值
        String author = request.getParameter("author");
        String detail = request.getParameter("detail");
    2,通过response对象获取响应输出流,并设置响应编码格式
        ServletOutputStream sos = response.getOutputStream();
        //设置保存的编码格式
        response.setCharacterEncodding("utf-8");
    3,判断获取两个参数的值是否null,或者为空,如果是android可以使用TextUtils
        if(author == null || detail == null){
            //设置输出的编码格式
            sos.write("未提交参数".getBytes("utf-8");
            //因为是null,处理数据结束
            return;
        }

        if("".equals(author) || "".equals(detail)){
            sos.write("内容为空");
            //处理数据完毕
            return;
        }

        //服务器的编码格式是iso-8859-1
        author = new String(author.getBytes("iso-8859-1"),"utf-8");
        detail = new String(detail.getBytes("iso-8859-1"),"utf-8");

    4,如果参数不为空,就将提交的数据保存到数据库(因为没有数据库,保存的xml文件中)
      保存,需要将author和detail封装成一个QiuShiBean对象qiushi,然后保存在ArrayList中

        //创建一个QiuShiBean对象,用来封装author和detail数据
        QiuShiBean qiushi = new QiuShiBean(author,detail);

        //创建一个File对象用来保存生成的xml文件
        File file = new File("d:\\db.xml");

        //如果文件不存在,创建一个,如果文件存在,追加数据,因为list根标签只能有一个
        所以,不能直接追加,先使用list读取出xml中的数据,再将新的qiushi数据读入,然后
        清空之前的xml文件,再将list中的数据全部添加到xml文件中
        if(file.exsits() && file.length() > 0){
            ArrayList<QIShiBean> list = new ArrayList<>();
            //一,导入XStream.jar包,将xml中的数据读取并转换为list类型
                1,创建一个XStream对象
                XStream xstream = new XStream();
                2,将QiuShiBean的字节码文件转换为一个qiushi父节点
                xstream.alias("qiushi",QiuShiBean.class);
                3,将xml的file对象转换为list集合
                list = (ArrayList<QiShiBean>)xstream.from(file);
            //二,将新添加进来的qiushi添加到list集合中
                list.add(qiushi);
            //三,通过xstream将list转换为xml字符串
                String xml = xstream.toXML(list);
            //四,创建一个字节输出流,将xml字符串写出到相应的xml文件中
                FileOutputStream fos = new FileOutputStream(file);
                fos.write(xml.getBytes("utf-8");
                fos.close();
        }else{
            //1,创建一个list集合
                ArrayList<QiuShiBean> list = new ArrayList<>();

            //2,将封装好的qiushi对象添加到list集合中
                list.add(qiushi);

            //3,使用XStream将list转换为xml字符串
                XStream xstream = new XStream();
                xstream.alias("qiushi",QiShiBean.class);
                String xml = xstream.toXML(list);

            //4,将得到的xml字符串写出到相应的xml文件中
                FileOutputStream fos = new FileOutputStream(file);
                fos.write(xml.getBytes("utf-8");
                fos.close();
        }
            //将响应结果返回
            sos.write("提交成功".getBytes("utf-8");
实例二:根据文件是否存在,将xml中的数据读出并转换为json 然后写出到请求的网页
1,获取响应的输出流,并设置编码格式
    ServletOutputStream sos = response.getOutputStream();
    response.setCharacterEncoding("utf-8");
2,定义要生成的json字符串,并将要获取的xml路径封装成file对象
    String jsonStr = "[]";//因为json是一个json数组
    File file = new File("D:\\db.xml");
3,判断如果文件存在,通过XStream将file直接转换为list集合
    if(file.exists() && file.length()>0){
        //创建一个list用来存放从file转换过来的xml数据
        ArrayList<QiuShiBean> list = new ArrayList<>();
        //通过XStream将xml封装的file对象转换为list
        XStream xstream = new XStream();
        xstream.alias("qiushi",QiuShiBean.class);
        list = (ArrayList<QiuShiBean>) xstream.fromXML(file);

4,通过Gson对象将list集合转换为json字符串
    Gson gson = new Gson();
    jsonStr = gson.toJson(list);

        //将获取的json字符串写出
        sos.write(jsonStr.getBytes("utf-8");
    }else{
         sos.write(jsonStr.getBytes("utf-8");
    }
WebView在androd中的使用
1,添加网络权限
    android.permission.INTERNET
2,获取webview的setting对象,并设置js可用属性
    WebSettings settings = wv.getSettings();
    settings.setJavaScriptCanOpenWindowsAutomatically(true);
    settings.setJavaScriptEnabled(true);
    settings.setDomStorageEnabled(true);
3,给webView加载网页数据
    wv.loadUrl("http://xxxx");

4,如果不想显示标题栏
    在activity绑定视图之前设置
    requestWindwoFeature(Window.FEATURE_NO_TITLE);
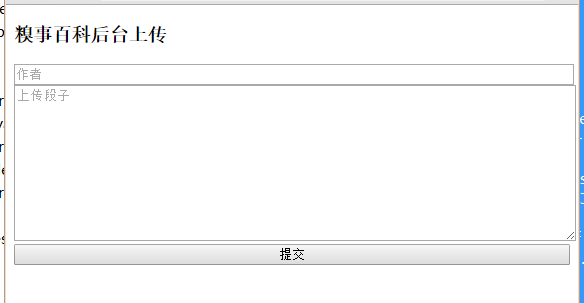
upload.html源码
作用:提交数据
<!DOCTYPE html>
<html>
    <head>
        <meta charset="utf-8" />
        <meta name="viewport" content="width=device-width,initial-scale=1,minimum-scale=1,maximum-scale=1,user-scalable=no" />
        <title>糗事百科后台上传页面</title>
        <style type="text/css">
            form,input,textarea{
                width: 100%;
            }
        </style>
    </head>
    <body>
        <h3>糗事百科后台上传</h3>
        <form action="http://192.168.18.90:8080/Pro3/SubmitServlet" method="get">
            <input type="text" name="author" id="author" placeholder="作者"/>
            <textarea name="detail" rows="10" cols="30" placeholder="上传段子"></textarea>
            <input type="submit"  value="提交"/>
        </form>
    </body>
</html>
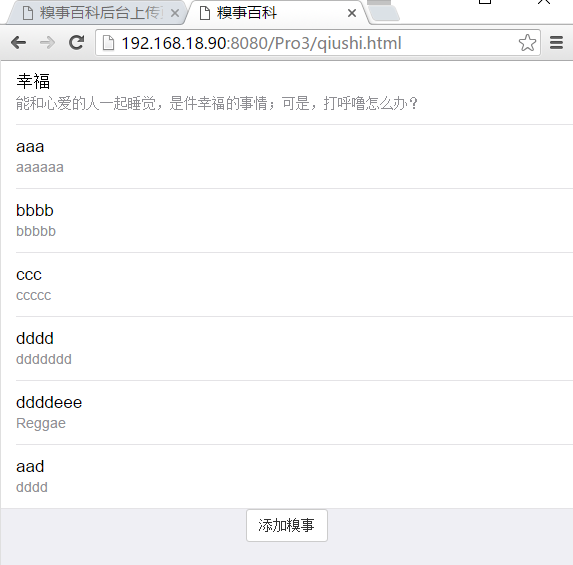
qiushi.html源码
作用:用来读取服务器中NetWork中的json数据,并将json数据转换数据,并填充到相应的控件
<!DOCTYPE html>
<html>
<head>
<meta charset="UTF-8">
<meta name="viewport"
    content="width=device-width,initial-scale=1,minimum-scale=1,maximum-scale=1,user-scalable=no" />
<title>糗事百科</title>
<link rel="stylesheet" type="text/css" href="css/mui.min.css" />
<script src="js/mui.min.js" type="text/javascript" charset="utf-8"></script>
<script src="http://libs.baidu.com/jquery/2.0.0/jquery.min.js"></script>
<script type="text/javascript">
    //第一步:使用jquery的$(document).ready()实现完全加载
    $(document).ready(function() {
        $.get("http://192.168.18.90:8080/Pro3/NetWork", function(data, state) {
            //第二步,将json字符串转换为json数组对象
            var arr = eval(data);

            //遍历json数组,获取json对象
            for (var i = 0; i < arr.length; i++) {
                //获取父节点元素
                var parent = document.getElementById("container");
                //创建一个li节点,并设置li节点的属性
                var liTag = document.createElement("li");
                liTag.setAttribute("class", "mui-table-view-cell mui-media");

                //创建一个a节点,并设置属性
                var aTag = document.createElement("a");
                aTag.setAttribute("href", "#");
                //创建一个div标签,并设置属性
                var divTag = document.createElement("div");
                divTag.setAttribute("class", "mui-media-body");
                divTag.innerHTML = arr[i].author;

                //创建一个p标签,并设置属性
                var pTag = document.createElement("p");
                pTag.setAttribute("class", 'mui-ellipsis');
                pTag.innerHTML = arr[i].detail;

                //添加相应的元素到父节点

                divTag.appendChild(pTag);
                aTag.appendChild(divTag);
                liTag.appendChild(aTag);
                parent.appendChild(liTag);

            }

        });
    });
</script>
</head>
<body>
    <ul id="container" class="mui-table-view">
        <li class="mui-table-view-cell mui-hidden">cared
            <div id="M_Toggle" class="mui-switch mui-active">
                <div class="mui-switch-handle"></div>
            </div>
        </li>
        <li class="mui-table-view-cell mui-media"><a href="#"> <!-- <img class="mui-media-object mui-pull-right" src="http://dcloudio.github.io/mui/assets/img/shuijiao.jpg"> -->
                <div class="mui-media-body">
                    幸福
                    <p class='mui-ellipsis'>能和心爱的人一起睡觉,是件幸福的事情;可是,打呼噜怎么办?</p>
                </div>
        </a></li>


    </ul>

    <div style="text-align: center;">


        <a href="http://192.168.18.90:8080/Pro3/upload.html">
            <button>添加糗事</button>
        </a>
    </div>

</body>
</html>
SubmitServlet.java源码
作用:将upload提交来的数据封装成QiuShiBean对象,然后添加互list中,再将list转换为xml文件,保存在本地
package com.itheima.pro3;

import java.io.File;
import java.io.FileOutputStream;
import java.io.IOException;
import java.util.ArrayList;
import java.util.List;

import javax.servlet.ServletException;
import javax.servlet.ServletOutputStream;
import javax.servlet.annotation.WebServlet;
import javax.servlet.http.HttpServlet;
import javax.servlet.http.HttpServletRequest;
import javax.servlet.http.HttpServletResponse;

import com.itheima.pro3.bean.QiShiBean;
import com.thoughtworks.xstream.XStream;
import com.thoughtworks.xstream.io.xml.DomDriver;

/**
 * Servlet implementation class SubmitServlet
 */
@WebServlet("/SubmitServlet")
public class SubmitServlet extends HttpServlet {
    private static final long serialVersionUID = 1L;

    protected void doGet(HttpServletRequest request, HttpServletResponse response) throws ServletException, IOException {

        /*
         * 处理请求的方法
         * 1,获取提交参数
         * String author = request.getParameter("author");
         * tomcat服务器默认接收参数是iso-8859-1编码  但是浏览器使用的utf-8
         *
         */

        String author = request.getParameter("author");
        String detail = request.getParameter("detail");

        //获取响应的输出流

        ServletOutputStream sos = response.getOutputStream();


        response.setCharacterEncoding("utf-8");

        //判断对象是否为空
        if(author == null || detail == null){
            sos.write("未提交参数".getBytes("utf-8"));
            return;
        }
        if("".equals(author) || "".equals(detail)){
            sos.write("内容为空".getBytes("utf-8"));
            return;
        }

        //转换iso-8859-1编码内容成utf-8

        author = new String(author.getBytes("iso-8859-1"),"utf-8");
        detail = new String(detail.getBytes("iso-8859-1"),"utf-8");

        //1,创建一个qiushiBean对象
        QiShiBean qishi = new QiShiBean(author,detail);

        //xml文件保存的位置
        File file = new File("D:\\db\\qiushi.xml");
        //2,判断文件是否存在
        if(file.exists()&& file.length() > 0){      //文件存在,不是第一次上传
            //1,利用XStream从xml文件中读取所有的段子,不能使用追加写进去,因为只能有一个list根标签,得到list集合

            ArrayList<QiShiBean> list = new ArrayList<>();

            XStream xstream = new XStream(new DomDriver());
            xstream.alias("qiushi", QiShiBean.class);

            list = (ArrayList<QiShiBean>) xstream.fromXML(file);


            //2,向list集合中添加新的bean对象
                    list.add(qishi);

            //3,将添加新的bean对象的list集合写回源文件
            String xml = xstream.toXML(list);
            //4,清空原来 文件内容
            sos.write(xml.getBytes("utf-8"));
            //创建一个字节输出流,但是会清空文件,将xml文件写入文件
            FileOutputStream fos = new FileOutputStream(file);
            fos.write(xml.getBytes("utf-8"));
            fos.close();


        }else{                                      //文件不存在,或者长度为0
            //创建一个list集合
            ArrayList<QiShiBean> list = new ArrayList<>();
            //将qiushi添加进来
            list.add(qishi);

        //将集合转换为xml格式
        XStream xstream = new XStream(new DomDriver());
        xstream.alias("qiushi", QiShiBean.class);
        String xml = xstream.toXML(list);


        sos.write(xml.getBytes("utf-8"));

        //创建一个字节输出流,但是会清空文件,将xml文件写入文件
        FileOutputStream fos = new FileOutputStream(file);
        fos.write(xml.getBytes("utf-8"));
        fos.close();


        }

        sos.write("提交成功".getBytes("utf-8"));


    }


}
NetWork.java源码
作用:将保存的xml文件转换为json字符串,并写出
package com.itheima.pro;

import java.io.File;
import java.io.IOException;
import java.util.ArrayList;

import javax.servlet.ServletException;
import javax.servlet.ServletOutputStream;
import javax.servlet.annotation.WebServlet;
import javax.servlet.http.HttpServlet;
import javax.servlet.http.HttpServletRequest;
import javax.servlet.http.HttpServletResponse;

import com.google.gson.Gson;
import com.itheima.pro3.bean.QiShiBean;
import com.thoughtworks.xstream.XStream;
import com.thoughtworks.xstream.io.xml.DomDriver;

/**
 * Servlet implementation class NetWork
 */
@WebServlet("/NetWork")
public class NetWork extends HttpServlet {
    private static final long serialVersionUID = 1L;

    protected void doGet(HttpServletRequest request, HttpServletResponse response) throws ServletException, IOException {
        // TODO Auto-generated method stub
        //xml文件保存的位置


        //获取response的输出流,将转换的json数据返回
        ServletOutputStream sos = response.getOutputStream();
        //设置响应的编码方式
        response.setCharacterEncoding("utf-8");

        QiShiBean qishi = new QiShiBean();
        File file = new File("D:\\db\\qiushi.xml");
        String jsonStr = "[]";
        //2,判断文件是否存在
        if(file.exists()&& file.length() > 0){      //文件存在,不是第一次上传
            //1,利用XStream从xml文件中读取所有的段子,不能使用追加写进去,因为只能有一个list根标签,得到list集合

            ArrayList<QiShiBean> list = new ArrayList<>();

            XStream xstream = new XStream(new DomDriver());
            xstream.alias("qiushi", QiShiBean.class);

            list = (ArrayList<QiShiBean>) xstream.fromXML(file);


            String xml = xstream.toXML(list);
            //4,通过Gson对象将list集合转换为json字符串

            Gson gson = new Gson();
            jsonStr = gson.toJson(list);

            //将获取的json字符串写出
            sos.write(jsonStr.getBytes("utf-8"));


        }else{

            sos.write(jsonStr.getBytes("utf-8"));
        }
    }


}
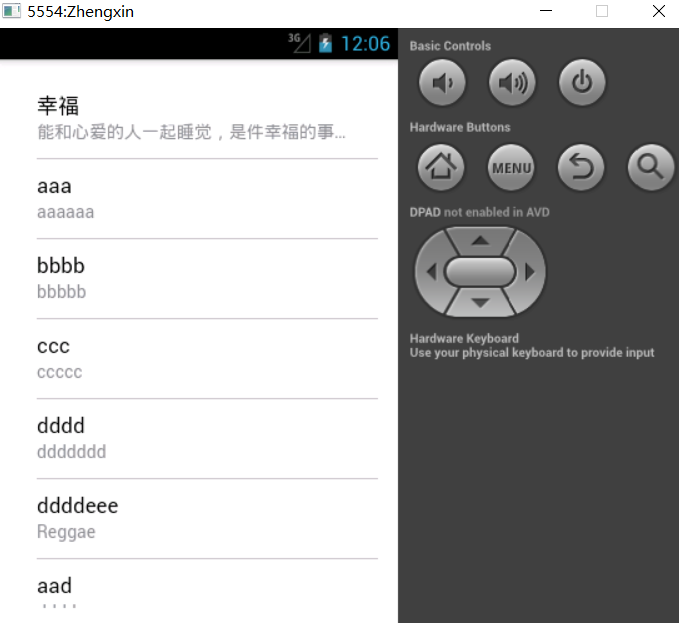
android客户端的源码
作用:使用WebView来显示服务器的数据
public class MainActivity extends Activity {

    @Override
    protected void onCreate(Bundle savedInstanceState) {
        super.onCreate(savedInstanceState);
        requestWindowFeature(Window.FEATURE_NO_TITLE);
        setContentView(R.layout.activity_main);
        //初始化我们要使用的控件
        WebView wv = (WebView) findViewById(R.id.wv);
        //给webView设置js属性
        WebSettings settings = wv.getSettings();
        settings.setJavaScriptCanOpenWindowsAutomatically(true);
        settings.setJavaScriptEnabled(true);
        settings.setDomStorageEnabled(true);

        //给webView加载网页数据

        wv.loadUrl("http://192.168.18.90:8080/Pro3/qiushi.html");


    }


}


 2135
2135

 被折叠的 条评论
为什么被折叠?
被折叠的 条评论
为什么被折叠?
 到【灌水乐园】发言


