


官方教程主要是一步一步的介绍如何用ListView来显示一条Json数据。
模拟数据
在编写关于获取远程数据的代码之前,先让我们用一些模拟数据,以便上手React Native。在Facebook(公司),我们的做法是一般在JS文件的顶部声明常量,下面接着就是一些import。当然你可以在index.ios.js或index..android.js(这里考虑android)的任意位置增加下面的常量:
var MOCKED_MOVIES_DATA = [ {title: 'Title', year: '2015', posters: {thumbnail: 'http://i.imgur.com/UePbdph.jpg'}}, ];渲染一个movie
我们现在为这个movie渲染title,year和thumbnail。由于thumbnail在React Native中是一个Image组件,因此增加Image到下面React imports列表。
import React, {
  Component,
} from 'react';
import {
  AppRegistry,
  Image,
  StyleSheet,
  Text,
  View,
} from 'react-native';
接着修改render方法来渲染我们上面提到的(模拟)数据。
render() {
var movie = MOCKED_MOVIES_DATA[0];
return (
<View style={styles.container}>
<Text>{movie.title}</Text>
<Text>{movie.year}</Text>
<Image source={{uri: movie.posters.thumbnail}} />
</View>
);
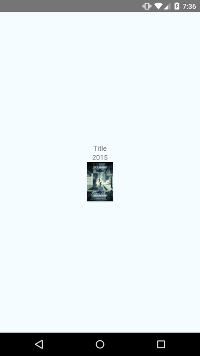
}手机上打开开发者菜单Reload JS后你应该可以看到“2015”和下面的“Title”。注意,Image没有被渲染上。这是因为我们没有为其制定宽和高。这需要通过styles来实现。让我们清除不在使用的styles再修改styles。
var styles = StyleSheet.create({
  container: {
    flex: 1,
    justifyContent: 'center',
    alignItems: 'center',
    backgroundColor: '#F5FCFF',
  },
  thumbnail: {
    width: 53,
    height: 81,
  },
});
同时,我们需要将style应用到Image组件上。
<Image
source={{uri: movie.posters.thumbnail}}
style={styles.thumbnail}
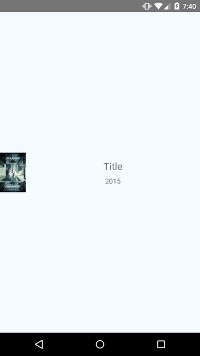
/>重新Reload JS,我们会看到下面的效果:
增加一些样式
上面渲染了我们的数据,现在让我们使他看起来更好,我打算在图片的右边放一些文字,让title变大并且居中。
我们需要增加一个容器以便我们在水平方向上布局我们的组件。
 return (
        <View style={styles.container}>
          <Image
            source={{uri: movie.posters.thumbnail}}
            style={styles.thumbnail}
          />
          <View style={styles.rightContainer}>
            <Text style={styles.title}>{movie.title}</Text>
            <Text style={styles.year}>{movie.year}</Text>
          </View>
        </View>
      );
没有太多的改变,我们增加了一个容器包含所有的Text并把这些Text移动Image的下面(因为他们是在Image的右边显示)。然后我们看看style做的修改:
container: {
    flex: 1,
    flexDirection: 'row',
    justifyContent: 'center',
    alignItems: 'center',
    backgroundColor: '#F5FCFF',
},我们使用FlexBox(弹性盒模型)来布局-关于FlexBox去this great guide了解更多。
在上面的代码片段中,我们增加了flexDirection:’row’,这使得容器里的子view在水平方向上布局而不是在垂直方向上。
现在在Js style object中增加另一个style:
rightContainer: {
    flex: 1,
  },
这意味着rightContainer占据父容器中Image以外的剩余的空间,如果你感觉效果不明显,可以给rightContainer增加一个backgroundColor并移除flex:1。你将会看到容器尺寸变成了能容纳子view的最小尺寸。
简单的文字样式:
title: {
fontSize: 20,
marginBottom: 8,
textAlign: 'center',
},
year: {
textAlign: 'center',
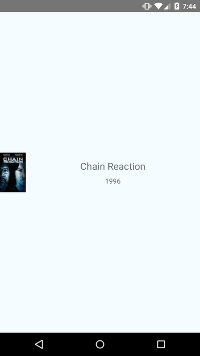
},重新Reload JS,你将看到新的视图
取得真正的数据
从Rotten Tomatoes’s API是取得数据是真正的开始学习React Native,因此我们在这块尽情畅游。
在JS文件顶部增加下面的常量,在请求数据的时候需要使用。
/**
 * For quota reasons we replaced the Rotten Tomatoes' API with a sample data of
 * their very own API that lives in React Native's Github repo.
 */
var REQUEST_URL = 'https://raw.githubusercontent.com/facebook/react-native/master/docs/MoviesExample.json';
为我们的应用增加一些初始的状态,我们可以判断this.state.movies == null ,根据movies是否为null来决定movies data是否已经加载完成。当请求响应回来时,使用this.setState(movies:moviesData)来设置数据。在React类里render方法上增加这些代码:
constructor(props) {
    super(props);
    this.state = {
      movies: null,
    };
  }
我们要在组件加载完成后发送一个请求。componentDimMount是React components方法,React仅仅在组件加载完成后调用一次该方法。
componentDidMount() { this.fetchData(); }现在再增加fetchData方法。这个方法用于获取数据。你需要做的只是在解析了协议之后调用this.setState({movies:data}),因为React工作的方式是:setState方法会触发render方法重新渲染,这时render方法里this.setstate.movies将不再是null。注意,我们在方法链最好调用了done()方法,一般总是需要调用done()方,否则任何抛出的异常你将都看不到。
fetchData() {
    fetch(REQUEST_URL)
      .then((response) => response.json())
      .then((responseData) => {
        this.setState({
          movies: responseData.movies,
        });
      })
      .done();
  }
现在修改render()方法,如果没有movies data就渲染loading view否则渲染第一个movies(获取到的json数据包含多个movies)。
render() {
    if (!this.state.movies) {
      return this.renderLoadingView();
    }

    var movie = this.state.movies[0];
    return this.renderMovie(movie);
  }

  renderLoadingView() {
    return (
      <View style={styles.container}>
        <Text>
          Loading movies...
        </Text>
      </View>
    );
  }

  renderMovie(movie) {
    return (
      <View style={styles.container}>
        <Image
          source={{uri: movie.posters.thumbnail}}
          style={styles.thumbnail}
        />
        <View style={styles.rightContainer}>
          <Text style={styles.title}>{movie.title}</Text>
          <Text style={styles.year}>{movie.year}</Text>
        </View>
      </View>
    );
  }
重新reload JS,你将看到“Loading movies…”直到响应返回,才会渲染从Rotten Tomatoes取得的第一条movie。
ListView
现在修改应用程序,我们使用ListView组件来渲染所有的数据,而不仅仅显示出第一条movie。
为什么使用ListView更好,而不是仅仅渲染所有这些数据或者使用ScrollView?尽管React是快速的,但是渲染一个可能无限的元素列表是慢的。使用ListView渲染views,你仅仅展现一整个屏幕的元素,但是屏幕以外(看不到的)的views会从native view的层次结构上删除。
首先:添加ListView到import中。
import React, {
  Component,
} from 'react';
import {
  AppRegistry,
  Image,
  ListView,
  StyleSheet,
  Text,
  View,
} from 'react-native';
接着修改render方法,一旦获取数据就使用ListView渲染所有movie,而不是仅仅一条movie。
render() {
    if (!this.state.loaded) {
      return this.renderLoadingView();
    }

    return (
      <ListView
        dataSource={this.state.dataSource}
        renderRow={this.renderMovie}
        style={styles.listView}
      />
    );
  }
dataSource是一个接口,ListView用以决定哪一行在更新过程中改变过。
注意我们使用this.state的dataSource。接下来增加一个空的dataSource到constructor里面。现在我们正在给dataSource里的数据排序,我们不应该再使用this.state.movies已避免数据排序两次。我们使用boolean类型的属性(this.state.loaded)来判断数据是否加载完成。
constructor(props) {
    super(props);
    this.state = {
      dataSource: new ListView.DataSource({
        rowHasChanged: (row1, row2) => row1 !== row2,
      }),
      loaded: false,
    };
  }
修改fetchData方法,相应地更新state值。
fetchData() {
    fetch(REQUEST_URL)
      .then((response) => response.json())
      .then((responseData) => {
        this.setState({
          dataSource: this.state.dataSource.cloneWithRows(responseData.movies),
          loaded: true,
        });
      })
      .done();
  }
最后我们为ListView增加样式。
listView: {
paddingTop: 20,
backgroundColor: '#F5FCFF',
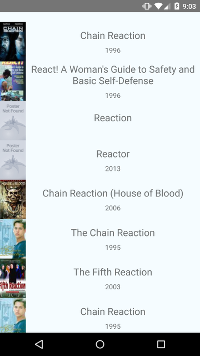
},最终的效果:
最终的代码:
/**
 * Sample React Native App
 * https://github.com/facebook/react-native
 */

import React, {
  Component,
} from 'react';
import {
  AppRegistry,
  Image,
  ListView,
  StyleSheet,
  Text,
  View,
} from 'react-native';

var REQUEST_URL = 'https://raw.githubusercontent.com/facebook/react-native/master/docs/MoviesExample.json';

class AwesomeProject extends Component {
  constructor(props) {
    super(props);
    this.state = {
      dataSource: new ListView.DataSource({
        rowHasChanged: (row1, row2) => row1 !== row2,
      }),
      loaded: false,
    };
  }

  componentDidMount() {
    this.fetchData();
  }

  fetchData() {
    fetch(REQUEST_URL)
      .then((response) => response.json())
      .then((responseData) => {
        this.setState({
          dataSource: this.state.dataSource.cloneWithRows(responseData.movies),
          loaded: true,
        });
      })
      .done();
  }

  render() {
    if (!this.state.loaded) {
      return this.renderLoadingView();
    }

    return (
      <ListView
        dataSource={this.state.dataSource}
        renderRow={this.renderMovie}
        style={styles.listView}
      />
    );
  }

  renderLoadingView() {
    return (
      <View style={styles.container}>
        <Text>
          Loading movies...
        </Text>
      </View>
    );
  }

  renderMovie(movie) {
    return (
      <View style={styles.container}>
        <Image
          source={{uri: movie.posters.thumbnail}}
          style={styles.thumbnail}
        />
        <View style={styles.rightContainer}>
          <Text style={styles.title}>{movie.title}</Text>
          <Text style={styles.year}>{movie.year}</Text>
        </View>
      </View>
    );
  }
}

var styles = StyleSheet.create({
  container: {
    flex: 1,
    flexDirection: 'row',
    justifyContent: 'center',
    alignItems: 'center',
    backgroundColor: '#F5FCFF',
  },
  rightContainer: {
    flex: 1,
  },
  title: {
    fontSize: 20,
    marginBottom: 8,
    textAlign: 'center',
  },
  year: {
    textAlign: 'center',
  },
  thumbnail: {
    width: 53,
    height: 81,
  },
  listView: {
    paddingTop: 20,
    backgroundColor: '#F5FCFF',
  },
});

AppRegistry.registerComponent('AwesomeProject', () => AwesomeProject);本文译自:https://facebook.github.io/react-native/docs/tutorial.html#content
react native是react的衍生平,学习react之前有必要了解一下react的知识,推荐链接:http://www.ruanyifeng.com/blog/2015/03/react.html。
ReactNative 通信机制,推荐链接:http://bugly.qq.com/bbs/forum.php?mod=viewthread&tid=663&utm_source=tuicool&utm_medium=referral
关于ECMAScript6,推荐链接:http://www.infoq.com/cn/minibooks/ES6-in-Depth


 1万+
1万+

 被折叠的 条评论
为什么被折叠?
被折叠的 条评论
为什么被折叠?
 到【灌水乐园】发言


