


Git学习笔记
标签(空格分隔): 工作相关
声明:以下为本人在工作中用git进行代码管理的笔记,按命令进行总结,仅供参考。
文章链接:https://www.zybuluo.com/guhuizaifeiyang/note/605443
git-game
- Git学习笔记
- 在Linux上安装Git
- git配置文件
- commit提交
- git status
- git diff
- 版本回退(git checkout/git reset)
- 文件追溯(git blame)
- git log
- 双点和多点
- 使用分支
- 设置Git别名
- Patch
- 修改提交log信息
- git stash
- git tag
- cherry-pick
- git checkout
- git revert
- git clean
- git rebase
- git rebase -i
- repo forall
- git show
- git remote
- git fetch
- git merge
- git mv
- git rev-parse
- git grep
- git ls-tree 列出版本库的目录树
- .gitignore忽略规则
- 从其他分支merge指定文件到当前分支,git checkout 是个合适的工具。
- 查看其它分支的某个文件
- 问题
在Linux上安装Git
首先,输入git,看系统有没有安装Git。如果没有安装,输入sudo apt-get install git即可完成Git的安装。
创建版本库
- 创建一个空目录:
$ mkdir learngit
$ cd learngit
$ pwd
/Users/michael/learngit- 配置身份:
git config --global user.name=
git config --global user.email=- 初始化Git仓库:
$ git init
Initialized empty Git repository in /Users/michael/learngit/.git/
如果Git的版本是1.6.5以上,可以在git init命令的后面直接输入目录名称:
$ git init learngit
git config --global –edit
Open the global configuration file in a text editor for manual editing.- 查看所有设置
$ git config --list- 删除版本库
在创建仓库的目录下找到隐藏的.git文件夹,删除该文件夹即可。
git配置文件
Git的三个配置文件的优先级:
- 版本库级别的配置文件 git config -e
- 全局配置文件(用户主目录下.gitconfig) git config -e –global
- 系统级配置文件(/etc/.gitconfig) git config -e –system
commit提交
git add
git add是进行git代码管理的第一步,是用来保存修改过的代码的。git常用的有三条git add命令,分别是git add . 、 git add -u 、git add -A
git add
我通常是通过git add <path>的形式把我们添加到索引库中,可以是文件也可以是目录。
.表示当前目录。git add -u
git add -u [<path>]: 把<path>中所有tracked文件中被修改过或已删除文件的信息添加到索引库。它不会处理untracted的文件。
.表示当前目录。git add -A
git add -A []表示把中所有tracked文件中被修改过或已删除文件和所有untracted的文件信息添加到索引库。
.表示当前目录。
总结:
1. git add -A 保存所有的修改
2. git add . 保存新的添加和修改,但是不包括删除
3. git add -u 保存修改和删除,但是不包括新建文件。
git commit
git commit -m <说明>git commit --amend -m <说明>
修改最后一次提交的信息
git status
查看仓库的状态
git diff
如果git status告诉你有文件被修改过,用git diff可以查看修改内容。
- git diff
比较工作区(working directory)和暂存区(stage)快照之间的差异,也就是修改之后还没有暂存起来的变化内容 - git diff –cached或者git diff –staged
比较已经暂存区(stage)的文件和上次提交(commited)时的快照之间的差异 - git diff branch_name
查看当前工作目录与另一个分支branch_name的区别
你也以加上路径限定符,来只 比较某一个文件或目录。
git diff branch_name -- <path> - git diff master..test
比较项目中任意两个版本的差异。 - git diff commit_id
比较工作区(working directory)commit_id之间的差异。 - git diff file
查看文件file修改的内容 - git diff commit_id1 commit_id2 – file
查看file在commit_id1和commit_id2的差异
以上命令都可以使用diff工具来对比差异:git difftool [ ]
版本回退(git checkout/git reset)
- HEAD指向的版本就是当前版本,因此,Git允许我们在版本的历史之间穿梭,使用命令git reset –hard commit_id。其中HEAD、HEAD^、HEAD^^分别表示最新版本、上一个版本、上上个版本的commit_id。
- 穿梭前,用git log可以查看提交历史,以便确定要回退到哪个版本。git log –stat可以查看提交详细历史。
要重返未来,用git reflog查看命令历史,以便确定要回到未来的哪个版本。

总结:
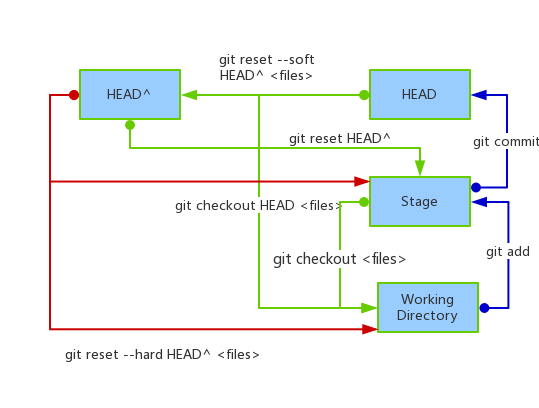
版本回退有以下几种方式:- git reset
此为默认方式,回退commit和stage信息。即暂存区将回退,但工作区不会回退. - git reset –soft commit_id
回退了commit的信息,暂存区和工作区都不会回退。 不能带路径进行软性重置。 - git reset –hard commit_id
彻底回退到某个版本,即暂存区和工作区都会被commit_id覆盖。不能带路径进行硬性重置。 - git checkout
丢弃工作区的修改,工作区被暂存区覆盖。 git checkout commit_id
丢弃工作区的修改,暂存区和工作区都会被commit_id覆盖。文件追溯(git blame)
当针对某个文件执行git blame时,就会逐行显示文件,在文件的每一行的行首显示此行最早是在什么版本,由谁引入的。
If you want to know who changed certain lines, you can use the -L flag to figure out who changed those lines. You can use the command:
git blame -L <line-number>,<ending-linenumber> <filename>line-number is the line you wish to start at.
ending-linenumber is the line you wish to end at.
git log
git log
Display the entire commit history using the default formatting.git log -n <limit>
Limit the number of commits by<limit>. For example, git log -n 3 will display only 3 commits.git log --oneline
Condense each commit to a single line.git log --stat
Along with the ordinary git log information, include which files were altered and the relative number of lines that were added or deleted from each of them.git log -p
Display the patch representing each commit. This shows the full diff of each commit, which is the most detailed view you can have of your project history.git log --author='<pattern>'
Search for commits by a particular author. The argument can be a plain string or a regular expression.git log --committer='<patter>'
仅显示指定提交者相关的提交。git log --grep='<pattern>'
Search for commits with a commit message that matches , which can be a plain string or a regular expression.git log <since>..<until>
Show only commits that occur between (<since> and <until>]. Both arguments can be either a commit ID, a branch name, HEAD, or any other kind of revision reference.
git log --since="2016-3-15" --before="2016-3-25"
//查看[2016-3-15,2016-3-25)之间的log
git log <file>
Only display commits that include the specified file.git log --graph --decorate --oneline
A few useful options to consider. The —graph flag that will draw a text based graph of the commits on the left hand side of the commit messages. —decorate adds the names of branches or tags of the commits that are shown. —oneline shows the commit information on a single line making it easier to browse through commits at-a-glance.git log -S 'key word'
仅显示添加或移除了某个关键字的提交,如果你希望得到更精确的结果,你可以使用 -G 选项来使用正则表达式搜索。git log --since=2.weeks
列出两周内的提交
这个命令可以在多种格式下工作,比如说具体的某一天 “2008-01-15”,或者是相对地多久以前 “2 years 1 day 3 minutes ago”。git log -L <start>,<end>:<file>
git log -L :<funcname>:<file>
Git 会尝试找出这个函数的范围,然后查找历史记录,并且显示从函数创建之后一系列变更对应的补丁。
<start> and <end> can take one of these forms:

number

If <start> or <end> is a number, it specifies an absolute line number (lines count from 1).

/regex/

This form will use the first line matching the given POSIX regex. If <start> is a regex, it will search from the end of the previous -L range, if any, otherwise from the start of file. If <start> is “^/regex/”, it will search from the start of file. If <end> is a regex, it will search starting at the line given by <start>.

+offset or -offset

This is only valid for <end> and will specify a number of lines before or after the line given by <start>.
显示文件main.c中的函数main()随着时间的推移而演变。
git log -L '/int main/',/^}/:main.c
git log --no-merges master..
..后面留空会默认用HEAD填充
如果你曾经与很多人在同一个持久分支上工作,可能你会经历父分支(例如master)会有大量的资源要合并到你的功能分支上,这使得我们很难分辨主分支发生了哪些变更、你的分支发生了哪些变更、尚未合并到master分支的变更。
git log –no-merges master..可以解决这个问题,注意–no-merges 选项意味着只显示没有合并到任何分支的变更,master..选项意味着只显示没有合并到master分支的变更(你必须在master后面加上..)。
你也可以使用 git show –no-merges master.. 或者 git log -p –no-merges master.. 命令(输出结果相同)来查看一下尚未合并的文件的详细变更。git log --ancestry-path commit1..commit2
查找commi1到commit2之间,属于commit1的后代,commit2的祖先的提交。
拓展:
git log --ancestry-path commit1..commit2 --merges
–merges
Print only merge commits. This is exactly the same as –min-parents=2.–no-merges
Do not print commits with more than one parent. This is exactly the same as –max-parents=1.–min-parents=
- –max-parents=
- –no-min-parents
–no-max-parents
Show only commits which have at least (or at most) that many parent commits. In particular, –max-parents=1 is the same as –no-merges, –min-parents=2 is the same as –merges. –max-parents=0 gives all root commits and –min-parents=3 all octopus merges.
–no-min-parents and –no-max-parents reset these limits (to no limit) again. Equivalent forms are –min-parents=0 (any commit has 0 or more parents) and –max-parents=-1 (negative numbers denote no upper limit).git log --pretty=format
git log --pretty=format:"%h - author: %an, %ad; commiter: %cn, %cd : %s""定制要显示的记录格式,这样的输出便于后期编程提取分析。
下表列出了常用的格式占位符写法及其代表的意义。
| 选项 | 说明 |
|---|---|
| %H | 提交对象(commit)的完整哈希字串 |
| %h | 提交对象的简短哈希字串 |
| %T | 树对象(tree)的完整哈希字串 |
| %t | 树对象的简短哈希字串 |
| %P | 父对象(parent)的完整哈希字串 |
| %p | 父对象的简短哈希字串 |
| %an | 作者(author)的名字 |
| %ae | 作者的电子邮件地址 |
| %ad | 作者修订日期(可以用 -date= 选项定制格式) |
| %ar | 作者修订日期,按多久以前的方式显示 |
| %cn | 提交者(committer)的名字 |
| %ce | 提交者的电子邮件地址 |
| %cd | 提交日期 |
| %cr | 提交日期,按多久以前的方式显示 |
| %s | 提交说明 |
还可以给出若干搜索条件,列出符合的提交。 用 –author 选项显示指定作者的提交,用 –grep 选项搜索提交说明中的关键字。 (请注意,如果要得到同时满足这两个选项搜索条件的提交,就必须用 –all-match 选项。否则,满足任意一个条件的提交都会被匹配出来)
(试了一下,发现不用–all-match也会筛选出两个都匹配的提交)
git log对比分支实用技能:
双点和多点
- 查看 dev 有,而 master 中没有的。
git log ^master dev- 查看 dev 中比 master 中多提交了哪些内容
git log master..devGit 允许你在任意引用前加上 ^ 字符或者 –not 来指明你不希望提交被包含其中的分支。
// 这三个命令是等效的
$ git log refA..refB
$ git log ^refA refB
$ git log refB --not refA
这个语法很好用,因为你可以在查询中指定超过两个的引用,这是双点语法无法实现的。 比如,你想查看所有被 refA 或 refB 包含的但是不被 refC 包含的提交,你可以输入下面中的任意一个命令
$ git log refA refB ^refC
$ git log refA refB --not refC- 查看master和dev的差异
git log dev...master// 该命令可以显示出差异的提交具体是哪个分支
// 根据我们在 –left-right dev…master 的顺序,左箭头 < 表示是 dev 的,右箭头 > 表示是 master的。
git log --left-right dev...master使用分支
- 查看分支:git branch
- 查看远程分支:git branch -r
- 查看所有分支:git branch -a
- 创建分支:git branch name
- 切换分支:git checkout name
- 创建+切换分支:git checkout -b name
- 从远程分支创建分支:git checkout –b name origin/name
- 重命名分支:git branch -m
- 删除分支:git branch -d name
- 合并某分支到当前分支:git merge name
- 合并时发生冲突,不使用fast-forward模式:git merge –no-ff –m ‘commit message’ name。合并分支支时,加上–no-ff参数就可以用用普通模式合并,合并后的历史有分支能看出来曾经做过合并,而而fast forward合并就看不出来曾经做过合并。
- git branch –contains
查看某个提交属于哪个分支 - –merged 与 –no-merged 这两个有用的选项可以过滤这个列表中已经合并或尚未合并到当前分支的分支。
- 删除远程分支: git push origin –delete branch_name
设置Git别名
将commit用ci代替:
$ sudo git config --system alias.ci commit可在/etc/gitconfig文件中查看,能被所有用户使用。
或者:
git config --global alias.ci commit可在.gitconfig文件中查看,只在本用户的全局配置中生效。
Patch
可以根据一个diff文件进行版本更新。
三种种简单的patch方案:
一、 用git diff生成的标准patch。
git diff master>patch
git apply patch
二、 git format-patch生成的git专用patch。
1 使用git format-patch生成所需要的patch:
- 当前分支所有超前master的提交:
git format-patch -M master - 某次提交以后的所有patch:
git format-patch 4e16
4e16指的是commit名,不包括4e16。 - 从根到指定提交的所有patch:
git format-patch –root 4e16
包括4e16 - 某两次提交之间的所有patch:
git format-patch 365a..4e16
(365a和4e16 ]分别对应两次提交的名称 - 某次提交(含)之前的几次提交:
git format-patch –n commit_id
-n指patch数,commit_id
单次提交即为:git format-patch -1 commit_id
git format-patch生成的补丁文件默认从1开始顺序编号,并使用对应提交信息中的第一行作为文件名。如果使用了– numbered-files选项,则文件名只有编号,不包含提交信息;如果指定了–stdout选项,可指定输出位置,如当所有patch输出到一个文件;可指定-o <dir>指定patch的存放目录;
2 应用patch:
先检查patch文件:git apply –stat newpatch.patch
检查能否应用成功:git apply –check newpatch.patch
打补丁:git am newpatch.patch
3 解决冲突:
强制打补丁
git apply --reject PATCH手动解决代码冲突(检视生成的 .rej 文件,与冲突文件比较,修改冲突内容,或者使用
git mergetool进行修改,并最终把文件加入到index中)
$ git add FIXED_FILES
$ git add 其他 apply 进来的文件
$ git am --resolved
三、 Linux patch
单个文件
diff –uN from-file to-file >to-file.patch
patch –p1 < to-file.patch
多个文件
diff –uNr from-docu to-docu >to-docu.patch
patch –p1 < to-docu.patch
-u 显示有差异行的前后几行(上下文), 默认是前后各3行。
-r 递归地对比一个目录和它的所有子目录(即整个目录树)。
-N 如果某个文件缺少了, 就当作是空文件来对比
-p1 忽略补丁中的路径的第一级目录
Example:
to-docu.patch:
diff -uNr old/Camera2/src/com/android/camera/app/AppController.java new/Camera2/src/com/android/camera/app/AppController.java
--- old/Camera2/src/com/android/camera/app/AppController.java   2016-10-12 17:23:22.000000000 +0800
+++ new/Camera2/src/com/android/camera/app/AppController.java   2016-10-10 16:07:24.000000000 +0800
@@ -425,7 +425,9 @@
      * Finishes the activity since the intent got canceled.
      */
     public void finishActivityWithIntentCanceled();
-
+
     public ShutterButton.OnShutterButtonListener getPhotoShutterListener();
     public ShutterButton.OnShutterButtonListener getVideoShutterListener();
+
+    public int getCameraId();
 }
步骤:
1、进入到Camera2目录
2、命令:patch -p2 < to-docu.patch
因为patch中diff的对比路径为old/Camera2/和new/Camera2/,而当前目录为/Camera2/,所以用-p2忽略补丁中的路径的前两级目录,
修改提交log信息
git commit --amend -m <message>可以修改最后一次提交的信息。
对于历史提交,必须使用rebase。
git rebase –i HEAD~3
表示要修改当前版本的倒数第三次状态。执行这个命令后,会显示:
pick:*
pick:*
pick:*
如果你要修改哪个,就将那行的pick改成edit,然后保存退出。然后再使用:
git commit –amend来对commit进行修改。
修改完成之后,使用git rebase –continue。
git stash
当在一个分支的开发工作未完成,却又要切换到另外一个分支进行开发的时候,除了commit原分支的代码改动的方法外,我觉得git stash是一个更加便捷的选择。
步骤如下:
一、添加改动到stash。在原分支 git stash save -u “message”,执行完该命令后,工作区会恢复到最近一次提交,所以一定要将当前更改提交或者保存到stash。
二、恢复改动。如果你要恢复的是最近的一次改动,git stash pop即可,我用这个用的最多。如果有多次stash操作,那就通过git stash list查看stash列表,从中选择你想要pop的stash,运行命令git stash pop stash@{id}或者 git stash apply stash@{id}即可。
三、删除stash。git stash drop stash@{id} 如果不加stash编号,默认的就是删除最新的,也就是编号为0的那个,加编号就是删除指定编号的stash。git stash clear 是清除所有stash,整个世界一下子清净了!
四、git stash pop与 git stash apply stash@{id}的区别。
git stash pop stash@{id}命令会在执行后将对应的stash id 从stash list里删除,而 git stash apply stash@{id} 命令则会继续保存stash id。
五、使用 –index 选项来运行 git stash apply 命令,来尝试重新应用暂存的修改。
六、可以运行 git stash drop 加上将要移除的储藏的名字来移除它git stash drop stash@{0}
七、从储藏创建一个分支。运行 git stash branch 创建一个新分支,检出储藏工作时所在的提交。从而避免不得不需要解决冲突的情况。
git tag
- 创建tag
git tag v1.0 [commit_id] - 查看tag
git tag
git tag -l ‘v1.8.*’ - 查看标签信息
git show v0.9 - 创建带有说明的标签
git tag -a v0.1 -m “version 0.1 released” 3628164 - 删除标签
git tag -d v0.1 - 推送某个标签到远程
git push origin v1.0 - 一次性推送全部尚未推送到远程的本地标签
git push origin –-tags - 如果标签已经推送到远程,要删除远程标签
git tag -d v0.9
git push origin :refs/tags/v0.9
检出标签
在 Git 中你并不能真的检出一个标签,因为它们并不能像分支一样来回移动。 如果你想要工作目录与仓库中特定的标签版本完全一样,可以使用 git checkout -b [branchname] [tagname] 在特定的标签上创建一个新分支:
$ git checkout -b version2 v2.0.0
Switched to a new branch ‘version2’
当然,如果在这之后又进行了一次提交,version2 分支会因为改动向前移动了,那么 version2 分支就会和 v2.0.0 标签稍微有些不同,这时就应该当心了。
cherry-pick
如果某个特性分支上有多个commits,但你只想引入其中之一就可以使用这种方法。
git cherry-pick <commit id>
git cherry-pick -x <commit id>:保留原提交者信息。
git cherry-pick <start-commit-id>..<end-commit-id>:表示把<start-commit-id>到<end-commit-id>之间(左开右闭,不包含start-commit-id)的提交cherry-pick到当前分支;
git cherry-pick -n <commit id>:This flag applies the changes necessary to cherry-pick each named commit to your working tree and the index, without making any commit.
git checkout
The git checkout command serves three distinct functions: checking out files, checking out commits, and checking out branches.
git checkout master
Return to the master branch.git checkout <commit> <file>
Check out a previous version of a file. This turns the that resides in the working directory into an exact copy of the one from and adds it to the staging area.git checkout <commit>
Update all files in the working directory to match the specified commit. You can use either a commit hash or a tag as the<commit>argument. This will put you in a detached HEAD state.git checkout - -ours // 抛弃remote的版本,保留本地的
git checkout - -theirs // 抛弃本地的版本,完全采用remote的
git revert
git revert 是撤销某次操作,此次操作之前的commit都会被保留,并且生成一个新的commit。
git clean
* git clean -n
Perform a “dry run” of git clean. This will show you which files are going to be removed without actually doing it.
* git clean -f
Remove untracked files from the current directory. This will not remove untracked folders or files specified by .gitignore.
* git clean -f <path>
Remove untracked files, but limit the operation to the specified path.
* git clean -df
Remove untracked files and untracked directories from the current directory.
* git clean -xf
Remove untracked files from the current directory as well as any files that Git usually ignores.
git rebase
git rebase,顾名思义,就是重新定义(re)起点(base)的作用,即重新定义分支的版本库状态。要搞清楚这个东西,要先看看版本库状态切换的两种情况:
1. 我们知道,在某个分支上,我们可以通过git reset,实现将当前分支切换到本分支以前的任何一个版本状态,即所谓的“回溯”。即实现了本分支的“后悔药”。也即版本控制系统的初衷。
2. 还有另一种情况,当我们的项目有多个分支的时候。我们除了在本地开发的时候可能会“回溯”外,也常常会将和自己并行开发的别人的分支修改添加到自 己本地来。这种情况下很常见。作为项目管理员,肯定会不断的合并各个子项目的补丁,并将最新版本推送到公共版本库,而作为开发人员之一,提交自己的补丁之 后,往往需要将自己的工作更新到最新的版本库,也就是说把别的分支的工作包含进来。
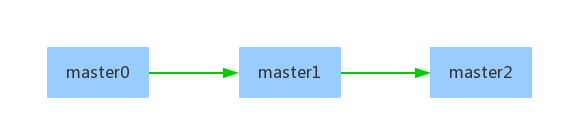
举个例子来说吧!假设我们的项目初期只有一个master分支,然后分支上作过两次提交。这个时候系统只有一个master分支,他的分支历史如下:
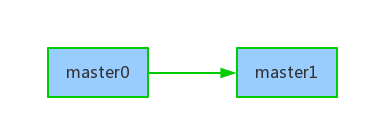
这个时候,我们可以通过git reset将master分支(工作目录、工作缓存或者是版本库)切换到master1或者master0版本,这就是前面所说的第一种情况。
假设我们这里把master分支通过git reset回溯到了master1状态。那么这个时候系统仍然只有一个master分支,分支的历史如下:
然后,我们在这里以master1为起点,创建了另一个分支test。那么对于test分支来说,他的第一个版本test0就和master1是同一个版本,此时项目的分支历史如下:
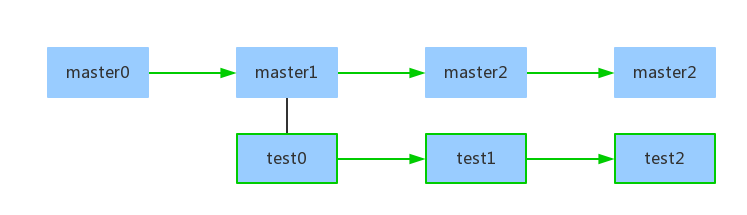
- 这个时候,通过第一种git reset的方式,可以将master分支的当前状态(master3)回溯到master分支的master0、master1、master2状态。 也可以将test分支当前状态(test2)回溯到test分支的test0、test1状态,以及test分支的父分支master的master0、 master1状态。
- 那么。如果我要让test分支从test0到test2之间所有的改变都添加到master分支来,使得master分支包含test分支的所有修改。这个时候就要用到git rebase了。
首先,我们切换到master分支,然后运行下面的命令,即可实现我们的要求:
git rebase test这个时候,git做了些什么呢?
1. 先将test分支的代码checkout出来,作为工作目录
2. 然后将master分支从test分支创建起的所有改变的补丁,依次打上。如果打补丁的过程没问题,rebase就搞定了
3. 如果打补丁的时候出现了问题,就会提示你处理冲突, 在解决完冲突后,用”git-add”命令去更新这些内容的索引(index), 然后,你无需执行 git-commit。处理好了,可以运行git rebase –continue继续直到完成
4. 如果你不想处理,你还是有两个选择,一个是放弃rebase过程(运行git rebase –abort),另一个是直接用test分支的取代当前分支的(git rebase –skip)。

当我们使用Git log来参看commit时,其commit的顺序也有所不同。
假设C3提交于9:00AM,C5提交于10:00AM,C4提交于11:00AM,C6提交于12:00AM,
对于使用git merge来合并所看到的commit的顺序(从新到旧)是:C7 ,C6,C4,C5,C3,C2,C1
对于使用git rebase来合并所看到的commit的顺序(从新到旧)是:C7 ,C6‘,C5’,C4,C3,C2,C1
因为C6’提交只是C6提交的克隆,C5’提交只是C5提交的克隆,
从用户的角度看使用git rebase来合并后所看到的commit的顺序(从新到旧)是:C7 ,C6,C5,C4,C3,C2,C1
另外,我们在使用git pull命令的时候,可以使用–rebase参数,即git pull –rebase,这里表示把你的本地当前分支里的每个提交(commit)取消掉,并且把它们临时 保存为补丁(patch)(这些补丁放到”.git/rebase”目录中),然后把本地当前分支更新 为最新的”origin”分支,最后把保存的这些补丁应用到本地当前分支上。
git rebase -i
作用:排序、编辑提交信息、删除无用提交,合并同问题提交
ctrl+x退出->Y->Enter
pick就是cherry-pick
reword 就是在cherry-pick的同时你可以编辑commit message,它会在执行的时候跳出一个界面让你编辑信息,当你退出的时候,会继续执行命令
edit 麻烦点,cherry-pick同时 ,会停止,让你编辑信息,完了后,你要用git rebase –continue命令继续执行,相对上面来说有点麻烦,感觉没必要啊。
squash,合并此条记录到前一个记录中,并把commit message也合并进去 。
fixup ,合并此条记录到前一个记录中,但是忽略此条commit message
(并将前一个记录改为r,退出后重新rename message)
如果要删除某条纪录,则删掉该行,并将前一个记录改为r,退出后重新rename message
repo forall
- repo forall -c
这个命令会遍历所有的git仓库,并在每个仓库执行-c所指定的命令(这个被执行的命令就不限于仅仅是git命令了,而是任何被系统支持的命令,比如:ls 、 pwd 、cp 等等的 ) repo forall -p -c git branch
//该命令会遍历所有仓库并打印每个仓库的分支情况,由于有了-p参数,这样便会打印出每个仓库的路径!!!repo sync同步所有仓库后,怎么查看更新了哪些仓库?
repo forall -p -c git log –since=”2016-3-15” –before=”2016-3-16”
git show
查看修改纪录
* git show commitId 查看某次修改纪录
* git show commitId1 commitId2 查看[Id1 Id2]的修改纪录
* git show HEAD@{5}
查看仓库中 HEAD 在五次前的所指向的提交
* git show master@{5.minutes.ago}
查看master分支在5分钟之前的提交
git remote
We will first check which remotes you have with:
git remote -vTo configure a new remote, you can use the command:
git remote add <remote_name> <git_remote_URL>If at any time, you messed up, you can remove remotes with:
git remote rm <remote_name>git fetch
git fetch downloads all the objects and references from a specified repository. This will download every branch and tag in the specified repository, unless you choose to not download branches and/or tags.
To complete this for your repository, you can use the following command:
git fetch <remote_name>git merge
If you want to combine all his files with your repository, you can try to merge it with your branch with the following command:
git merge <fetched_remote_name>/<your_branch_name>–no-ff:不使用fast-forward方式合并,保留分支的commit历史
–squash:使用squash方式合并,把多次分支commit历史压缩为一次
git mv
$ git mv README.md README
$ git status
On branch master
Changes to be committed:
  (use "git reset HEAD <file>..." to unstage)

    renamed:    README.md -> README
其实,运行 git mv 就相当于运行了下面三条命令:

$ mv README.md README
$ git rm README.md
$ git add README
git rev-parse
(1) 在工作区中建立目录a/b/c,进入到该目录中。
$ cd /path/workspace/demo/
$ mkdir -p a/b/c
$ cd /path/workspace/demo/a/b/c
(2) 显示版本库.git目录所在的位置。
$ git rev-parse --git-dir
/path/workspace/demo/.git
(3) 显示工作区根目录。
$ git rev-parse --show-toplevel
/path/workspace/demo
(4) 相对于工作区根目录的相对目录。
$ git rev-parse --show-prefix
a/b/c
(5) 显示从当前目录(cd)后退(up)到工作区的根的深度。
$ git rev-parse --show-cdup
../../../
(6) 显示引用对应的提交ID
$ git rev-parse master
6ca3b1d62dba6e6c550b343d4fd83911c022b95d
$ git rev-parse HEAD
6ca3b1d62dba6e6c550b343d4fd83911c022b95d
$ git rev-parse refs/heads/master
6ca3b1d62dba6e6c550b343d4fd83911c022b95d
git grep
git grep -n '<patter>'从提交历史或者工作目录中查找一个字符串或者正则表达式,并输出行号。- `git grep -p ‘’ 如果你想看匹配的行是属于哪一个方法或者函数,你可以传入 -p 选项
git ls-tree 列出版本库的目录树
用法:git ls-tree [<选项>] <树或提交> [<路径>...]

    -d                    只显示树
    -r                    递归到子树
    -t                    当递归时显示树
    -z                    条目以NUL字符终止
    -l, --long            包括对象大小
    --name-only           只列出文件名
    --name-status         只列出文件名
    --full-name           使用文件的全路径
    --full-tree           列出整个树;不仅仅当前目录(隐含 --full-name)
    --abbrev[=<n>]        用 <n> 位数字显示 SHA-1 哈希值
举例:
$ git ls-tree -l HEAD.gitignore忽略规则
- 空行或以
#开始的行会被忽略 - 通配符,
*代表任意多字符,?代表一个字符,[abc]代表可选字符范围等。 - 如果名称的最前面是一个路径分隔符
/,表明要忽略的文件在此目录下,而非子目录的文件。 - 如果名称的最后面是一个路径分隔符
/,表明要忽略的是整个目录,同名文件不忽略,否则同名的文件和目录都忽略。 - 名称的最前面加一个
!,代表不忽略
举个例子:
# 注释行,被忽略
*.a      # 忽略所有以.a为扩展名的文件
!lib.a   # 但是lib.a文件或目录不要忽略
/TODO    # 只忽略此目录下的TODO文件,子目录的TODO文件不忽略。
build/   # 忽略所有build/目录下的文件
doc/*.txt # 忽略文件如doc/notes.txt,但是文件如doc/server/arch.txt不被忽略
从其他分支merge指定文件到当前分支,git checkout 是个合适的工具。
git checkout source_branch <path>...查看其它分支的某个文件
$ git show BRANCH:PATH
````


<div class="se-preview-section-delimiter"></div>

## 如何直接在github网站上更新你fork的repo?
1.打开你的github fork repo;
2.点击Pull request;
3.点击new pull request.默认情况下,github会比较original/your fork,这时应该不会有任何输出,因为你并没有做过任何变更;
4.点击switching the base.这时github将反过来比较yourfork/original,这时你将看到original相对你fork时的所有commit;
5.点击create a pull request for this comparison,这时将会反过来向你的repo提交一个pull request;
6.这时你作为你自己fork的repo的owner,你就可以点击confirm the merge,大笔一挥,所有的改动都被你一网打尽了@!
enjoy it!


<div class="se-preview-section-delimiter"></div>

## unpack failed


<div class="se-preview-section-delimiter"></div>
error: unpack failed: error Missing tree f87f1f6851c617c2be1777e91df7a873e0bb7423
fatal: Unpack error, check server log
解决方法来自 stackoverflow.
使用如下命令即可推送成功:


<div class="se-preview-section-delimiter"></div>
git push –no-thin review HEAD:refs/for/master
关键点是 --no-thin 选项. stackoverflow 上的那位答主这么解释的:
默认情况下 git push 会在向服务器推送时进行优化,以将所发送的包降低到最小. 做法是发送时忽略本地仓库和远端仓库中共有的部分. 即 git push 默认是采用 --thin 选项的.
发生本文中出现的问题,貌似是因为某个 git 对象和服务器不一致了.
这时加上 --no-thin 参数,把该传的都传过去,问题就解决了.


<div class="se-preview-section-delimiter"></div>

## 祖先引用

`HEAD^1^2`:HEAD的第一父提交的第二父提交
`HEAD~1~2`:HEAD的第一父提交前3次提交
祖先引用是另一种指明一个提交的方式。 如果你在引用的尾部加上一个 ^, Git 会将其解析为该引用的上一个提交。 假设你的提交历史是:


<div class="se-preview-section-delimiter"></div>
$ git log –pretty=format:’%h %s’ –graph
* 734713b fixed refs handling, added gc auto, updated tests
* d921970 Merge commit ‘phedders/rdocs’
|\
| * 35cfb2b Some rdoc changes
* | 1c002dd added some blame and merge stuff
|/
* 1c36188 ignore *.gem
* 9b29157 add open3_detach to gemspec file list
你可以使用 HEAD^ 来查看上一个提交,也就是 “HEAD 的父提交”:


<div class="se-preview-section-delimiter"></div>
$ git show HEAD^
commit d921970aadf03b3cf0e71becdaab3147ba71cdef
Merge: 1c002dd… 35cfb2b…
Author: Scott Chacon schacon@gmail.com
Date: Thu Dec 11 15:08:43 2008 -0800
Merge commit 'phedders/rdocs'
你也可以在 ^ 后面添加一个数字——例如 d921970^2 代表 `“d921970 的第二父提交” `这个语法只适用于合并(merge)的提交,因为合并提交会有多个父提交。 第一父提交是你合并时所在分支,而第二父提交是你所合并的分支:


<div class="se-preview-section-delimiter"></div>
$ git show d921970^
commit 1c002dd4b536e7479fe34593e72e6c6c1819e53b
Author: Scott Chacon schacon@gmail.com
Date: Thu Dec 11 14:58:32 2008 -0800
added some blame and merge stuff
$ git show d921970^2
commit 35cfb2b795a55793d7cc56a6cc2060b4bb732548
Author: Paul Hedderly paul+git@mjr.org
Date: Wed Dec 10 22:22:03 2008 +0000
Some rdoc changes
另一种指明祖先提交的方法是 ~。 同样是指向第一父提交,因此 HEAD~ 和 HEAD^ 是等价的。 而区别在于你在后面加数字的时候。 `EAD~2 代表 “第一父提交的第一父提交”`,也就是 “祖父提交” —— Git 会根据你指定的次数获取对应的第一父提交。 例如,在之前的列出的提交历史中,HEAD~3 就是


<div class="se-preview-section-delimiter"></div>
$ git show HEAD~3
commit 1c3618887afb5fbcbea25b7c013f4e2114448b8d
Author: Tom Preston-Werner tom@mojombo.com
Date: Fri Nov 7 13:47:59 2008 -0500
ignore *.gem
也可以写成 HEAD^^^,也是第一父提交的第一父提交的第一父提交:
$ git show HEAD^^^
commit 1c3618887afb5fbcbea25b7c013f4e2114448b8d
Author: Tom Preston-Werner tom@mojombo.com
Date: Fri Nov 7 13:47:59 2008 -0500
ignore *.gem
“`
你也可以组合使用这两个语法 —— 你可以通过 HEAD~3^2 来取得之前引用的第二父提交(假设它是一个合并提交)。
问题
- git commit没有反应
去掉.repo/repo/hooks/prepare-commit-msg的执行权限


 2万+
2万+

 被折叠的 条评论
为什么被折叠?
被折叠的 条评论
为什么被折叠?
 到【灌水乐园】发言


