


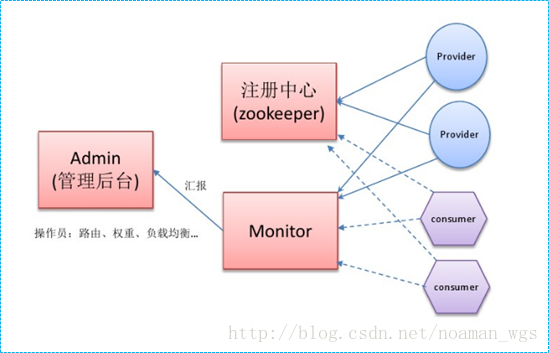
首先,如果要使用dubbo的话,需要下载一个注册中心,比较常用的是 zookeeper
所以我们首先需要下载并安装 zookeeper
下载地址为
http://mirrors.hust.edu.cn/apache/zookeeper/ 然后点击版本进去下载即可
我下载的是 zookeeper-3.4.11.tar.gz 版本的,这个应该是linux的包,不过可以在Windows下直接解压使用
解压完直接去 conf下面的 zoo_sample.cfg 把它改名为 zoo.cfg
然后再到bin目录下
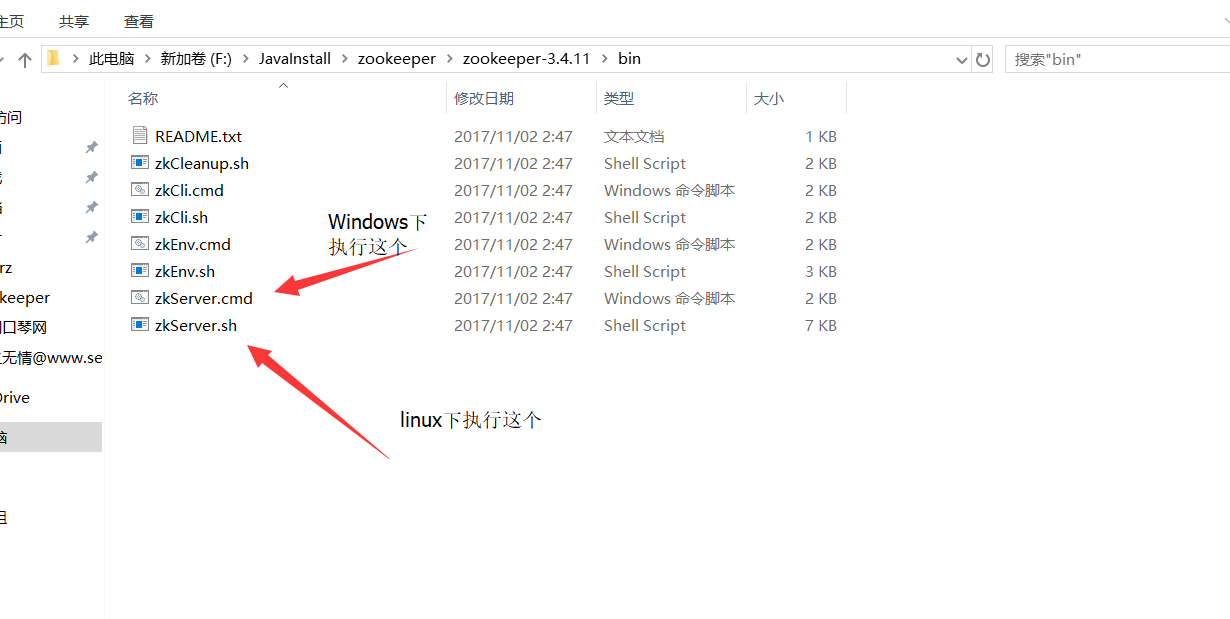
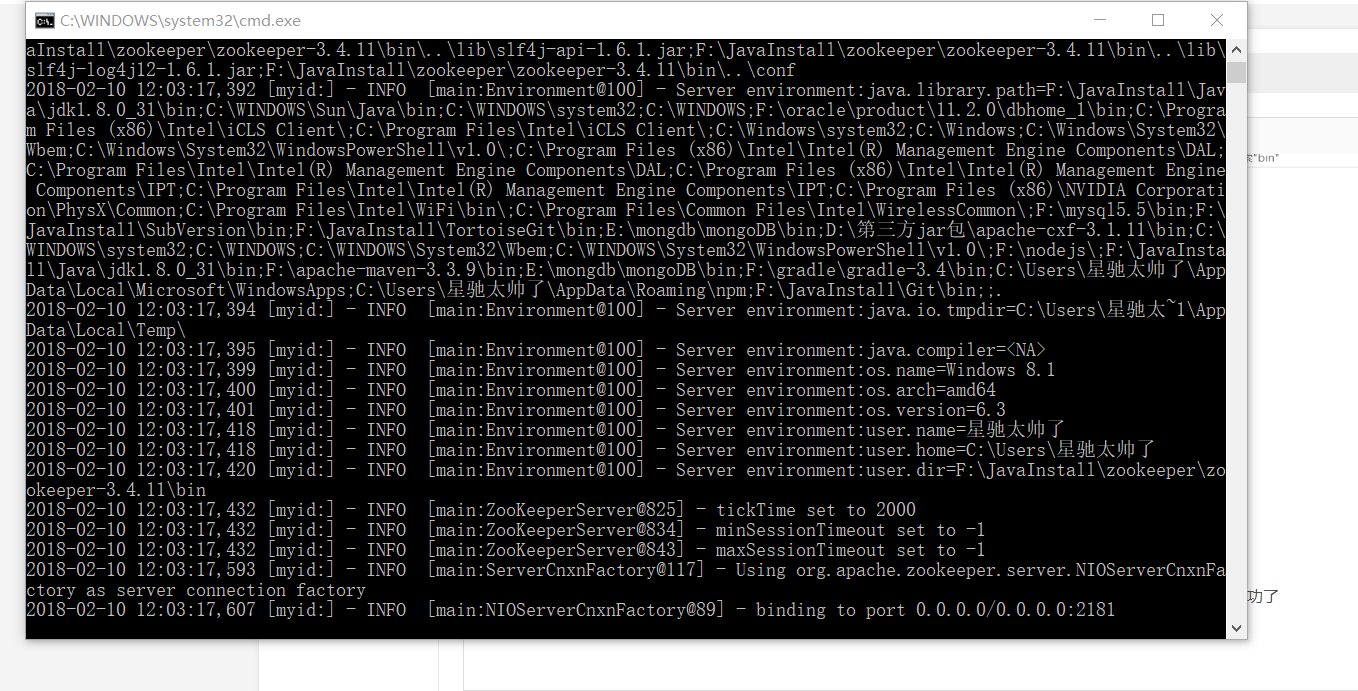
需要注意的是你已经把jdk配置到环境变量中了,不过一般也会配置吧,执行完看到下面的界面就说明启动成功了
至于zookeeper 的其他操作就请自行百度理解吧,现在可以跑起来就行了
启动了这个之后,就可以进行dubbo的demo实例了
需要建立三个maven工程
dubbo-api 存放接口的工程
dubbo--provider 服务的提供者工程,实现了接口的类和一些dao类
dubbo--coustmer 服务的消费者
首先是建立dubbo-api 工程(jar工程),这个很简单,只有一个接口在里面
package com.dubbo.api;

import java.util.List;

/**
 * @author while(true)
 * @date 2018年2月9日 下午10:42:20
 * @Desction 用于提供对外暴露的服务演示接口
 * @version 1.0
 */
public interface DemoService {

	List<String> getPermission(Long id);

}
pom文件也是不需要配置什么就可以了
然后是建立 dubbo--provider(war工程)工程 ,需要依赖 dubbo-api工程
下面说一下配置文件
web.xml配置springmvc的一些基本东西,如果这些不知道的话,可以看一下我的另一篇文章
http://blog.csdn.net/zxc_user/article/details/73784798
web.xml
<?xml version="1.0" encoding="UTF-8"?>
<web-app xmlns:xsi="http://www.w3.org/2001/XMLSchema-instance"
	xmlns="http://java.sun.com/xml/ns/javaee"
	xsi:schemaLocation="http://java.sun.com/xml/ns/javaee http://java.sun.com/xml/ns/javaee/web-app_2_5.xsd"
	id="WebApp_ID" version="2.5">

	<servlet>
		<servlet-name>springDispatcherServlet</servlet-name>
		<servlet-class>org.springframework.web.servlet.DispatcherServlet</servlet-class>
		<init-param>
			<param-name>contextConfigLocation</param-name>
			<param-value>classpath:springmvc.xml</param-value>
		</init-param>
		<load-on-startup>1</load-on-startup>
	</servlet>


	<!-- 拦截所有请求 -->
	<servlet-mapping>
		<servlet-name>springDispatcherServlet</servlet-name>
		<url-pattern>/</url-pattern>
	</servlet-mapping>

	<context-param>
		<param-name>contextConfigLocation</param-name>
		<param-value>classpath:spring.xml</param-value>
	</context-param>


	<!-- springIOC 容器监听器 -->
	<listener>
		<listener-class>org.springframework.web.context.ContextLoaderListener</listener-class>
	</listener>

</web-app>
然后是配置springmvc的文件
springmvc.xml
<?xml version="1.0" encoding="UTF-8"?>
<beans xmlns="http://www.springframework.org/schema/beans"
	xmlns:xsi="http://www.w3.org/2001/XMLSchema-instance"
	xmlns:context="http://www.springframework.org/schema/context"
	xmlns:mvc="http://www.springframework.org/schema/mvc"
	xmlns:dubbo="http://code.alibabatech.com/schema/dubbo"
	xsi:schemaLocation="http://www.springframework.org/schema/mvc http://www.springframework.org/schema/mvc/spring-mvc-4.3.xsd
		http://www.springframework.org/schema/beans http://www.springframework.org/schema/beans/spring-beans.xsd
		http://www.springframework.org/schema/context http://www.springframework.org/schema/context/spring-context-4.3.xsd
		http://code.alibabatech.com/schema/dubbo http://code.alibabatech.com/schema/dubbo/dubbo.xsd">
	<!-- 扫描了com.dubbo.api.DemoService的实现类所在包 -->
    <context:component-scan base-package="com.dubbo.provider"></context:component-scan>
    <!-- dubbo服务名 -->
   	<dubbo:application name="hehe_provider" />
   	<!-- 绑定到 zookeeper 注册中心的地址,这个就是上面刚刚在本地启动的那个注册中心-->
	<dubbo:registry address="zookeeper://127.0.0.1:2181"/>
	<!-- 服务提供的端口 -->
	<dubbo:protocol name="dubbo" port="20880" />
	<!-- 要让dubbo发布出来的接口, ref 指向一个实现类-->
	<dubbo:service interface="com.dubbo.api.DemoService" ref="demoService" />

</beans>
至于spring.xml文件提供一个空的就行了,或者你有什么配置自己加吧
demoService的实现类
package com.dubbo.provider;

import java.util.Arrays;
import java.util.HashMap;
import java.util.List;
import java.util.Map;

import org.springframework.stereotype.Service;

import com.dubbo.api.DemoService;
/**
 * @author while(true)
 * @date 2018年2月9日 下午11:26:00
 * @Desction 服务的实现类
 * @version 1.0
 */
@Service("demoService")
public class DemoServiceImpl implements DemoService{

	//模拟的静态数据
	private static Map<Long, List<String>> data;

	static {
		data = new HashMap<>();
		data.put(1l, Arrays.asList("zxc", "ldh", "hzh"));
		data.put(2l, Arrays.asList("111", "222", "333"));
		data.put(3l, Arrays.asList("aaa", "bbb", "ccc"));
	}

	@Override
	public List<String> getPermission(Long id) {
		return data.get(id);
	}

}
然后还有一个pom文件,各种依赖和tomcat插件,虽然有点长,还是贴出来吧。
<project xmlns="http://maven.apache.org/POM/4.0.0" xmlns:xsi="http://www.w3.org/2001/XMLSchema-instance" xsi:schemaLocation="http://maven.apache.org/POM/4.0.0 http://maven.apache.org/xsd/maven-4.0.0.xsd">
  <modelVersion>4.0.0</modelVersion>
  <groupId>com.demo.dubbo</groupId>
  <artifactId>dubbo--provider</artifactId>
  <version>0.0.1-SNAPSHOT</version>
  <packaging>war</packaging>

     <properties>
      <spring.version>4.3.8.RELEASE</spring.version>
      <springmvc.version>4.3.8.RELEASE</springmvc.version>
      <servlet.version>3.1.0</servlet.version>
      <jsp.version>2.2</jsp.version>
 	</properties>
  <dependencies>
     	<dependency>
	     	 <groupId>com.demo.dubbo</groupId>
			 <artifactId>dubbo-api</artifactId>
			 <version>0.0.1-SNAPSHOT</version>
	     </dependency>

	        <!-- Spring的依赖 -->
	<dependency>
	   <groupId>org.springframework</groupId>
	   <artifactId>spring-context</artifactId>
	   <version>${spring.version}</version>
	</dependency>

	<!-- springmvc的依赖 -->
	<dependency>
	   <groupId>org.springframework</groupId>
	   <artifactId>spring-web</artifactId>
	   <version>${springmvc.version}</version>
	</dependency>

	<dependency>
	   <groupId>org.springframework</groupId>
	   <artifactId>spring-webmvc</artifactId>
	   <version>${springmvc.version}</version>
	</dependency>

	<!-- servlet依赖的jar包 -->
	<dependency>
	   <groupId>javax.servlet</groupId>
	   <artifactId>javax.servlet-api</artifactId>
	   <version>${servlet.version}</version>
	   <scope>provided</scope>
	</dependency>

	<!-- JSP依赖的jar包 -->
	<dependency>
	   <groupId>javax.servlet.jsp</groupId>
	   <artifactId>jsp-api</artifactId>
	   <version>${jsp.version}</version>
	   <scope>provided</scope>
	</dependency>

	    <dependency>
		    <groupId>com.fasterxml.jackson.core</groupId>
		    <artifactId>jackson-core</artifactId>
		    <version>2.8.1</version>
		</dependency>

		<!-- https://mvnrepository.com/artifact/com.fasterxml.jackson.core/jackson-databind -->
		<dependency>
		    <groupId>com.fasterxml.jackson.core</groupId>
		    <artifactId>jackson-databind</artifactId>
		    <version>2.8.1</version>
		</dependency>

		<!-- https://mvnrepository.com/artifact/com.fasterxml.jackson.core/jackson-annotations -->
		<dependency>
		    <groupId>com.fasterxml.jackson.core</groupId>
		    <artifactId>jackson-annotations</artifactId>
		    <version>2.8.1</version>
		</dependency>

		 <!-- dubbo -->
<dependency>
      <groupId>com.alibaba</groupId>
      <artifactId>dubbo</artifactId>
      <version>2.5.3</version>
      <exclusions>
        <exclusion>
          <groupId>org.springframework</groupId>
          <artifactId>spring</artifactId>
        </exclusion>
      </exclusions>
    </dependency>
    <dependency>
      <groupId>com.101tec</groupId>
      <artifactId>zkclient</artifactId>
      <version>0.10</version>
    </dependency>
    </dependencies>

  <build>
     <plugins>
            <plugin>
				<groupId>org.apache.tomcat.maven</groupId>
				<artifactId>tomcat7-maven-plugin</artifactId>
				<configuration>
				<port>8081</port>  <!-- 端口号 -->
				<path>/</path>     <!-- 访问路径 -->
				</configuration>
			</plugin>
     </plugins>
  </build>
</project>
然后启动该项目,如果启动成功就说明你配置对了
最后是创建 dubbo--coustmer(war工程),需要依赖 dubbo-api工程
基本上的配置跟 dubbo -- provider 一致
只说一下不同的地方,springmvc.xml
<?xml version="1.0" encoding="UTF-8"?>
<beans xmlns="http://www.springframework.org/schema/beans"
	xmlns:xsi="http://www.w3.org/2001/XMLSchema-instance"
	xmlns:context="http://www.springframework.org/schema/context"
	xmlns:mvc="http://www.springframework.org/schema/mvc"
	xsi:schemaLocation="http://www.springframework.org/schema/mvc http://www.springframework.org/schema/mvc/spring-mvc-4.3.xsd
		http://www.springframework.org/schema/beans http://www.springframework.org/schema/beans/spring-beans.xsd
		http://www.springframework.org/schema/context http://www.springframework.org/schema/context/spring-context-4.3.xsd">

    <mvc:annotation-driven/>
    <mvc:default-servlet-handler/>
    <!-- 扫描包 -->
    <context:component-scan base-package="com.dubbo.coustmer"></context:component-scan>
    <!-- 对静态资源文件的访问  restful-->
    <mvc:resources mapping="/js/**" location="/js/" />
    <mvc:resources mapping="/lib/**" location="/lib/" />
    <mvc:resources mapping="/plugins/**" location="/plugins/" />
    <mvc:resources mapping="/uploadFiles/**" location="/uploadFiles/" />
    <mvc:resources mapping="/WEB-INF/html/**" location="/WEB-INF/html/" />

    <!-- 配置SpringMVC的视图解析器 -->
    <bean class="org.springframework.web.servlet.view.InternalResourceViewResolver">
        <property name="prefix" value="/WEB-INF/html"/>
        <property name="suffix" value=".jsp"/>
    </bean>

</beans>
spring.xml
<?xml version="1.0" encoding="UTF-8"?>
<beans xmlns="http://www.springframework.org/schema/beans"
	xmlns:xsi="http://www.w3.org/2001/XMLSchema-instance"
	xmlns:context="http://www.springframework.org/schema/context"
	xmlns:dubbo="http://code.alibabatech.com/schema/dubbo"
	xsi:schemaLocation="http://www.springframework.org/schema/beans http://www.springframework.org/schema/beans/spring-beans.xsd
		http://www.springframework.org/schema/context http://www.springframework.org/schema/context/spring-context-4.3.xsd
		http://code.alibabatech.com/schema/dubbo http://code.alibabatech.com/schema/dubbo/dubbo.xsd">
    <!-- 消费者的名字,跟提供者不一样即可,没什么要求 -->
 	<dubbo:application name="hello-world-customer"/>
 	<!-- 绑定注册中心,跟提供者的注册中心一样 -->
    <dubbo:registry address="zookeeper://127.0.0.1:2181"/>
    <!-- 生成远程服务代理,可以和本地bean一样使用demoService -->
    <dubbo:reference id="demoService" interface="com.dubbo.api.DemoService"/>
</beans>
然后是记得tomcat插件的端口要改一下,改为8082端口的
记得扫描包要在springmvc中扫,不要在ioc容器中扫
最后是一个controller使用注册中心里面的service层
package com.dubbo.coustmer;

import java.util.List;

import org.springframework.beans.factory.annotation.Autowired;
import org.springframework.web.bind.annotation.PathVariable;
import org.springframework.web.bind.annotation.RequestMapping;
import org.springframework.web.bind.annotation.RestController;

import com.dubbo.api.DemoService;

@RestController
@RequestMapping("/demo")
public class DemoController {

	@Autowired
	private DemoService demoService;

	@RequestMapping("/test/{id}")
	public List<String> demoTest(@PathVariable("id") Long id) {
		return demoService.getPermission(id);
	}

}
然后把这个项目也启动一下即可
启动完成之后在浏览器输入
http://localhost:8082/demo/test/2
看到下面的界面就可以了

Dubbo管理控制台介绍
管理控制台功能
路由规则,动态配置,服务降级
访问控制,权重调整
负载均衡
下载dubbo-admin,可自行根据网上介绍安装。大致做法就是将dubbo-admin中 的某个文件夹内容替换到tomcat的conf中,再运行tomcat即可。但我在实际操作中发现JDK8无法运行,后来找到一个JDK8可以实现的dubbo-admin版本,下载地址:http://www.itmayun.com/it/files/226631678709806/resource/901920001882583/1.html。
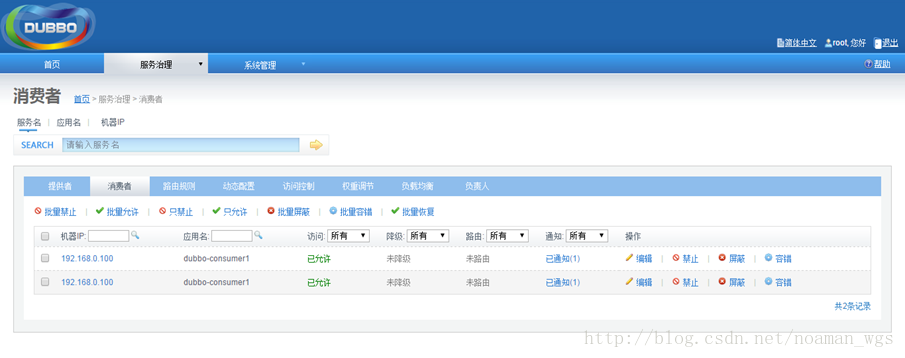
成功开启输入用户名密码root后,即可进入控制台首页查看消费者提供者情况:
查看提供者: 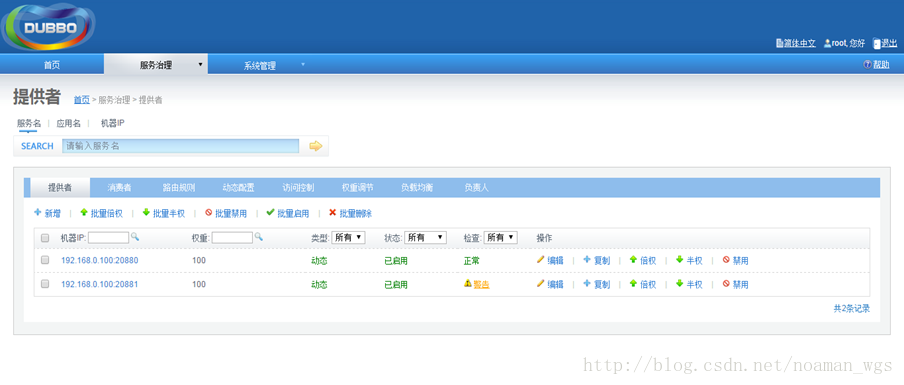
查看消费者:


 1375
1375

 被折叠的 条评论
为什么被折叠?
被折叠的 条评论
为什么被折叠?
 到【灌水乐园】发言


