


去阿里申请免费1年 下载其他


解压出 .pem 和key

华硕路由器导入证书
外部网络→DDNS→上传HTTPS/SSL 证书

配置阿里云docker镜像地址 - 辉_少 - 博客园 阿里云镜像

虚拟机 需要配置网络 查看→ centos7配置IP地址 - nonzero - 博客园
![]()
vi /etc/sysconfig/network-scripts/ifcfg-eth0
vim /etc/sysconfig/network-scripts/ifcfg-eth0 //按2下tab显示网卡名
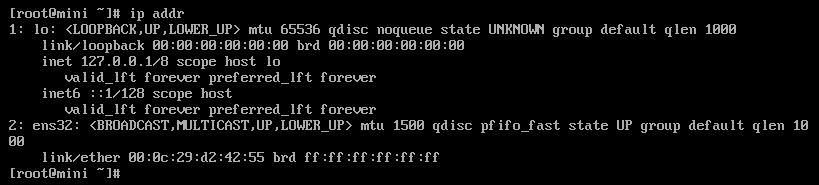
有关于centos7获取IP地址的方法主要有两种,1:动态获取ip;2:设置静态IP地址
在配置网络之前我们先要知道centos的网卡名称是什么,centos7不再使用ifconfig命令,可通过命令 IP addr查看,如图,网卡名为ens32,是没有IP地址的
动态ip设置
固定ip设置
TYPE=Ethernet
PROXY_METHOD=none
BROWSER_ONLY=no
BOOTPROTO=static   #设置静态ip
DEFROUTE=yes
IPV4_FAILURE_FATAL=no
IPV6INIT=yes
IPV6_AUTOCONF=yes
IPV6_DEFROUTE=yes
IPV6_FAILURE_FATAL=no
IPV6_ADDR_GEN_MODE=stable-privacy
NAME=eth0
UUID=6afff2a9-c1bf-4914-afbf-97fc921cd205
DEVICE=eth0
ONBOOT=yes      #这里如果是no的话设置为yes,表示网卡设备自动启动(能联网ping www.baidu.com)
PEERDNS=yes
PEERROUTES=yes
IPV6_PEERDNS=yes
IPV6_PEERROUTES=yes
IPV6_PRIVACY=no

GATEWAY=192.168.50.1   #默认网关(路由器网关==路由器登录界面)
IPADDR=192.168.50.6    #自己定的固定ip
NETMASK=255.255.255.0  #子网掩码
DNS1=223.5.5.5         #dns服务器1,所在网络可用dns服务,可以设置其他的
DNS2=223.6.6.6         #备用dns2
ip addr 查看ip
systemctl restart network 重启网络
没有ifconfig命令
Redhat7没有安装ifconfig命令的解决方法_Linux日志的技术博客_51CTO博客
yum install net-tools 即可安装ifconfig命令
centos关机与重启命令
Linux centos重启命令:
1、reboot 普通重启
2、shutdown -r now 立刻重启(root用户使用)
3、shutdown -r 10 过10分钟自动重启(root用户使用)
4、shutdown -r 20:35 在时间为20:35时候重启(root用户使用)
如果是通过shutdown命令设置重启的话,可以用shutdown -c命令取消重启
Linux centos关机命令:
1、halt 立刻关机
2、poweroff 立刻关机
3、shutdown -h now 立刻关机(root用户使用)
4、shutdown -h 10 10分钟后自动关机
如果是通过shutdown命令设置关机的话,可以用shutdown -c命令取消重启
vim安装
i. 那么如何安裝 vim 呢?
输入rpm -qa|grep vim 命令, 如果 vim 已经正确安裝,会返回下面的三行代码:
root@server1 [~]# rpm -qa|grep vim
vim-enhanced-7.0.109-7.el5
vim-minimal-7.0.109-7.el5
vim-common-7.0.109-7.el5
如果少了其中的某一条,比如 vim-enhanced 的,就用命令 yum -y install vim-enhanced 来安裝:
yum -y install vim-enhanced
如果上面的三条一条都沒有返回, 可以直接用 yum -y install vim* 命令
yum -y install vim*
查找字符串

按下回车,可以看到vim把光标移动到该字符处

再按n(小写)查看下一个匹配

按N(大写)查看上一个匹配
安装配置SSH
 1.检查是否安装openssh-server:
 #yum list installed | grep openssh-server

 安装openssh-server:
#yum install openssh-server

 2.修改sshd_config:
#vi /etc/ssh/sshd_config      #Port 22是linux默认ssh端口,自定义SSH端口必须避开系统已使用端口尽量大于10000修改如下:
#Port 22            #保留这行或者去掉前面‘#’号
Port 10000             #添加要开放的端口
Centos7开启SSH服务 - KinwingHU - 博客园
首先,要确保CentOS7安装了 openssh-server,在终端中输入
yum list installed | grep openssh-server
安装 yum install openssh-server
编辑:vim /etc/ssh/sshd_config
然后开启允许远程登录
最后,开启使用用户名密码来作为连接验证
保存文件,退出
(群晖docker centos7 启动sshd:成功才可显示:# /usr/sbin/sshd -D & )
开启 sshd 服务,输入 sudo service sshd start
检查 sshd 服务是否已经开启,输入ps -e | grep sshd
或者输入netstat -an | grep 22 检查 22 号端口是否开启监听
、为了免去每次开启 CentOS 时,都要手动开启 sshd 服务,可以将 sshd 服务添加至自启动列表中,
输入systemctl enable sshd.service
可以通过输入systemctl list-unit-files | grep sshd,查看是否开启了sshd 服务自启动
远程ssh连接 docker cenots7
配置ssh: vim /etc/ssh/sshd_config
完整设置
# This sshd was compiled with PATH=/usr/local/bin:/usr/bin

# The strategy used for options in the default sshd_config shipped with
# OpenSSH is to specify options with their default value where
# possible, but leave them commented.  Uncommented options override the
# default value.

# If you want to change the port on a SELinux system, you have to tell
# SELinux about this change.
# semanage port -a -t ssh_port_t -p tcp #PORTNUMBER
#
Port 22
#AddressFamily any
ListenAddress 0.0.0.0
ListenAddress ::

HostKey /etc/ssh/ssh_host_rsa_key
#HostKey /etc/ssh/ssh_host_dsa_key
HostKey /etc/ssh/ssh_host_ecdsa_key
HostKey /etc/ssh/ssh_host_ed25519_key

# Ciphers and keying
#RekeyLimit default none

# Logging
#SyslogFacility AUTH
SyslogFacility AUTHPRIV
#LogLevel INFO

# Authentication:

#LoginGraceTime 2m
#PermitRootLogin yes
#StrictModes yes
#MaxAuthTries 6
#MaxSessions 10

#PubkeyAuthentication yes

# The default is to check both .ssh/authorized_keys and .ssh/authorized_keys2
# but this is overridden so installations will only check .ssh/authorized_keys
AuthorizedKeysFile      .ssh/authorized_keys

#AuthorizedPrincipalsFile none

#AuthorizedKeysCommand none
#AuthorizedKeysCommandUser nobody

# For this to work you will also need host keys in /etc/ssh/ssh_known_hosts
#HostbasedAuthentication no
# Change to yes if you don't trust ~/.ssh/known_hosts for
# HostbasedAuthentication
#IgnoreUserKnownHosts no
# Don't read the user's ~/.rhosts and ~/.shosts files
#IgnoreRhosts yes

# To disable tunneled clear text passwords, change to no here!
#PasswordAuthentication yes
#PermitEmptyPasswords no
PasswordAuthentication yes

# Change to no to disable s/key passwords
#ChallengeResponseAuthentication yes
ChallengeResponseAuthentication no

# Kerberos options
#KerberosAuthentication no
#KerberosOrLocalPasswd yes
#KerberosTicketCleanup yes
#KerberosGetAFSToken no
#KerberosUseKuserok yes

# GSSAPI options
GSSAPIAuthentication yes
GSSAPICleanupCredentials no
#GSSAPIStrictAcceptorCheck yes
#GSSAPIKeyExchange no
#GSSAPIEnablek5users no

# Set this to 'yes' to enable PAM authentication, account processing,
# and session processing. If this is enabled, PAM authentication will
# be allowed through the ChallengeResponseAuthentication and
# PasswordAuthentication.  Depending on your PAM configuration,
# PAM authentication via ChallengeResponseAuthentication may bypass
# the setting of "PermitRootLogin without-password".
# If you just want the PAM account and session checks to run without
# PAM authentication, then enable this but set PasswordAuthentication
# and ChallengeResponseAuthentication to 'no'.
# WARNING: 'UsePAM no' is not supported in Red Hat Enterprise Linux and may cause several
# problems.
UsePAM yes

#AllowAgentForwarding yes
#AllowTcpForwarding yes
#GatewayPorts no
X11Forwarding yes
#X11DisplayOffset 10
#X11UseLocalhost yes
#PermitTTY yes
#PrintMotd yes
#PrintLastLog yes
#TCPKeepAlive yes
#UseLogin no
#UsePrivilegeSeparation sandbox
#PermitUserEnvironment no
#Compression delayed
#ClientAliveInterval 0
#ClientAliveCountMax 3
#ShowPatchLevel no
#UseDNS yes
#PidFile /var/run/sshd.pid
#MaxStartups 10:30:100
#PermitTunnel no
#ChrootDirectory none
#VersionAddendum none

# no default banner path
#Banner none

# Accept locale-related environment variables
AcceptEnv LANG LC_CTYPE LC_NUMERIC LC_TIME LC_COLLATE LC_MONETARY LC_MESSAGES
AcceptEnv LC_PAPER LC_NAME LC_ADDRESS LC_TELEPHONE LC_MEASUREMENT
AcceptEnv LC_IDENTIFICATION LC_ALL LANGUAGE
AcceptEnv XMODIFIERS

# override default of no subsystems
Subsystem       sftp    /usr/libexec/openssh/sftp-server

# Example of overriding settings on a per-user basis
#Match User anoncvs
#       X11Forwarding no
#       AllowTcpForwarding no
#       PermitTTY no
#       ForceCommand cvs server
------------------------------------------------------------------------------------------------------------------

部分参考
docker中centos7安装ssh服务 - 少时不知贵 - 博客园
Linux系统安装docker并用ssh登录docker容器_hpf247的博客-CSDN博客_docker ssh
群晖nas通过docker安装宝塔面板,摇身一变为全能web服务器 > oD^Blog
配置 使用外网Xshell ssh连接 docker centos7 (从这里开始配置centos)
 (0)安装ifconfig命令: yum install net-tools
(1)安装ssh服务 :yum install openssh-server
(2)安装vim:  yum -y install vim*
(3)编辑ssh配置参考上面 : vim /etc/ssh/sshd_config  (按i去除# 开放22端口) wq(保存) q(退出) q!(强制退出) /字符串 (搜索字符串 n寻找下个 N寻找上一个) 按上面配置
(4)启动sshd:

 /usr/sbin/sshd -D &  //启动服务

这时报以下错误:
[root@ b3426410ff43 /]# /usr/sbin/sshd
Could not load host key: /etc/ssh/ssh_host_rsa_key
Could not load host key: /etc/ssh/ssh_host_ecdsa_key
Could not load host key: /etc/ssh/ssh_host_ed25519_key

执行以下命令解决:

[root@b3426410ff43 /]# ssh-keygen -q -t rsa -b 2048 -f /etc/ssh/ssh_host_rsa_key -N ''
[root@b3426410ff43 /]# ssh-keygen -q -t ecdsa -f /etc/ssh/ssh_host_ecdsa_key -N ''
[root@b3426410ff43 /]# ssh-keygen -t dsa -f /etc/ssh/ssh_host_ed25519_key -N ''

然后再 启动sshd:
/usr/sbin/sshd -D &

远程ssh已经开通

(5) 修改root 密码
 [root@b5926410fe60 /]# passwd root

netstat -an | grep 22 检查22端口是否开启

如报:bash: netstat: command not found
请安装(0)ifconfig命令: yum install net-tools 
应用启动容器,进入终端,输入命令安装宝塔面板
安装宝塔命令
yum install -y wget && wget -O install.sh http://download.bt.cn/install/install_6.0.sh && bash install.sh


还需要配置21 端口,路由器开放端口
地址就是群晖:192.168.50.5:8889/d2009dcf

安装docker官方教程
Install Docker Engine on CentOS | Docker Documentation
参考博客
CentOS安装Docker-ce并配置国内镜像 - 东北小狐狸 - 博客园
添加阿里镜像稳定版仓库
$ sudo yum-config-manager --add-repo http://mirrors.aliyun.com/docker-ce/linux/centos/docker-ce.repo安装docker
 设置开机自启并启动Docker
sudo systemctl enable docker

# 设置开机启动
systemctl enable docker

sudo systemctl start docker

更换国内源
sudo mkdir -p /etc/docker

sudo tee /etc/docker/daemon.json <<-'EOF'
{
  "registry-mirrors": ["https://k7en6s5m.mirror.aliyuncs.com"]
}
EOF

sudo systemctl daemon-reload
sudo systemctl restart docker
安装 maven
解压:tar vxf apache-maven-3.5.2-bin.tar.gz
移动:mv apache-maven-3.5.2 /usr/local/maven3
jdk安装 - 烂城 - 博客园 自己博客
使用 Docker 部署 Spring Boot 项目
将项目 spring-boot-docker 拷贝服务器中,进入项目路径下进行打包测试。
进入项目才能执行mvn

使用 DockerFile 构建docker镜像:
mvn package docker:build![]()
#打包
mvn package
#启动
java -jar target/spring-boot-docker-1.0.jar1、创建容器是指定
docker run -p <host_port1>:<container_port1> -p <host_port2>:<container_port2>启动docker
sudo systemctl start docker  //启动

docker images //查看镜像

service docker stop //关闭docker

强制清除docker目录镜像文件

//删除/var/lib/docker/image/overlay2/imagedb/content/sha256下的文件即可

rm -rf /var/lib/docker/image/overlay2/imagedb/content/sha256

附docker常用命令:
重启docker服务  sudo service docker restart

关闭docker服务  docker service docker stop

开启docker服务  docker service docker start

查看当前运行的容器:docker ps

查询存在的容器:docker ps -a

删除容器:docker -rm  CONTAINERID

强制删除容器:docker -rm -f  CONTAINERID
使用docker images命令
docker images
REPOSITORY                      TAG                 IMAGE ID            CREATED             SIZE
springboot/spring-boot-docker   latest              99ce9468da74        6 seconds ago       117.5 MB
运行docker镜像
先运行docker images 再查看对应运动镜像

docker run -p 8080:8080 -t springboot/spring-boot-docker

docker run -p 8085:80 -t springboot/docker

docker run -p 8085:8080 -p 8086:8443 -t springboot/docker    //多端口设置

docker run -p 本机端口:docker端口 -t 镜像名
docker端口被占用解决

 查看当前端口
iptables -t nat -nL --line-number |grep 80

根据编号删除规则
   iptables -t nat -D DOCKER $num
   iptables -t nat -D DOCKER 2
删除docker镜像
要删除全部image的话直接输入
docker rmi $(docker images -q)
Docker无法删除images,出现这个错误是因为依赖container,可能有多个container
1.进入root权限

sudo su


2. 列出所有运行或没有运行的镜像

docker ps  -a


3.停止container,这样才能够删除其中的images:

.停止所有的容器container

docker stop $(docker ps -a -q)


如果想要删除一个container的话加一个指令:

docker rm  ID或者name
docker rm  $(docker ps -a -q) //全部删除
4.查看当前有些什么images

docker images


5.相关容器关闭后,删除对应的images,通过image的id来指定删除谁

关键 要删除全部image的话

docker rmi $(docker images -q)
删除docker镜像操作流程

-----------------------------------------------------------------------------------------------------------------------------------------------------------------
springboot配置https访问
生成证书
如果配置了JAVA开发环境,可以使用keytool命令生成证书。我们打开控制台,输入:
keytool -genkey -alias tomcat -dname "CN=Andy,OU=kfit,O=kfit,L=HaiDian,ST=BeiJing,C=CN" -storetype PKCS12 -keyalg RSA -keysize 2048 -keystore keystore.p12 -validity 365application.properties

使用阿里申请的ssl
如何让springboot打包的项目部署在阿里云上使用https和http方式访问 - JFaith - 博客园
application.yml
server:
  servlet:
    #配置访问的项目路径
    context-path: /
    #配置HTTPS访问端口
  port: 8443
  ssl:
    enabled: true
    key-store: classpath:xx.top.pfx
    key-store-password: xx
#配置http访问端口
http:
  port: 8080
@Configuration
public class TomcatConfig {
@Bean
public ServletWebServerFactory servletContainer() {
TomcatServletWebServerFactory tomcat = new TomcatServletWebServerFactory();
tomcat.addAdditionalTomcatConnectors(createStandardConnector()); // 添加http
return tomcat;
}
// 配置http
private Connector createStandardConnector() {
Connector connector = new Connector("org.apache.coyote.http11.Http11NioProtocol");
connector.setPort(8080);//nginx需要代理的端口,这里我直接写固定了,这里的端口是yml文件中的8080端口,你可以直接取yml文件的端口
return connector;
}
}cd 进入java项目 构建docker

设置双端口http/https
docker run -p 8085:8080 -p 8086:8443 -t springboot/docker

安装nginx
docker pull nginx   拉取

docker images 查看镜像

docker run -d --name nginx01 -p 3535:80 nginx  启动

docker run -d --name nginx01 -p 3535:80 -p 3636:443 nginx  http/https启动

docker start a54d644c20ae //启动已存在容器

docker restart 7c9105129793  //重启容器

docker ps  查看运行

curl localhost:3535 测试页面

查看nginx的运行状态:docker ps|grep nginx

docker attach 容器id  //进入容器命令模式

docker exec -it 容器名字 /bin/bash   进入容器交互模式 exit退出交互

mkdir -p /data/nginx/{conf,conf.d,html,logs,ssl}  //创建将要挂载的目录

docker run -it -v /data/nginx/conf/nginx.conf:/etc/nginx/nginx.conf nginx /bin/bash //挂载nginx.conf

docker run -it -v /data/nginx/conf.d/default.conf:/etc/nginx/conf.d/default.conf nginx /bin/bash  //挂载default.conf

docker run -it -v /data/nginx/html:/usr/share/nginx/html nginx /bin/bash //挂载html

docker run -it -v /data/nginx/logs:/var/log/nginx   nginx /bin/bash //挂载日志

docker run -it -v /data/nginx/ssl:/ssl  nginx /bin/bash  //挂载ssl证书

#一次挂载5个
docker run -it -v /data/nginx/conf/nginx.conf:/etc/nginx/nginx.conf   -v /data/nginx/conf.d/default.conf:/etc/nginx/conf.d/default.conf  -v /data/nginx/html:/usr/share/nginx/html  -v /data/nginx/logs:/var/log/nginx -v /data/nginx/ssl:/ssl nginx /bin/bash

docker cp 7dca3a0d8141:/usr/share/nginx/html/50x.html /data/nginx/html //从容器拷贝文件到宿主机

#docker cp 宿主机中要拷贝的文件名及其路径 容器名:要拷贝到容器里面对应的路径
docker cp /opt/test/file.txt mycontainer:/opt/testnew/ //从宿主机拷贝文件到容器

cat nginx.conf //在docker容器查看内容

docker run --name mynginx -d -p 82:80  -v /data/nginx/conf/nginx.conf:/etc/nginx/nginx.conf  -v /data/nginx/logs:/var/log/nginx -d docker.io/nginx    //启动并挂载


#1.运行mgomx开启端口&挂载
docker run --name nginx01 -p 3636:80 -p 3535:443 -v /data/nginx/conf/nginx.conf:/etc/nginx/nginx.conf   -v /data/nginx/conf.d/default.conf:/etc/nginx/conf.d/default.conf  -v /data/nginx/html:/usr/share/nginx/html  -v /data/nginx/logs:/var/log/nginx -v /data/nginx/ssl:/ssl -d nginx /bin/bash

#2. 第二种也可以
		docker run --detach \
        --name nginx01 \
        -p 443:443\
        -p 80:80 \
        -v /data/nginx/html:/usr/share/nginx/html:rw\
        -v /data/nginx/conf/nginx.conf:/etc/nginx/nginx.conf/:rw\
        -v /data/nginx/conf.d/default.conf:/etc/nginx/conf.d/default.conf:rw\
        -v /data/nginx/logs:/var/log/nginx/:rw\
        -v /data/nginx/ssl:/ssl/:rw\
        -d nginx

# 查看配置文件是否配置成功
nginx -t

# 重启你的本机nginx
service nginx restart


--------------------------------------------------------------------------------

docker容器里无法使用vi命令 解决办法

1. apt-get update
2. apt-get install vim
#按这篇文章配置成功
https://www.jianshu.com/p/5f9bd492f186
Docker中运行nginx并挂载本地目录到镜像中 - HaydenGuo - 博客园
nginx创建配置文件
vim /data/nginx/conf/nginx.conf #docker位置 etc/nginx/nginx.conf
docker run -it -v /data/nginx/conf/nginx.conf:/etc/nginx/nginx.conf nginx /bin/bash 挂载nginx.conf
#运行nginx的用户
user  nginx;
#启动进程设置成和CPU数量相等
worker_processes  1;

#全局错误日志及PID文件的位置
error_log  /var/log/nginx/error.log warn;
pid        /var/run/nginx.pid;

#工作模式及连接数上限
events {
        #单个后台work进程最大并发数设置为1024
    worker_connections  1024;
}


http {
        #设定mime类型
    include       /etc/nginx/mime.types;
    default_type  application/octet-stream;

        #设定日志格式
    log_format  main  '$remote_addr - $remote_user [$time_local] "$request" '
                      '$status $body_bytes_sent "$http_referer" '
                      '"$http_user_agent" "$http_x_forwarded_for"';

    access_log  /var/log/nginx/access.log  main;

    sendfile        on;
    #tcp_nopush     on;

        #设置连接超时的事件
    keepalive_timeout  65;

        #开启GZIP压缩
    #gzip  on;

    include /etc/nginx/conf.d/*.conf;
}
vim /data/nginx/conf.d/default.conf #docker位置 /etc/nginx/conf.d/default.conf
server {
    listen    80;       #侦听80端口,如果强制所有的访问都必须是HTTPs的,这行需要注销掉
    listen    443 ssl;
    server_name  www.buagengen.com;             #域名

    # 增加ssl
    #ssl on;        #如果强制HTTPs访问,这行要打开
    ssl_certificate /ssl/server.crt;
    ssl_certificate_key /ssl/server.key;

    ssl_session_cache    shared:SSL:1m;
    ssl_session_timeout  5m;

     # 指定密码为openssl支持的格式
     ssl_protocols  SSLv2 SSLv3 TLSv1.2;

     ssl_ciphers  HIGH:!aNULL:!MD5;  # 密码加密方式
     ssl_prefer_server_ciphers  on;   # 依赖SSLv3和TLSv1协议的服务器密码将优先于客户端密码

     # 定义首页索引目录和名称
     location / {
        root   /usr/share/nginx/html;
        index  index.html index.htm;
     }

    #重定向错误页面到 /50x.html
    error_page   500 502 503 504  /50x.html;
    location = /50x.html {
        root   /usr/share/nginx/html;
    }
}
vim /data/nginx/html/index.html
<html>
<head>
    <meta http-equiv="Content-Type" content="text/html; charset=utf-8"/>
    <title>系统时间</title>
</head>
<body>
<div id="datetime">
    <script>
        setInterval("document.getElementById('datetime').innerHTML=new Date().toLocaleString();", 1000);
    </script>
</div>
</body>
安装tomcat
docker run -it --rm tomcat:9.0  //一般用来测试,用完即删

docker pull tomcat:9.0

docker run -d -p 8111:8080 --name tomcat01 tomcat  //启动

docker exec -it tomcat01 /bin/bash  //进入容器交互

cp -r webapps.dist/* webapps  //在容器里拷贝webapps.dist 到webapps(原因是webapps空的)
安装mysql
docker pull mysql:5.7   //拉取

docker run -d -p 3306:3306 -v /home/mysql/conf:/etc/mysql/conf.d -v /home/mysql/data:/var/lib/mysql -e MYSQL_ROOT_PASSWORD=123456 --name mysql01 mysql:5.7 //-e设置环境配置 设置mysql密码,启动


docker exec -it 232529bf287f /bin/bash

mysql -uroot -p

set password for root@localhost = password('123456'); //修改密码

1.开启远程访问权限

use mysql;

select host,user from user;

ALTER USER 'root'@'%' IDENTIFIED WITH mysql_native_password BY '123456';

flush privileges;

重启docker
systemctl restart docker


 485
485


 被折叠的 条评论
为什么被折叠?
被折叠的 条评论
为什么被折叠?
 到【灌水乐园】发言


