


1、关联查询
1.1 商品订单数据模型
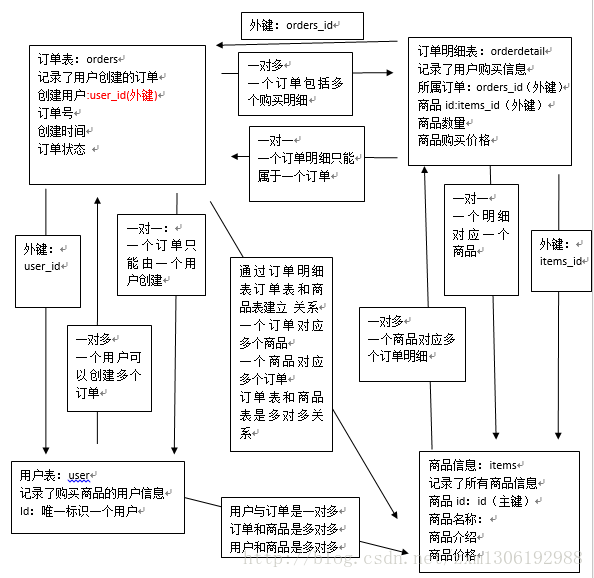
1.2 一对一查询
案例:查询所有订单信息,关联查询下单用户信息。
1.2.1 方法一:
使用resultType,定义订单信息po类,此po类中包括了订单信息和用户信息:
OrdersMapperCustom.xml
<mapper namespace="cn.itcast.mybatis.mapper.OrdersMapperCustom">
    <!-- 查询订单关联查询用户 -->
    <select id="findOrdersUser"  resultType="cn.itcast.mybatis.po.OrdersCustom">
        SELECT
        orders.*,
        user.username,
        user.address
        FROM
        orders,
        user
        WHERE orders.user_id = user.id
    </select>
</mapper>
定义po类,应该包括上边sql查询出来的所有字段
OrdersCustom类继承Orders类后OrdersCustom类包括了Orders类的所有字段,只需要定义用户的信息字段即可。
public class OrdersCustom extends Orders {

    private String username;// 用户名称
    private String address;// 用户地址
    //get/set。。。。
}
Mapper接口:
OrdersMapperCustom.java
public interface OrdersMapperCustom {
    //查询订单关联查询用户信息
    public List<OrdersCustom> findOrdersUser() throws Exception;
}
测试:
    @Test
    public void testFindOrderUser() throws Exception {
        SqlSession sqlSession=sqlSessionFactory.openSession();
        //创建代理对象
        OrdersMapperCustom ordersMapperCustom=sqlSession.getMapper(OrdersMapperCustom.class);

        //调用mapper的方法
        List<OrdersCustom> list=ordersMapperCustom.findOrdersUser();
        System.out.println(list);
        sqlSession.close();
    }
1.2.2 方法二:
使用resultMap,定义专门的resultMap用于映射一对一查询结果。
OrdersMapperCustom.xml
<!--订单关联查询用户信息的resultMap  -->
    <!--将整个查询的结果映射到cn.itcast.mybatis.po.Orders中 -->
    <resultMap type="cn.itcast.mybatis.po.Orders" id="OrderUserResultMap">
        <!-- 配置映射的订单信息 -->
        <!-- id:指定查询列中的唯一标识 ,如果有多个列组成唯一标识,配置多个id,result为普通列
            column:查询出的列名
            property:映射到的pojo的属性名
        -->
        <id column="id" property="id"/>
        <result column="user_id" property="userId"/>
        <result column="number" property="number"/>
        <result column="createtime" property="createtime"/>
        <result column="note" property="note"/>

        <!-- 配置映射的关联的用户信息 -->
        <!-- association:映射关联查询单个对象的信息
             property:要将关联查询的用户信息映射到Orders中哪个属性
         -->
        <association property="user" javaType="cn.itcast.mybatis.po.User">
            <id column="user_id" property="id"/>
            <result column="username" property="username"/>
            <result column="sex" property="sex"/>
            <result column="address" property="address"/>
        </association>

    </resultMap>

<!-- 查询订单关联查询用户信息,使用resultmap -->
    <select id="findOrdersUserResultMap"  resultMap="OrderUserResultMap">
        SELECT
        orders.*,
        user.username,
        user.sex,
        user.address
        FROM
        orders,
        user
        WHERE orders.user_id = user.id
    </select>
定义po类
在Orders类中加入User属性,user属性中用于存储关联查询的用户信息,因为订单关联查询用户是一对一关系,所以这里使用单个User对象存储关联查询的用户信息。
Mapper接口:
    //查询订单关联查询用户信息,使用ResultMap
    public List<Orders> findOrdersUserResultMap() throws Exception;
测试:
@Test
    public void testFindOrderUserResultMap() throws Exception {
        SqlSession sqlSession=sqlSessionFactory.openSession();
        //创建代理对象
        OrdersMapperCustom ordersMapperCustom=sqlSession.getMapper(OrdersMapperCustom.class);

        //调用mapper的方法
        List<Orders> list=ordersMapperCustom.findOrdersUserResultMap();
        System.out.println(list);
        sqlSession.close();
    }
1.3 一对多查询
案例:查询所有订单信息及订单下的订单明细信息。
订单信息与订单明细为一对多关系。
使用resultMap实现如下:
Mapper.xml:
<!-- 查询订单和订单明细的ResultMap -->
    <resultMap type="cn.itcast.mybatis.po.Orders" id="OrdersAndOrderDetailResultMap" extends="OrderUserResultMap">
        <!-- 订单信息 -->
        <!-- 用户信息 -->
        <!-- 使用继承,不用再配置订单信息和用户信息的映射 -->

        <!-- 订单明细 -->
        <!-- 一个订单关联查询出多条明细,要使用Collection进行映射
            collection:对关联查询到多条记录映射到集合对象中
            property:将关联查询到多条记录映射到cn.itcast.mybatis.po.Orders中的哪个属性
            ofType:指定映射到集合属性中pojo的类型
         -->
         <collection property="orderdetails" ofType="cn.itcast.mybatis.po.Orderdetail">
            <!-- id:订单明细的唯一标识 -->
            <id column="orderdetail_id" property="id" />
            <result column="items_id" property="itemsId" />
            <result column="items_num" property="itemsNum" />
            <result column="orders_id" property="ordersId" />
         </collection>
    </resultMap>

    <!-- 查询订单关联、用户信息和订单明细,使用resultmap -->
    <select id="findOrdersAndOrderDetailResultMap" resultMap="OrdersAndOrderDetailResultMap">
        SELECT
            orders.*,
            user.username,
            user.sex,
            user.address,
            orderdetail.id orderdetail_id,
            orderdetail.items_id,
            orderdetail.items_num,
            orderdetail.orders_id
        FROM
            orders,
            user ,
            orderdetail
        WHERE orders.user_id = user.id AND orderdetail.orders_id=orders.id
    </select>
定义po类:
在Orders类中加入User属性。
在Orders类中加入List orderdetails属性
Mapper接口:
    //查询订单,关联了用户,及订单明细
    public List<Orders> findOrdersAndOrderDetailResultMap() throws Exception;
测试:
    @Test
    public void testFindOrderwithDetailsResultMap() throws Exception {
        SqlSession sqlSession=sqlSessionFactory.openSession();
        //创建代理对象
        OrdersMapperCustom ordersMapperCustom=sqlSession.getMapper(OrdersMapperCustom.class);

        //调用mapper的方法
        List<Orders> list=ordersMapperCustom.findOrdersAndOrderDetailResultMap();
        System.out.println(list);
        sqlSession.close();
    }
1.4 多对多查询
需要查询所有用户信息,关联查询订单及订单明细信息,订单明细信息中关联查询商品信息
po定义:
在User中添加 List< Orders> orders 属性,在Orders类中加入 List< Orderdetail> orderdetails属性,在Orderdetail中加入Items属性
Mapper.xml:
订单:一个用户对应多个订单,使用collection映射到用户对象的订单列表属性中
订单明细:一个订单对应多个明细,使用collection映射到订单对象中的明细属性中
商品信息:一个订单明细对应一个商品,使用association映射到订单明细对象的商品属性中。
    <!-- 查询用户及购买的商品 -->
    <resultMap type="cn.itcast.mybatis.po.User" id="UserAndItemsResultMap">
        <!-- 用户信息 -->
        <id column="user_id" property="id"/>
        <result column="username" property="username"/>
        <result column="sex" property="sex"/>
        <result column="address" property="address"/>

        <!-- 订单信息 ,一个用户对应多个订单-->
        <collection property="ordersList" ofType="cn.itcast.mybatis.po.Orders">
            <id column="id" property="id"/>
            <result column="user_id" property="userId" />
            <result column="number" property="number" />
            <result column="createtime" property="createtime" />
            <result column="note" property="note" />

            <!-- 订单明细 ,一个订单包含多个明细-->
            <collection property="orderdetails" ofType="cn.itcast.mybatis.po.Orderdetail">
                <id column="orderdetail_id" property="id" />
                <result column="items_id" property="itemsId" />
                <result column="items_num" property="itemsNum" />
                <result column="orders_id" property="ordersId" />

                <!-- 商品信息,一个订单明细对应一个商品 -->
                <association property="items" javaType="cn.itcast.mybatis.po.Items">
                    <id column="items_id" property="id"/>
                    <result column="items_name" property="name" />
                    <result column="items_detail" property="detail" />
                    <result column="items_price" property="price" />
                </association>
            </collection>
        </collection>
    </resultMap>

<!-- 查询用户及购买的商品信息,使用resultmap -->
    <select id="findUserAndItemsResultMap" resultMap="UserAndItemsResultMap">
        SELECT
          orders.*,
          user.username,
            user.sex,
          user.address,
          orderdetail.id orderdetail_id,
          orderdetail.items_id,
            orderdetail.items_num,
            orderdetail.orders_id,
            items.name items_name,
            items.detail items_detail,
            items.price items_price
        FROM
          orders,
          user ,
          orderdetail,
            items
        WHERE orders.user_id = user.id AND orderdetail.orders_id=orders.id AND orderdetail.items_id=items.id
    </select>
Mapper接口:
    //查询用户购买的商品信息
    public List<User> findUserAndItemsResultMap() throws Exception;
测试:
    @Test
    public void testFindUserAndItemsResultMap() throws Exception {
        SqlSession sqlSession=sqlSessionFactory.openSession();
        //创建代理对象
        OrdersMapperCustom ordersMapperCustom=sqlSession.getMapper(OrdersMapperCustom.class);

        //调用mapper的方法
        List<User> list=ordersMapperCustom.findUserAndItemsResultMap();
        System.out.println(list);
        sqlSession.close();
    }
1.5 resultMap小结
resultType:
作用:将查询结果按照sql列名pojo属性名一致性映射到pojo中。
场合:常见一些明细记录的展示,比如用户购买商品明细,将关联查询信息全部展示在页面时,此时可直接使用resultType将每一条记录映射到pojo中,在前端页面遍历list(list中是pojo)即可。
resultMap:
使用association和collection完成一对一和一对多高级映射(对结果有特殊的映射要求)。
association:
作用:将关联查询信息映射到一个pojo对象中。
场合:
为了方便查询关联信息可以使用association将关联订单信息映射为用户对象的pojo属性中,比如:查询订单及关联用户信息。
使用resultType无法将查询结果映射到pojo对象的pojo属性中,根据对结果集查询遍历的需要选择使用resultType还是resultMap。
collection:
作用:将关联查询信息映射到一个list集合中。
场合:
为了方便查询遍历关联信息可以使用collection将关联信息映射到list集合中,比如:查询用户权限范围模块及模块下的菜单,可使用collection将模块映射到模块list中,将菜单列表映射到模块对象的菜单list属性中,这样的作的目的也是方便对查询结果集进行遍历查询。
如果使用resultType无法将查询结果映射到list集合中。
1.6延迟加载
需要查询关联信息时,使用mybatis延迟加载特性可有效的减少数据库压力,首次查询只查询主要信息,关联信息等用户获取时再加载。
1.6.1 打开延迟加载开关
在mybatis核心配置文件中配置:
| 设置项 | 描述 | 默认值 |
|---|---|---|
| lazyLoadingEnabled | 全局性设置懒加载。如果设为‘false’,则所有相关联的都会被初始化加载。 | false |
| aggressiveLazyLoading | 当设置为‘true’的时候,懒加载的对象可能被任何懒属性全部加载。否则,每个属性都按需加载。 | true |
<settings>
        <setting name="lazyLoadingEnabled" value="true"/>
        <setting name="aggressiveLazyLoading" value="false"/>
</settings>
1.6.2 实例
需求:
查询订单信息,关联查询用户信息。
默认只查询订单信息,当需要查询用户信息时再去查询用户信息。
定义po类:
在Orders类中加入User属性。
Mapper.xml
只有使用resultMap支持延迟加载设置。
    <select id="findUserById" parameterType="int"
        resultType="User">
        SELECT * FROM USER WHERE id=#{value}
    </select>
<!-- 延迟加载resultMap -->
<resultMap type="cn.itcast.mybatis.po.Orders" id="OrderUserLazyResultMap">
<!-- 对订单信息进行配置 -->
<id column="id" property="id"/>
<result column="user_id" property="userId" />
<result column="number" property="number" />
<result column="createtime" property="createtime" />
<result column="note" property="note" />
<!-- 实现对用户信息进行延迟加载 -->
<!-- select:指定延迟加载的statement的id(如果在其他文件,需要带上namespace)-->
<!-- column:主查询中需要关联子查询的列名-->
<association property="user" javaType="cn.itcast.mybatis.po.User" select="cn.itcast.mybatis.mapper.UserMapper.findUserById" column="user_id">
</association>
</resultMap>
<!-- 查询订单关联查询用户,用户信息需要延迟加载 -->
<select id="findOrdersUserLazyLoading" resultMap="OrderUserLazyResultMap">
select * from orders
</select>Mapper接口:
    //查询订单信息,关联用户信息,用户信息使用延迟加载
    public List<Orders> findOrdersUserLazyLoading() throws Exception;
测试:
    @Test
    public void testFindOrderUserLazyLoading() throws Exception {
        SqlSession sqlSession=sqlSessionFactory.openSession();
        //创建代理对象
        OrdersMapperCustom ordersMapperCustom=sqlSession.getMapper(OrdersMapperCustom.class);

        //查询订单信息(单表)
        List<Orders> list=ordersMapperCustom.findOrdersUserLazyLoading();

        //遍历上边的订单信息
        for(Orders orders:list){
            //执行getUser()去查询用户信息,这里实现按需加载
            User user=orders.getUser();
            System.out.println(user);
        }

        sqlSession.close();
    }
1.6.3 延迟加载的思考
不使用mybatis提供的延迟加载功能是否可以实现延迟加载?
实现方法:
针对订单和用户两个表定义两个mapper方法。
1、订单查询mapper方法
2、根据用户id查询用户信息mapper方法
默认使用订单查询mapper方法只查询订单信息。
当需要关联查询用户信息时再调用根据用户id查询用户信息mapper方法查询用户信息。
1.6.4 一对多延迟加载
一对多延迟加载的方法同一对一延迟加载,在collection标签中配置select内容。
本部分内容自学。
2、查询缓存
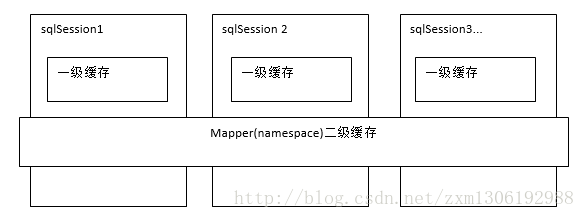
2.1 mybatis缓存介绍
Mybatis一级缓存的作用域是同一个SqlSession,在同一个sqlSession中两次执行相同的sql语句,第一次执行完毕会将数据库中查询的数据写到缓存(内存),第二次会从缓存中获取数据将不再从数据库查询,从而提高查询效率。当一个sqlSession结束后该sqlSession中的一级缓存也就不存在了。Mybatis默认开启一级缓存。
Mybatis二级缓存是多个SqlSession共享的,其作用域是mapper的同一个namespace,不同的sqlSession两次执行相同namespace下的sql语句且向sql中传递参数也相同即最终执行相同的sql语句,第一次执行完毕会将数据库中查询的数据写到缓存(内存),第二次会从缓存中获取数据将不再从数据库查询,从而提高查询效率。Mybatis默认没有开启二级缓存需要在setting全局参数中配置开启二级缓存。
2.2 一级缓存
2.2.1 工作原理
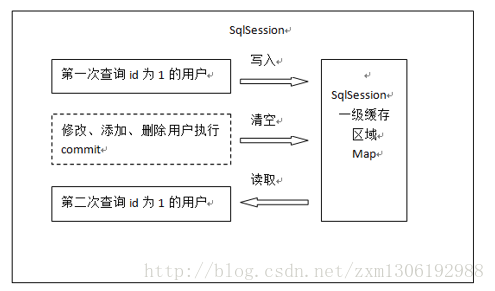
一级缓存区域是根据SqlSession为单位划分的。
每次查询会先从缓存区域找,如果找不到从数据库查询,查询到数据将数据写入缓存。
Mybatis内部存储缓存使用一个HashMap,key为hashCode+sqlId+Sql语句。value为从查询出来映射生成的java对象
sqlSession执行insert、update、delete等操作commit提交后会清空缓存区域。
2.2.2 测试
    <update id="updateUser" parameterType="cn.itcast.mybatis.po.User">
        update user set username=#{username},birthday=#{birthday},sex=#{sex},address=#{address}
          where id=#{id}
    </update>
@Test
public void testCache1() throws Exception{
SqlSession sqlSession=sqlSessionFactory.openSession();
UserMapper userMapper=sqlSession.getMapper(UserMapper.class);
//第一次发起请求,查询id为1的用户
User user1=userMapper.findUserById(1);
System.out.println(user1);
//如果执行commit操作了,将清空缓存
user1.setUsername("测试用户3");
userMapper.updateUser(user1);
sqlSession.commit();
//第二次发起请求,同一个session则不再向数据发出语句直接从缓存取出,如果前面有commit()会重新发出sql操作
User user2=userMapper.findUserById(1);
System.out.println(user2);
sqlSession.close();
}2.3 二级缓存
2.3.1 工作原理

二级缓存区域是根据mapper的namespace划分的,相同namespace的mapper查询数据放在同一个区域,
每次查询会先从缓存区域找,如果找不到从数据库查询,查询到数据将数据写入缓存。
Mybatis内部存储缓存使用一个HashMap,key为hashCode+sqlId+Sql语句。value为从查询出来映射生成的java对象
sqlSession执行insert、update、delete等操作commit提交后会清空缓存区域。
二级缓存与一级缓存区别,二级缓存的范围更大,每一个namespace的mapper都有一个二缓存区域,两个mapper的namespace如果相同,这两个mapper执行sql查询到数据将存在相同 的二级缓存区域中。
2.3.2 开启二级缓存:
在核心配置文件SqlMapConfig.xml< settings>中加入
        <!--开启二级缓存  -->
<setting name="cacheEnabled" value="true"/>| name | 描述 | 默认值 |
|---|---|---|
| cacheEnabled | 对在此配置文件下的所有cache 进行全局性开/关设置。 | true |
还要在你的Mapper映射文件中添加一行: < cache /> ,表示此mapper开启二级缓存。
< cache />2.3.3 po类实现序列化
二级缓存需要查询结果映射的pojo对象实现java.io.Serializable接口实现序列化和反序列化操作,注意如果存在父类、成员pojo都需要实现序列化接口。
因为二级缓存数据存储介质多种多样,不一样在内存。
public class Orders implements Serializable
public class User implements Serializable
2.3.4 测试
    @Test
    public void testCache2() throws Exception{
        SqlSession sqlSession1=sqlSessionFactory.openSession();
        SqlSession sqlSession2=sqlSessionFactory.openSession();
        SqlSession sqlSession3=sqlSessionFactory.openSession();

        UserMapper userMapper1=sqlSession1.getMapper(UserMapper.class);
        //第一次发起请求,查询id为1的用户
        User user1=userMapper1.findUserById(1);
        System.out.println(user1);
        sqlSession1.close();//关闭后,才会将sqlSession中数据写入二级缓存区域中

        UserMapper userMapper3=sqlSession3.getMapper(UserMapper.class);
        //使用sqlSession3执行commit操作
        User user3=userMapper3.findUserById(1);
        System.out.println(user3);
        user3.setUsername("张明明");
        userMapper3.updateUser(user3);
        sqlSession3.commit();
        sqlSession3.close();

        UserMapper userMapper2=sqlSession2.getMapper(UserMapper.class);
        //第二次发起请求,查询id为1的用户,如果前面没有commit()会直接从缓存取
        User user2=userMapper2.findUserById(1);
        System.out.println(user2);
        sqlSession2.close();
    }
2.3.5 禁用二级缓存
在statement中设置useCache=false可以禁用当前select语句的二级缓存,即每次查询都会发出sql去查询,默认情况是true,即该sql使用二级缓存。
< select id=”findOrderListResultMap” resultMap=”ordersUserMap” useCache=”false”>
总结:针对每次查询都需要最新的数据sql,要设置成useCache=false,禁用二级缓存。
2.3.6 刷新缓存(就是清空缓存)
在mapper的同一个namespace中,如果有其它insert、update、delete操作数据后需要刷新缓存,如果不执行刷新缓存会出现脏读。
设置statement配置中的flushCache=”true” 属性,默认情况下为true即刷新缓存,如果改成false则不会刷新。使用缓存时如果手动修改数据库表中的查询数据会出现脏读。
如下:
< insert id=”insertUser” parameterType=”cn.itcast.mybatis.po.User” flushCache=”true”>
2.3.7 Mybatis Cache参数
flushInterval(刷新间隔)可以被设置为任意的正整数,而且它们代表一个合理的毫秒形式的时间段。默认情况是不设置,也就是没有刷新间隔,缓存仅仅调用语句时刷新。
size(引用数目)可以被设置为任意正整数,要记住你缓存的对象数目和你运行环境的可用内存资源数目。默认值是1024。
readOnly(只读)属性可以被设置为true或false。只读的缓存会给所有调用者返回缓存对象的相同实例。因此这些对象不能被修改。这提供了很重要的性能优势。可读写的缓存会返回缓存对象的拷贝(通过序列化)。这会慢一些,但是安全,因此默认是false。
如下例子:
< cache eviction=”FIFO” flushInterval=”60000” size=”512” readOnly=”true”/>
这个更高级的配置创建了一个 FIFO 缓存,并每隔 60 秒刷新,存数结果对象或列表的 512 个引用,而且返回的对象被认为是只读的,因此在不同线程中的调用者之间修改它们会导致冲突。可用的收回策略有, 默认的是 LRU:
1. LRU – 最近最少使用的:移除最长时间不被使用的对象。
2. FIFO – 先进先出:按对象进入缓存的顺序来移除它们。
3. SOFT – 软引用:移除基于垃圾回收器状态和软引用规则的对象。
4. WEAK – 弱引用:更积极地移除基于垃圾收集器状态和弱引用规则的对象。
2.3.8 mybatis整合ehcache
EhCache 是一个纯Java的进程内缓存框架,是一种广泛使用的开源Java分布式缓存,具有快速、精干等特点,是Hibernate中默认的CacheProvider。
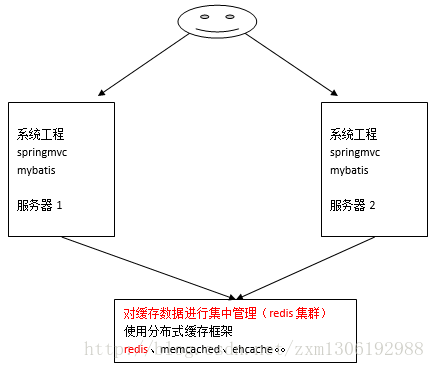
mybatis无法实现分布式缓存,需要和其它分布式缓存框架进行整合。
2.3.8.1 整合原理
mybatis提供二级缓存Cache接口,如下:
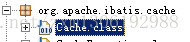
它的默认实现类:

通过实现Cache接口可以实现mybatis缓存数据通过其它缓存数据库整合,mybatis的特长是sql操作,缓存数据的管理不是mybatis的特长,为了提高缓存的性能将mybatis和第三方的缓存数据库整合,比如ehcache、memcache、redis等。
2.3.8.2 第一步:引入缓存的依赖包
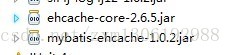
maven坐标:
<dependency>
            <groupId>org.mybatis.caches</groupId>
            <artifactId>mybatis-ehcache</artifactId>
            <version>1.0.2</version>
        </dependency>
2.3.8.3 第二步:引入缓存配置文件
classpath下添加:ehcache.xml
内容如下:
<ehcache xmlns:xsi="http://www.w3.org/2001/XMLSchema-instance"
    xsi:noNamespaceSchemaLocation="../config/ehcache.xsd">
    <diskStore path="F:\develop\ehcache" />
    <defaultCache
        maxElementsInMemory="1000"
        maxElementsOnDisk="10000000"
        eternal="false"
        overflowToDisk="false"
        timeToIdleSeconds="120"
        timeToLiveSeconds="120"
        diskExpiryThreadIntervalSeconds="120"
        memoryStoreEvictionPolicy="LRU">
    </defaultCache>
</ehcache>
属性说明:
diskStore:指定数据在磁盘中的存储位置。
defaultCache:当借助CacheManager.add(“demoCache”)创建Cache时,EhCache便会采用指定的的管理策略
以下属性是必须的:
maxElementsInMemory - 在内存中缓存的element的最大数目
maxElementsOnDisk - 在磁盘上缓存的element的最大数目,若是0表示无穷大
eternal - 设定缓存的elements是否永远不过期。如果为true,则缓存的数据始终有效,如果为false那么还要根据timeToIdleSeconds,timeToLiveSeconds判断
overflowToDisk - 设定当内存缓存溢出的时候是否将过期的element缓存到磁盘上
以下属性是可选的:
timeToIdleSeconds - 当缓存在EhCache中的数据前后两次访问的时间超过timeToIdleSeconds的属性取值时,这些数据便会删除,默认值是0,也就是可闲置时间无穷大
timeToLiveSeconds - 缓存element的有效生命期,默认是0.,也就是element存活时间无穷大
diskSpoolBufferSizeMB 这个参数设置DiskStore(磁盘缓存)的缓存区大小.默认是30MB.每个Cache都应该有自己的一个缓冲区.
diskPersistent - 在VM重启的时候是否启用磁盘保存EhCache中的数据,默认是false。
diskExpiryThreadIntervalSeconds - 磁盘缓存的清理线程运行间隔,默认是120秒。每个120s,相应的线程会进行一次EhCache中数据的清理工作
memoryStoreEvictionPolicy - 当内存缓存达到最大,有新的element加入的时候, 移除缓存中element的策略。默认是LRU(最近最少使用),可选的有LFU(最不常使用)和FIFO(先进先出)
2.3.8.4 第三步:开启ehcache缓存
EhcacheCache是ehcache对Cache接口的实现:

修改mapper.xml文件,在cache中指定EhcacheCache。
<cache type="org.mybatis.caches.ehcache.EhcacheCache"/>根据需求调整缓存参数:
<cache type="org.mybatis.caches.ehcache.EhcacheCache" >
        <property name="timeToIdleSeconds" value="3600"/>
        <property name="timeToLiveSeconds" value="3600"/>
        <!-- 同ehcache参数maxElementsInMemory -->
        <property name="maxEntriesLocalHeap" value="1000"/>
        <!-- 同ehcache参数maxElementsOnDisk -->
        <property name="maxEntriesLocalDisk" value="10000000"/>
        <property name="memoryStoreEvictionPolicy" value="LRU"/>
    </cache>
2.3.9 应用场景
对于访问多的查询请求且用户对查询结果实时性要求不高,此时可采用mybatis二级缓存技术降低数据库访问量,提高访问速度,业务场景比如:耗时较高的统计分析sql、电话账单查询sql等。
实现方法如下:通过设置刷新间隔时间,由mybatis每隔一段时间自动清空缓存,根据数据变化频率设置缓存刷新间隔flushInterval,比如设置为30分钟、60分钟、24小时等,根据需求而定。
2.3.10 局限性
mybatis二级缓存对细粒度的数据级别的缓存实现不好,比如如下需求:对商品信息进行缓存,由于商品信息查询访问量大,但是要求用户每次都能查询最新的商品信息,此时如果使用mybatis的二级缓存就无法实现当一个商品变化时只刷新该商品的缓存信息而不刷新其它商品的信息,因为mybaits的二级缓存区域以mapper为单位划分,当一个商品信息变化会将所有商品信息的缓存数据全部清空。解决此类问题需要在业务层根据需求对数据有针对性缓存。
3、与spring整合
实现mybatis与spring进行整合,通过spring管理SqlSessionFactory、mapper接口。
3.1 整合环境
创建一个新的java工程(接近实际开发的工程结构)
jar包:
mybatis3.2.7的jar包
spring3.2.0的jar包
mybatis和spring的整合包
dbcp连接池
数据库驱动
参考:
全部jar包

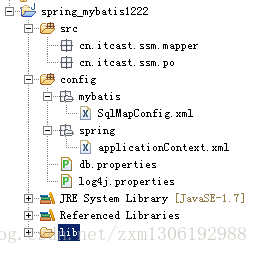
3.2 Mybatis配置文件
在classpath下创建mybatis/SqlMapConfig.xml
<?xml version="1.0" encoding="UTF-8" ?>
<!DOCTYPE configuration
PUBLIC "-//mybatis.org//DTD Config 3.0//EN"
"http://mybatis.org/dtd/mybatis-3-config.dtd">

<configuration>

<!-- 使用自动扫描器时,mapper.xml文件如果和mapper.java接口在一个目录则此处不用定义mappers -->
    <mappers>
        <package name="cn.itcast.ssm.mapper" />
    </mappers>
</configuration>
3.3 Spring配置文件
在classpath下创建applicationContext.xml,定义数据库链接池、SqlSessionFactory。在定义sqlSessionFactory时指定数据源dataSource和mybatis的配置文件。
<beans xmlns="http://www.springframework.org/schema/beans"
    xmlns:xsi="http://www.w3.org/2001/XMLSchema-instance" xmlns:mvc="http://www.springframework.org/schema/mvc"
    xmlns:context="http://www.springframework.org/schema/context"
    xmlns:aop="http://www.springframework.org/schema/aop" xmlns:tx="http://www.springframework.org/schema/tx"
    xsi:schemaLocation="http://www.springframework.org/schema/beans
        http://www.springframework.org/schema/beans/spring-beans-3.2.xsd
        http://www.springframework.org/schema/mvc
        http://www.springframework.org/schema/mvc/spring-mvc-3.2.xsd
        http://www.springframework.org/schema/context
        http://www.springframework.org/schema/context/spring-context-3.2.xsd
        http://www.springframework.org/schema/aop
        http://www.springframework.org/schema/aop/spring-aop-3.2.xsd
        http://www.springframework.org/schema/tx
        http://www.springframework.org/schema/tx/spring-tx-3.2.xsd ">

    <!-- 加载配置文件 -->
    <context:property-placeholder location="classpath:db.properties" />
    <!-- 数据库连接池,使用dbcp -->
    <bean id="dataSource" class="org.apache.commons.dbcp.BasicDataSource"
        destroy-method="close">
        <property name="driverClassName" value="${jdbc.driver}" />
        <property name="url" value="${jdbc.url}" />
        <property name="username" value="${jdbc.username}" />
        <property name="password" value="${jdbc.password}" />
        <property name="maxActive" value="10" />
        <property name="maxIdle" value="5" />
    </bean>

    <!-- mapper配置 -->
    <!-- 让spring管理sqlsessionfactory 使用mybatis和spring整合包中的 -->
    <bean id="sqlSessionFactory" class="org.mybatis.spring.SqlSessionFactoryBean">
        <!-- 数据库连接池 -->
        <property name="dataSource" ref="dataSource" />
        <!-- 加载mybatis的全局配置文件 -->
        <property name="configLocation" value="classpath:mybatis/SqlMapConfig.xml" />
    </bean>

</beans>
3.4 原始dao开发
使用此种方法即原始dao开发方法,需要编写dao接口,dao接口实现类、映射文件。
User.xml
<mapper namespace="test">
    <!-- 通过id查询用户表的记录 -->
    <select id="findUserById" parameterType="int" resultType="cn.itcast.ssm.po.User">
        SELECT * FROM USER WHERE id=#{value}
    </select>
</mapper>
在SqlMapconfig.xml中加载User.xml
    <mappers>
        <mapper resource="sqlmap/User.xml"/>
    </mappers>
dao接口,UserDao.java:
public interface UserDao {
    //根据id查询用户信息
    public User findUserById(int id) throws Exception;
}
dao实现类(继承SqlSessionDaoSupport),UserDaoImpl.java
dao接口实现类需要注入SqlSessoinFactory,通过spring进行注入。
public class UserDaoImpl extends SqlSessionDaoSupport implements UserDao{

    @Override
    public User findUserById(int id) throws Exception {
        //继承SqlSessionDaoSuport,通过this.getSqlSession()得到sqlSession
        SqlSession sqlSession=this.getSqlSession();
        User user=sqlSession.selectOne("test.findUserById",id);

        return user;
    }

}
在applicationContext.xml中配置dao:
    <!-- 原始dao接口 -->
    <bean id="userDao" class="cn.itcast.ssm.dao.UserDaoImpl">
        <property name="sqlSessionFactory" ref="sqlSessionFactory"></property>
    </bean>
测试:
public class UserDaoImplTest {

    private ApplicationContext applicationContext;

    //要先得到Spring容器
    @Before
    public void setUp() throws Exception {
        applicationContext=new ClassPathXmlApplicationContext("classpath:spring/applicationContext.xml");
    }

    @Test
    public void testFindUserById() throws Exception {
        UserDao userDao=(UserDao) applicationContext.getBean("userDao");
        User user=userDao.findUserById(1);
        System.out.println(user);
    }

}
3.5 Mapper代理开发
UserMapper.java
public interface UserMapper {

    //根据id查询用户信息
    public User findUserById(int id) throws Exception;

}
UserMapper.xml
<mapper namespace="cn.itcast.ssm.mapper.UserMapper">

    <select id="findUserById" parameterType="int" resultType="User">
        SELECT * FROM USER WHERE id=#{value}
    </select>

</mapper>
在sqlMapConfig.xml中配置映射文件的位置
如果mapper.xml和mappre接口的名称相同且在同一个目录,这里可以不用配置
此处使用包扫描的方式
    <mappers>
        <package name="cn.itcast.ssm.mapper" />
    </mappers>
Spring中定义,applicationContext.xml
    <!-- mapper配置 -->
    <!-- MapperFactoryBean 是整合包中提供的,能根据mapper接口生成代理对象 -->
    <bean id="userMapper" class="org.mybatis.spring.mapper.MapperFactoryBean">
        <!-- 指定mapper接口,mapperInterface是 MapperFactoryBean类的一个属性-->
        <property name="mapperInterface" value="cn.itcast.ssm.mapper.UserMapper"></property>

        <property name="sqlSessionFactory" ref="sqlSessionFactory"></property>
    </bean>
测试:
public class UserMapperTest {
    private ApplicationContext applicationContext;

    //要先得到Spring容器
    @Before
    public void setUp() throws Exception {
        applicationContext=new ClassPathXmlApplicationContext("classpath:spring/applicationContext.xml");
    }

    @Test
    public void testFindUserById() throws Exception {
        UserMapper userMapper=(UserMapper) applicationContext.getBean("userMapper");
        User user=userMapper.findUserById(1);
        System.out.println(user);
    }

}
3.6 使用mapper扫描器
上面的方法需要多每个mapper进行配置,太麻烦
此方法在spring配置文件中定义一个mapper扫描器,自动扫描包中的mapper接口生成代代理对象。
如果将mapper.xml和mapper接口的名称保持一致且放在一个目录 则不用在sqlMapConfig.xml中进行配置
Spring中定义,applicationContext.xml
    <!-- mapper批量扫描-->
    <!--使用整合包中的MapperScannerConfigurer类,从mapper包中扫描出mapper接口,自动创建代理对象,并且在spring容器中注册
               需要遵循:mapper.java和mapper.xml 映射文件再名称保持一致,且在同一个目录中
               自动扫描出来的mapper的bean的id为mapper类名(首字母消息)
     -->
     <bean class="org.mybatis.spring.mapper.MapperScannerConfigurer">
        <!-- 指定要扫描的包名,如果多个包,中间用逗号分隔 -->
        <property name="basePackage" value="cn.itcast.ssm.mapper"></property>
        <property name="sqlSessionFactoryBeanName" value="sqlSessionFactory"></property>
     </bean>
4、逆向工程
使用官方网站的mapper自动生成工具mybatis-generator-core-1.3.2来生成po类和mapper映射文件。
建议使用java程序方式,也可以用ide插件
1、新建工程,使用官方jar包,并导入其他必要包:

2、建立配置文件,generatorConfig.xml:
注意改下几点:
1、 添加要生成的数据库表
2、 po文件所在包路径
3、 mapper文件所在包路径
<?xml version="1.0" encoding="UTF-8"?>
<!DOCTYPE generatorConfiguration
  PUBLIC "-//mybatis.org//DTD MyBatis Generator Configuration 1.0//EN"
  "http://mybatis.org/dtd/mybatis-generator-config_1_0.dtd">

<generatorConfiguration>
    <context id="testTables" targetRuntime="MyBatis3">
        <commentGenerator>
            <!-- 是否去除自动生成的注释 true:是 : false:否 -->
            <property name="suppressAllComments" value="true" />
        </commentGenerator>
        <!--数据库连接的信息:驱动类、连接地址、用户名、密码 -->
        <jdbcConnection driverClass="com.mysql.jdbc.Driver"
            connectionURL="jdbc:mysql://localhost:3306/mybatis" userId="root"
            password="root">
        </jdbcConnection>
        <!-- <jdbcConnection driverClass="oracle.jdbc.OracleDriver"
            connectionURL="jdbc:oracle:thin:@127.0.0.1:1521:yycg"
            userId="yycg"
            password="yycg">
        </jdbcConnection> -->

        <!-- 默认false,把JDBC DECIMAL 和 NUMERIC 类型解析为 Integer,为 true时把JDBC DECIMAL 和
            NUMERIC 类型解析为java.math.BigDecimal -->
        <javaTypeResolver>
            <property name="forceBigDecimals" value="false" />
        </javaTypeResolver>

        <!-- targetProject:生成PO类的位置 -->
        <javaModelGenerator targetPackage="cn.itcast.ssm.po"
            targetProject=".\src">
            <!-- enableSubPackages:是否让schema作为包的后缀 -->
            <property name="enableSubPackages" value="false" />
            <!-- 从数据库返回的值被清理前后的空格 -->
            <property name="trimStrings" value="true" />
        </javaModelGenerator>
        <!-- targetProject:mapper映射文件生成的位置 -->
        <sqlMapGenerator targetPackage="cn.itcast.ssm.mapper"
            targetProject=".\src">
            <!-- enableSubPackages:是否让schema作为包的后缀 -->
            <property name="enableSubPackages" value="false" />
        </sqlMapGenerator>
        <!-- targetPackage:mapper接口生成的位置 -->
        <javaClientGenerator type="XMLMAPPER"
            targetPackage="cn.itcast.ssm.mapper"
            targetProject=".\src">
            <!-- enableSubPackages:是否让schema作为包的后缀 -->
            <property name="enableSubPackages" value="false" />
        </javaClientGenerator>
        <!-- 指定数据库表 -->
        <table tableName="items"></table>
        <table tableName="orders"></table>
        <table tableName="orderdetail"></table>
        <table tableName="user"></table>
        <!-- <table schema="" tableName="sys_user"></table>
        <table schema="" tableName="sys_role"></table>
        <table schema="" tableName="sys_permission"></table>
        <table schema="" tableName="sys_user_role"></table>
        <table schema="" tableName="sys_role_permission"></table> -->

        <!-- 有些表的字段需要指定java类型
         <table schema="" tableName="">
            <columnOverride column="" javaType="" />
        </table> -->
    </context>
</generatorConfiguration>
3、使用java类生成mapper文件:
public class GeneratorSqlmap {

    public void generator() throws Exception{

        List<String> warnings = new ArrayList<String>();
        boolean overwrite = true;
        //指定 逆向工程配置文件
        File configFile = new File("generatorConfig.xml");
        ConfigurationParser cp = new ConfigurationParser(warnings);
        Configuration config = cp.parseConfiguration(configFile);
        DefaultShellCallback callback = new DefaultShellCallback(overwrite);
        MyBatisGenerator myBatisGenerator = new MyBatisGenerator(config,
                callback, warnings);
        myBatisGenerator.generate(null);

    }
    public static void main(String[] args) throws Exception {
        try {
            GeneratorSqlmap generatorSqlmap = new GeneratorSqlmap();
            generatorSqlmap.generator();
        } catch (Exception e) {
            e.printStackTrace();
        }
    }

}
4、拷贝生成的mapper文件和po类到工程中指定的目录中
5、在applicationContext.xml 中设置扫描器,保证mapper接口能自动创建对象,并在spring中注册
    <!-- mapper批量扫描-->
     <bean class="org.mybatis.spring.mapper.MapperScannerConfigurer">
        <!-- 指定要扫描的包名,如果多个包,中间用逗号分隔 -->
        <property name="basePackage" value="cn.itcast.ssm.mapper"></property>
        <property name="sqlSessionFactoryBeanName" value="sqlSessionFactory"></property>
     </bean>
6、测试mapper中的常用方法
public class ItemsMapperTest {

    private ApplicationContext applicationContext;
    private ItemsMapper itemsMapper;

    //要先得到Spring容器
    @Before
    public void setUp() throws Exception {
        applicationContext=new ClassPathXmlApplicationContext("classpath:spring/applicationContext.xml");
        itemsMapper=(ItemsMapper) applicationContext.getBean("itemsMapper");
    }

    //根据主键删除
    @Test
    public void testDeleteByPrimaryKey() {
        itemsMapper.deleteByPrimaryKey(4);
    }

    @Test
    public void testInsert() {
        Items items=new Items();
        items.setName("手机");
        items.setPrice(999f);
        itemsMapper.insert(items);
    }

    //自定义条件查询
    @Test
    public void testSelectByExample() {
        ItemsExample itemsExample=new ItemsExample();
        //通过criteria构造查询条件
        ItemsExample.Criteria criteria=itemsExample.createCriteria();
        criteria.andNameEqualTo("笔记本");//构造条件 name='笔记本3'
        List<Items> list = itemsMapper.selectByExample(itemsExample);
        System.out.println(list);
    }

    //根据主键来查询
    @Test
    public void testSelectByPrimaryKey() {
        Items items = itemsMapper.selectByPrimaryKey(1);
        System.out.println(items);
    }

    //更新数据
    @Test
    public void testUpdateByPrimaryKey() {
        Items items=itemsMapper.selectByPrimaryKey(1);
        items.setName("水杯");
        //将传入的数据对所有的字段进行程序,一般先查,再更新
        itemsMapper.updateByPrimaryKey(items);

        //如果传入字段不为空,才更新,一般用于批量更新
        //itemsMapper.updateByPrimaryKeySelective(items);
    }

}
逆向工程注意事项
1、 Mapper文件内容不覆盖而是追加
XXXMapper.xml文件已经存在时,如果进行重新生成则mapper.xml文件内容不被覆盖而是进行内容追加,结果导致mybatis解析失败。
解决方法:删除原来已经生成的mapper xml文件再进行生成。
Mybatis自动生成的po及mapper.java文件不是内容而是直接覆盖没有此问题。
2、 Table schema问题
下边是关于针对oracle数据库表生成代码的schema问题:
Schma即数据库模式,oracle中一个用户对应一个schema,可以理解为用户就是schema。
当Oralce数据库存在多个schema可以访问相同的表名时,使用mybatis生成该表的mapper.xml将会出现mapper.xml内容重复的问题,结果导致mybatis解析错误。
解决方法:在table中填写schema,如下:
< table schema=”XXXX” tableName=” ” >
XXXX即为一个schema的名称,生成后将mapper.xml的schema前缀批量去掉,如果不去掉当oracle用户变更了sql语句将查询失败。
快捷操作方式:mapper.xml文件中批量替换:“from XXXX.”为空
Oracle查询对象的schema可从dba_objects中查询,如下:
select * from dba_objects


 3749
3749


 被折叠的 条评论
为什么被折叠?
被折叠的 条评论
为什么被折叠?
 到【灌水乐园】发言


