


以NLTK为基础配合讲解自然语言处理的原理
http://www.nltk.org/
Python上著名的自然语⾔处理库
自带语料库,词性分类库
自带分类,分词,等功能
强⼤的社区⽀持
还有N多的简单版wrapper,如 TextBlob
NLTK安装
# Mac/Unix
sudo pip install -U nltk
# 顺便便还可以装个Numpy
sudo pip install -U numpy
# 测试是否安装成功
>>> python
>>> import nltk
安装语料库
import nltk
nltk.download()速度慢,可以在网页https://raw.githubusercontent.com/nltk/nltk_data/gh-pages/index.xml里找链接,用迅雷下载
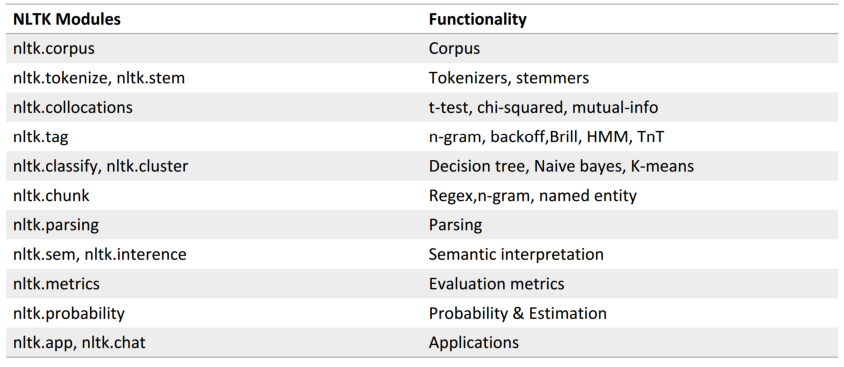
功能⼀览表
NLTK⾃带语料库
>>> from nltk.corpus import brown
>>> brown.categories()  # 分类
['adventure', 'belles_lettres', 'editorial',
'fiction', 'government', 'hobbies', 'humor',
'learned', 'lore', 'mystery', 'news', 'religion',
'reviews', 'romance', 'science_fiction']
>>> len(brown.sents()) # 一共句子数
57340
>>> len(brown.words()) # 一共单词数
1161192
文本处理流程
文本 -> 预处理(分词、去停用词) -> 特征工程 -> 机器学习算法 -> 标签
分词(Tokenize)
把长句⼦拆成有“意义”的⼩部件
>>> import nltk
>>> sentence = “hello, world"
>>> tokens = nltk.word_tokenize(sentence)
>>> tokens
['hello', ‘,', 'world']
中英文NLP区别:
英文直接使用空格分词,中文需要专门的方法进行分词:

中文分词:
import jieba
seg_list = jieba.cut('我来到北京清华大学', cut_all=True)
print('Full Mode:', '/'.join(seg_list))  # 全模式
seg_list = jieba.cut('我来到北京清华大学', cut_all=False)
print('Default Mode:', '/'.join(seg_list))  # 精确模式
seg_list = jieba.cut('他来到了网易杭研大厦')  # 默认是精确模式
print('/'.join(seg_list))
seg_list = jieba.cut_for_search('小明硕士毕业于中国科学院计算所,后在日本京都大学深造')  # 搜索引擎模式
print('搜索引擎模式:', '/'.join(seg_list))
seg_list = jieba.cut('小明硕士毕业于中国科学院计算所,后在日本京都大学深造', cut_all=True)
print('Full Mode:', '/'.join(seg_list))
Full Mode: 我/来到/北京/清华/清华大学/华大/大学
Default Mode: 我/来到/北京/清华大学
他/来到/了/网易/杭研/大厦 (jieba有新词发现功能,“杭研”没有在词典中,但是也被Viterbi算法识别出来了)
搜索引擎模式: 小明/硕士/毕业/于/中国/科学/学院/科学院/中国科学院/计算/计算所/,/后/在/日本/京都/大学/日本京都大学/深造
Full Mode: 小/明/硕士/毕业/于/中国/中国科学院/科学/科学院/学院/计算/计算所///后/在/日本/日本京都大学/京都/京都大学/大学/深造
其他中文分词工具:CoreNLP :java编写,有命名实体识别、词性标注、词语词干化、语句语法树的构造还有指代关系等功能
对于 社交网络上的文本,有很多不合语法不合正常逻辑的语言表达:
@某人,表情符号,URL,#话题符号(hashtag)等
如:Twitter上的语句推文
RT @angelababy: love you baby! :D http://ah.love #168cm
如果直接分词:
from nltk.tokenize import word_tokenize

tweet='RT @angelababy: love you baby! :D http://ah.love #168cm'
print(word_tokenize(tweet))
[‘RT’, ‘@’, ‘angelababy’, ‘:’, ‘love’, ‘you’, ‘baby’, ‘!’, ‘:’, ‘D’, ‘http’, ‘:’, ‘//ah.love’, ‘#’, ‘168cm’]
需要借助正则表达式,将表情符,网址,话题,@某人等作为一个整体,
对照表:http://www.regexlab.com/zh/regref.htm
import re
emoticons_str = r"""
(?:
[:=;] # 表示眼睛的字符
[oO\-]? # 表示鼻子的字符
[D\)\]\(\]/\\OpP] # 表示嘴的字符
)"""
regex_str = [
emoticons_str,
r'<[^>]+>', # HTML tags
r'(?:@[\w_]+)', # @某人
r"(?:\#+[\w_]+[\w\'_\-]*[\w]+)", # 话题标签
r'http[s]?://(?:[a-z]|[0-9]|[$-_@.&+]|[!*\(\),]|(?:%[0-9a-f][0-9a-f]))+', # URLs
r'(?:(?:\d+,?)+(?:\.?\d+)?)', # 数字
r"(?:[a-z][a-z'\-_]+[a-z])", # 含有- 和’ 的单词
r'(?:[\w_]+)', # 其他
r'(?:\S)' # 其他
]
tokens_re = re.compile(r'(' + '|'.join(regex_str) + ')', re.VERBOSE | re.IGNORECASE)
emoticon_re=re.compile(r'^'+emoticons_str+'$',re.VERBOSE|re.IGNORECASE)
def tokenize(s):
return tokens_re.findall(s)
def preprocess(s,lowercase=False):
tokens=tokenize(s)
if lowercase:
tokens=[token if emoticon_re.search(token) else token.lower() for token in tokens]
return tokens
tweet='RT @angelababy: love you baby! :D http://ah.love #168cm'
print(preprocess(tweet))[‘RT’, ‘@angelababy’, ‘:’, ‘love’, ‘you’, ‘baby’, ‘!’, ‘:D’, ‘http://ah.love‘, ‘#168cm’]
纷繁复杂的词形
- Inflection 变化:walk=>walking=>walked 不影响词性
- derivation 引申:nation(noun)=>national(adjective)=>nationalize(verb) 影响词性
词形归一化
- Stemming 词干提取(词根还原):把不影响词性的inflection 的小尾巴砍掉 (使用词典,匹配最长词)
- walking 砍掉ing=>walk
- walked 砍掉ed=>walk
- Lemmatization 词形归一(词形还原):把各种类型的词的变形,都归一为一个形式(使用wordnet)
- went 归一 => go
- are 归一 => be
NLTK实现Stemming
from nltk.stem.lancaster import LancasterStemmer
lancaster_stemmer=LancasterStemmer()
print(lancaster_stemmer.stem('maximum'))
print(lancaster_stemmer.stem('multiply'))
print(lancaster_stemmer.stem('provision'))
print(lancaster_stemmer.stem('went'))
print(lancaster_stemmer.stem('wenting'))
print(lancaster_stemmer.stem('walked'))
print(lancaster_stemmer.stem('national'))
maxim
multiply
provid
went
went
walk
nat
from nltk.stem.porter import PorterStemmer
porter_stemmer=PorterStemmer()
print(porter_stemmer.stem('maximum'))
print(porter_stemmer.stem('multiply'))
print(porter_stemmer.stem('provision'))
print(porter_stemmer.stem('went'))
print(porter_stemmer.stem('wenting'))
print(porter_stemmer.stem('walked'))
print(porter_stemmer.stem('national'))
maximum
multipli
provis
went
went
walk
nation
from nltk.stem import SnowballStemmer
snowball_stemmer=SnowballStemmer("english")
print(snowball_stemmer.stem('maximum'))
print(snowball_stemmer.stem('multiply'))
print(snowball_stemmer.stem('provision'))
print(snowball_stemmer.stem('went'))
print(snowball_stemmer.stem('wenting'))
print(snowball_stemmer.stem('walked'))
print(snowball_stemmer.stem('national'))
maximum
multipli
provis
went
went
walk
nation
NLTK实现 Lemmatization
from nltk.stem import WordNetLemmatizer
wordnet_lemmatizer=WordNetLemmatizer()
print(wordnet_lemmatizer.lemmatize('dogs'))
print(wordnet_lemmatizer.lemmatize('churches'))
print(wordnet_lemmatizer.lemmatize('aardwolves'))
print(wordnet_lemmatizer.lemmatize('abaci'))
print(wordnet_lemmatizer.lemmatize('hardrock'))
dog
church
aardwolf
abacus
hardrock
问题:Went v.是go的过去式 n.英文名:温特
所以增加词性信息,可使NLTK更好的 Lemmatization
from nltk.stem import WordNetLemmatizer
wordnet_lemmatizer = WordNetLemmatizer()
# 没有POS Tag,默认是NN 名词
print(wordnet_lemmatizer.lemmatize('are'))
print(wordnet_lemmatizer.lemmatize('is'))
# 加上POS Tag
print(wordnet_lemmatizer.lemmatize('is', pos='v'))
print(wordnet_lemmatizer.lemmatize('are', pos='v'))
are
is
be
be
NLTK标注POS Tag
import nltk
text=nltk.word_tokenize('what does the beautiful fox say')
print(text)
print(nltk.pos_tag(text))
[‘what’, ‘does’, ‘the’, ‘beautiful’, ‘fox’, ‘say’]
[(‘what’, ‘WDT’), (‘does’, ‘VBZ’), (‘the’, ‘DT’), (‘beautiful’, ‘JJ’), (‘fox’, ‘NNS’), (‘say’, ‘VBP’)]
词性符号对照表
- CC Coordinating conjunction
- CD Cardinal number
- DT Determiner
- EX Existential there
- FW Foreign word
- IN Preposition or subordinating conjunction
- JJ Adjective
- JJR Adjective, comparative
- JJS Adjective, superlative
- LS List item marker
- MD Modal
- NN Noun, singular or mass
- NNS Noun, plural
- NNP Proper noun, singular
- NNPS Proper noun, plural
- PDT Predeterminer
- POS Possessive ending
- PRP Personal pronoun
- PRP$ Possessive pronoun
- RB Adverb
- RBR Adverb, comparative
- RBS Adverb, superlative
- RP Particle
- SYM Symbol
- TO to
- UH Interjection
- VB Verb, base form
- VBD Verb, past tense
- VBG Verb, gerund or present participle
- VBN Verb, past participle
- VBP Verb, non-3rd person singular present
- VBZ Verb, 3rd person singular present
- WDT Wh-determiner
- WP Wh-pronoun
- WP$ Possessive wh-pronoun
- WRB Wh-adverb
Stopwords
一千个 He 有一千种指代,一千个 The 有一千种指示
对于注重理解文本【意思】的应用场景来说歧义太多
英文停止词列表:https://www.ranks.nl/stopwords
NLTK有停用词列表
import nltk
from nltk.corpus import stopwords
word_list=nltk.word_tokenize('what does the beautiful fox say')
print(word_list )
filter_words=[word for word in word_list if word not in stopwords.words('english')]
print(filter_words)
[‘what’, ‘does’, ‘the’, ‘beautiful’, ‘fox’, ‘say’]
[‘beautiful’, ‘fox’, ‘say’]
⼀条typical的⽂本预处理流⽔线

根据具体task 决定,如果是文本查重、写作风格判断等,可能就不需要去除停止词
什么是自然语言处理?
自然语言——> 计算机数据
文本预处理让我们得到了什么?

NLTK在NLP上的经典应⽤
- 情感分析
- 文本相似度
- 文本分类
应用:情感分析
最简单的方法:基于情感词典(sentiment dictionary)
类似于关键词打分机制
like 1
good 2
bad -2
terrible -3
比如:AFINN-111
http://www2.imm.dtu.dk/pubdb/views/publication_details.php?id=6010
import nltk
from nltk.corpus import stopwords
from nltk.stem import SnowballStemmer

snowball_stemmer = SnowballStemmer("english")

sentiment_dictionary = {}
for line in open('AFINN-111.txt'):
    word, score = line.split('\t')
    sentiment_dictionary[word] = int(score)

text = 'I went to Chicago yesterday, what a fucking day!'
word_list = nltk.word_tokenize(text)  # 分词
words = [(snowball_stemmer.stem(word)) for word in word_list]  # 词干提取,词形还原最好有词性,此处先不进行
words = [word for word in word_list if word not in stopwords.words('english')]  # 去除停用词
print('预处理之后的词:', words)
total_score = sum(sentiment_dictionary.get(word, 0) for word in words)
print('该句子的情感得分:', total_score)
if total_score > 0:
    print('积极')
elif total_score == 0:
    print('中性')
else:
    print('消极')
预处理之后的词: [‘I’, ‘went’, ‘Chicago’, ‘yesterday’, ‘,’, ‘fucking’, ‘day’, ‘!’]
该句子的情感得分: -4
消极
缺点:新词无法处理、依赖人工主观性、无法挖掘句子深层含义
配上ML的情感分析
from nltk.classify import NaiveBayesClassifier

# 随手造点训练集
s1 = 'this is a good book'
s2 = 'this is a awesome book'
s3 = 'this is a bad book'
s4 = 'this is a terrible book'

def preprocess(s):
    dic = ['this', 'is', 'a', 'good', 'book', 'awesome', 'bad', 'terrible']
    return {word: True if word in s else False for word in dic} # 返回句子的词袋向量表示


# 把训练集给做成标准形式
training_data = [[preprocess(s1), 'pos'],
                 [preprocess(s2), 'pos'],
                 [preprocess(s3), 'neg'],
                 [preprocess(s4), 'neg']]

# 喂给model吃
model = NaiveBayesClassifier.train(training_data)
# 打出结果
print(model.classify(preprocess('this is a terrible book')))
neg
文本相似度
使用 Bag of Words 元素的频率表示文本特征
使用 余弦定理 判断向量相似度

import nltk
from nltk import FreqDist

corpus = 'this is my sentence ' \
         'this is my life ' \
         'this is the day'

# 根据需要做预处理:tokensize,stemming,lemma,stopwords 等
tokens = nltk.word_tokenize(corpus)
print(tokens)

# 用NLTK的FreqDist统计一下文字出现的频率
fdist = FreqDist(tokens)
# 类似于一个Dict,带上某个单词, 可以看到它在整个文章中出现的次数
print(fdist['is'])
# 把最常见的50个单词拿出来
standard_freq_vector = fdist.most_common(50)
size = len(standard_freq_vector)
print(standard_freq_vector)


# Func:按照出现频率大小,记录下每一个单词的位置
def position_lookup(v):
    res = {}
    counter = 0
    for word in v:
        res[word[0]] = counter
        counter += 1
    return res


# 把词典中每个单词的位置记录下来
standard_position_dict = position_lookup(standard_freq_vector)
print(standard_position_dict)

#新的句子
sentence='this is cool'
# 建立一个跟词典同样大小的向量
freq_vector=[0]*size
# 简单的预处理
tokens=nltk.word_tokenize(sentence)
# 对于新句子里的每个单词
for word in tokens:
    try:
        # 如果在词典里有,就在标准位置上加1
        freq_vector[standard_position_dict[word]]+=1
    except KeyError:
        continue

print(freq_vector)
[‘this’, ‘is’, ‘my’, ‘sentence’, ‘this’, ‘is’, ‘my’, ‘life’, ‘this’, ‘is’, ‘the’, ‘day’]
3
[(‘this’, 3), (‘is’, 3), (‘my’, 2), (‘sentence’, 1), (‘life’, 1), (‘the’, 1), (‘day’, 1)]
{‘this’: 0, ‘is’: 1, ‘my’: 2, ‘sentence’: 3, ‘life’: 4, ‘the’: 5, ‘day’: 6}
[1, 1, 0, 0, 0, 0, 0]
应用:文本分类
TF-IDF
TF:Term Frequency 衡量一个term 在文档中出现得有多频繁。
TF(t)=t出现在文档中的次数文档中的term总数
IDF:Inverse Document Frequency ,衡量一个term有多重要。
有些词出现的很多,但明显不是很有用,如 ‘is’’the’ ‘and’ 之类的词。
IDF(t)=loge(文档总数含有t的文档总数)
(如果一个词越常见,那么分母就越大,逆文档频率就越小越接近0。所以分母通常加1,是为了避免分母为0(即所有文档都不包含该词)。log表示对得到的值取对数。)
如果某个词比较少见,但是它在这篇文章中多次出现,那么它很可能就反映了这篇文章的特性,正是我们所需要的关键词。
TF−IDF=TF∗IDF
NLTK实现TF-IDF
from nltk.text import TextCollection

# 首先,把所有的文档放到TextCollection类中
# 这个类会自动帮你断句,做统计,做计算
corpus = TextCollection(['this is sentence one',
                         'this is sentence two',
                         ' is sentence three'])

# 直接就能算出tfidf
# (term:一句话中的某个term,text:这句话)
print(corpus.tf_idf('this', 'this is sentence four'))

# 对于每个新句子
new_sentence='this is sentence five'
# 遍历一遍所有的vocabulary中的词:
standard_vocab=['this' 'is' 'sentence' 'one' 'two' 'five']
for word in standard_vocab:
    print(corpus.tf_idf(word, new_sentence))
得到了 TF-IDF的向量表示后,用ML 模型就行分类即可:

案例:关键词搜索
kaggle竞赛题:https://www.kaggle.com/c/home-depot-product-search-relevance
Step1:导入所需
import numpy as np
import pandas as pd
from sklearn.ensemble import RandomForestRegressor, BaggingRegressor
from nltk.stem.snowball import SnowballStemmer
读入训练/测试集
df_train = pd.read_csv('../input/train.csv', encoding="ISO-8859-1")
df_test = pd.read_csv('../input/test.csv', encoding="ISO-8859-1")
df_desc = pd.read_csv('../input/product_descriptions.csv') # 产品介绍
看看数据们都长什么样子
df_train.head()
df_desc.head()
# 合并数据一起处理
df_all = pd.concat((df_train, df_test), axis=0, ignore_index=True)
# 将产品描述根据 product_uid 连接过来
df_all = pd.merge(df_all, df_desc, how='left', on='product_uid')df_all.head()
Step 2: 文本预处理
我们这里遇到的文本预处理比较简单,因为最主要的就是看关键词是否会被包含。
所以我们统一化我们的文本内容,以达到任何term在我们的数据集中只有一种表达式的效果。
stemmer = SnowballStemmer('english')

def str_stemmer(s):
    return " ".join([stemmer.stem(word) for word in s.lower().split()])

def str_common_word(str1, str2):
    return sum(int(str2.find(word)>=0) for word in str1.split())
接下来,把每一个column都跑一遍,以清洁所有的文本内容
# 对 文字列进行 词干提取
df_all['search_term'] = df_all['search_term'].map(lambda x: str_stemmer(x))
df_all['product_title'] = df_all['product_title'].map(lambda x: str_stemmer(x))
df_all['product_description'] = df_all['product_description'].map(lambda x: str_stemmer(x))
Step 3: 自制文本特征
# 关键词的长度
df_all['len_of_query'] = df_all['search_term'].map(lambda x:len(x.split())).astype(np.int64)
# 标题中有多少关键词重合
df_all['commons_in_title'] = df_all.apply(lambda x:str_common_word(x['search_term'],x['product_title']), axis=1)
# 描述中有多少关键词重合
df_all['commons_in_desc'] = df_all.apply(lambda x:str_common_word(x['search_term'],x['product_description']), axis=1)
把不能被『机器学习模型』处理的column给drop掉
df_all = df_all.drop(['search_term','product_title','product_description'],axis=1)Step 4: 重塑训练/测试集
总体处理完之后,再将训练集合测试集分开
df_train = df_all.loc[df_train.index]
df_test = df_all.loc[df_test.index]
记录下测试集的id
留着上传的时候 能对的上号
test_ids = df_test['id']分离出y_train
y_train = df_train['relevance'].values把原集中的label给删去
X_train = df_train.drop(['id','relevance'],axis=1).values
X_test = df_test.drop(['id','relevance'],axis=1).values
Step 5: 建立模型
from sklearn.ensemble import RandomForestRegressor
from sklearn.model_selection import cross_val_score
# 用CV结果保证公正客观性,调试不同的alpha值
params = [1, 3, 5, 6, 7, 8, 9, 10]
test_scores = []
for param in params:
clf = RandomForestRegressor(n_estimators=30, max_depth=param)
test_score = np.sqrt(-cross_val_score(clf, X_train, y_train, cv=5, scoring='neg_mean_squared_error'))
test_scores.append(np.mean(test_scores))画个图来看看:
import matplotlib.pyplot as plt
%matplotlib inline
plt.plot(params, test_scores)
plt.title("Param vs CV Error");
大概6~7的时候达到了最优解
Step 6: 上传结果
rf = RandomForestRegressor(n_estimators=30, max_depth=6)
rf.fit(X_train, y_train)
y_pred = rf.predict(X_test)
pd.DataFrame({"id": test_ids, "relevance": y_pred}).to_csv('submission.csv',index=False)
总结:
这一篇教程中,虽然都是用的最简单的方法,但是基本框架是很完整的。
同学们可以尝试修改/调试/升级的部分是:
文本预处理步骤: 你可以使用很多不同的方法来使得文本数据变得更加清洁
自制的特征: 相处更多的特征值表达方法(关键词全段重合数量,重合比率,等等)
更好的回归模型: 根据之前的课讲的Ensemble方法,把分类器提升到极致


 4676
4676

 被折叠的 条评论
为什么被折叠?
被折叠的 条评论
为什么被折叠?
 到【灌水乐园】发言


