


本文测试环境:
win10 64位
vistual studio 2019
Emgu CV 4.6.0
环境配置准备:
1 新增控制台项目,.net framework为4.7.2
2 把win-x64目录的native目录下的文件全部拷贝到项目的运行目录Debug目录下
3 项目选择x64
4 添加项目引用Emgu.CV.dll、Emgu.CV.Platform.NetFramework.dll、System.Drawing.dll和System.Runtime.InteropServices.RuntimeInformation.dll
具体配置参考:
Emgu CV4图像处理之环境搭建1(C#)_zxy2847225301的博客-CSDN博客
1 Canny边缘检测
1 实现Canny算法需要以下五个步骤:

高斯模糊:使用高斯滤波进行图像去噪,这很好理解,为了更好的提取轮廓
灰度转换:提取轮廓一般都是灰度图
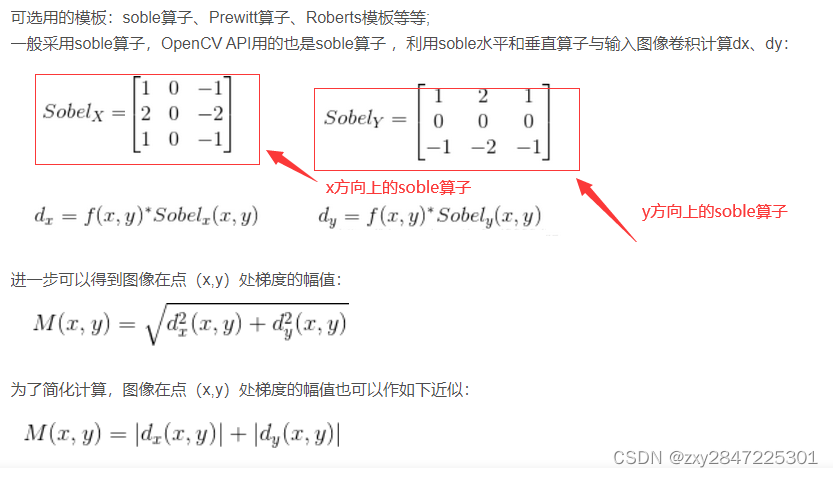
计算梯度和方向:使用soble算子,不知这个soble算子是咋来的,梯度方向怎么来的,看了几篇博文,不是很懂
非最大值信号抑制:
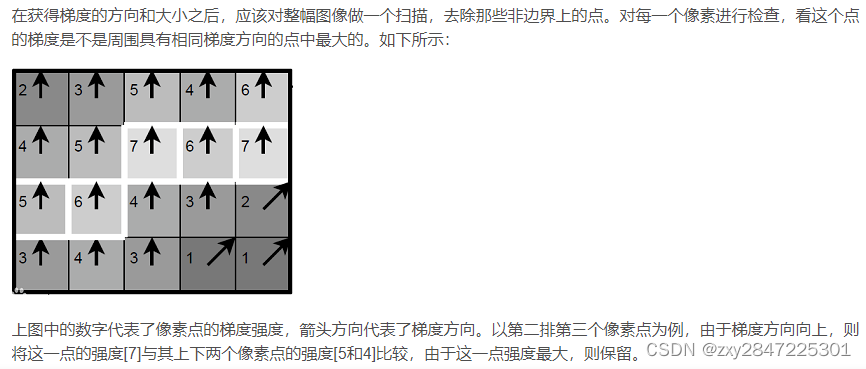
上图好像有点明白
高低阈值输出二值图像:

函数原型如下:

例子代码:
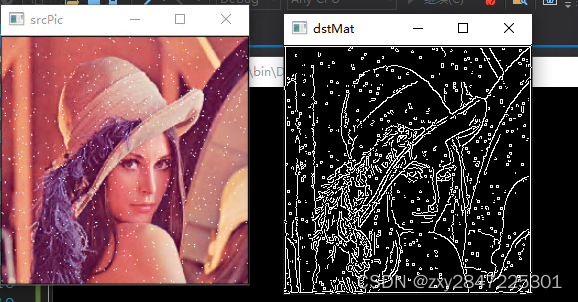
pic_noise.png原图如下:

using Emgu.CV;
using Emgu.CV.Structure;
using Emgu.CV.Util;
using System;
using System.Collections.Generic;
using System.Drawing;
using System.IO;
using System.Linq;
using System.Text;
using System.Threading.Tasks;

namespace EmguCVDemo2
{
    class Program
    {
        static void Main(string[] args)
        {

            Image<Bgr,Byte> srcPic = new Image<Bgr, Byte>("pic_noise.png");
            ImgCanny(srcPic);
            CvInvoke.WaitKey(0);
            Console.ReadLine();
        }

        /// <summary>
        /// Canny边缘检测
        /// </summary>
        /// <param name="srcPic"></param>
        private static void ImgCanny(Image<Bgr, Byte> srcPic)
        {
            Mat dstMat = new Mat();
            CvInvoke.Canny(srcPic, dstMat, 110, 220);
            CvInvoke.Imshow("srcPic", srcPic);
            CvInvoke.Imshow("dstMat", dstMat);
            CvInvoke.WaitKey(0);
        }


    }
}
运行结果如下:
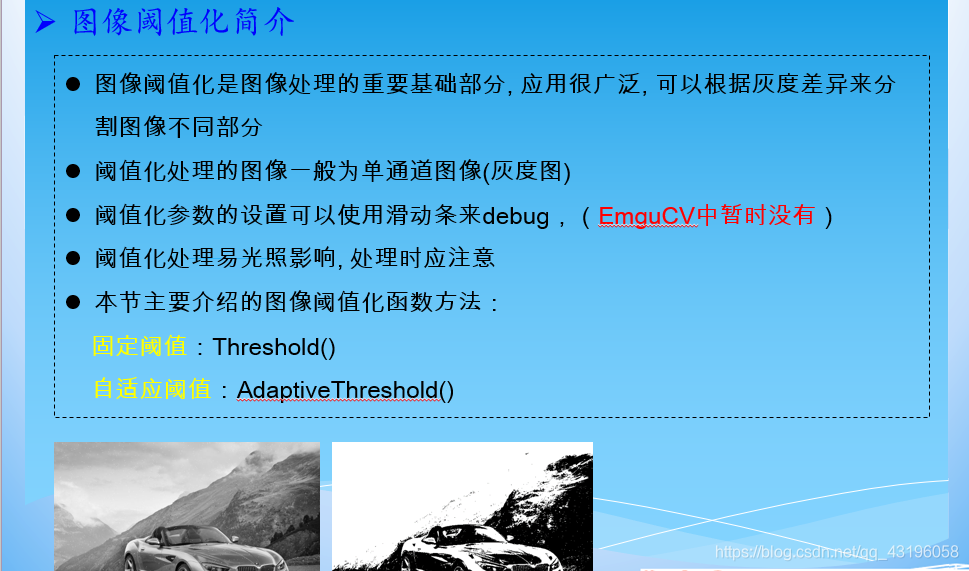
2 图像阈值化(提取轮廓)
2.1 固定阈值:Threshold函数原型如下:

第一个参数src为输入图像
第二个参数dst为输出图像
第三个参数threshold是给定的阈值,当第五个参数theasholdType为Binary时,则:
value>threshold时,取maxValue
value<=threshold时,取0
第四个参数maxValue,当theasholdType为Binary或BinaryInv时才有效
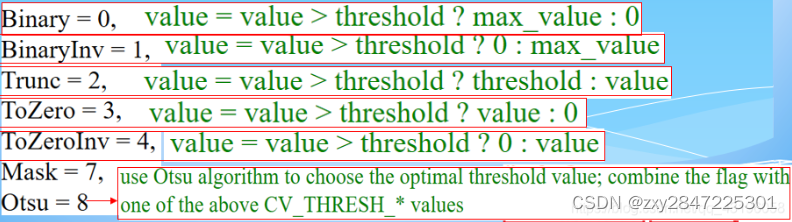
第五个参数取值如下:
例子代码如下:
using Emgu.CV;
using Emgu.CV.Structure;
using Emgu.CV.Util;
using System;
using System.Collections.Generic;
using System.Drawing;
using System.IO;
using System.Linq;
using System.Text;
using System.Threading.Tasks;

namespace EmguCVDemo2
{
    class Program
    {
        static void Main(string[] args)
        {

            Image<Bgr,Byte> srcPic = new Image<Bgr, Byte>("pic_noise.png");
            ImgThreshold(srcPic);
            CvInvoke.WaitKey(0);
            Console.ReadLine();
        }


        /// <summary>
        /// 固定阈值
        /// </summary>
        /// <param name="srcPic"></param>
        private static void ImgThreshold(Image<Bgr, Byte> srcPic)
        {
            //原图先转灰度图
            CvInvoke.CvtColor(srcPic, srcPic, Emgu.CV.CvEnum.ColorConversion.Bgr2Gray);
            Mat dstMat = new Mat();
            //当值灰度值高于100,则取255,其他情况取0(二值化为0,255)
            CvInvoke.Threshold(srcPic, dstMat, 100, 255, Emgu.CV.CvEnum.ThresholdType.Binary);
            CvInvoke.Imshow("srcPic", srcPic);
            CvInvoke.Imshow("dstMat", dstMat);
            CvInvoke.WaitKey(0);
        }

    }
}
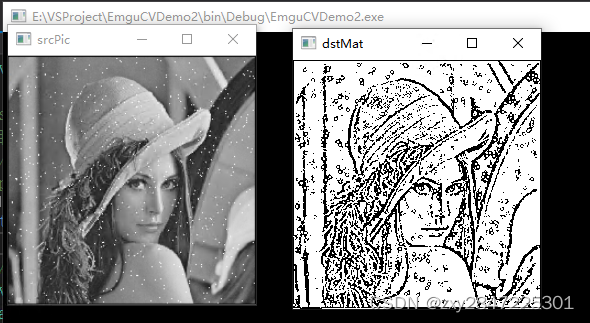
运行结果如下:

2.2 自适应阈值AdaptiveThreshold
函数原型如下:

各个参数含义如下:
src:源图像
dst:输出图像,与源图像大小一致
adaptiveType:在一个邻域内计算阈值所采用的算法,有两个取值,分别为 MeanC 和 GaussianC。
MeanC的计算方法是计算出领域的平均值再减去第七个参数double param1的值。
GaussianC的计算方法是计算出领域的高斯均值再减去第七个参数double param1的值。
thresholdType:这是阈值类型,有 BINARY 和BINARY_INV等 具体的请看官方的说明,这里不多做解释。
blockSize:adaptiveThreshold的计算单位是像素的邻域块,这是局部邻域大小,3、5、7等。
param1:这个参数实际上是一个偏移值调整量,用均值和高斯计算阈值后,再减或加这个值就是最终阈值。
参考代码如下:
using Emgu.CV;
using Emgu.CV.Structure;
using Emgu.CV.Util;
using System;
using System.Collections.Generic;
using System.Drawing;
using System.IO;
using System.Linq;
using System.Text;
using System.Threading.Tasks;

namespace EmguCVDemo2
{
    class Program
    {
        static void Main(string[] args)
        {

            Image<Bgr,Byte> srcPic = new Image<Bgr, Byte>("pic_noise.png");
            ImgAdaptiveThreshold(srcPic);
            CvInvoke.WaitKey(0);
            Console.ReadLine();
        }


        /// <summary>
        /// 自适应阈值
        /// </summary>
        /// <param name="srcPic"></param>
        private static void ImgAdaptiveThreshold(Image<Bgr, Byte> srcPic)
        {
            //原图先转灰度图
            CvInvoke.CvtColor(srcPic, srcPic, Emgu.CV.CvEnum.ColorConversion.Bgr2Gray);
            Mat dstMat = new Mat();

            CvInvoke.AdaptiveThreshold(srcPic, dstMat, 255, Emgu.CV.CvEnum.AdaptiveThresholdType.GaussianC, Emgu.CV.CvEnum.ThresholdType.Binary, 7, 5);
            CvInvoke.Imshow("srcPic", srcPic);
            CvInvoke.Imshow("dstMat", dstMat);
            CvInvoke.WaitKey(0);
        }
    }
}
运行结果如下:


 1450
1450


 被折叠的 条评论
为什么被折叠?
被折叠的 条评论
为什么被折叠?
 到【灌水乐园】发言


