


文章目录
JSON数据传输参数
前面我们说过,现在比较流行的开发方式为异步调用。前后台以异步方式进行交换,传输的数据使用的是JSON,所以前端如果发送的是JSON数据,后端该如何接收?
对于JSON数据类型,我们常见的有三种:
json普通数组(["value1","value2","value3",...])json对象({key1:value1,key2:value2,...})json对象数组([{key1:value1,...},{key2:value2,...}])
对于上述数据,前端如何发送,后端如何接收?
JSON普通数组
步骤1:pom.xml添加依赖
我们可以将json数据以字符串的形式用形参进行接收,然后我们自己进行json的解析,但是这样未免太过麻烦。我们是否能直接用所需要类型的形参去接收json数据?
换句话说就是让SpringMVC帮助我们进行json的解析。而想要达到这一要求,就需要json解析器,常用的 JSON 解析器有Gson、fastJson、JackSon、JsonLib,SpringMVC默认使用的是jackson来处理json的转换。
但是SpringMVC默认是没有jackson的依赖的,所以需要在pom.xml添加jackson依赖
<dependency>
    <groupId>com.fasterxml.jackson.core</groupId>
    <artifactId>jackson-databind</artifactId>
    <version>2.9.0</version>
</dependency>
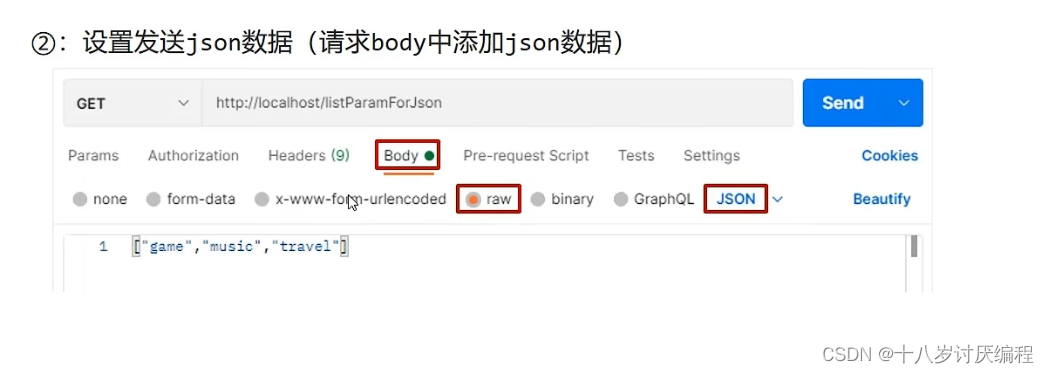
步骤2:PostMan发送JSON数据

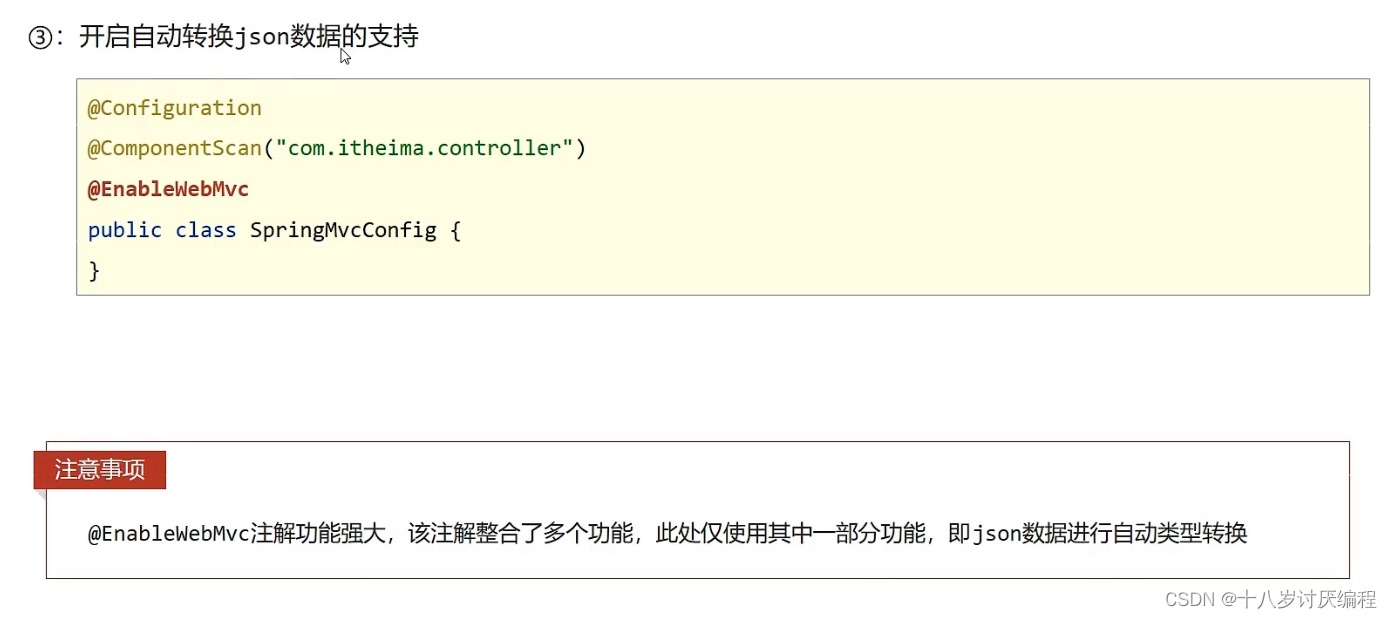
步骤3:开启SpringMVC注解支持
在SpringMVC的配置类中开启SpringMVC的注解支持,这里面就包含了将JSON转换成对象的功能。
@Configuration
@ComponentScan("com.nefu.controller")
//开启json数据类型自动转换
@EnableWebMvc
public class SpringMvcConfig {
}
我们可以打开这个注解看看;
我们把没有成员变量的注解叫做标记,我们可以把它理解为一个开关。在这里这个标记导入了一个配置类DelegatingWebMvcConfiguration,我们进入这个配置类可以看到相关的转换器注册方法:

步骤4:参数前添加@RequestBody
//使用@RequestBody注解将外部传递的json数组数据映射到形参的集合对象中作为数据
@RequestMapping("/listParamForJson")
@ResponseBody
public String listParamForJson(@RequestBody List<String> likes){
    System.out.println("list common(json)参数传递 list ==> "+likes);
    return "{'module':'list common for json param'}";
}
步骤5:启动运行程序

JSON普通数组的数据就已经传递完成,下面针对JSON对象数据和JSON对象数组的数据该如何传递呢?
JSON对象数据
我们会发现,只需要关注请求和数据如何发送?后端数据如何接收?
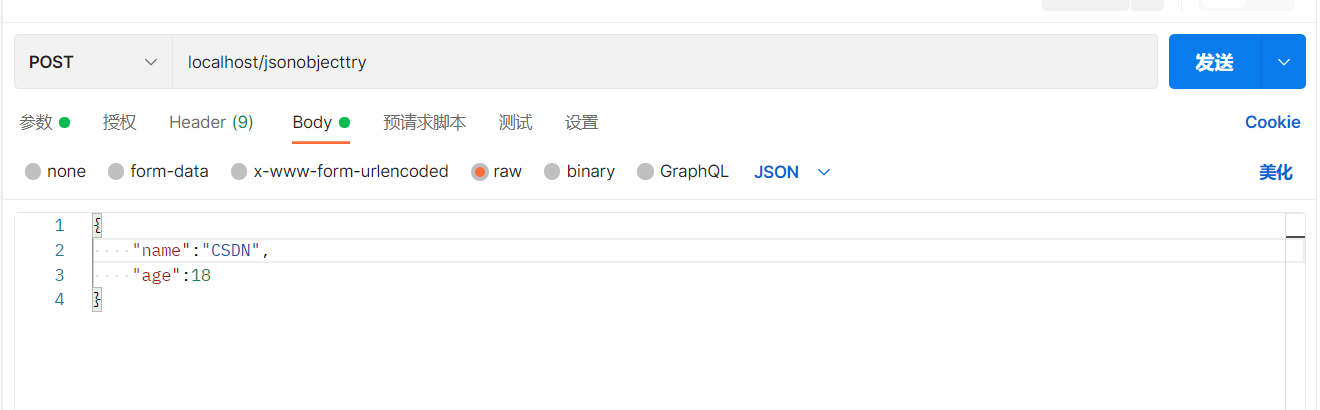
请求和数据的发送:
{
	"name":"itcast",
	"age":15
}

后端接收数据:
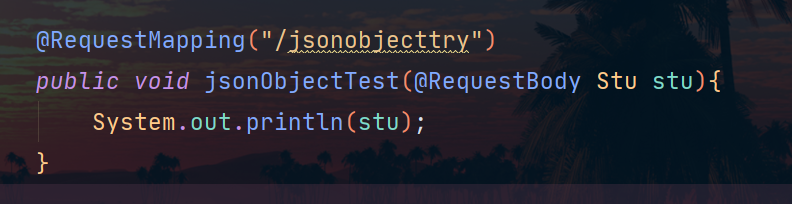
@RequestMapping("/pojoParamForJson")
@ResponseBody
public String pojoParamForJson(@RequestBody User user){
    System.out.println("pojo(json)参数传递 user ==> "+user);
    return "{'module':'pojo for json param'}";
}
启动程序访问测试

说明:
address为null的原因是前端没有传递数据给后端。
如果想要address也有数据,我们需求修改前端传递的数据内容:
{
	"name":"itcast",
	"age":15,
    "address":{
        "province":"beijing",
        "city":"beijing"
    }
}
再次发送请求,就能看到address中的数据

这里还有一个注意点,有的人可能会遇到这种情况;
我们通过PostMan发送请求:
我们回到控制台发现会报错:
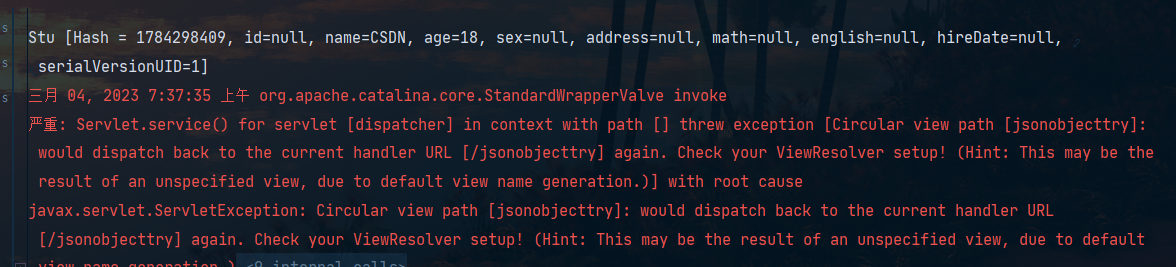
具体原因可以看下面这篇文章;
《Springboot极简教程》问题解决:javax.servlet.ServletException: Circular view path [login]: would dispatch back
通过原因分析,造成问题有两个因素:
- 缺省转发
- view和path同名
所以,解决方案如下
- 消除缺省转发
- 修改view和path,让他们不同名

JSON对象数组
集合中保存多个POJO该如何实现?
请求和数据的发送:
[
    {"name":"itcast","age":15},
    {"name":"itheima","age":12}
]
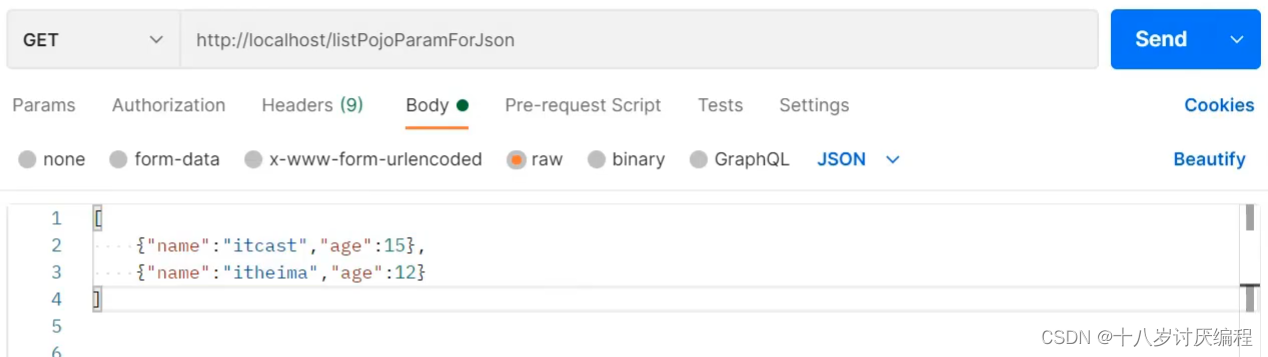
后端接收数据:
@RequestMapping("/listPojoParamForJson")
@ResponseBody
public String listPojoParamForJson(@RequestBody List<User> list){
    System.out.println("list pojo(json)参数传递 list ==> "+list);
    return "{'module':'list pojo for json param'}";
}
启动程序访问测试

小结
SpringMVC接收JSON数据的实现步骤为:
(1)导入jackson包

(2)使用PostMan发送JSON数据
(3)开启SpringMVC注解驱动,在配置类上添加@EnableWebMvc注解
(4)Controller方法的参数前添加@RequestBody注解

知识点1:@EnableWebMvc
| 名称 | @EnableWebMvc |
|---|---|
| 类型 | 配置类注解 |
| 位置 | SpringMVC配置类定义上方 |
| 作用 | 开启SpringMVC多项辅助功能 |
注意:@EnableWebMvc必须配合@Configuration注解一起使用。
(意思是这个类应当是托管到spring容器的配置类)
知识点2:@RequestBody
| 名称 | @RequestBody |
|---|---|
| 类型 | 形参注解 |
| 位置 | SpringMVC控制器方法形参定义前面 |
| 作用 | 将请求中请求体所包含的数据传递给请求参数,此注解一个处理器方法只能使用一次 |
@RequestBody与@RequestParam区别
-
区别
- @RequestParam用于接收url地址传参,表单传参【application/x-www-form-urlencoded】
- @RequestBody用于接收json数据【application/json】
-
应用
- 后期开发中,发送json格式数据为主,@RequestBody应用较广
- 如果发送非json格式数据,选用@RequestParam接收请求参数
这个地方可以联系GET和POST请求的特点进行理解:
- GET请求典型表现是将请求参数直接写在URL中进行传递。GET请求是没有请求体的
- POST请求典型表现是将请求参数放在请求体(即请求正文)中进行传递,当然也能像GET请求一样将请求参数直接写在URL中进行传递。
所以说@RequestParam注解并不是GET专属的,POST请求也可以使用,因为POST请求也可以将请求参数直接写在URL中进行传递
日期类型参数传递
前面我们处理过简单数据类型、POJO数据类型、数组和集合数据类型以及JSON数据类型,接下来我们还得处理一种开发中比较常见的一种数据类型,日期类型
日期类型比较特殊,因为对于日期的格式有N多中输入方式,比如:
- 2088-08-18
- 2088/08/18
- 08/18/2088
- …
针对这么多日期格式,SpringMVC该如何接收,它能很好的处理日期类型数据么?
实现步骤
步骤1:编写方法接收日期数据
在UserController类中添加方法,把参数设置为日期类型
@RequestMapping("/dataParam")
@ResponseBody
public String dataParam(Date date)
    System.out.println("参数传递 date ==> "+date);
    return "{'module':'data param'}";
}
步骤2:启动Tomcat服务器
查看控制台是否报错,如果有错误,先解决错误。
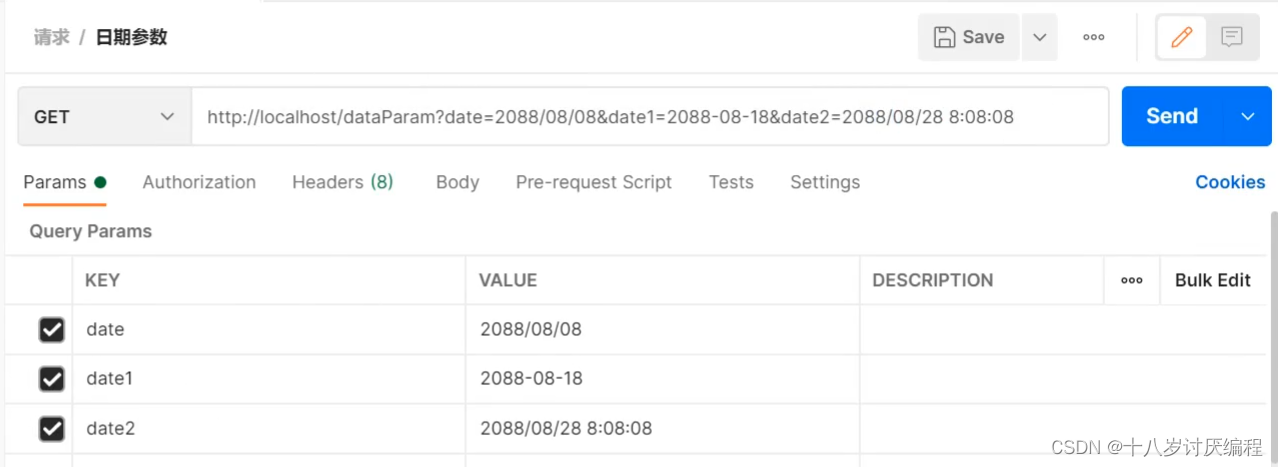
步骤3:使用PostMan发送请求
使用PostMan发送GET请求,并设置date参数
http://localhost/dataParam?date=2088/08/08

步骤4:查看控制台
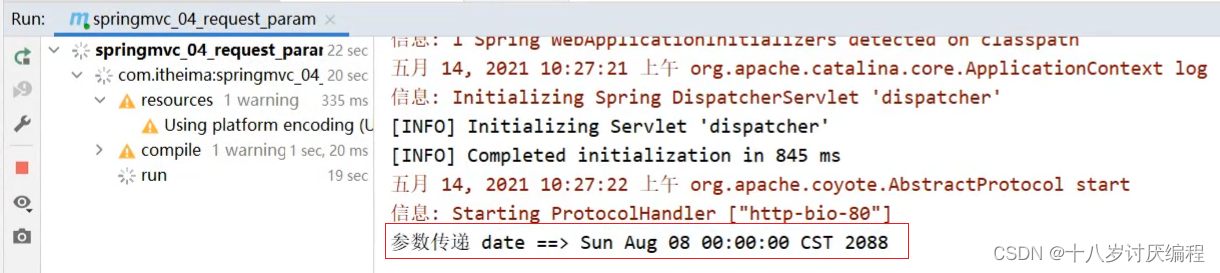
通过打印,我们发现SpringMVC可以接收日期数据类型,并将其打印在控制台。
这个时候,我们就想如果把日期参数的格式改成其他的,SpringMVC还能处理么?
步骤5:更换日期格式
为了能更好的看到程序运行的结果,我们在方法中多添加一个日期参数
@RequestMapping("/dataParam")
@ResponseBody
public String dataParam(Date date,Date date1)
    System.out.println("参数传递 date ==> "+date);
    return "{'module':'data param'}";
}
使用PostMan发送请求,携带两个不同的日期格式,
http://localhost/dataParam?date=2088/08/08&date1=2088-08-08
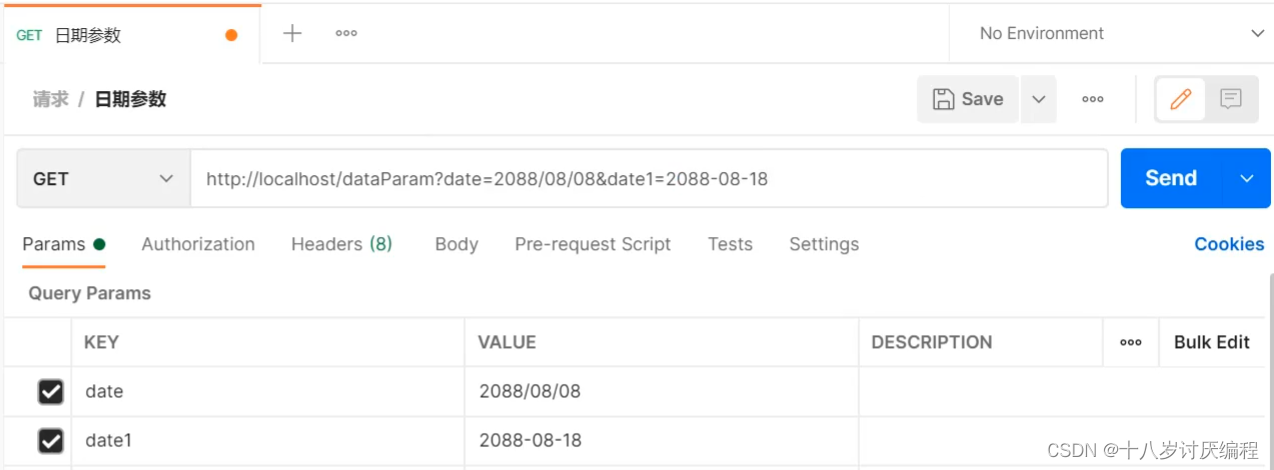
发送请求和数据后,页面会报400,控制台会报出一个错误
Resolved [org.springframework.web.method.annotation.MethodArgumentTypeMismatchException: Failed to convert value of type ‘java.lang.String’ to required type ‘java.util.Date’; nested exception is org.springframework.core.convert.ConversionFailedException: Failed to convert from type [java.lang.String] to type [java.util.Date] for value ‘2088-08-08’; nested exception is java.lang.IllegalArgumentException]
从错误信息可以看出,错误的原因是在将2088-08-08转换成日期类型的时候失败了,原因是SpringMVC默认支持的字符串转日期的格式为yyyy/MM/dd,而我们现在传递的不符合其默认格式,SpringMVC就无法进行格式转换,所以报错。
解决方案也比较简单,需要使用@DateTimeFormat
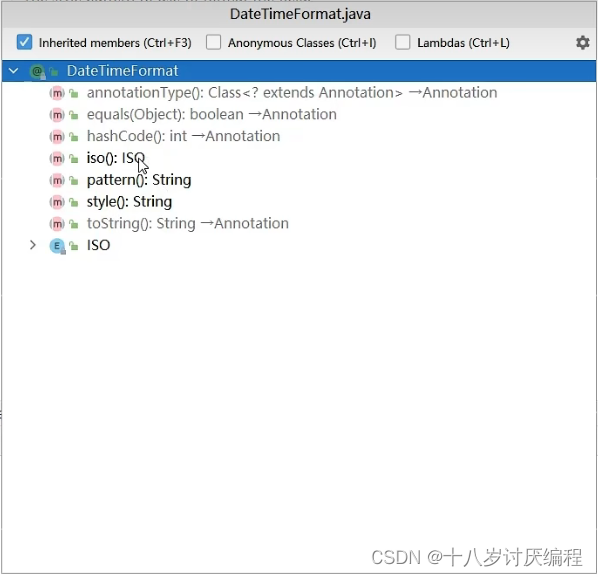
使用其中的pattern指定格式
@RequestMapping("/dataParam")
@ResponseBody
public String dataParam(Date date,
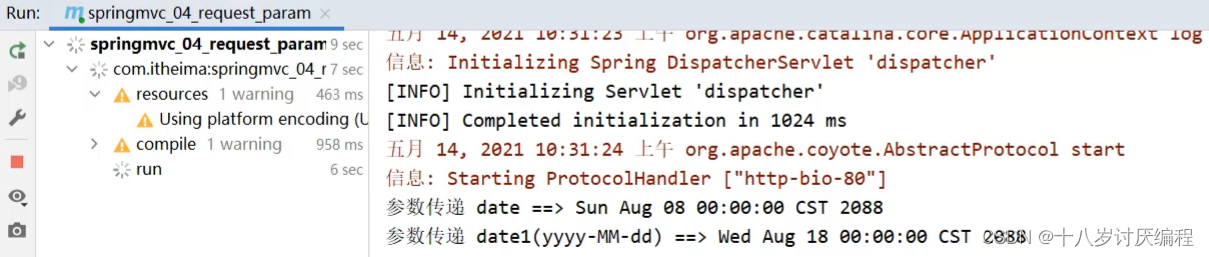
@DateTimeFormat(pattern="yyyy-MM-dd") Date date1)
System.out.println("参数传递 date ==> "+date);
System.out.println("参数传递 date1(yyyy-MM-dd) ==> "+date1);
return "{'module':'data param'}";
}
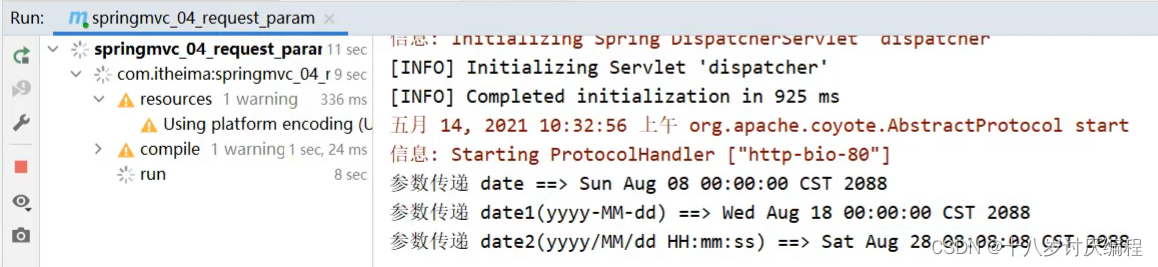
重新启动服务器,重新发送请求测试,SpringMVC就可以正确的进行日期转换了
步骤6:携带时间的日期
接下来我们再来发送一个携带时间的日期,看下SpringMVC该如何处理?
先修改UserController类,添加第三个参数
@RequestMapping("/dataParam")
@ResponseBody
public String dataParam(Date date,
                        @DateTimeFormat(pattern="yyyy-MM-dd") Date date1,
                        @DateTimeFormat(pattern="yyyy/MM/dd HH:mm:ss") Date date2)
    System.out.println("参数传递 date ==> "+date);
	System.out.println("参数传递 date1(yyyy-MM-dd) ==> "+date1);
	System.out.println("参数传递 date2(yyyy/MM/dd HH:mm:ss) ==> "+date2);
    return "{'module':'data param'}";
}
使用PostMan发送请求,携带两个不同的日期格式,
http://localhost/dataParam?date=2088/08/08&date1=2088-08-08&date2=2088/08/08 8:08:08
重新启动服务器,重新发送请求测试,SpringMVC就可以将日期时间的数据进行转换
@DateTimeFormat
| 名称 | @DateTimeFormat |
|---|---|
| 类型 | 形参注解 |
| 位置 | SpringMVC控制器方法形参前面 |
| 作用 | 设定日期时间型数据格式 |
| 相关属性 | pattern:指定日期时间格式字符串 |
内部实现原理
讲解内部原理之前,我们需要先思考个问题:
- 前端传递字符串,后端使用日期Date接收
- 前端传递JSON数据,后端使用对象接收
- 前端传递字符串,后端使用Integer接收
- 后台需要的数据类型有很多种
- 在数据的传递过程中存在很多类型的转换
问:谁来做这个类型转换?
答:SpringMVC
问:SpringMVC是如何实现类型转换的?
答:SpringMVC中提供了很多类型转换接口和实现类
在框架中,有一些类型转换接口,其中有:
- (1) Converter接口
/**
*	S: the source type
*	T: the target type
*/
public interface Converter<S, T> {
    @Nullable
    //该方法就是将从页面上接收的数据(S)转换成我们想要的数据类型(T)返回
    T convert(S source);
}
Spring MVC 框架的 Converter 是一个可以将一种数据类型转换成另一种数据类型的接口,这里 S 表示源类型,T 表示目标类型。开发者在实际应用中使用框架内置的类型转换器基本上就够了,但有时需要编写具有特定功能的类型转换器。
内置的类型转换器在Spring MVC 框架中,对于常用的数据类型,开发者无须创建自己的类型转换器,因为 Spring MVC 框架有许多内置的类型转换器用于完成常用的类型转换。
注意:Converter所属的包为org.springframework.core.convert.converter
Converter接口的实现类
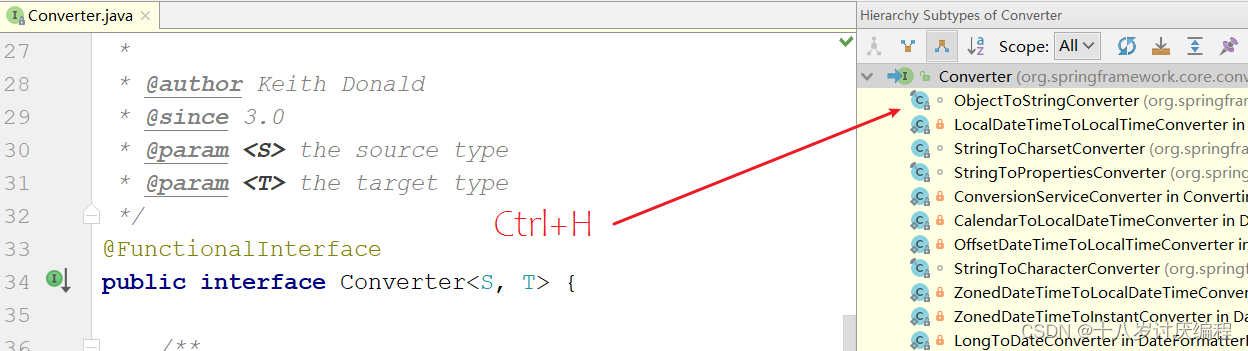
框架中有提供很多对应Converter接口的实现类,用来实现不同数据类型之间的转换,如:
请求参数年龄数据(String→Integer)
日期格式转换(String → Date)
- (2) HttpMessageConverter接口
该接口是实现对象与JSON之间的转换工作
注意:SpringMVC的配置类把@EnableWebMvc当做标配配置上去,不要省略
因为@EnableWebMvc还有一个功能就是:根据类型匹配对应的类型转换器!
SpringMvc返回JSON的工作原理
- @ResponseBody:该注解用于将Controller的方法返回的对象,通过适当的HttpMessageConverter转换为指定格式后,写入到Response对象的body数据区
- 原理:使用HtppMessageConverter这个类。这个类负责将请求信息转换成一个对象。将对象输出为响应信息。
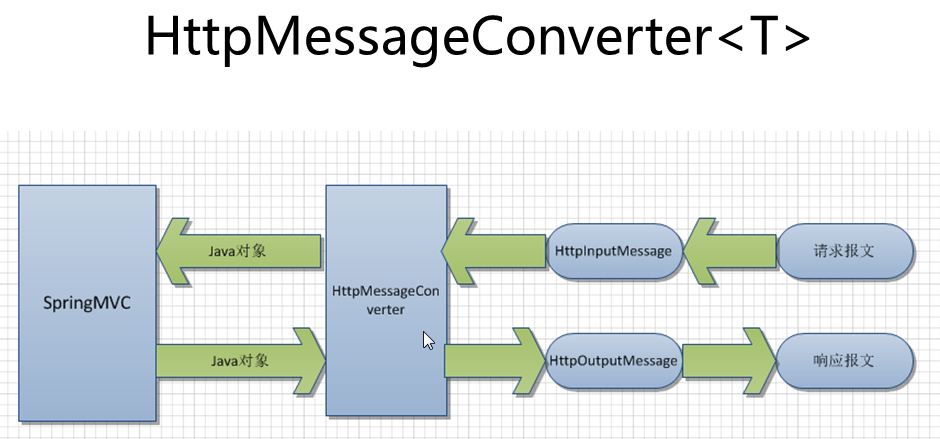
- @RequestBody:该注解用于读取Request请求的body部分数据,使用系统默认配置的HttpMessageConverter进行解析,然后把相应的数据绑定到要返回的对象上,再把HttpMessageConverter返回的对象数据绑定到 controller中方法的参数上。
-
使用时机:
-
GET、POST方式提时, 根据request header Content-Type的值来判断:
- application/x-www-form-urlencoded, 可选(即非必须,因为这种情况的数据@RequestParam, @ModelAttribute也可以处理,当然@RequestBody也能处理)
- multipart/form-data, 不能处理(即使用@RequestBody不能处理这种格式的数据)
- 其他格式, 必须(其他格式包括application/json, application/xml等。这些格式的数据,必须使用@RequestBody来处理)
-
PUT方式提交时, 根据request header Content-Type的值来判断:
- application/x-www-form-urlencoded, 必须
- multipart/form-data, 不能处理
- 其他格式, 必须
-
说明:request的body部分的数据编码格式由header部分的Content-Type指定
-
我们再来看看HttpMessageConverter的源码:
public interface HttpMessageConverter<T> {

    /**
     * Indicates whether the given class can be read by this converter.
     * @param clazz the class to test for readability
     * @param mediaType the media type to read, can be {@code null} if not specified.
     * Typically the value of a {@code Content-Type} header.
     * @return {@code true} if readable; {@code false} otherwise
     */
    boolean canRead(Class<?> clazz, MediaType mediaType);

    /**
     * Indicates whether the given class can be written by this converter.
     * @param clazz the class to test for writability
     * @param mediaType the media type to write, can be {@code null} if not specified.
     * Typically the value of an {@code Accept} header.
     * @return {@code true} if writable; {@code false} otherwise
     */
    boolean canWrite(Class<?> clazz, MediaType mediaType);

    /**
     * Return the list of {@link MediaType} objects supported by this converter.
     * @return the list of supported media types
     */
    List<MediaType> getSupportedMediaTypes();

    /**
     * Read an object of the given type form the given input message, and returns it.
     * @param clazz the type of object to return. This type must have previously been passed to the
     * {@link #canRead canRead} method of this interface, which must have returned {@code true}.
     * @param inputMessage the HTTP input message to read from
     * @return the converted object
     * @throws IOException in case of I/O errors
     * @throws HttpMessageNotReadableException in case of conversion errors
     */
    T read(Class<? extends T> clazz, HttpInputMessage inputMessage)
            throws IOException, HttpMessageNotReadableException;

    /**
     * Write an given object to the given output message.
     * @param t the object to write to the output message. The type of this object must have previously been
     * passed to the {@link #canWrite canWrite} method of this interface, which must have returned {@code true}.
     * @param contentType the content type to use when writing. May be {@code null} to indicate that the
     * default content type of the converter must be used. If not {@code null}, this media type must have
     * previously been passed to the {@link #canWrite canWrite} method of this interface, which must have
     * returned {@code true}.
     * @param outputMessage the message to write to
     * @throws IOException in case of I/O errors
     * @throws HttpMessageNotWritableException in case of conversion errors
     */
    void write(T t, MediaType contentType, HttpOutputMessage outputMessage)
            throws IOException, HttpMessageNotWritableException;

}
该接口定义了四个方法,分别是读取数据时的 canRead(), read() 和 写入数据时的canWrite(), write()方法。
我们在使用@EnableWebMvc注解时相当于在容器中又注册了几个核心组件bean,其中有一个RequestMappingHandlerAdapter,它可以为我们配置默认的HttpMessageConverter:
	ByteArrayHttpMessageConverter converts byte arrays.

    StringHttpMessageConverter converts strings.

    ResourceHttpMessageConverter converts to/from org.springframework.core.io.Resource for all media types.

    SourceHttpMessageConverter converts to/from a javax.xml.transform.Source.

    FormHttpMessageConverter converts form data to/from a MultiValueMap<String, String>.

    Jaxb2RootElementHttpMessageConverter converts Java objects to/from XML — added if JAXB2 is present on the classpath.

    MappingJacksonHttpMessageConverter converts to/from JSON — added if Jackson is present on the classpath.

    AtomFeedHttpMessageConverter converts Atom feeds — added if Rome is present on the classpath.

    RssChannelHttpMessageConverter converts RSS feeds — added if Rome is present on the classpath.
我们可以看到:
MappingJacksonHttpMessageConverter converts to/from JSON — added if Jackson is present on the classpath.
也就是说当我们引入了jackson的依赖时,MappingJacksonHttpMessageConverter 会被加入到HttpMessageConverter的列表中被使用
HttpMessageConverter匹配过程
@RequestBody注解时: 根据Request对象header部分的Content-Type类型,逐一匹配合适的HttpMessageConverter来读取数据;
private Object readWithMessageConverters(MethodParameter methodParam, HttpInputMessage inputMessage, Class paramType)
            throws Exception {

        MediaType contentType = inputMessage.getHeaders().getContentType();
        if (contentType == null) {
            StringBuilder builder = new StringBuilder(ClassUtils.getShortName(methodParam.getParameterType()));
            String paramName = methodParam.getParameterName();
            if (paramName != null) {
                builder.append(' ');
                builder.append(paramName);
            }
            throw new HttpMediaTypeNotSupportedException(
                    "Cannot extract parameter (" + builder.toString() + "): no Content-Type found");
        }

        List<MediaType> allSupportedMediaTypes = new ArrayList<MediaType>();
        if (this.messageConverters != null) {
            for (HttpMessageConverter<?> messageConverter : this.messageConverters) {
                allSupportedMediaTypes.addAll(messageConverter.getSupportedMediaTypes());
                if (messageConverter.canRead(paramType, contentType)) {
                    if (logger.isDebugEnabled()) {
                        logger.debug("Reading [" + paramType.getName() + "] as \"" + contentType
                                +"\" using [" + messageConverter + "]");
                    }
                    return messageConverter.read(paramType, inputMessage);
                }
            }
        }
        throw new HttpMediaTypeNotSupportedException(contentType, allSupportedMediaTypes);
    }
@ResponseBody注解时: 根据Request对象header部分的Accept属性(逗号分隔),逐一按accept中的类型,去遍历找到能处理的HttpMessageConverter;
源代码如下:
private void writeWithMessageConverters(Object returnValue,
                HttpInputMessage inputMessage, HttpOutputMessage outputMessage)
                throws IOException, HttpMediaTypeNotAcceptableException {
            List<MediaType> acceptedMediaTypes = inputMessage.getHeaders().getAccept();
            if (acceptedMediaTypes.isEmpty()) {
                acceptedMediaTypes = Collections.singletonList(MediaType.ALL);
            }
            MediaType.sortByQualityValue(acceptedMediaTypes);
            Class<?> returnValueType = returnValue.getClass();
            List<MediaType> allSupportedMediaTypes = new ArrayList<MediaType>();
            if (getMessageConverters() != null) {
                for (MediaType acceptedMediaType : acceptedMediaTypes) {
                    for (HttpMessageConverter messageConverter : getMessageConverters()) {
                        if (messageConverter.canWrite(returnValueType, acceptedMediaType)) {
                            messageConverter.write(returnValue, acceptedMediaType, outputMessage);
                            if (logger.isDebugEnabled()) {
                                MediaType contentType = outputMessage.getHeaders().getContentType();
                                if (contentType == null) {
                                    contentType = acceptedMediaType;
                                }
                                logger.debug("Written [" + returnValue + "] as \"" + contentType +
                                        "\" using [" + messageConverter + "]");
                            }
                            this.responseArgumentUsed = true;
                            return;
                        }
                    }
                }
                for (HttpMessageConverter messageConverter : messageConverters) {
                    allSupportedMediaTypes.addAll(messageConverter.getSupportedMediaTypes());
                }
            }
            throw new HttpMediaTypeNotAcceptableException(allSupportedMediaTypes);
        }
@EnableWebMvc注解详解
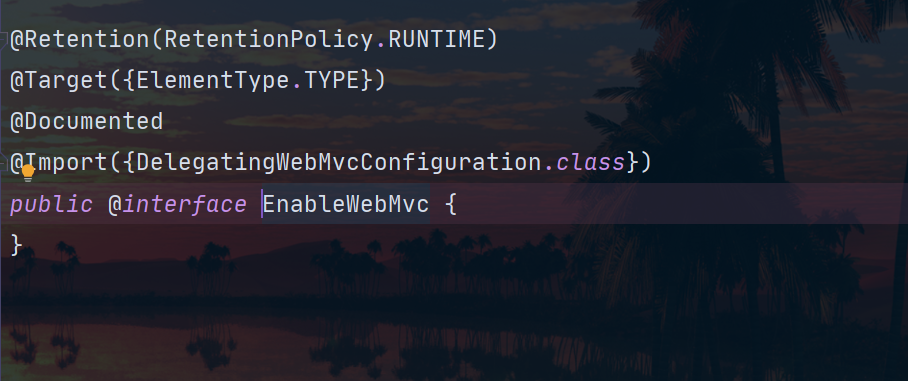
我们来看一下@EnableWebMvc的源码:
@Retention(RetentionPolicy.RUNTIME)
@Target(ElementType.TYPE)
@Documented
@Import(DelegatingWebMvcConfiguration.class)
public @interface EnableWebMvc {

}
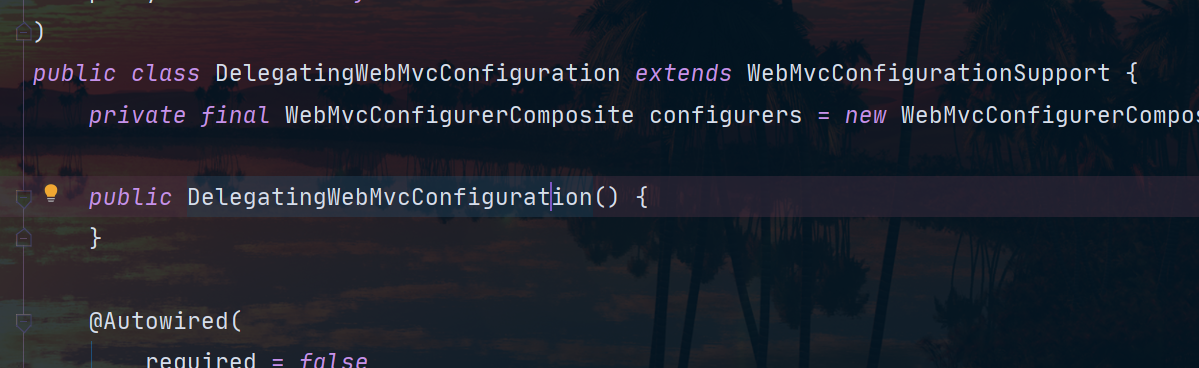
我们可以看到这里导入了一个配置类DelegatingWebMvcConfiguration,
DelegatingWebMvcConfiguration译为
委托Web Mvc配置
看到委托,第一感觉就是代理,而代理也就意味着功能的增强。
我们再来看看DelegatingWebMvcConfiguration类的源码:
DelegatingWebMvcConfiguration是继承了WebMvcConfigurationSupport的配置类。这个WebMvcConfigurationSupport类的作用呢,其实提供了spring mvc的几个核心组件的能力。如果想要从此类扩展,只需要继承并重写它的一些方法(有兴趣的可以看下这个类的源码)。
我们可以借助IDEA工具看看WebMvcConfigurationSupport的为我们提供的功能bean:
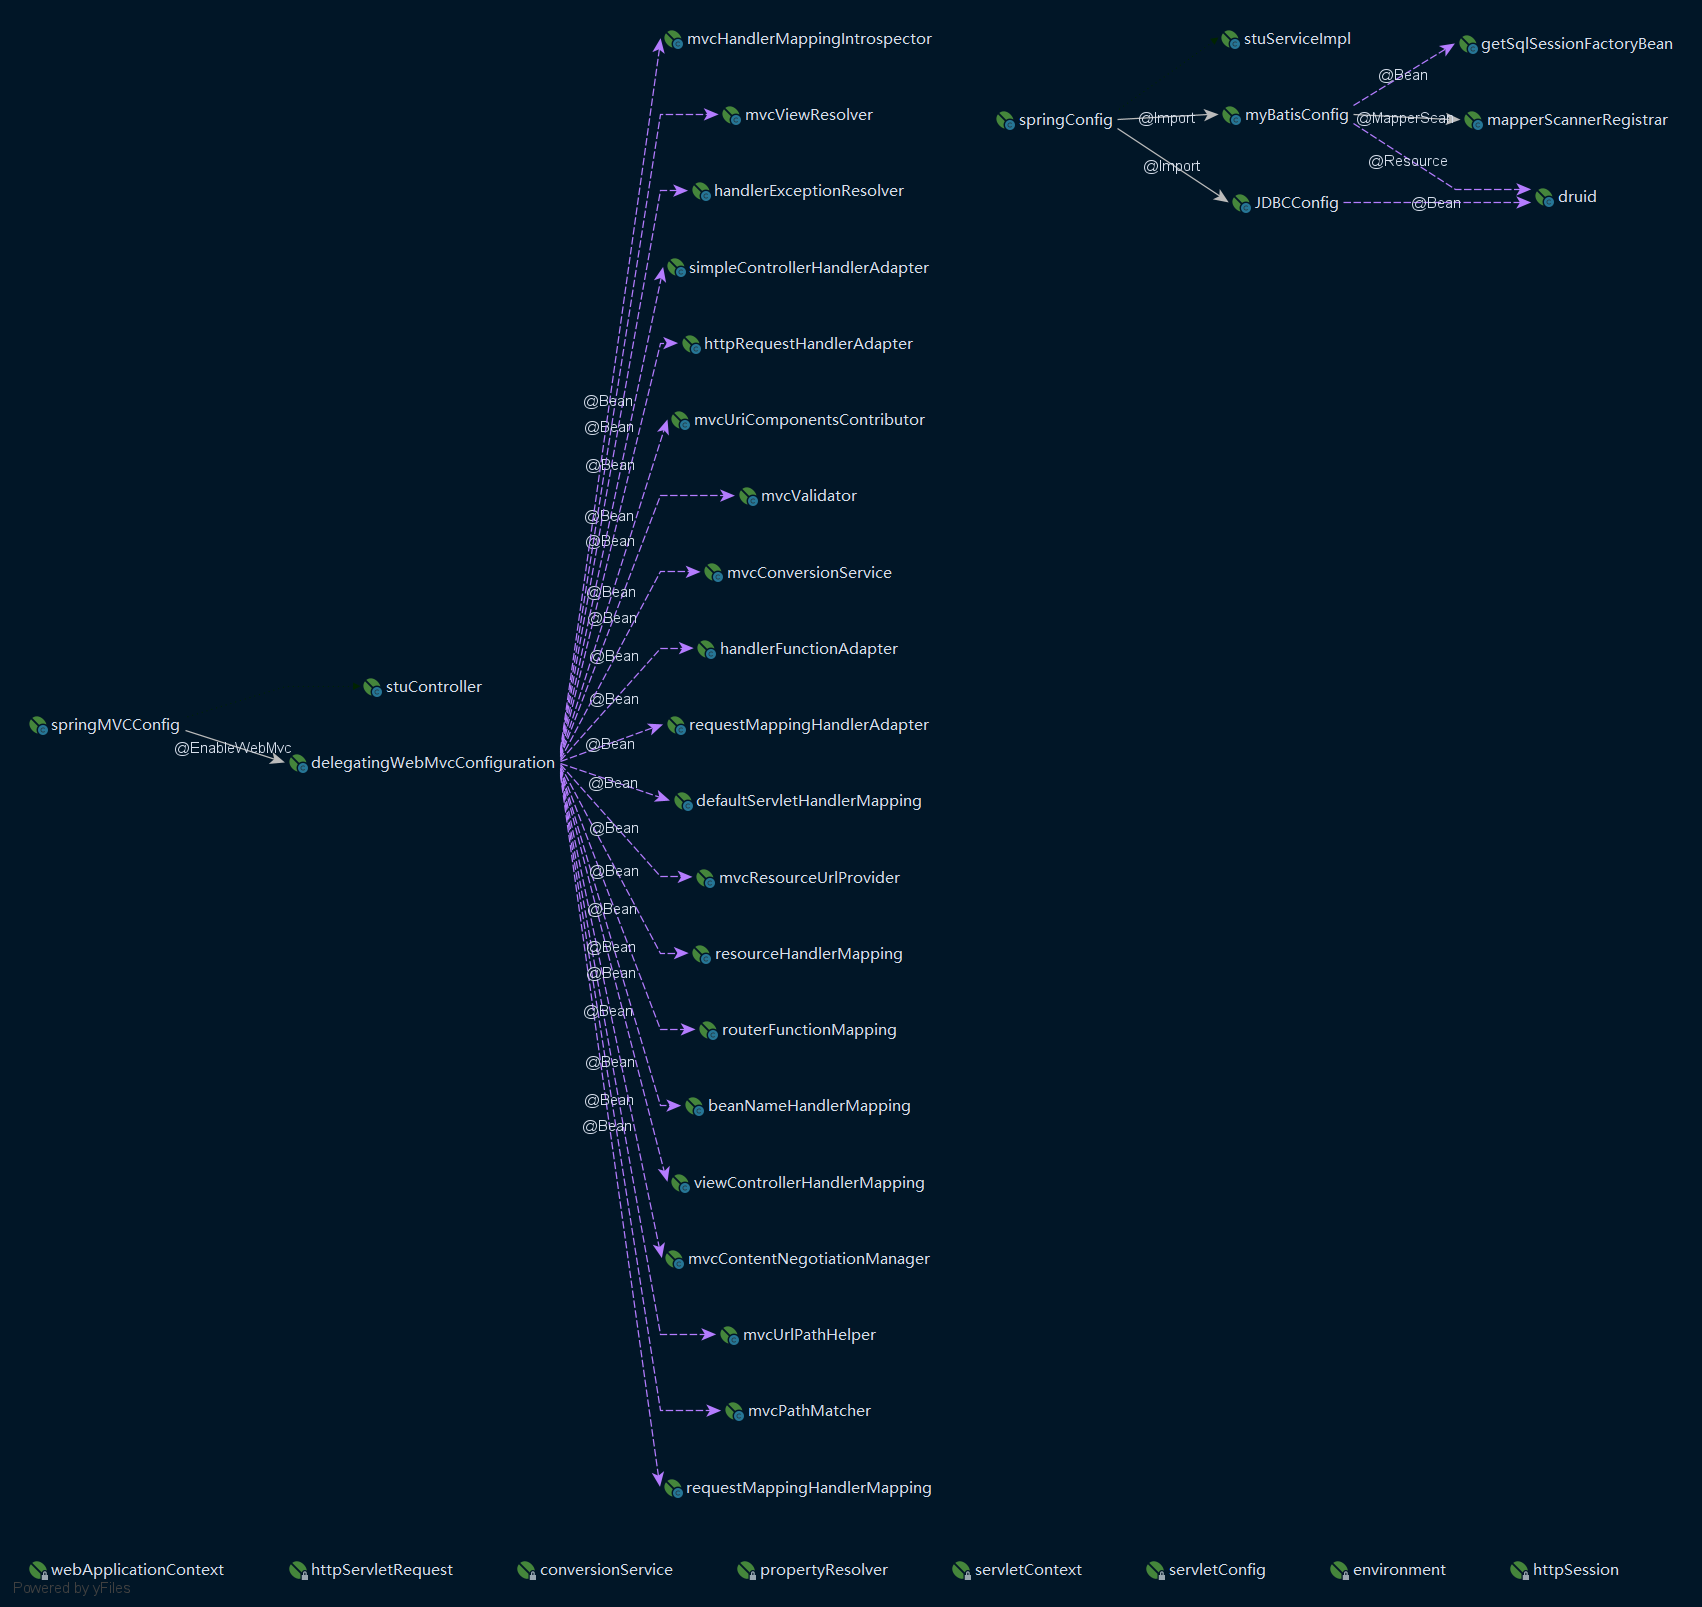
图中通过@Bean注册的bean都存在于WebMvcConfigurationSupport类中。
这里我们就看出了@EnableWebMvc注解的两个作用:
-
启用spring mvc的这几个核心组件提供的能力、
-
支持自定义spring mvc配置的能力
- 而它的这个能力,关键在于DelegatingWebMvcConfiguration配置类,前面说了DelegatingWebMvcConfiguration类继承自WebMvcConfigurationSupport类并重写了它的一些方法,就是它重写的这些方法,允许了我们增加自定义配置。
我们再来看看源码:
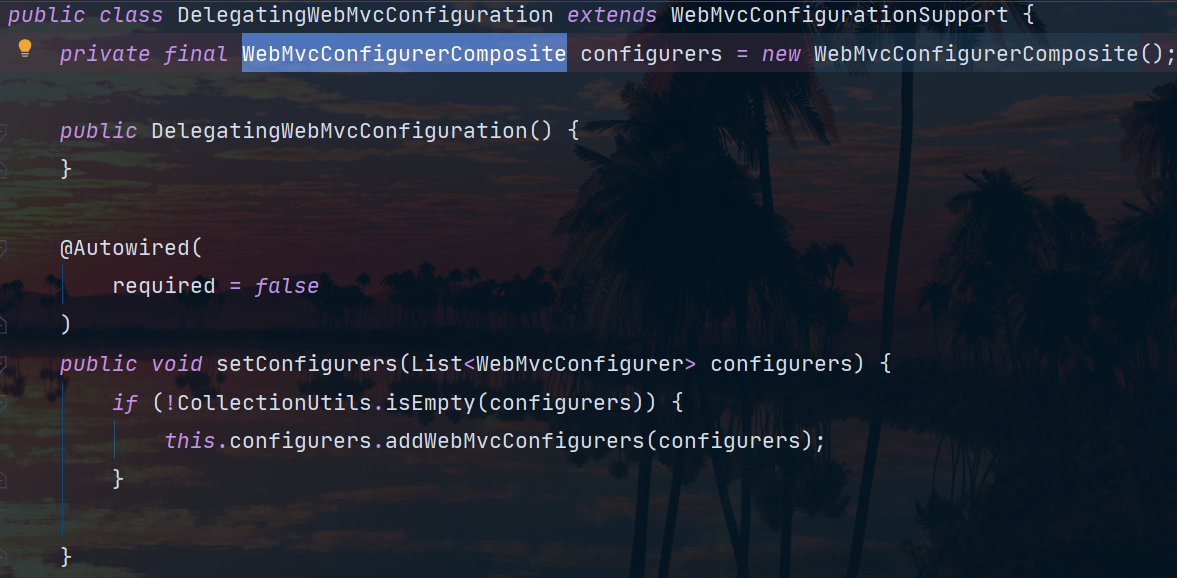

DelegatingWebMvcConfiguration类会把所有实现了接口WebMvcConfigurer的类(子类也是)包括我们那些托管到spring容器的自定义的配置类(因为也实现了它)都会把这些配置加上。
我的配置类注册到了spring容器中,spring通过自动注入的方式把所有WebMvcConfigurer接口的实现类注入到了DelegatingWebMvcConfiguration的configurers属性中,在WebMvcConfigurerComposite类把这些配置都给配置上。然后回调那些实现了WebMvcConfigurer接口的实现类,最终将我们自定义的配置都给加上。
那么spring mvc怎么知道我自定义哪些配置了,在WebMvcConfigurerComposite类回调我们重写方法的接口时,如果我们重写了需要自定义配置的方法,自然就加上了,现在的问题是第二个,如果自定义了配置,是否会加载默认配置?这个就看自定义谁的配置了,比如HttpMessageConverter,如果在重写了方法configMessageConverters自定义了配置,就不会加载默认配置,如果重写的方法是extendMessageContertes就会加载自定义的和默认的,看下源码就明白了:
	/**
	 * Provides access to the shared {@link HttpMessageConverter}s used by the
	 * {@link RequestMappingHandlerAdapter} and the
	 * {@link ExceptionHandlerExceptionResolver}.
	 * This method cannot be overridden.
	 * Use {@link #configureMessageConverters(List)} instead.
	 * Also see {@link #addDefaultHttpMessageConverters(List)} that can be
	 * used to add default message converters.
	 */
	protected final List<HttpMessageConverter<?>> getMessageConverters() {
		if (this.messageConverters == null) {
			this.messageConverters = new ArrayList<HttpMessageConverter<?>>();
			configureMessageConverters(this.messageConverters);
			if (this.messageConverters.isEmpty()) {
                // 这里如果非空的就不加载默认配置了,注释上也有解释
				addDefaultHttpMessageConverters(this.messageConverters);
			}
			extendMessageConverters(this.messageConverters);
		}
		return this.messageConverters;
	}


 2175
2175


 被折叠的 条评论
为什么被折叠?
被折叠的 条评论
为什么被折叠?
 到【灌水乐园】发言


