


自动配置(Auto-Configuration)
自动配置(auto-configuration)是Spring Boot最重要的特性之一,因为该特性会根据应用的classpath(这个主要是根据maven pom.xml决定),annotations和其他的一些java配置描述符自动配置Spring Boot应用。例如,如果在你的classpath中配置了H2(在pom.xml文件中添加了H2的依赖),你不必维护任何数据连接,Spring Boot会自动配置一个内存数据库。
Auto-configuration是非侵入性的,在任何时候你都可以开始定义你自己的配置来替换auto-configuration的特定部分。比如说,如果你添加了自己的DataSource bean,默认嵌入的数据库支持将会失效。
如果你发现一些特定的自动配置类你不想应用,你可以使用 @EnableAutoConfiguration 注解的排除属性来禁用它们。
import org.springframework.boot.autoconfigure.*;
import org.springframework.boot.autoconfigure.jdbc.*;
import org.springframework.context.annotation.*;
@Configuration
@EnableAutoConfiguration(exclude={DataSourceAutoConfiguration.class})
public class MyConfiguration {
}
如果类不在classpath中,你也可以使用注解的excludeName属性并指定类的完全限定名(fully qualified name)来排除。你也可以通过spring.autoconfigure.exclude属性来控制自动配置的类列表。
@EnableAutoConfiguration和@Enable<Technology>注解
在Spring FrameWork和它的一些模块如Spring Core, Spring Data,Spring AMQP, Spring Integration中,提供了@Enable<Technology>注解。如@EnableTransactionManagement, @EnableRabbit, @EnableIntegration就是上诉所提到的模块中的一部分。在Spring应用中,你可以根据“约定大于配置(convention over configuration)”的模式去使用它们,这样就会让你的应用非常容易开发且不用因为配置文件太多而担心维护的问题。
Spring Boot采取了这些注解的优点,在@EnableAutoConfiguration注解中的这些注解被用来执行自动配置(auto-configuration)。让我们来近距离的看一下@EnableAutoConfiguration注解并看一看它背后的逻辑。
@Target({ElementType.TYPE})
@Retention(RetentionPolicy.RUNTIME)
@Documented
@Inherited
@AutoConfigurationPackage
@Import({EnableAutoConfigurationImportSelector.class})
public @interface EnableAutoConfiguration {
    String ENABLED_OVERRIDE_PROPERTY = "spring.boot.enableautoconfiguration";

    Class<?>[] exclude() default {};

    String[] excludeName() default {};
}
我们知道,这个类会尝试去猜测和配置应用中需要的bean。auto-configuration类是基于classpath(pom.xml的配置)的配置和应用中定义的beans被使用,但是发挥这种魔力的是org.springframework.boot.autoconfigure.EnableAutoConfigurationImportSelector类,该类可以找到所有必须的配置类。
EnableAutoConfigurationImportSelector类继承自AutoConfigurationImportSelector类(不同版本的Spring Boot可能有所不同),该类有很多方法,但是要让自动配置( auto-configuration)生效最重要的方法之一就是getCandidateConfiguration方法。
//...
protected List<String> getCandidateConfigurations(AnnotationMetadata metadata,
            AnnotationAttributes attributes) {
    List<String> configurations = SpringFactoriesLoader.loadFactoryNames(
                getSpringFactoriesLoaderFactoryClass(), getBeanClassLoader());
        Assert.notEmpty(configurations,
                "No auto configuration classes found in META-INF/spring.factories. If you "
                        + "are using a custom packaging, make sure that file is correct.");
    return configurations;
}
//...
getCandidateConfigurations方法返回SpringFactoriesLoader.loadFactoryNames,SpringFactoriesLoader.loadFactories会查找spring-boot-autoconfigure jar中定义的 META-INF/spring.factories文件。
# Initializers
org.springframework.context.ApplicationContextInitializer=\
org.springframework.boot.autoconfigure.logging.AutoConfigurationReportLoggingInitializer
...
# Application Listeners
org.springframework.context.ApplicationListener=\
org.springframework.boot.autoconfigure.BackgroundPreinitializer
# Auto Configure
org.springframework.boot.autoconfigure.EnableAutoConfiguration=\
org.springframework.boot.autoconfigure.admin.SpringApplicationAdminJmxAutoConfiguration,\
org.springframework.boot.autoconfigure.aop.AopAutoConfiguration,\
org.springframework.boot.autoconfigure.amqp.RabbitAutoConfiguration,\
org.springframework.boot.autoconfigure.MessageSourceAutoConfiguration,\
org.springframework.boot.autoconfigure.PropertyPlaceholderAutoConfiguration,\
org.springframework.boot.autoconfigure.batch.BatchAutoConfiguration,\
org.springframework.boot.autoconfigure.cache.CacheAutoConfiguration,\
org.springframework.boot.autoconfigure.cassandra.CassandraAutoConfiguration,\
org.springframework.boot.autoconfigure.cloud.CloudAutoConfiguration,\
....
....
可以看到,在spring.factories文件中定义了在应用运行时所有可能自动配置的类。
构建代码
Spring Boot不需要使用任何特殊的代码结构, 然而, 这里有一些有用的最佳实践。
使用default包:当类没有包含 package 声明时, 它被认为处于 default package 下,通常不推荐并且要避免使用 default package。因为对于使用 @ComponentScan , @EntityScan 或 @SpringBootApplication 注解的Spring Boot应用来说, 来自每个jar的类都会被读取, 这会带来一些特殊的问题。
定位main应用类:建议将main应用类放在位于其他类上面的根包(root package) 中。通常使用 @EnableAutoConfiguration 注解你的main类, 并且暗地里为某些项定义了一个基础“search package”。 例如, 如果你正在编写一个JPA应用,在被 @EnableAutoConfiguration所注解的类的包中的所有@Entity 注解的项都将会被检索到。
使用root包允许在不需要指定basePackage属性的情况下使用@ComponentScan注解。如果main类位于根包中, 你也可以使用 @SpringBootApplication 注解。
下面是一个典型的结构:
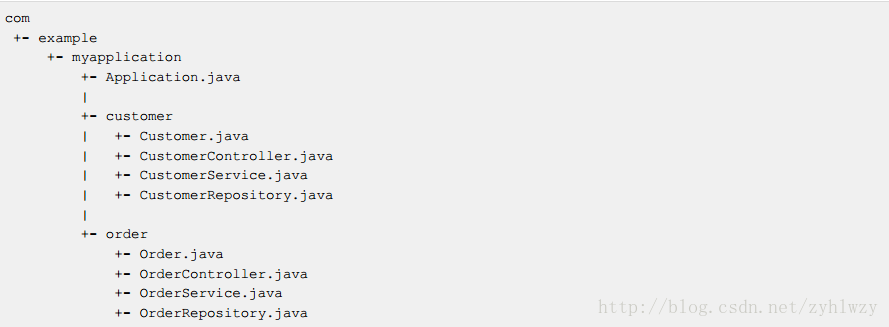
Application.java 文件将声明 main 方法, 还有基本的@SpringBootApplication注解
@SpringBootApplication
public class Application {
    public static void main(String[] args) {
        SpringApplication.run(Application.class, args);
    }
}
Spring Beans和依赖注入(dependency injection)
你可以自由地使用任何标准的Spring框架技术去定义beans和它们注入的依赖。 简单起见, 我们经常使用 @ComponentScan 注解搜索beans, 并结合 @Autowired 构造器注入。建议遵循Java推荐的包命名规范, 使用一个反转的域名(例如 com.example.project ) 。
如果使用上面建议的结构组织代码(将应用类放到根包下) , 你可以添加@SpringBootApplication或@ComponentScan 注解而不需要任何参数。 你的所有应用程序组件( @Component , @Service , @Repository , @Controller 等) 将被自动注册为Spring Beans。
下面是一个 @Service Bean的示例, 它使用构建器注入获取一个需要的 RiskAssessor bean。
package com.example.service;
import org.springframework.beans.factory.annotation.Autowired;
import org.springframework.stereotype.Service;
@Service
public class DatabaseAccountService implements AccountService {
    private final RiskAssessor riskAssessor;

    @Autowired
    public DatabaseAccountService(RiskAssessor riskAssessor) {
    this.riskAssessor = riskAssessor;
    }
    // ...
}
如果bean只有一个构造函数,你可以忽略@Autowired。
@Service
public class DatabaseAccountService implements AccountService {
    private final RiskAssessor riskAssessor;
    public DatabaseAccountService(RiskAssessor riskAssessor) {
        this.riskAssessor = riskAssessor;
    }
    // ...
}
注意在上面的代码中如何使用构建器注入来允许 riskAssessor 字段被标记为 final , 这意味着 riskAssessor 后续是不能改变的。
很多Spring Boot开发者总是使用 @Configuration , @EnableAutoConfiguration 和 @ComponentScan 注解他们的main类。 由于这些注解被如此频繁地一块使用 , Spring Boot提供一个方便的 @SpringBootApplication 选择。@SpringBootApplication 注解等价于以默认属性使用 @Configuration , @EnableAutoConfiguration 和 @ComponentScan 。


 656
656

 被折叠的 条评论
为什么被折叠?
被折叠的 条评论
为什么被折叠?
 到【灌水乐园】发言


