


RestTemplate基本使用(get、post)请求发送HTTP请求,设置请求体 @RibbonClient和@LoadBalanced之间的区别

简介
springboot 自带 http 工具类 常 用于 微服务 发送http请求 调用接口
GET请求
-
方式一:getForEntity:返回的正文对象包装在httpEntity实体中,适用于获取除返回的正文之外,对返回头,状态码有需求的场景
-
方式二:getForObject:返回正文,适用于只对正文感兴趣场景
两种方法除了返回结果不同之外,其他的使用姿势基本一样,有三种
 * public <T> T getForObject(String url, Class<T> responseType, Object... uriVariables)
 * public <T> T getForObject(String url, Class<T> responseType, Map<String, ?> uriVariables)
 * public <T> T getForObject(URI url, Class<T> responseType)
准备 后台接口

 //创建rest模板对象
        RestTemplate template = new RestTemplate();
        //方式一
        HttpEntity<String> res = template.getForEntity(  "http://localhost:8081/order/8",String.class);
        System.out.println(res);

  //方式一 可变参数 传参
        String obj1 = template.getForObject("http://localhost:8081/get/?productId={?}&name={?}&price={?}", String.class, "9", "娃娃菜", "99.66");
        System.out.println(obj1);

   //方式二 把参数放在Map中
        ResponseEntity<String> entity = template.getForEntity("http://localhost:8081/get/?productId={productId}&name={name}&price={price}", String.class, new HashMap<String, Object>() {
            {
                put("productId", 99);
                put("name", "百事可乐");
                put("price", 45.55);
            }
        });
        System.out.println(entity);

方式三 …
POST请求 表单请求
- postForEntity: 返回的正文封装在 HttpEntity
- postForObject: 直接返回正文对象
API
 * public <T> T postForObject(String url, @Nullable Object request, Class<T> responseType, Object... uriVariables);
    * public <T> T postForObject(String url, @Nullable Object request, Class<T> responseType, Map<String, ?> uriVariables);
     * public <T> T postForObject(URI url, @Nullable Object request, Class<T> responseType);


post 和get 用法差不多 多了个参数  后面的uriVariables是 url 参数,不是 POST 表单参数哦
 RestTemplate postTem = new RestTemplate();
//        //方式一 url 直接拼接
        ResponseEntity<String> post = postTem.postForEntity("http://localhost:8081/post?test=zs", new LinkedMultiValueMap<>(), String.class);
        System.out.println(post);

        //方式二  提交的表单参数
        MultiValueMap<String, Object> params = new LinkedMultiValueMap<>();
        params.add("productId", 99);
        params.add("name", "王老吉");
        params.add("price", 45.33);
//
        ResponseEntity<String> post = postTem.postForEntity("http://localhost:8081/post", params, String.class);
        System.out.println(post);

     //方式一  url上传参数
        String s = postTem.postForObject("http://localhost:8081/post/?productId={?}&name={?}&price={?}", params, String.class, "9", "娃娃菜", "99.66");
        System.out.println(s);

//方式二
String s1 = postTem.postForObject("http://localhost:8081/post/?productId={productId}&name={name}&price={price}", params, String.class, new HashMap<String, Object>() {
    {
        put("productId", 99);
        put("name", "百事可乐");
        put("price", 45.55);
    }
});
System.out.println(s1);

方式三 …
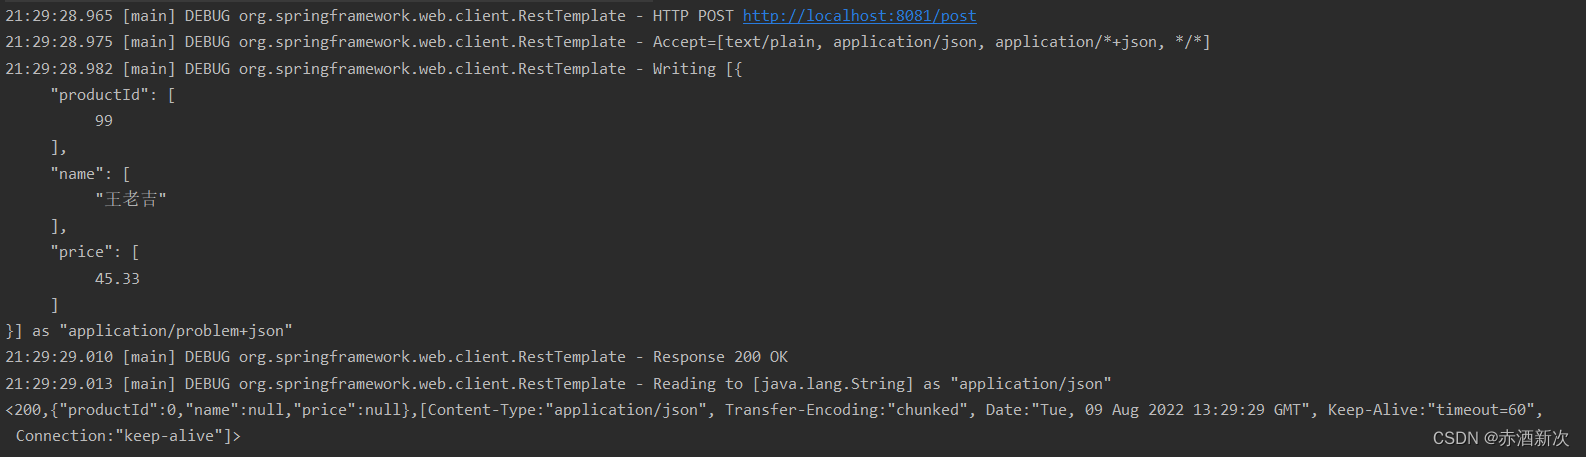
post body
请求一个json串 需要处理一下 请求头 Content-Type 为 application/json
    public static void postBody() {
        RestTemplate template = new RestTemplate();
        HttpHeaders headers = new HttpHeaders();
        headers.setContentType(MediaType.APPLICATION_PROBLEM_JSON);


        JSONObject params = new JSONObject();

        params.append("productId", 99);
        params.append("name", "王老吉");
        params.append("price", 45.33);

        HttpEntity<String> entity = new HttpEntity<>(params.toJSONString(5), headers);
        ResponseEntity<String> forEntity = template.postForEntity("http://localhost:8081/post", entity, String.class);
        System.out.println(forEntity);

    }
结果
@RibbonClient和@LoadBalanced之间的区别
@LoadBalanced是标记注释,@RibbonClient用于配置目的。
@LoadBalanced
用作标记注释,指示被注释的对象RestTemplate应使用RibbonLoadBalancerClient与您的服务进行交互。
反过来,这允许您对传递给的网址使用“逻辑标识符” RestTemplate。这些逻辑标识符通常是服务的名称
restTemplate.getForObject("http://some-service-name/user/{id}", String.class, 1);
- some-service-name逻辑标识符在哪里
@RibbonClient
用于配置功能区客户端。
至少有两种情况需要使用 @RibbonClient
- 您需要为特定的功能区客户端自定义功能区设置
- 您没有使用任何服务发现
自定义功能区设置:
定义一个 @RibbonClient
@RibbonClient(name = "some-service", configuration = SomeServiceConfig.class)
- name -将其设置为与功能区调用的服务相同的名称,但需要其他自定义功能区以与功能区交互
- configuration-将其设置为@Configuration所有定义为的类@Beans。确保 不 选择此类,@ComponentScan否则它将覆盖所有功能区客户端的默认设置
如果您未使用Service
Discovery,则注释name字段@RibbonClient将用于application.properties在您传递给的URL
中的前缀以及“逻辑标识符”中为您的配置添加前缀RestTemplate。
定义一个 @RibbonClient
@RibbonClient(name = “myservice”)
然后在你的 application.properties
my服务service.ribbon.eureka.enabled=false
my服务service.ribbon.listOfServers=http://localhost:5000, http://localhost:5001


 1368
1368


 被折叠的 条评论
为什么被折叠?
被折叠的 条评论
为什么被折叠?
 到【灌水乐园】发言


