


Spring MVC基础知识
1. 创建web应用
新建Maven项目
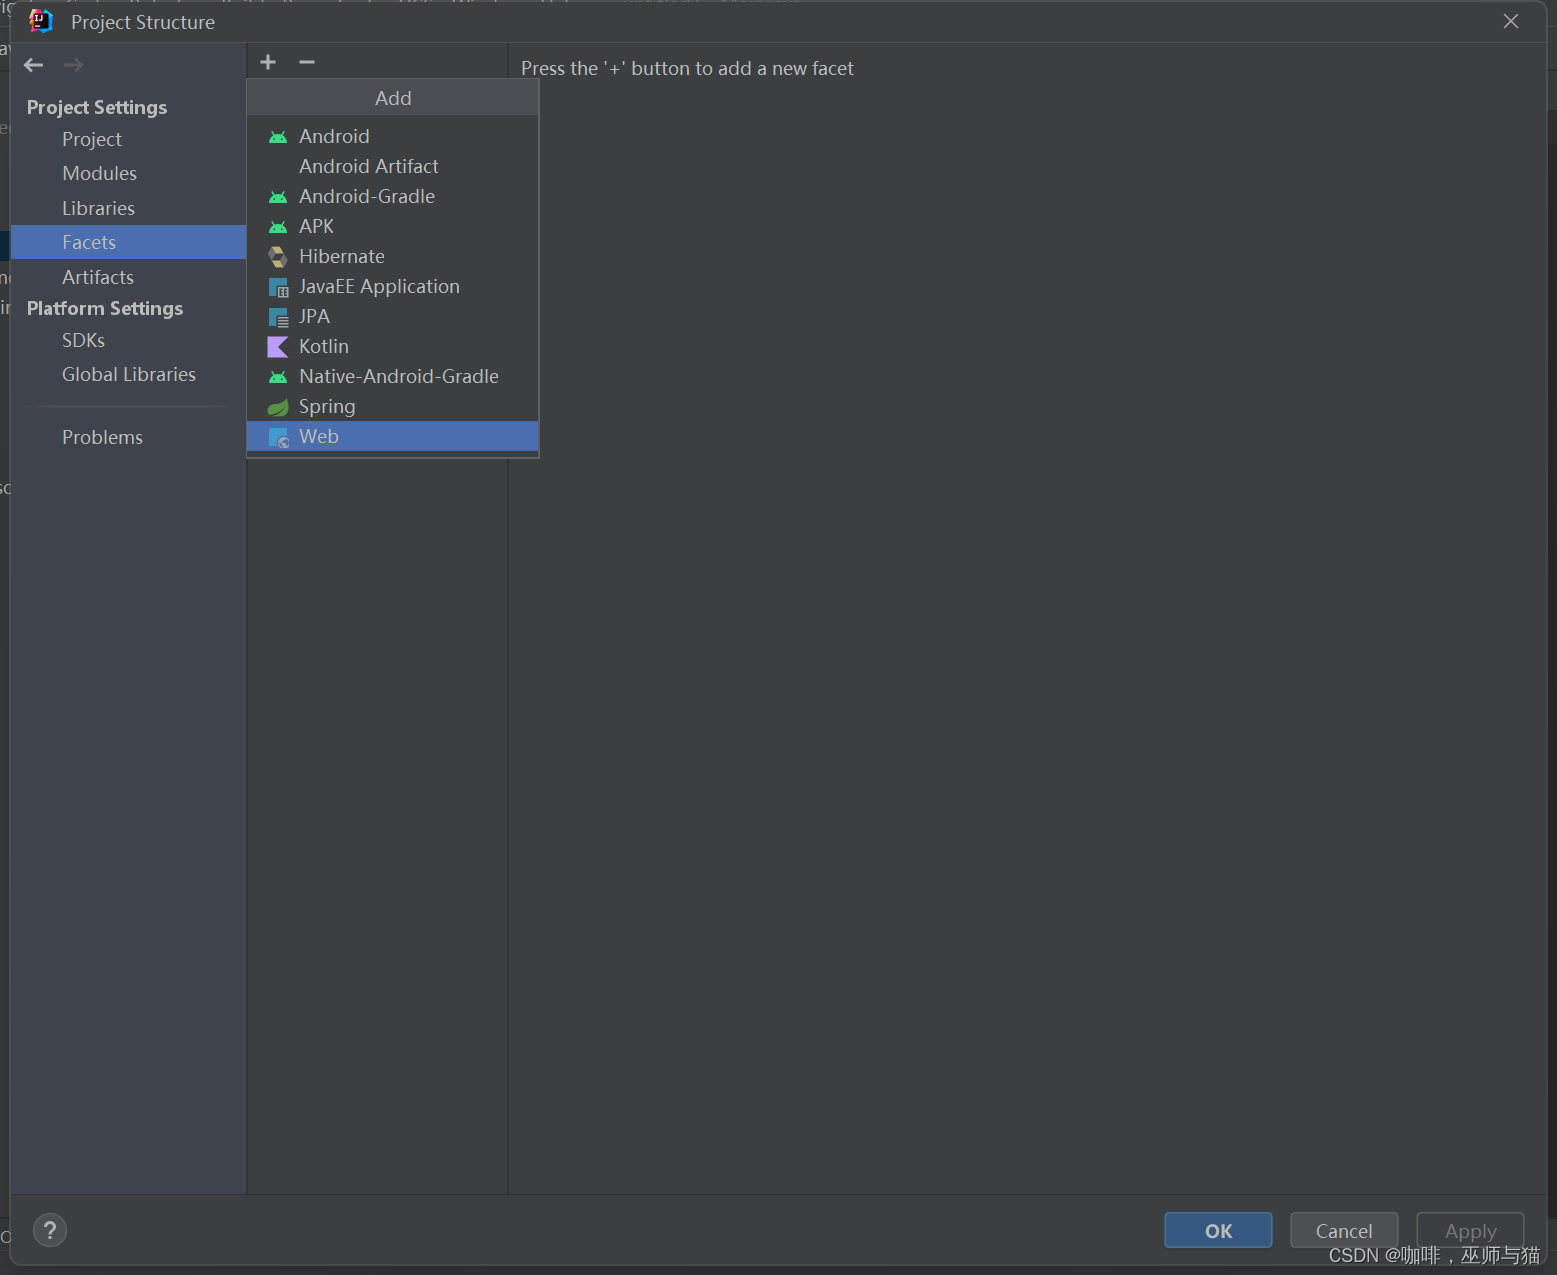
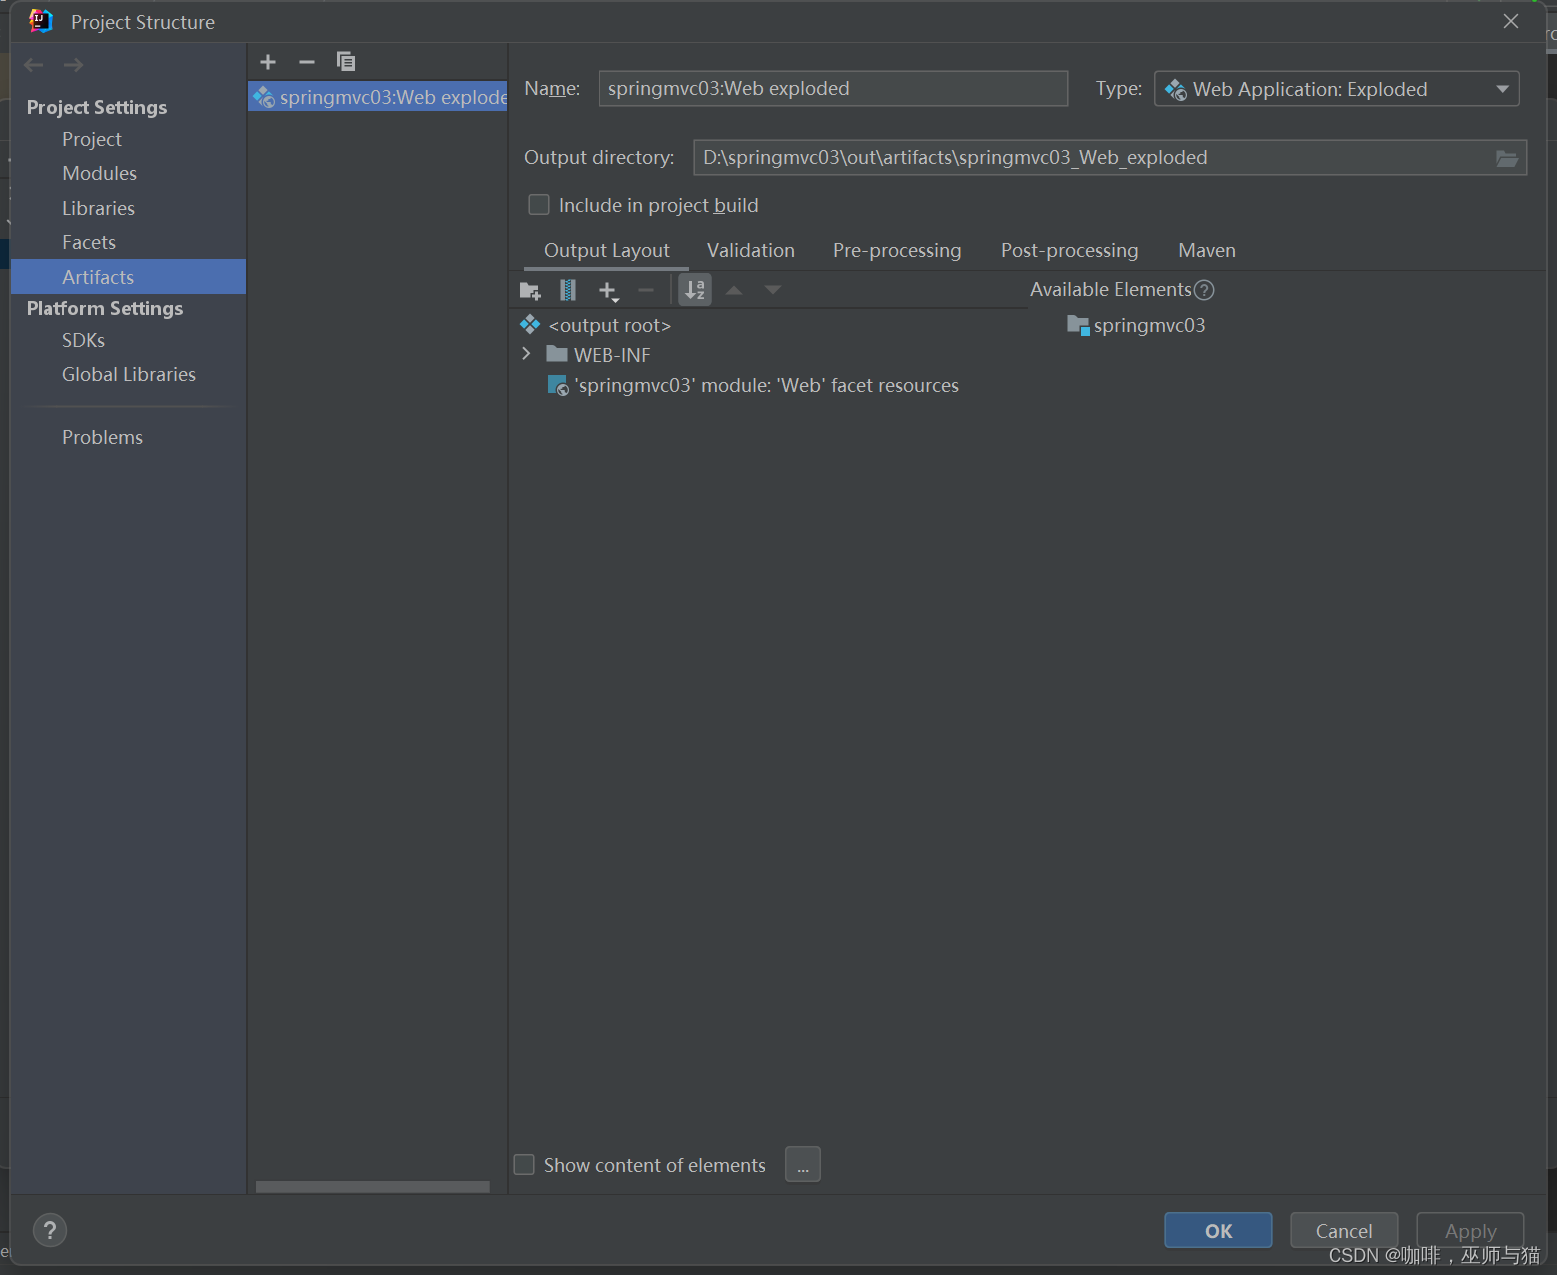
点击File -> Project Structure -> Facets -> +号 -> Web
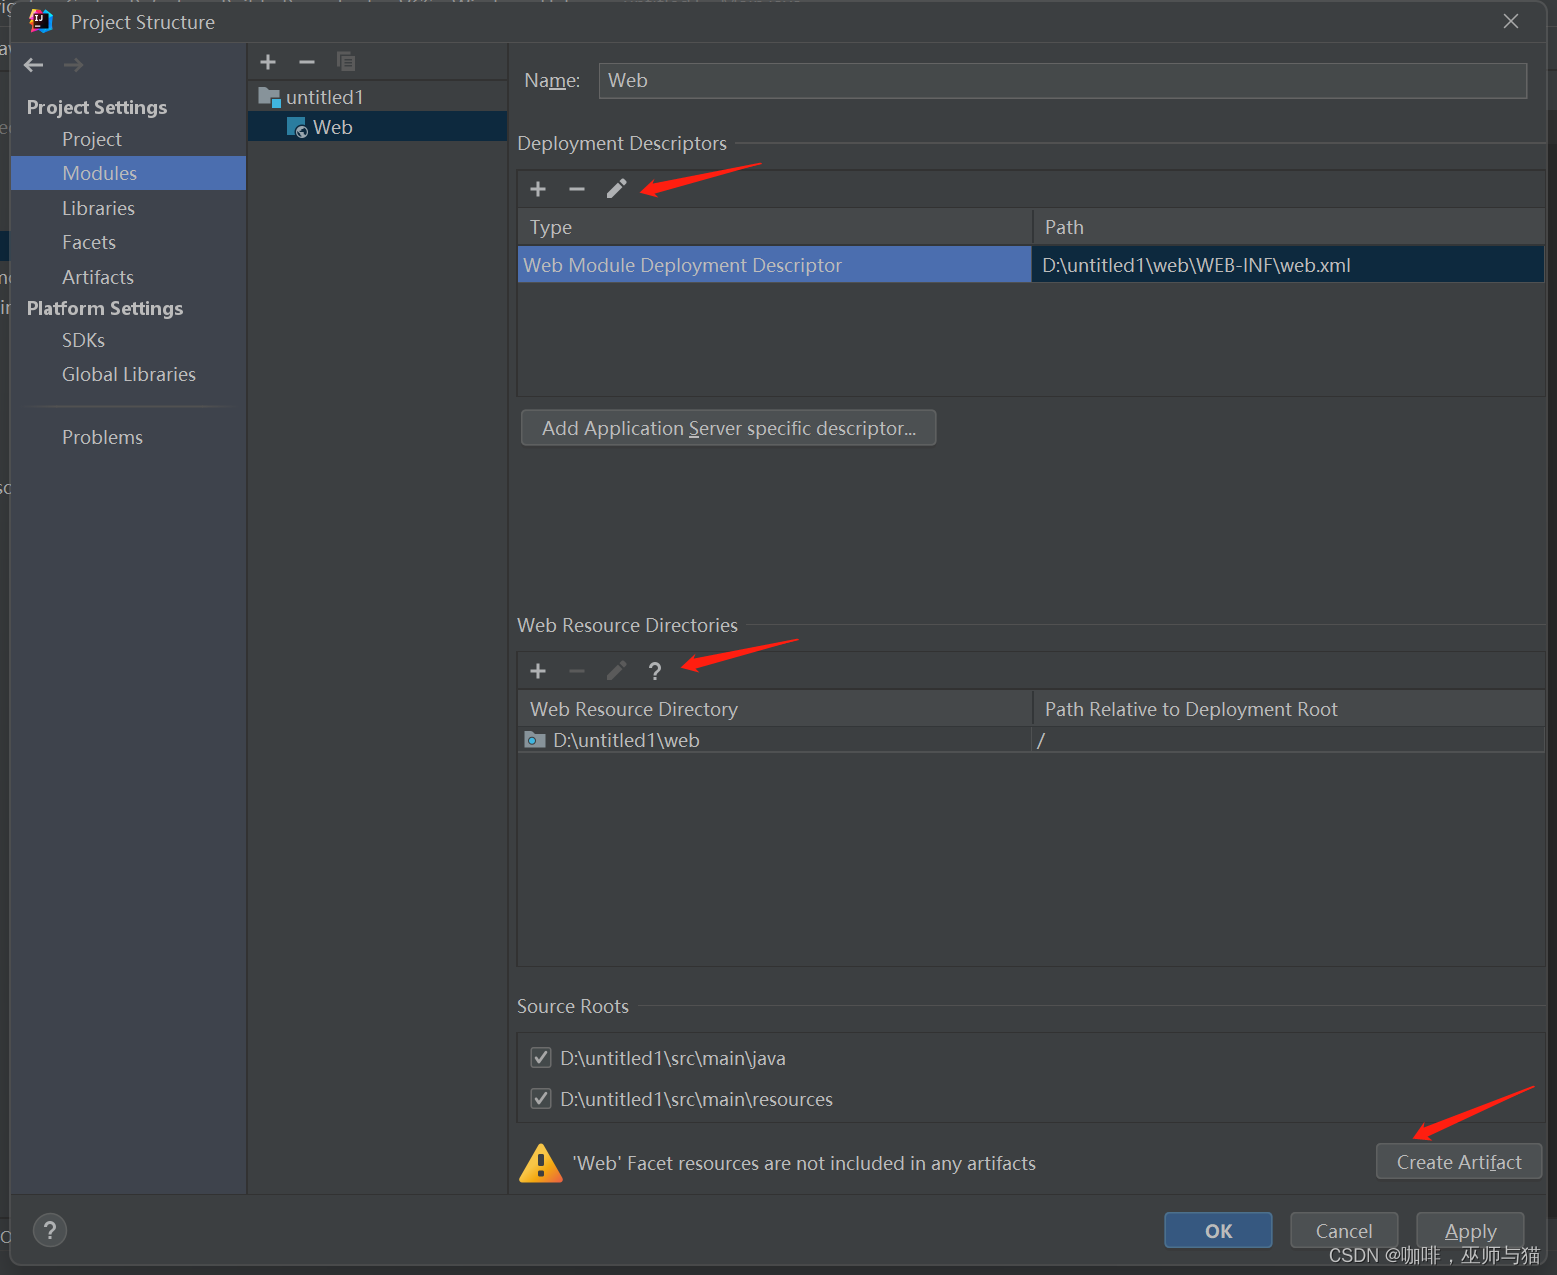
修改文件描述符路径为硬盘:\项目名\src\main\存储页面的文件夹(如:webapp)\WEB-INF\web.xml
修改Web页面路径为硬盘:\项目名\src\main\存储页面的文件夹(如:webapp)
创建Artifact
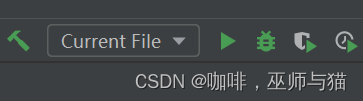
点击右上角Current File -> Edit Configurations
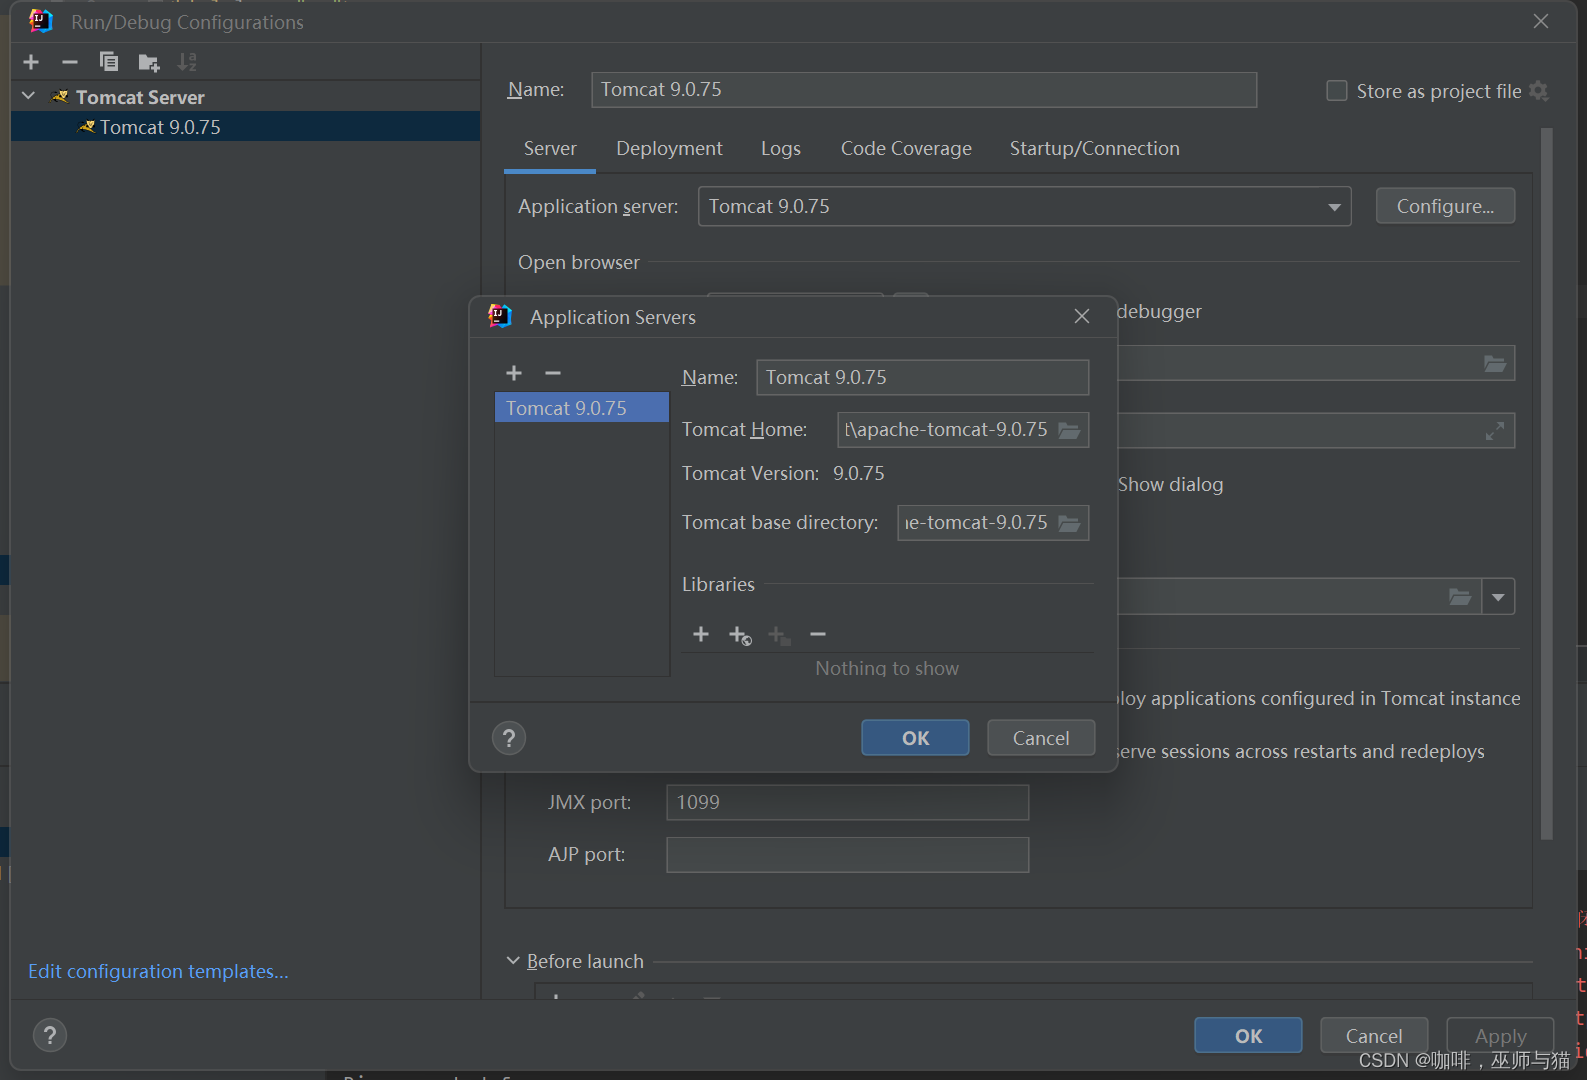
点击 +号,找到 Tomcat Server -> local
点击 Application Server 后面的 Configure,将Tomcat Home设为保存Tomcat的路径。
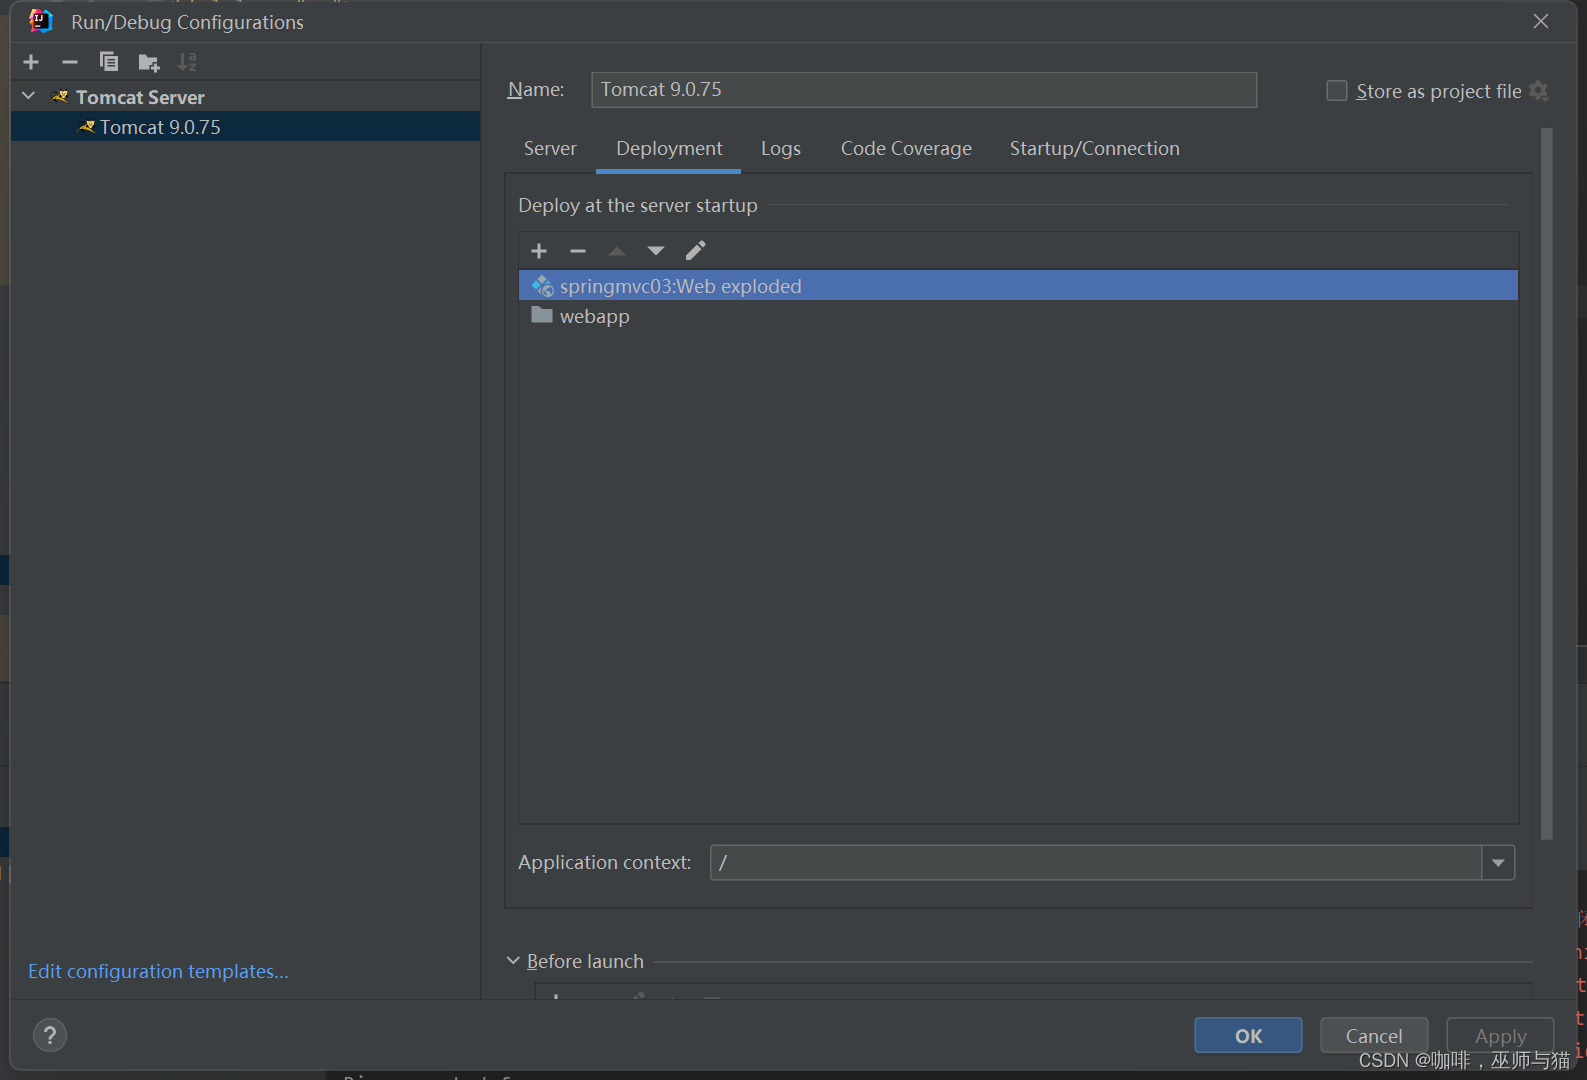
点击Deployment, 选择加号添加 Artifact。
将Application Context改为 \。
返回Server,将更新设为页面或源代码发生变化就更新(热部署)。
可以修改端口,如80端口。
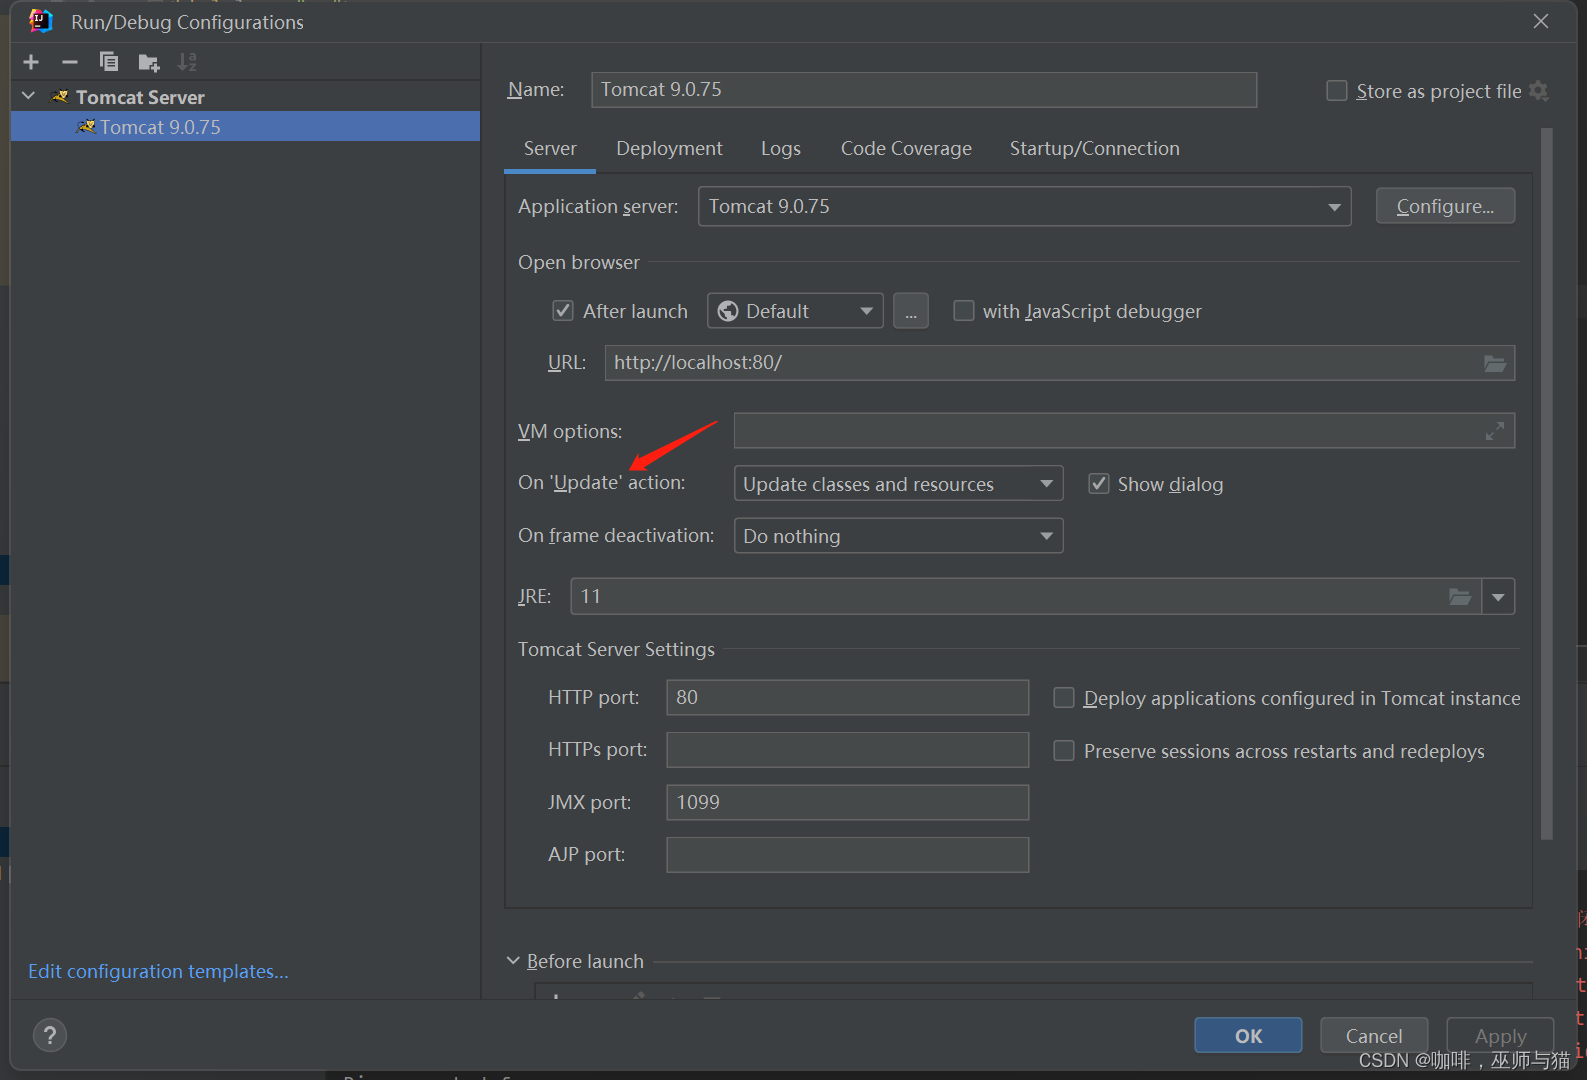
点击OK创建完成。
注:如果遇到404的问题可以参考这个解决方法。
关于Tomcat在本地启动没问题,在IDEA部署发生404的解决
2. Spring MVC 环境配置
1.Maven依赖spring-webmvc
<!-- 引入阿里云镜像仓库解决找不到依赖的问题 -->
    <repositories>
       <repository>
           <id>aliyun</id>
           <name>aliyun</name>
           <url>https://maven.aliyun.com/repository/public</url>
       </repository>
    </repositories>

	<dependencies>
        <dependency>
            <groupId>org.springframework</groupId>
            <artifactId>spring-webmvc</artifactId>
            <version>5.1.9.RELEASE</version>
        </dependency>
    </dependencies>
2.web.xml配置DispatcherServlet
<servlet>
        <servlet-name>springmvc</servlet-name>
        <!-- DispatcherServlet是Spring MVC最核心的对象DispatcherServlet用于栏截Http请求,并根据请求的URL调用与之对应的Controller方法,来完成Http请求的处理 -->
        <servlet-class>org.springframework.web.servlet.DispatcherServlet</servlet-class>
        <!-- 增加初始化参数,通知DispatcherServlet在启动web应用的时候加载哪个xml文件 -->
        <init-param>
            <param-name>contextConfigLocation</param-name>
            <param-value>classpath:applicationContext.xml</param-value>
        </init-param>
        <!-- 在Web应用启动时自动创建Spring IOC容器并初始化DispatcherServlet, 如果不设置这项,则会在第一次访问url的时候创建Spring IOC容器 -->
        <load-on-startup>0</load-on-startup>
    </servlet>
    <servlet-mapping>
        <servlet-name>springmvc</servlet-name>
        <!-- "/"代表拦截所有请求 -->
        <url-pattern>/</url-pattern>
    </servlet-mapping>
<url-pattern>/</url-pattern>
/: 会匹配到/login这样的路径型url,不会匹配到模式为*.jsp这样的后缀型url
2、 <url-pattern>/*</url-pattern>
/*:会匹配所有url(只匹配当前文件夹下文件,不匹配子文件夹下文件):路径型的和后缀型的url(包括/login,*.jsp,*.js和*.html等)

一般情况下DispatcherServlet只需要处理我们向后台服务器的请求,不需要处理静态页面等内容,所以,建议使用/。
3.配置applicationContext的mvc标记
<?xml version="1.0" encoding="UTF-8"?>
<beans xmlns="http://www.springframework.org/schema/beans"
       xmlns:mvc="http://www.springframework.org/schema/mvc"
       xmlns:context="http://www.springframework.org/schema/context"
       xmlns:xsi="http://www.w3.org/2001/XMLSchema-instance" xmlns:mv="http://www.springframework.org/schema/mvc"
       xsi:schemaLocation="http://www.springframework.org/schema/beans
            http://www.springframework.org/schema/beans/spring-beans.xsd
            http://www.springframework.org/schema/context
            http://www.springframework.org/schema/context/spring-context.xsd
            http://www.springframework.org/schema/mvc
            http://www.springframework.org/schema/mvc/spring-mvc.xsd">

    <!-- 注意xmlns:mvc="http://www.springframework.org/schema/mvc" 命名空间,要想使mvc生效必须使用这个命名空间下的标签才可以。 -->
    <!--
    context:component-scan 标签作用
    在Spring IOC初始化过程中,自动创建并管理com.imooc.springmvc及子包中
    拥有以下注解的对象.
    @Repository
    @Service
    @Controller
    @Component
    -->
    <context:component-scan base-package="com.imooc.springmvc"></context:component-scan>
    <!--启用Spring MVC的注解开发模式-->
    <mvc:annotation-driven/>
   	<!-- 将图片/JS/CSS等静态资源排除在外,可提高执行效率 -->
    <mvc:default-servlet-handler/>
4.开发Controller控制器
在src/main/java文件夹下创建包扫描的文件夹.
创建测试控制类。
package com.imooc.springmvc.controller;

import org.springframework.stereotype.Controller;
import org.springframework.web.bind.annotation.GetMapping;
import org.springframework.web.bind.annotation.ResponseBody;

@Controller
public class TestController {
    @GetMapping("/t") //localhost/t
    @ResponseBody //直接向响应输出字符串数据,不跳转页面。把方法返回的结果直接写进http响应体中。
    public  String test(){
        return "SUCCESS";
    }
}
更新maven依赖
因为新添加了springmvc的maven依赖,所以要更新maven依赖。
Edit Configurations -> Deployment -> Edit Artifact -> 选中在Available Elements 的所有依赖 -> 点击 Put into /WEB-INF /lib.
之后访问http://localhost/t即可得到测试页面.

3. Spring MVC执行示意图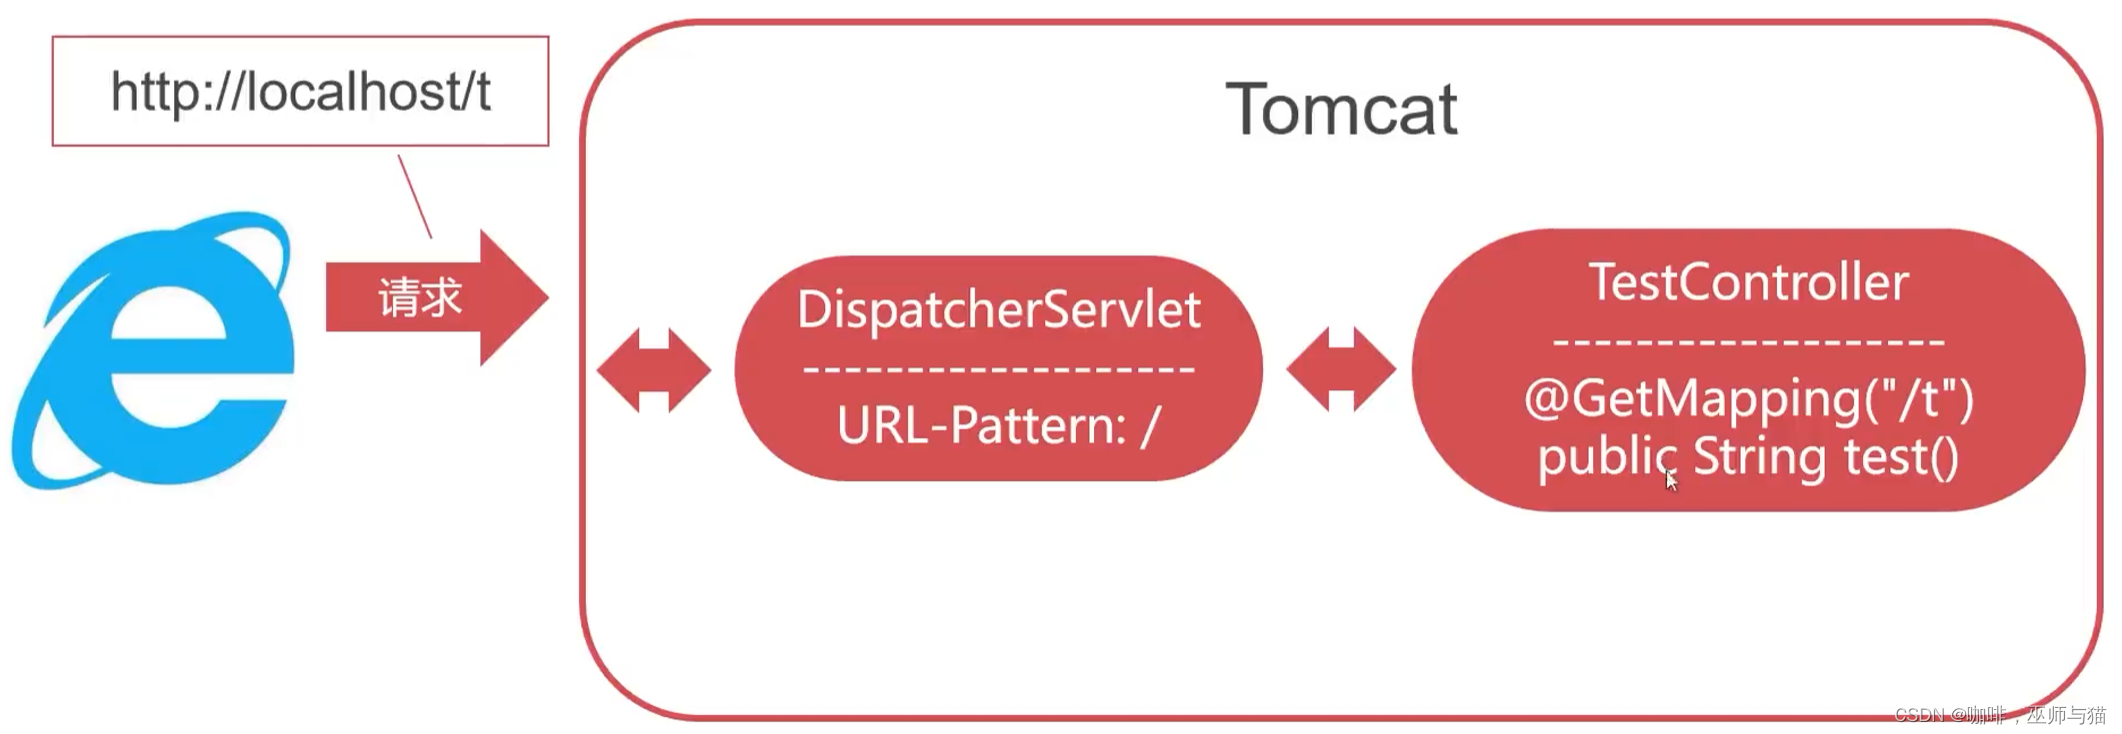
4. URL Mapping URL映射
问题:处理业务的方法如何和URL绑定在一起
@RequestMapping - 通用绑定, 放在类上面为全局的方法都加上前缀,放在方法上面,不再区分get和post请求。
@GetMapping - 绑定Get请求
@PostMapping - 绑定Post请求
@RequestMapping 绑定指定的类型请求方法:
@RequestMapping(value=“/g”,method = RequestMethod.GET)。
package com.imooc.springmvc.controller;

import org.springframework.stereotype.Controller;
import org.springframework.web.bind.annotation.GetMapping;
import org.springframework.web.bind.annotation.PostMapping;
import org.springframework.web.bind.annotation.RequestMapping;
import org.springframework.web.bind.annotation.ResponseBody;

@Controller
@RequestMapping("/um") //放在类上面为全局的方法都加上前缀,放在方法上面,不再区分get和post请求。
public class URLMappingController {
    @GetMapping("/g")
    @ResponseBody
    public String getMapping(){
        return "This is get method.";

    }

    @PostMapping ("/p")
    @ResponseBody
    public String postMapping(){
        return "This is post method.";
    }

}
5. Controller方法接受请求参数
使用Controller方法参数接收
前端页面。
<!DOCTYPE html>
<html lang="en">
<head>
    <meta charset="UTF-8">
    <title>Title</title>
</head>
<body>
<form action="/um/p" method="post">
    <input name="username"><br/>
    <input name="password"><br/>
    <input type="submit" value="提交">
</form>

</body>
</html>
处理业务用的Controller类
package com.imooc.springmvc.controller;

import org.springframework.stereotype.Controller;
import org.springframework.web.bind.annotation.*;

@Controller
@RequestMapping("/um") //放在类上面为全局的方法都加上前缀,放在方法上面,不再区分get和post请求。
public class URLMappingController {
    @GetMapping("/g")
    @ResponseBody
    //Get请求中如果有不符合命名规范的参数可以使用@RequestParam()将不规范命名的参数注入后面的自定义参数中。
    public String getMapping(@RequestParam("user_name") String username){
        System.out.println("username:" + username);
        return "This is get method.";

    }

    @PostMapping ("/p")
    @ResponseBody
//    注:方法中的类型可以自动转换,如页面中的表单输入为字符串,
//    如果定义为public String postMapping(String username, Long password){},
//    则password参数自动转为Long类型。参数名一定要和前端页面中的表单参数名一样。
//    可能遇到的问题:如果页面上输入的数据带有非数字内容,可能会出现400转换错误,需要检查吧表单校验是否严谨。
    public String postMapping(String username, String password){
        System.out.println(username+":"+password);
        return "This is post method.";
    }

}
使用Java Bean接收数据
如果表单的参数比较多,则可以使用实体对象来接收。
首先准备一个实体类。
package com.imooc.springmvc.entity;

public class User {
    private String username;
    private Long password;

    public String getUsername() {
        return username;
    }

    public void setUsername(String username) {
        this.username = username;
    }

    public Long getPassword() {
        return password;
    }

    public void setPassword(Long password) {
        this.password = password;
    }
}
然后将接收的方法参数改为实体类,springmvc会自动找到这个实体类并根据类的参数赋值。
@PostMapping ("/p1")
    @ResponseBody
    public String postMappingBean(User user){
        System.out.println(user.getUsername()+":"+user.getPassword());
        return "This is Java Bean post method.";
    }
6. 接受表单复合数据
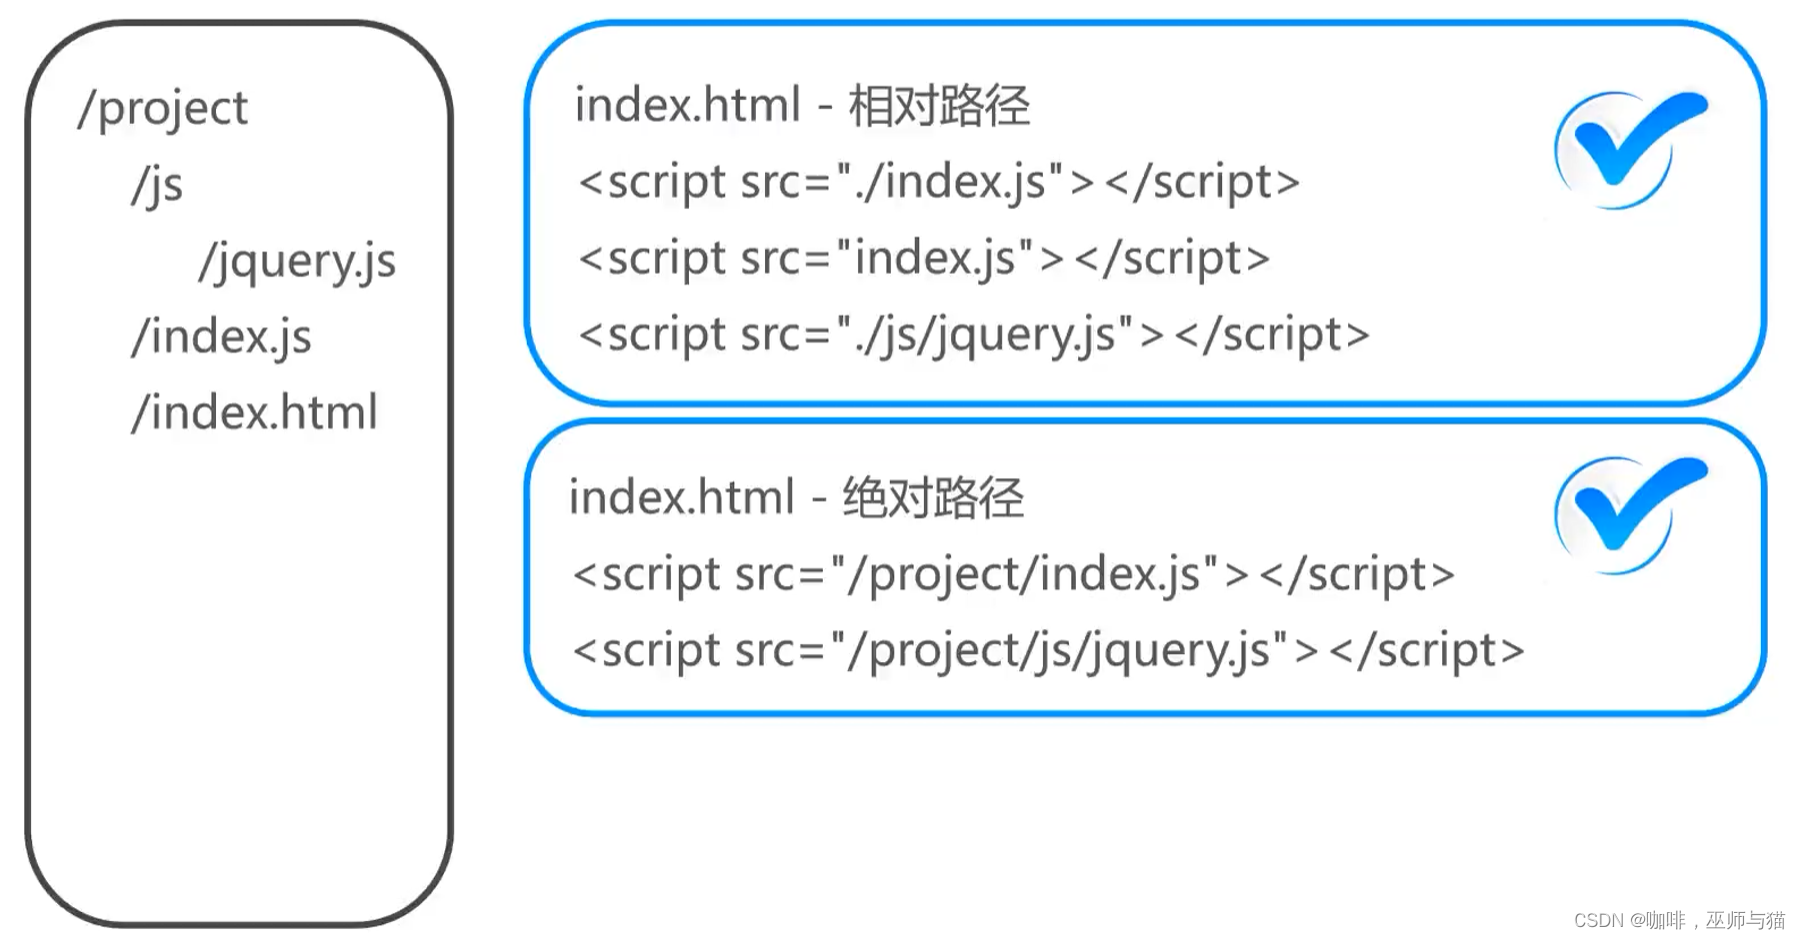
相对路径和绝对路径的区别。
对于表单的复合数据如checkbox,可以使用数组,列表来接收,比如下面这个表单:
<!DOCTYPE html>
<html lang="en">
<head>
    <meta charset="UTF-8">
    <title>学员调查问卷</title>
    <style>
        .container {
            position: absolute;
            border: 1px solid #cccccc;
            left: 50%;
            top: 50%;
            width: 400px;
            height: 600px;
            margin-left: -200px;
            margin-top: -300px;
            box-sizing: border-box;
            padding: 10px;
        }

        h2 {
            margin: 10px 0px;
            text-align: center;
        }

        h3 {
            margin: 10px 0px;
        }
    </style>
</head>
<body>
<div class="container">
    <h2>学员调查问卷</h2>
    <form action="./apply" method="post">
        <h3>您的姓名</h3>
        <input name="name" class="text" style="width: 150px">
        <h3>您正在学习的技术方向</h3>
        <select name="course" style="width: 150px">
            <option value="java">Java</option>
            <option value="h5">HTML5</option>
            <option value="python">Python</option>
            <option value="php">PHP</option>
        </select>
        <div>
            <h3>您的学习目的:</h3>
            <input type="checkbox" name="purpose" value="1">就业找工作
            <input type="checkbox" name="purpose" value="2">工作要求
            <input type="checkbox" name="purpose" value="3">兴趣爱好
            <input type="checkbox" name="purpose" value="4">其他
        </div>

        <h3>收货人</h3>
        <input name="delivery.name" class="text" style="width: 150px">
        <h3>联系电话</h3>
        <input name="delivery.mobile" class="text" style="width: 150px">
        <h3>收货地址</h3>
        <input name="delivery.address" class="text" style="width: 150px">

        <div style="text-align: center;padding-top:10px">
            <input type="submit" value="提交" style="width:100px">
        </div>
    </form>

</div>
</body>
</html>
可以用下面的几个方法进行接收:
注:如果在方法的参数列表里用List(默认为ArrrayList)接收数据,则需要在参数前面加上@RequestParam注解,如果是用实体类接收数据,实体类中的List属性则不用加上@RequestParam注解。
用Map接收数据也是。
如果有参数可能为空,需要设置默认值则可以使用下面的方法:
@RequestParam(value = “n”,defaultValue = “ANON”)。
package com.imooc.springmvc.controller;

import com.imooc.springmvc.entity.Form;
import org.springframework.stereotype.Controller;
import org.springframework.web.bind.annotation.PostMapping;
import org.springframework.web.bind.annotation.RequestParam;
import org.springframework.web.bind.annotation.ResponseBody;
import java.util.List;
import java.util.Map;

@Controller
public class FormController {
//    @PostMapping("/apply")
    @ResponseBody
    public String apply(@RequestParam(value = "n",defaultValue = "ANON") String name, String course, Integer[] purpose){
        System.out.println(name);
        System.out.println(course);
        for (Integer p : purpose) {
            System.out.println(p);
        }
        return "SUCCESS";
    }

//    @PostMapping("/apply")
    @ResponseBody
    public String apply(String name, String course, @RequestParam List<Integer> purpose){
        System.out.println(name);
        System.out.println(course);
        for (Integer p : purpose) {
            System.out.println(p);
        }
        return "SUCCESS";
    }

//    @PostMapping("/apply")
    @ResponseBody
    public String apply(Form form){
        return "SUCCESS";
    }

}
实体类的定义如下:
package com.imooc.springmvc.entity;

import java.util.List;

public class Form {
    private String name;
    private String course;
    private List<Integer> purpose;
    private Delivery delivery = new Delivery();
    public String getName() {
        return name;
    }

    public void setName(String name) {
        this.name = name;
    }

    public String getCourse() {
        return course;
    }

    public void setCourse(String course) {
        this.course = course;
    }

    public List<Integer> getPurpose() {
        return purpose;
    }

    public void setPurpose(List<Integer> purpose) {
        this.purpose = purpose;
    }

    public Delivery getDelivery() {
        return delivery;
    }

    public void setDelivery(Delivery delivery) {
        this.delivery = delivery;
    }
}
注:Map也可以接收表单数据,但无法接收复合数据,如果接收复合数据则只会得到一个值,其他数据会丢失。
//    @PostMapping("/apply")
    @ResponseBody
    public String apply(@RequestParam Map map){
        System.out.println(map);
        return "SUCCESS";
    }
7. 关联对象赋值
如果我们想要在接收数据的实体类中引用另外一个实体类,则需要修改表单中的name属性,值应该为被引用的实体类对象在接收数据的实体类中的参数名.原本的参数名。
举个例子如下,接收数据的实体类如下:
package com.imooc.springmvc.entity;

import java.util.List;

public class Form {
    private String name;
    private String course;
    private List<Integer> purpose;
    private Delivery delivery = new Delivery();
    public String getName() {
        return name;
    }

    public void setName(String name) {
        this.name = name;
    }

    public String getCourse() {
        return course;
    }

    public void setCourse(String course) {
        this.course = course;
    }

    public List<Integer> getPurpose() {
        return purpose;
    }

    public void setPurpose(List<Integer> purpose) {
        this.purpose = purpose;
    }

    public Delivery getDelivery() {
        return delivery;
    }

    public void setDelivery(Delivery delivery) {
        this.delivery = delivery;
    }
}
被引用的实体类:
ackage com.imooc.springmvc.entity;

public class Delivery {
    private String name;
    private String address;
    private String mobile;

    public String getName() {
        return name;
    }

    public void setName(String name) {
        this.name = name;
    }

    public String getAddress() {
        return address;
    }

    public void setAddress(String address) {
        this.address = address;
    }

    public String getMobile() {
        return mobile;
    }

    public void setMobile(String mobile) {
        this.mobile = mobile;
    }
}
表单中的属性值为:
<h3>收货人</h3>
        <input name="delivery.name" class="text" style="width: 150px">
        <h3>联系电话</h3>
        <input name="delivery.mobile" class="text" style="width: 150px">
        <h3>收货地址</h3>
        <input name="delivery.address" class="text" style="width: 150px">
使用注解将字符串转换为指定格式的额日期类型:
public String postMapping1(User user , String username ,@DateTimeFormat(pattern = "yyyy-MM-dd") Date createTime){
        return "<h1>这是Post响应</h1>";
    }
8. 解决中文乱码问题
对于Get方法,在8版本及以前的Tomcat找到安装文件夹下的conf目录中server.xml配置文件找到8080端口代码段进行修改
<Connector port="8080" protocol="HTTP/1.1" connectionTimeout="20000" redirectPort="8443"/>
<!--修改为下面的代码-->
<Connector
port="8080" protocol="HTTP/1.1"
connectionTimeout="20000"
redirectPort="8443" URIEncoding="UTF-8"/>
对于Post方法,则需要在web.xml中配置过滤器
<filter>
        <filter-name>characterFilter</filter-name>
        <filter-class>org.springframework.web.filter.CharacterEncodingFilter</filter-class>
        <init-param>
            <param-name>encoding</param-name>
            <param-value>UTF-8</param-value>
        </init-param>
    </filter>
    <filter-mapping>
        <filter-name>characterFilter</filter-name>
        <url-pattern>/*</url-pattern>
    </filter-mapping>
解决Response响应乱码-Spring项目的applicationContext.xml配置StringHttpMessageConverter
<mvc:annotation-driven conversion-service="conversionService">
        <mvc:message-converters>
            <bean class="org.springframework.http.converter.StringHttpMessageConverter">
                <property name="supportedMediaTypes">
                    <list>
                        <!-- response.setContentType("text/html;charset=utf-8") -->
                        <value>text/plain;charset=utf-8</value>
                        <value>text/html;charset=utf-8</value>
                    </list>
                </property>
            </bean>
        </mvc:message-converters>
    </mvc:annotation-driven>
9. 响应结果输出
注解 @ResponseBody
@ResponseBody - 产生响应文本
@ResponseBody直接产生响应体的数据,过程不涉及任何视图
@ResponseBody可产生标准字符串/JSON/XML等格式数据
@ResponseBody被StringHttpMessageConverter所影响
@GetMapping("/g")
@ResponseBody
public String getMapping(@RequestParam("manager_name") String managerName , Date createTime){
    System.out.println("managerName:"+managerName);
    return "This is get method";
    }
ModelAndView对象
ModelAndView对象是指"模型(数据)与视图(界面)”对象
通过ModelAndView可将包含数据对象与模板引警进行绑定
SpringMVC中默认的View是JSP也可以配置其他模板引擎
这个模式的设计理念是将模型(即生成数据的Controller部分)和视图(即页面如jsp部分)进行解耦(通过EL表达式传输数据),实现动态页面。
@GetMapping("/view")
    public ModelAndView showView(Integer userId){
//        ModelAndView mav = new ModelAndView("redirect:/view.jsp");
        ModelAndView mav = new ModelAndView();
        mav.setViewName("/um/view.jsp");
        User user = new User();
        if(userId == 1){
            user.setUsername("lily");
        }else if(userId == 2){
            user.setUsername("smith");
        }else if(userId == 3){
            user.setUsername("lina");
        }
        mav.addObject("u" , user);
        return mav;
    }
<%@ page contentType="text/html;charset=UTF-8" language="java" %>
<html>
<head>
    <title>Title</title>
</head>
<body>
    <h1>I'm view page</h1>
    <hr>
    <h3>Username:${u.username}</h3>
</body>
</html>
mav.addObject()方法设置的属性默认存放在当前请求中
默认ModelAndView使用请求转发(forward)至页面
重定向使用 new ModelAndView(“redirect:/indexjsp”)
由于转发是将当前的请求发送给jsp页面,所以添加在mav.addObject()方法中的数据能用在jsp页面中。但是重定向是让服务器重新生成一个请求发送给jsp页面,所以mav.addObject()方法中的数据会丢失。
一种替代的模型和视图的方法例子:
//String与ModelMap
    //Controller方法返回String的情况
    //1. 方法被@ResponseBody描述,SpringMVC直接响应String字符串本身
    //2. 方法不存在@ResponseBody,则SpringMVC处理String指代的视图(页面)
    @GetMapping("/xxxx")
//    @ResponseBody
    public String showView1(Integer userId , ModelMap modelMap){
        String view = "/um/view.jsp";
        User user = new User();
        if(userId == 1){
            user.setUsername("lily");
        }else if(userId == 2){
            user.setUsername("smith");
        }else if(userId == 3){
            user.setUsername("lina");
        }
        modelMap.addAttribute("u", user);
        return view;
    }
10. SpringMVC整合Freemarker
- 在pom.xml中引入依赖(不要忘记手动更新artifact的依赖)
<dependency>
            <groupId>org.freemarker</groupId>
            <artifactId>freemarker</artifactId>
            <version>2.3.28</version>
        </dependency>
        <dependency>
            <groupId>org.springframework</groupId>
            <artifactId>spring-context-support</artifactId>
            <version>5.1.9.RELEASE</version>
        </dependency>
- 在applicationContext.xml中配置freemarker
<!-- 让SpringMVC知道freemarker的存在  -->
<bean id="ViewResolver" class="org.springframework.web.servlet.view.freemarker.FreeMarkerViewResolver">
		<!-- 设置响应输出,并解决中文乱乱码-->
        <property name="contentType" value="text/html;charset=utf-8"/>
        <!-- 指定Freemarker模板文件扩展名-->
        <property name="suffix" value=".ftl"/>
    </bean>
<!-- 配置freemarker的详细参数 -->
    <bean id="freemarkerConfig" class="org.springframework.web.servlet.view.freemarker.FreeMarkerConfigurer">
        <!--设置模板保存的目录-->
        <property name="templateLoaderPath" value="/WEB-INF/ftl"/>
       	<!--其他模板引擎设置-->
        <property name="freemarkerSettings">
            <props>
            	<!--设置Freemarker脚本与数据渲染时使用的字符集-->
                <prop key="defaultEncoding">UTF-8</prop>
            </props>
        </property>
    </bean>
整合完成,创建Controller测试用类
package com.imooc.springmvc.controller;

import com.imooc.springmvc.entity.User;
import org.springframework.stereotype.Controller;
import org.springframework.web.bind.annotation.GetMapping;
import org.springframework.web.bind.annotation.RequestMapping;
import org.springframework.web.servlet.ModelAndView;

@Controller
@RequestMapping("/fm")
public class FreemarkerController {
    @GetMapping("/test")
    public ModelAndView showTest(){
        ModelAndView mav = new ModelAndView("/test");
        User user = new User();
        user.setUsername("andy");
        mav.addObject("u", user);
        return mav;
    }
}
创建test.ftl页面
<h1>${u.username}</h1>


 1506
1506


 被折叠的 条评论
为什么被折叠?
被折叠的 条评论
为什么被折叠?
 到【灌水乐园】发言


