


上一篇笔记介绍了如果利用最基本的SSM五大组件,基于配置文件开发SpringMVC的web程序,但是在日常的开发中,利用注解的方式,更加简单便利。
一,编程步骤
建好maven项目以后
step1、导包
首先:导入Spring的jar包,下面是阿里云镜像的pom坐标:
<dependencies>
<dependency>
<groupId>org.springframework</groupId>
<artifactId>spring-webmvc</artifactId>
<version>3.2.8.RELEASE</version>
</dependency>
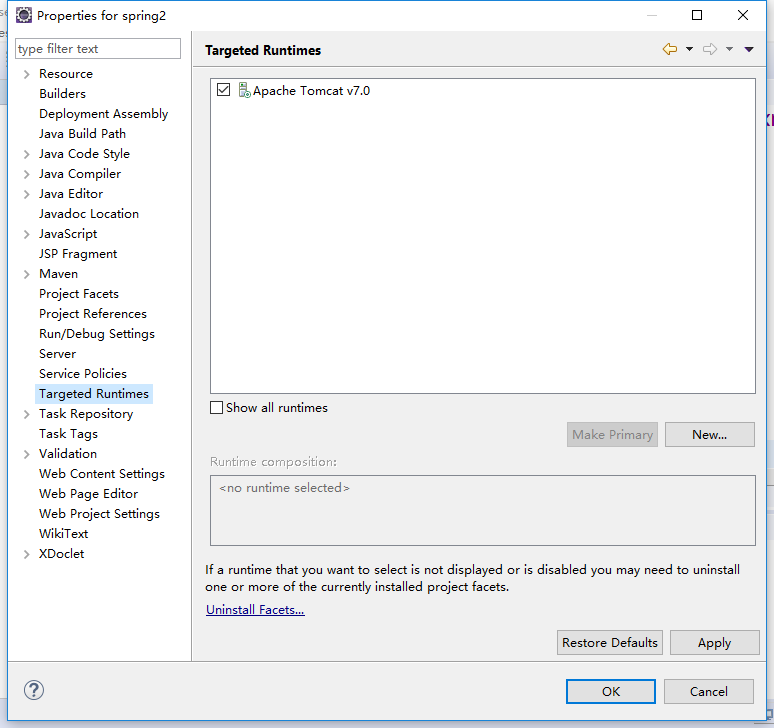
</dependencies>其次:在项目上右击,选择properties,然后选择Targeted Runtimes,选上Tomcat,这是导入Servlet用到的包。
step2、添加Spring配置文件,配置文件是和Spring的jar包配套的,下面是和此jar包配套的spring.xml没有配置过的内容。新建一个xml,复制上内容即可
<?xml version="1.0" encoding="UTF-8"?>
<beans xmlns="http://www.springframework.org/schema/beans"
	xmlns:xsi="http://www.w3.org/2001/XMLSchema-instance"
	xmlns:context="http://www.springframework.org/schema/context"
	xmlns:jdbc="http://www.springframework.org/schema/jdbc"
	xmlns:jee="http://www.springframework.org/schema/jee"
	xmlns:tx="http://www.springframework.org/schema/tx"
	xmlns:aop="http://www.springframework.org/schema/aop"
	xmlns:mvc="http://www.springframework.org/schema/mvc"
	xmlns:util="http://www.springframework.org/schema/util"
	xmlns:jpa="http://www.springframework.org/schema/data/jpa"
	xsi:schemaLocation="
		http://www.springframework.org/schema/beans http://www.springframework.org/schema/beans/spring-beans-3.2.xsd
		http://www.springframework.org/schema/context http://www.springframework.org/schema/context/spring-context-3.2.xsd
		http://www.springframework.org/schema/jdbc http://www.springframework.org/schema/jdbc/spring-jdbc-3.2.xsd
		http://www.springframework.org/schema/jee http://www.springframework.org/schema/jee/spring-jee-3.2.xsd
		http://www.springframework.org/schema/tx http://www.springframework.org/schema/tx/spring-tx-3.2.xsd
		http://www.springframework.org/schema/data/jpa http://www.springframework.org/schema/data/jpa/spring-jpa-1.3.xsd
		http://www.springframework.org/schema/aop http://www.springframework.org/schema/aop/spring-aop-3.2.xsd
		http://www.springframework.org/schema/mvc http://www.springframework.org/schema/mvc/spring-mvc-3.2.xsd
		http://www.springframework.org/schema/util http://www.springframework.org/schema/util/spring-util-3.2.xsd">


</beans>
将spring.xml配置文件放到src/main/resources文件夹下。此配置文件是没有进行配置的。
step3、在web.xml里配置DispatcherServlet。
<?xml version="1.0" encoding="UTF-8"?>
<web-app xmlns:xsi="http://www.w3.org/2001/XMLSchema-instance" xmlns="http://java.sun.com/xml/ns/javaee" xsi:schemaLocation="http://java.sun.com/xml/ns/javaee http://java.sun.com/xml/ns/javaee/web-app_2_5.xsd" version="2.5">
  <display-name>spring2</display-name>
  <welcome-file-list>
    <welcome-file>index.html</welcome-file>
    <welcome-file>index.htm</welcome-file>
    <welcome-file>index.jsp</welcome-file>
    <welcome-file>default.html</welcome-file>
    <welcome-file>default.htm</welcome-file>
    <welcome-file>default.jsp</welcome-file>
  </welcome-file-list>
<servlet>
		<!-- 指定Servlet别名 -->
		<servlet-name>action</servlet-name>
		<!--
			这里指定Servlet,由于Spring容器帮我们写好了,所以只需要指定即可。
			DispatcherServlet的意义和自己写的Servlet意义相同。
		 -->
		<servlet-class>org.springframework.web.servlet.DispatcherServlet</servlet-class>

		<!-- DispatcherServlet的初始化方法在执行时, 会启动spring容器。 contextConfigLocation负责指定spring配置文件的位置。 -->
		<init-param>
			<!-- 配置ServletConfig,一般用于读取web.xml中的常量配置。详见Servlet知识 -->
			<param-name>contextConfigLocation</param-name>
			<!-- 指定Spring配置文件的位置,此处在指resources下的spring.xml -->
			<param-value>classpath:spring.xml</param-value>
		</init-param>
		<!-- 设置为第一启动项,就是Tomcat启动成功后立即实例化Servlet -->
		<load-on-startup>1</load-on-startup>
	</servlet>

	<servlet-mapping>
		<!-- 设置访问路径对应的Servlet的别名 -->
		<servlet-name>action</servlet-name>
		<!-- 设置访问路径 -->
		<url-pattern>*.do</url-pattern>
	</servlet-mapping>
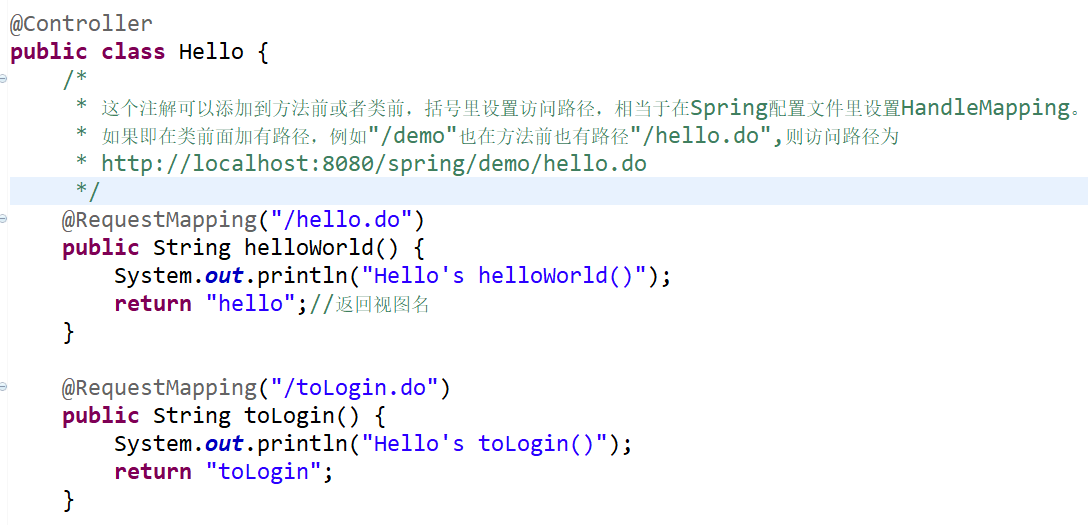
</web-app>利用注解编写Controller类的特点:
a. 不用实现Controller接口了。
b. 可以添加多个方法。
c. 方法名不做要求,返回类型可以是ModelAndView,也可以String。
d. 使用@Controller注解。(不用配置bean了)。
e. 使用@RequestMapping注解。(不用配置HandlerMapping了)。
step5、写jsp
新建一个hello.jsp。并在里面写一句话
step6、在spring.xml里配置组件扫描和视图解析器(ViewResolver)
<?xml version="1.0" encoding="UTF-8"?>
<beans xmlns="http://www.springframework.org/schema/beans"
	xmlns:xsi="http://www.w3.org/2001/XMLSchema-instance"
	xmlns:context="http://www.springframework.org/schema/context"
	xmlns:jdbc="http://www.springframework.org/schema/jdbc"
	xmlns:jee="http://www.springframework.org/schema/jee"
	xmlns:tx="http://www.springframework.org/schema/tx"
	xmlns:aop="http://www.springframework.org/schema/aop"
	xmlns:mvc="http://www.springframework.org/schema/mvc"
	xmlns:util="http://www.springframework.org/schema/util"
	xmlns:jpa="http://www.springframework.org/schema/data/jpa"
	xsi:schemaLocation="
		http://www.springframework.org/schema/beans http://www.springframework.org/schema/beans/spring-beans-3.2.xsd
		http://www.springframework.org/schema/context http://www.springframework.org/schema/context/spring-context-3.2.xsd
		http://www.springframework.org/schema/jdbc http://www.springframework.org/schema/jdbc/spring-jdbc-3.2.xsd
		http://www.springframework.org/schema/jee http://www.springframework.org/schema/jee/spring-jee-3.2.xsd
		http://www.springframework.org/schema/tx http://www.springframework.org/schema/tx/spring-tx-3.2.xsd
		http://www.springframework.org/schema/data/jpa http://www.springframework.org/schema/data/jpa/spring-jpa-1.3.xsd
		http://www.springframework.org/schema/aop http://www.springframework.org/schema/aop/spring-aop-3.2.xsd
		http://www.springframework.org/schema/mvc http://www.springframework.org/schema/mvc/spring-mvc-3.2.xsd
		http://www.springframework.org/schema/util http://www.springframework.org/schema/util/spring-util-3.2.xsd">

	<!-- 开启注解扫描,会扫描base-package指定的包及其子包下所有包含注解的类 -->
	<context:component-scan base-package="controller"></context:component-scan>

	<!-- 配置视图解析器 -->
	<!-- ViewResolver的实现类InternalResourceViewResolver -->
	<bean class="org.springframework.web.servlet.view.InternalResourceViewResolver">
    	<!-- hello.jsp文件的路径 ,因为路径是域名/项目名/WEB-INF/hello.jsp
    		路径:如果是静态资源,路径直接就是Tomcat的文件路径,并且不能放到WEB-INF文件夹内
    			如果是动态资源,必须放到WEB-INF内,外部无法直接访问,需要根据web.xml的配置
    	-->
    	<property name="prefix" value="/WEB-INF/"/>
    	<!-- jsp文件的后缀,这样做是为了支持其他格式的文件,比如asp -->
    	<property name="suffix" value=".jsp"/>
	</bean>


</beans>
二、获取请求参数值
用LoginController类演示
重新写一个类来演示如何获取网页传过来的请求参数:
package controller;

import javax.servlet.http.HttpServletRequest;

import org.springframework.stereotype.Controller;
import org.springframework.web.bind.annotation.RequestMapping;
import org.springframework.web.bind.annotation.RequestParam;

import entity.AdminParam;

@Controller
public class LoginController {
	@RequestMapping("/toLogin.do")
	public String toLogin() {
		System.out.println("LoginController's toLogin()");
		return "toLogin";
	}

	/*
	 * 1、使用request获取网页参数
	 *
	 * 前端控制器DispatcherServlet在调用处理器方法之前,
	 * 会分析方法的结构(使用反射机制),如果发现需要一个
	 * request对象,则DispatcherServlet会将request对象
	 * 传递进来.(了解)
	 */
	@RequestMapping("/login.do")
	public String login(HttpServletRequest request ) {
		System.out.println("login()方法");
		String admin = request.getParameter("admin");
		String password = request.getParameter("password");
		System.out.println("账户:"+admin+",密码:"+password);
		return "index";
	}

	//2、形参直接与传入的参数名保持一致(方便但是不推荐)
	@RequestMapping("/login2.do")
	public String login2(String admin, String password) {
		System.out.println("login2()方法");
		System.out.println("账户:"+admin+",密码:"+password);
		return "index";
	}

	//3、在形参前加@RequestParam("参数名"),即使使用第二种方法,最好也加上此注解
	@RequestMapping("/login3.do")
	public String login3(@RequestParam("admin")String name, @RequestParam("password")String pwd ){
		System.out.println("login3()方法");
		System.out.println("账户:"+name+",密码:"+pwd);
		return "index";
	}

	//4、形参实体类的属性需要和参数名一直,并且有get/set方法。重点使用(多参数方便)
	@RequestMapping("/login4.do")
	public String login4(AdminParam ap) {
		System.out.println("login4()方法");
		String admin = ap.getAdmin();
		String password = ap.getPassword();
		System.out.println("账户:"+admin+",密码:"+password);
		return "index";
	}


}
第四种方法中的AdminParam实体类:
package entity;

public class AdminParam {
	//属性名必须与参数名保持一致
	private String admin;
	private String password;

	public String getAdmin() {
		return admin;
	}
	public void setAdmin(String admin) {
		this.admin = admin;
	}
	public String getPassword() {
		return password;
	}
	public void setPassword(String password) {
		this.password = password;
	}


}
三、向页面传值
新建IndexController类演示
package controller;


import java.util.HashMap;
import java.util.Map;


import javax.servlet.http.HttpServletRequest;
import javax.servlet.http.HttpSession;


import org.springframework.stereotype.Controller;
import org.springframework.ui.ModelMap;
import org.springframework.web.bind.annotation.RequestMapping;
import org.springframework.web.servlet.ModelAndView;


import entity.AdminParam;


@Controller
public class IndexController {
	@RequestMapping("/toLogin.do")
	public String toLogin() {
		System.out.println("IndexController's toLogin()");
		return "toLogin";
	}
	/*
	 * 1、将数据绑定到HttpServletRequest对象上
	 * DispatcherServlet默认使用转发
	 */
	@RequestMapping("/index.do")
	//利用request获取页面参数和绑定数据转发
	public String index(HttpServletRequest request) {
		System.out.println("IndexController's index()");
		String admin = request.getParameter("admin");
		String password = request.getParameter("password");
		System.out.println("账户:"+admin+",密码:"+password);
		request.setAttribute("admin", admin);
		request.setAttribute("password", password);
		return "index";
	}
	//通过实体类获取页面参数,HttpServletRequst对象绑定属性转发传值
	@RequestMapping("/index2.do")
	public String index2(AdminParam ap, HttpServletRequest request) {
		System.out.println("index2()方法");
		String admin = ap.getAdmin();
		String password = ap.getPassword();
		System.out.println("账户:"+admin+",密码:"+password);
		request.setAttribute("admin", admin);
		request.setAttribute("password", password);
		return "index";
	}

	//2、通过ModelAndView传值
	@RequestMapping("/index3.do")
	public ModelAndView index3(AdminParam ap) {
		System.out.println("index3()方法");
		String admin = ap.getAdmin();
		String password = ap.getPassword();
		System.out.println("账户:"+admin+",密码:"+password);
		/*
		 * 将处理结果添加到ModelAndView对象里面
		 * ModelAndView(String viewName, Map data)
		 */
		Map<String, Object> data = new HashMap<String, Object>();
		//相当于request.setAttribute("admin", admin);和在页面直接取request里的值相同
		data.put("admin", admin);
		data.put("password", password);
		ModelAndView mav = new ModelAndView("index", data);

		return mav;
	}
	//通过ModelMap传值
	@RequestMapping("/index4.do")
	public String index4(AdminParam ap, ModelMap mm) {
		System.out.println("index4()方法");
		String admin = ap.getAdmin();
		String password = ap.getPassword();
		System.out.println("账户:"+admin+",密码:"+password);
		//将数据添加到ModelMap对象
		//相当于执行了request.setAttribute,和在页面直接取request里的值相同
		mm.addAttribute("admin", admin);
		mm.addAttribute("password", password);
		return "index";
	}
	//将数据绑定到HttpSession对象上
	@RequestMapping("/index5.do")
	public String index5(AdminParam ap, HttpSession session) {
		System.out.println("index5()方法");
		String admin = ap.getAdmin();
		String password = ap.getPassword();
		System.out.println("账户:"+admin+",密码:"+password);
		session.setAttribute("admin", admin);
		session.setAttribute("password", password);
		return "index";
	}

}
toLogin.jsp的页面
<%@ page language="java" contentType="text/html; charset=utf-8"
    pageEncoding="utf-8"%>
<html>
<head>
<meta http-equiv="Content-Type" content="text/html; charset=utf-8">
<title>Insert title here</title>
</head>
<body>
	<!-- action里的地址从index1.do-index5.do -->
	<form action="index5.do" method="post" >
		<p>账号:<input type="text" name="admin"></p>
		<p>密码:<input type="password" name="password"></p>
		<input type="submit" value="登录">
	</form>
</body>
</html>
index.jsp页面,el表达式不用变。
<%@page pageEncoding="utf-8"%>
<!DOCTYPE html>
<html>
<head>
<meta http-equiv="Content-Type" content="text/html; charset=utf-8">
<title>Insert title here</title>
</head>
<body>
	<h1>欢迎来到首页</h1>
	<p>账号是:${ admin}</p>
	<p>密码是:${ password}</p>
</body>
</html>
四、重定向
新建RedirectController类演示
package controller;

import org.springframework.stereotype.Controller;
import org.springframework.web.bind.annotation.RequestMapping;
import org.springframework.web.servlet.ModelAndView;
import org.springframework.web.servlet.view.RedirectView;
//重定向演示
@Controller
public class RedirectController {
	@RequestMapping("/demo.do")
	public String toLogin() {
		System.out.println("RedirectController's demo()");
		return "demo";
	}
	//如果返回String类型
	@RequestMapping("/redirect.do")
	public String redirect() {
		System.out.println("redirect()方法");
		return "redirect:http://www.163.com";
	}
	//如果返回ModelAndView类型
	@RequestMapping("/redirect2.do")
	public ModelAndView redirect2() {
		System.out.println("redirect2()方法");
		RedirectView rv = new RedirectView("http://www.qq.com");
		ModelAndView mav = new ModelAndView(rv);
		return mav;
	}
}
demo.jsp
<%@ page language="java" contentType="text/html; charset=utf-8"
    pageEncoding="utf-8"%>
<!DOCTYPE html PUBLIC "-//W3C//DTD HTML 4.01 Transitional//EN" "http://www.w3.org/TR/html4/loose.dtd">
<html>
<head>
<meta http-equiv="Content-Type" content="text/html; charset=utf-8">
<title>Insert title here</title>
</head>
<body>
	<h1>重定向演示</h1>
	<form action="redirect2.do">
		<input type="submit" value="重定向">
	</form>
</body>
</html>


 156
156


 被折叠的 条评论
为什么被折叠?
被折叠的 条评论
为什么被折叠?
 到【灌水乐园】发言


