


Maven 创建一个简单的 springboot 工程
文章目录
创建一个 Maven 项目
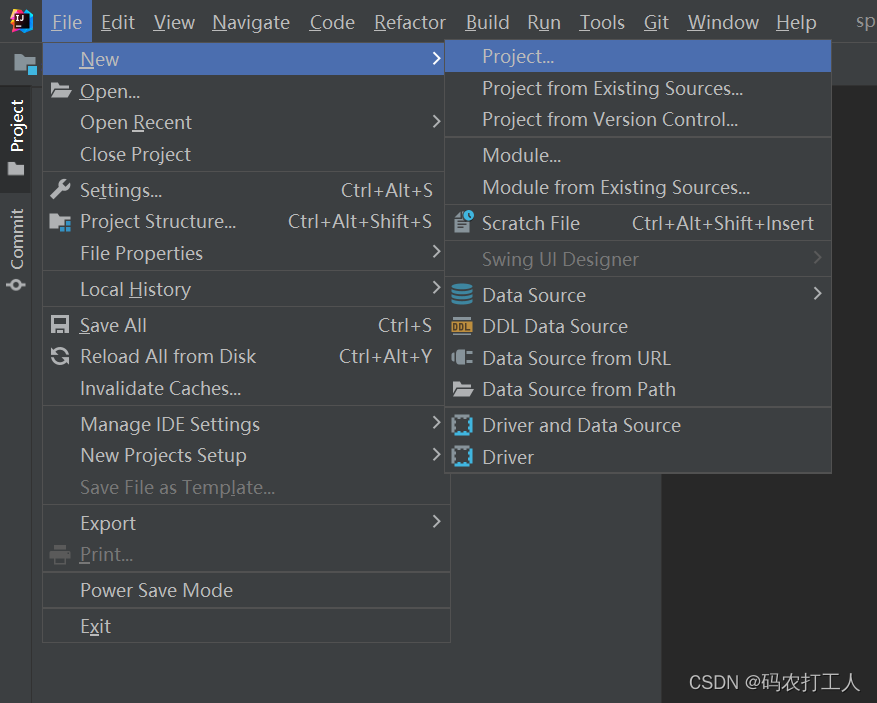
一、使用 idea 新建项目
选择路径:File -> New -> Project
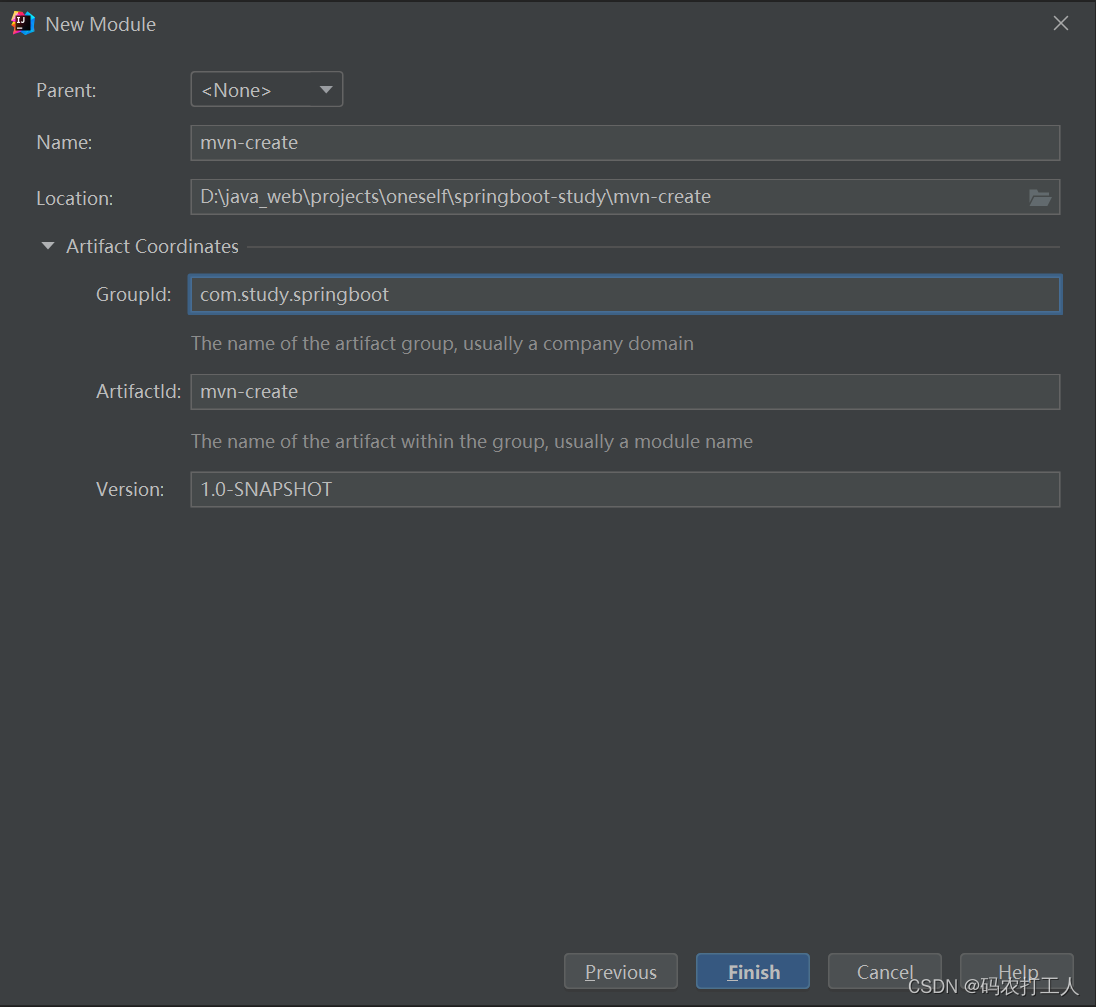
二、选择 Maven 创建项目

三、输入项目名,创建项目
修改项目,添加 springboot 必要的元素
一、配置 pom 文件
在项目的 pom 文件中配置父信息
<parent>
    <groupId>org.springframework.boot</groupId>
    <artifactId>spring-boot-starter-parent</artifactId>
    <version>2.7.0</version>
</parent>
在项目的 pom 文件中添加依赖包
<dependency>
    <groupId>org.springframework.boot</groupId>
    <artifactId>spring-boot-starter-web</artifactId>
</dependency>
二、创建主启动类
在项目的java 文件根目录下创建主启动类
@SpringBootApplication
public class MvnCreateApplication {
    public static void main(String[] args) {
        SpringApplication.run(MvnCreateApplication.class, args);
    }
}
@SpringBootApplication 注解表示这是一个 springboot 项目,标注该注解的类为 springboot 的主启动类
三、创建一个接口
@RestController
public class HelloController {

    @RequestMapping("/hello")
    public String hello() {
        return "Hello Springboot!";
    }
}
@RestController 注解为 @Controller 与 @ResponseBody 两个注解的组合
测试项目
一、运行 main 方法,启动项目
  .   ____          _            __ _ _
 /\\ / ___'_ __ _ _(_)_ __  __ _ \ \ \ \
( ( )\___ | '_ | '_| | '_ \/ _` | \ \ \ \
 \\/  ___)| |_)| | | | | || (_| |  ) ) ) )
  '  |____| .__|_| |_|_| |_\__, | / / / /
 =========|_|==============|___/=/_/_/_/
 :: Spring Boot ::                (v2.7.0)

2023-03-14 22:25:23.096  INFO 16264 --- [           main] c.study.springboot.MvnCreateApplication  : Starting MvnCreateApplication using Java 1.8.0_271 on LAPTOP-I6BO4MR4 with PID 16264 (D:\java_web\projects\oneself\springboot-study\mvn-create\target\classes started by 张治东 in D:\java_web\projects\oneself\springboot-study)
2023-03-14 22:25:23.100  INFO 16264 --- [           main] c.study.springboot.MvnCreateApplication  : No active profile set, falling back to 1 default profile: "default"
2023-03-14 22:25:23.813  INFO 16264 --- [           main] o.s.b.w.embedded.tomcat.TomcatWebServer  : Tomcat initialized with port(s): 8080 (http)
2023-03-14 22:25:23.819  INFO 16264 --- [           main] o.apache.catalina.core.StandardService   : Starting service [Tomcat]
2023-03-14 22:25:23.819  INFO 16264 --- [           main] org.apache.catalina.core.StandardEngine  : Starting Servlet engine: [Apache Tomcat/9.0.63]
2023-03-14 22:25:23.976  INFO 16264 --- [           main] o.a.c.c.C.[Tomcat].[localhost].[/]       : Initializing Spring embedded WebApplicationContext
2023-03-14 22:25:23.976  INFO 16264 --- [           main] w.s.c.ServletWebServerApplicationContext : Root WebApplicationContext: initialization completed in 841 ms
2023-03-14 22:25:24.255  INFO 16264 --- [           main] o.s.b.w.embedded.tomcat.TomcatWebServer  : Tomcat started on port(s): 8080 (http) with context path ''
2023-03-14 22:25:24.263  INFO 16264 --- [           main] c.study.springboot.MvnCreateApplication  : Started MvnCreateApplication in 1.615 seconds (JVM running for 2.678)
通过日志我们可以看到,项目是以 Tomcat 成功启动,端口号为8080。
二、浏览器调用接口

调用 hello 接口最后显示了 Hello Springboot!
表示项目成功运行。
项目打包
springboot 因为内嵌了 tomcat,所以直接打成 jar 便可直接运行
一、添加打包插件
我们需要在 pom 文件中添加 springboot 的打包插件
<build>
    <plugins>
        <plugin>
            <groupId>org.springframework.boot</groupId>
            <artifactId>spring-boot-maven-plugin</artifactId>
        </plugin>
    </plugins>
</build>
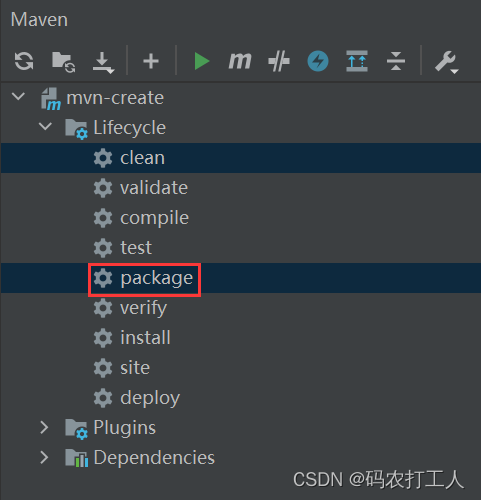
二、使用 maven 打包
然后在 maven 中使用 package 命令便可以打包
在命令行中执行打包好的jar包
D:\java_web\projects\oneself\springboot-study\mvn-create\target>java -jar mvn-create-1.0-SNAPSHOT.jar

  .   ____          _            __ _ _
 /\\ / ___'_ __ _ _(_)_ __  __ _ \ \ \ \
( ( )\___ | '_ | '_| | '_ \/ _` | \ \ \ \
 \\/  ___)| |_)| | | | | || (_| |  ) ) ) )
  '  |____| .__|_| |_|_| |_\__, | / / / /
 =========|_|==============|___/=/_/_/_/
 :: Spring Boot ::                (v2.7.0)

2023-03-21 12:42:22.188  INFO 11200 --- [           main] c.study.springboot.MvnCreateApplication  : Starting MvnCreateApplication v1.0-SNAPSHOT using Java 1.8.0_271 on LAPTOP-I6BO4MR4 with PID 11200 (D:\java_web\projects\oneself\springboot-study\mvn-create\target\mvn-create-1.0-SNAPSHOT.jar started by 张治东 in D:\java_web\projects\oneself\springboot-study\mvn-create\target)
2023-03-21 12:42:22.188  INFO 11200 --- [           main] c.study.springboot.MvnCreateApplication  : No active profile set, falling back to 1 default profile: "default"
2023-03-21 12:42:23.602  INFO 11200 --- [           main] o.s.b.w.embedded.tomcat.TomcatWebServer  : Tomcat initialized with port(s): 8080 (http)
2023-03-21 12:42:23.633  INFO 11200 --- [           main] o.apache.catalina.core.StandardService   : Starting service [Tomcat]
2023-03-21 12:42:23.633  INFO 11200 --- [           main] org.apache.catalina.core.StandardEngine  : Starting Servlet engine: [Apache Tomcat/9.0.63]
2023-03-21 12:42:24.447  INFO 11200 --- [           main] o.a.c.c.C.[Tomcat].[localhost].[/]       : Initializing Spring embedded WebApplicationContext
2023-03-21 12:42:24.447  INFO 11200 --- [           main] w.s.c.ServletWebServerApplicationContext : Root WebApplicationContext: initialization completed in 2181 ms
2023-03-21 12:42:24.869  INFO 11200 --- [           main] o.s.b.w.embedded.tomcat.TomcatWebServer  : Tomcat started on port(s): 8080 (http) with context path ''
2023-03-21 12:42:24.885  INFO 11200 --- [           main] c.study.springboot.MvnCreateApplication  : Started MvnCreateApplication in 3.26 seconds (JVM running for 4.152)
总结
- 首先需要创建一个 Maven 项目
- 在 pom 中添加对应的 父 pom
- 添加 springboot 的 web 依赖包
- 创建一个主启动类
- 创建一个 controller 接口
- 启动项目
- 使用 springboot 的 maven 打包插件,打包成 jar 包


 2398
2398


 被折叠的 条评论
为什么被折叠?
被折叠的 条评论
为什么被折叠?
 到【灌水乐园】发言


