


Target-Action传值
实质就是:A页面要给B页面传值,A就提供接口出去,抓A到B内部来,A间接调用自己内部方法(相当于,A把自己内部需 要操作的方法,传到B内来,到B内部进行赋值,这样就不存在访问不到各自的局部实例变量)
@property (nonatomic,assign)id traget; @property (nonatomic,assign)SEL action;
[self.traget performSelector:self.action withObject:nil];(是否需要传参数自己定,最多2个)
代码如下:
- #import "FirstViewController.h"
- #import "SecondViewController.h"
- #import "UIButton+Create.h"
- @interface FirstViewController ()
- {
- UILabel * _label;
- }
- @end
- @implementation FirstViewController
- - (void)dealloc
- {
- [_label release];
- [super dealloc];
- }
- - (id)initWithNibName:(NSString *)nibNameOrNil bundle:(NSBundle *)nibBundleOrNil
- {
- self = [super initWithNibName:nibNameOrNil bundle:nibBundleOrNil];
- if (self) {
- // Custom initialization
- }
- return self;
- }
- - (void)viewDidLoad
- {
- [super viewDidLoad];
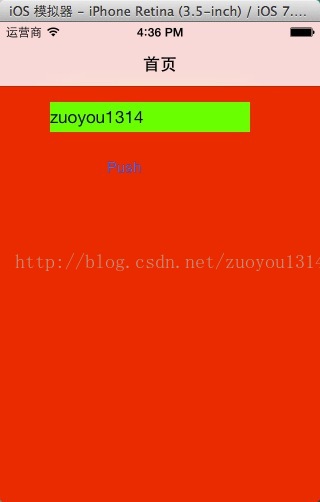
- self.view.backgroundColor = [UIColor redColor];
- self.navigationItem.title = @"首页";
- _label = [[UILabel alloc]initWithFrame:CGRectMake(50, 80, 200, 30)];
- _label.backgroundColor = [UIColor greenColor];
- // _label.text = self.text;
- [self.view addSubview:_label];
- UIButton * button = [UIButton systemButtonWithFrame:CGRectMake(100, 120, 50, 50) title:@"Push" target:self action:@selector(didClickButtonAction)];
- [self.view addSubview:button];
- // Do any additional setup after loading the view.
- }
- - (void)didClickButtonAction
- {
- SecondViewController * secondVC = [[SecondViewController alloc]init];
- secondVC.target = self;
- secondVC.action = @selector(didClick:);
- [self.navigationController pushViewController:secondVC animated:YES];
- [secondVC release];
- }
- - (void)didClick:(NSString *)text
- {
- _label.text = text;
- }
- - (void)didReceiveMemoryWarning
- {
- [super didReceiveMemoryWarning];
- // Dispose of any resources that can be recreated.
- }
- @end
- #import <UIKit/UIKit.h>
- @interface SecondViewController : UIViewController
- @property (nonatomic,assign)id target;
- @property (nonatomic,assign)SEL action;
- @end
- #import "SecondViewController.h"
- #import "FirstViewController.h"
- #import "UIButton+Create.h"
- @interface SecondViewController ()
- {
- UITextField * _textField;//创建一个输入框
- }
- @end
- @implementation SecondViewController
- - (void)dealloc
- {
- [_textField release];
- [super dealloc];
- }
- - (id)initWithNibName:(NSString *)nibNameOrNil bundle:(NSBundle *)nibBundleOrNil
- {
- self = [super initWithNibName:nibNameOrNil bundle:nibBundleOrNil];
- if (self) {
- // Custom initialization
- }
- return self;
- }
- - (void)viewDidLoad
- {
- [super viewDidLoad];
- self.view.backgroundColor = [UIColor orangeColor];
- self.navigationItem.title = @"第二页";
- _textField = [[UITextField alloc]initWithFrame:CGRectMake(50, 80, 200, 30)];
- _textField.borderStyle = UITextBorderStyleRoundedRect;
- [self.view addSubview:_textField];
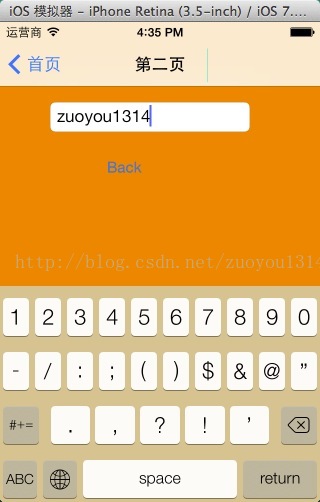
- UIButton * button = [UIButton systemButtonWithFrame:CGRectMake(100, 120, 50, 50) title:@"Back" target:self action:@selector(didClickButtonAction)];
- [self.view addSubview:button];
- // Do any additional setup after loading the view.
- }
- - (void)didClickButtonAction
- {
- [_target performSelector:_action withObject:_textField.text];
- [self.navigationController popToRootViewControllerAnimated:YES];
- }
- - (void)didReceiveMemoryWarning
- {
- [super didReceiveMemoryWarning];
- // Dispose of any resources that can be recreated.
- }
- @end
block传值
代码如下:
- <pre name="code" class="objc">#import "FirstViewController.h"
- #import "SecondViewController.h"
- #import "UIButton+Create.h"
- @interface FirstViewController ()
- {
- UILabel * _label;
- }
- @end
- @implementation FirstViewController
- - (void)dealloc
- {
- [_label release];
- [super dealloc];
- }
- - (id)initWithNibName:(NSString *)nibNameOrNil bundle:(NSBundle *)nibBundleOrNil
- {
- self = [super initWithNibName:nibNameOrNil bundle:nibBundleOrNil];
- if (self) {
- // Custom initialization
- }
- return self;
- }
- - (void)viewDidLoad
- {
- [super viewDidLoad];
- self.view.backgroundColor = [UIColor redColor];
- self.navigationItem.title = @"首页";
- self.view.userInteractionEnabled = YES;
- /**
- * 1.创建一个UIButton,
- * 2.并添加响应事件,从首页跳转到第二个页面.
- */
- UIButton * button = [UIButton systemButtonWithFrame:CGRectMake(100, 120, 50, 50) title:@"Push" target:self action:@selector(didClickButtonAction)];
- button.userInteractionEnabled = YES;
- [self.view addSubview:button];
- /**
- * 1.在第1个界面创建一个UILabel
- * 2.把第二页输入框输入的字符串,通过block内部实现传过来
- * 3.然后通过赋值给UILabel
- */
- _label = [[UILabel alloc]initWithFrame:CGRectMake(50, 80, 200, 30)];
- _label.backgroundColor = [UIColor greenColor];
- [self.view addSubview:_label];
- // Do any additional setup after loading the view.
- }
- - (void)didClickButtonAction
- {
- /**
- * 1.用push的方法推出下一个页面
- * 2.把第二页输入框输入的字符串,通过block内部实现传过来
- * 3.从而实现把输入框输入的字符串,传到UILabel上.
- */
- SecondViewController * secondVC = [[SecondViewController alloc]init];
- secondVC.blocks=^(NSString * str){
- _label.text = str;
- };
- [self.navigationController pushViewController:secondVC animated:YES];
- [secondVC release];
- }
- - (void)didReceiveMemoryWarning
- {
- [super didReceiveMemoryWarning];
- // Dispose of any resources that can be recreated.
- }
- @end
- #import "SecondViewController.h"
- #import "UIButton+Create.h"
- #import "FirstViewController.h"
- @interface SecondViewController ()
- {
- UITextField * _textField;//创建一个输入框
- }
- @end
- @implementation SecondViewController
- - (void)dealloc
- {
- [_textField release];
- [super dealloc];
- }
- - (id)initWithNibName:(NSString *)nibNameOrNil bundle:(NSBundle *)nibBundleOrNil
- {
- self = [super initWithNibName:nibNameOrNil bundle:nibBundleOrNil];
- if (self) {
- // Custom initialization
- }
- return self;
- }
- - (void)viewDidLoad
- {
- [super viewDidLoad];
- self.view.backgroundColor = [UIColor orangeColor];
- self.navigationItem.title = @"第二页";
- /**
- * 1.创建一个UIButton,
- * 2.并添加响应事件,从第二个页面返回到首页.
- */
- UIButton * button = [UIButton systemButtonWithFrame:CGRectMake(100, 120, 50, 50) title:@"Back" target:self action:@selector(didClickButtonAction)];
- [self.view addSubview:button];
- /**
- * 1.在第二个界面创建一个输入框
- *
- */
- _textField = [[UITextField alloc]initWithFrame:CGRectMake(50, 80, 200, 30)];
- _textField.borderStyle = UITextBorderStyleRoundedRect;
- [self.view addSubview:_textField];
- // Do any additional setup after loading the view.
- }
- - (void)didClickButtonAction
- {

属性/方法传值
//1.后面的界面定义了一个属性,用于保存,前一个界面,传过来的值
//注:属性定义成字符串还是别的类型,取决于你的需求,本例我们需要一个字符串,用于UILabel显示
//2.后面的界面创建完毕之后,为属性赋值,(即:记录需要传递的值)
//3.在需要使用值的地方,使用属性记录的值这种通过定义属性,达到传值的方式,称为属性传值,
//属性传值,一般用于从前一个界面向后一个界面传值;
代码如下:
- #import "FirstViewController.h"
- #import "SecondViewController.h"
- #import "UIButton+Create.h"
- @interface FirstViewController ()
- {
- UITextField * _textField;//创建一个输入框
- }
- @end
- @implementation FirstViewController
- - (void)dealloc
- {
- [_textField release];
- [super dealloc];
- }
- - (id)initWithNibName:(NSString *)nibNameOrNil bundle:(NSBundle *)nibBundleOrNil
- {
- self = [super initWithNibName:nibNameOrNil bundle:nibBundleOrNil];
- if (self) {
- // Custom initialization
- }
- return self;
- }
- - (void)viewDidLoad
- {
- [super viewDidLoad];
- self.view.backgroundColor = [UIColor redColor];
- self.navigationItem.title = @"首页";
- /**
- * 1.在第一个界面创建一个输入框
- *
- */
- _textField = [[UITextField alloc]initWithFrame:CGRectMake(50, 80, 200, 30)];
- _textField.borderStyle = UITextBorderStyleRoundedRect;
- [self.view addSubview:_textField];
- /**
- * 1.创建一个UIButton,
- * 2.并添加响应事件,从首页跳转到第二个页面.
- */
- UIButton * button = [UIButton systemButtonWithFrame:CGRectMake(100, 120, 50, 50) title:@"Push" target:self action:@selector(didClickButtonAction)];
- [self.view addSubview:button];
- // Do any additional setup after loading the view.
- }
- - (void)didClickButtonAction
- {
- /**
- * 1.用push的方法推出下一个页面
- * 2.把首页输入框输入的字符串,通过SecondViewController类的属性NSString * text接收
- * 3.从而实现把首页输入框输入的字符串,传到第二页的UILabel上.
- */
- SecondViewController * secondVC = [[SecondViewController alloc]init];
- secondVC.text = _textField.text;
- [self.navigationController pushViewController:secondVC animated:YES];
- [secondVC release];
- }
- - (void)didReceiveMemoryWarning
- {
- [super didReceiveMemoryWarning];
- // Dispose of any resources that can be recreated.
- }
- @end

- #import "SecondViewController.h"
- @interface SecondViewController ()
- @end
- @implementation SecondViewController
- - (void)dealloc
- {
- [_label release];
- [super dealloc];
- }
- - (id)initWithNibName:(NSString *)nibNameOrNil bundle:(NSBundle *)nibBundleOrNil
- {
- self = [super initWithNibName:nibNameOrNil bundle:nibBundleOrNil];
- if (self) {
- // Custom initialization
- }
- return self;
- }
- - (void)viewDidLoad
- {
- [super viewDidLoad];
- self.view.backgroundColor = [UIColor orangeColor];
- self.navigationItem.title = @"第二页";
- /**
- * 1.在第二个界面创建一个UILabel
- * 2.把首页输入框输入的字符串,通过SecondViewController类的属性NSString * text接收
- * 3.然后通过赋值给UILabel
- */
- _label = [[UILabel alloc]initWithFrame:CGRectMake(50, 80, 200, 30)];
- _label.backgroundColor = [UIColor greenColor];
- _label.text = self.text;
- [self.view addSubview:_label];
- // Do any additional setup after loading the view.
- }
- - (void)didReceiveMemoryWarning
- {
- [super didReceiveMemoryWarning];
- // Dispose of any resources that can be recreated.
- }

通知传值
//流程:
1.注册通知
2.通知中心,发送一条消息通知----------其中name名字千万不要写错了,会出现在3个地方
3.实现通知中心内部的方法,并实现传值
4.第四步,消息发送完,要移除掉
代码如下:
- #import "FirstViewController.h"
- #import "SecondViewController.h"
- #import "UIButton+Create.h"
- @interface FirstViewController ()
- {
- UILabel * _label;
- }
- @end
- @implementation FirstViewController
- - (void)dealloc
- {
- [_label release];
- //第四步,消息发送完,要移除掉
- [[NSNotificationCenter defaultCenter]removeObserver:self name:@"labelTextNotification" object:nil];
- [super dealloc];
- }
- - (id)initWithNibName:(NSString *)nibNameOrNil bundle:(NSBundle *)nibBundleOrNil
- {
- self = [super initWithNibName:nibNameOrNil bundle:nibBundleOrNil];
- if (self) {
- // Custom initialization
- }
- return self;
- }
- - (void)viewDidLoad
- {
- [super viewDidLoad];
- self.view.backgroundColor = [UIColor redColor];
- self.navigationItem.title = @"首页";
- _label = [[UILabel alloc]initWithFrame:CGRectMake(50, 80, 200, 30)];
- _label.backgroundColor = [UIColor greenColor];
- [self.view addSubview:_label];
- UIButton * button = [UIButton systemButtonWithFrame:CGRectMake(100, 120, 50, 50) title:@"Push" target:self action:@selector(didClickButtonAction)];
- [self.view addSubview:button];
- //第二步,通知中心,发送一条消息通知----------其中name名字千万不要写错了,会出现在3个地方
- [[NSNotificationCenter defaultCenter]addObserver:self selector:@selector(showLabelText:) name:@"labelTextNotification" object:nil];
- // Do any additional setup after loading the view.
- }
- - (void)showLabelText:(NSNotification *)notification
- {
- //第三,实现通知中心内部的方法,并实现传值
- id text = notification.object;
- _label.text = text;
- }
- - (void)didClickButtonAction
- {
- SecondViewController * secondVC = [[SecondViewController alloc]init];
- [self.navigationController pushViewController:secondVC animated:YES];
- [secondVC release];
- }
- - (void)didClick:(NSString *)text
- {
- _label.text = text;
- }
- - (void)didReceiveMemoryWarning
- {
- [super didReceiveMemoryWarning];
- // Dispose of any resources that can be recreated.
- }
- @end
- #import "SecondViewController.h"
- #import "FirstViewController.h"
- #import "UIButton+Create.h"
- @interface SecondViewController ()
- {
- UITextField * _textField;//创建一个输入框
- }
- @end
- @implementation SecondViewController
- - (void)dealloc
- {
- [_textField release];
- [super dealloc];
- }
- - (id)initWithNibName:(NSString *)nibNameOrNil bundle:(NSBundle *)nibBundleOrNil
- {
- self = [super initWithNibName:nibNameOrNil bundle:nibBundleOrNil];
- if (self) {
- // Custom initialization
- }
- return self;
- }
- - (void)viewDidLoad
- {
- [super viewDidLoad];
- self.view.backgroundColor = [UIColor orangeColor];
- self.navigationItem.title = @"第二页";
- _textField = [[UITextField alloc]initWithFrame:CGRectMake(50, 80, 200, 30)];
- _textField.borderStyle = UITextBorderStyleRoundedRect;
- [self.view addSubview:_textField];
- UIButton * button = [UIButton systemButtonWithFrame:CGRectMake(100, 120, 50, 50) title:@"Back" target:self action:@selector(didClickButtonAction)];
- [self.view addSubview:button];
- // Do any additional setup after loading the view.
- }
- - (void)didClickButtonAction
- {
- //第一步注册通知
- [[NSNotificationCenter defaultCenter]postNotificationName:@"labelTextNotification" object:_textField.text];
- [self.navigationController popToRootViewControllerAnimated:YES];
- }
- - (void)didReceiveMemoryWarning
- {
- [super didReceiveMemoryWarning];
- // Dispose of any resources that can be recreated.
- }
- @end


 301
301

 被折叠的 条评论
为什么被折叠?
被折叠的 条评论
为什么被折叠?
 到【灌水乐园】发言


